今年の2月にgoogleがiOS用自動UIフレームワークEaryGreyを公開してからおよそ10ヶ月が経ちました。EarlGreyは今現在も成長途中であるOSSではありますが、つい先日バージョン1.6.0がリリースされ、従来と比べて断然に導入が簡単になりました。
具体的には、以前のバージョンでは手動で各種Xcodeプロジェクト設定を行う必要があったのに対し、現在のバージョンでは各種ツールにより半自動で導入できるように改善されています。また、Swift 3にも正式対応1しました。
今回は、この最新版のEarlGreyの導入方法と簡単なUI自動テストの書き方について紹介したいと思います。
環境
- Xcode 8.2
- Swift 3.0.2
- iOS 10.2
事前準備
テストターゲットの追加とSchemeの設定
EarlGreyはUnitTestsターゲットを対象としてUI自動テストを実行します(UITestsターゲットではない点に注意)。
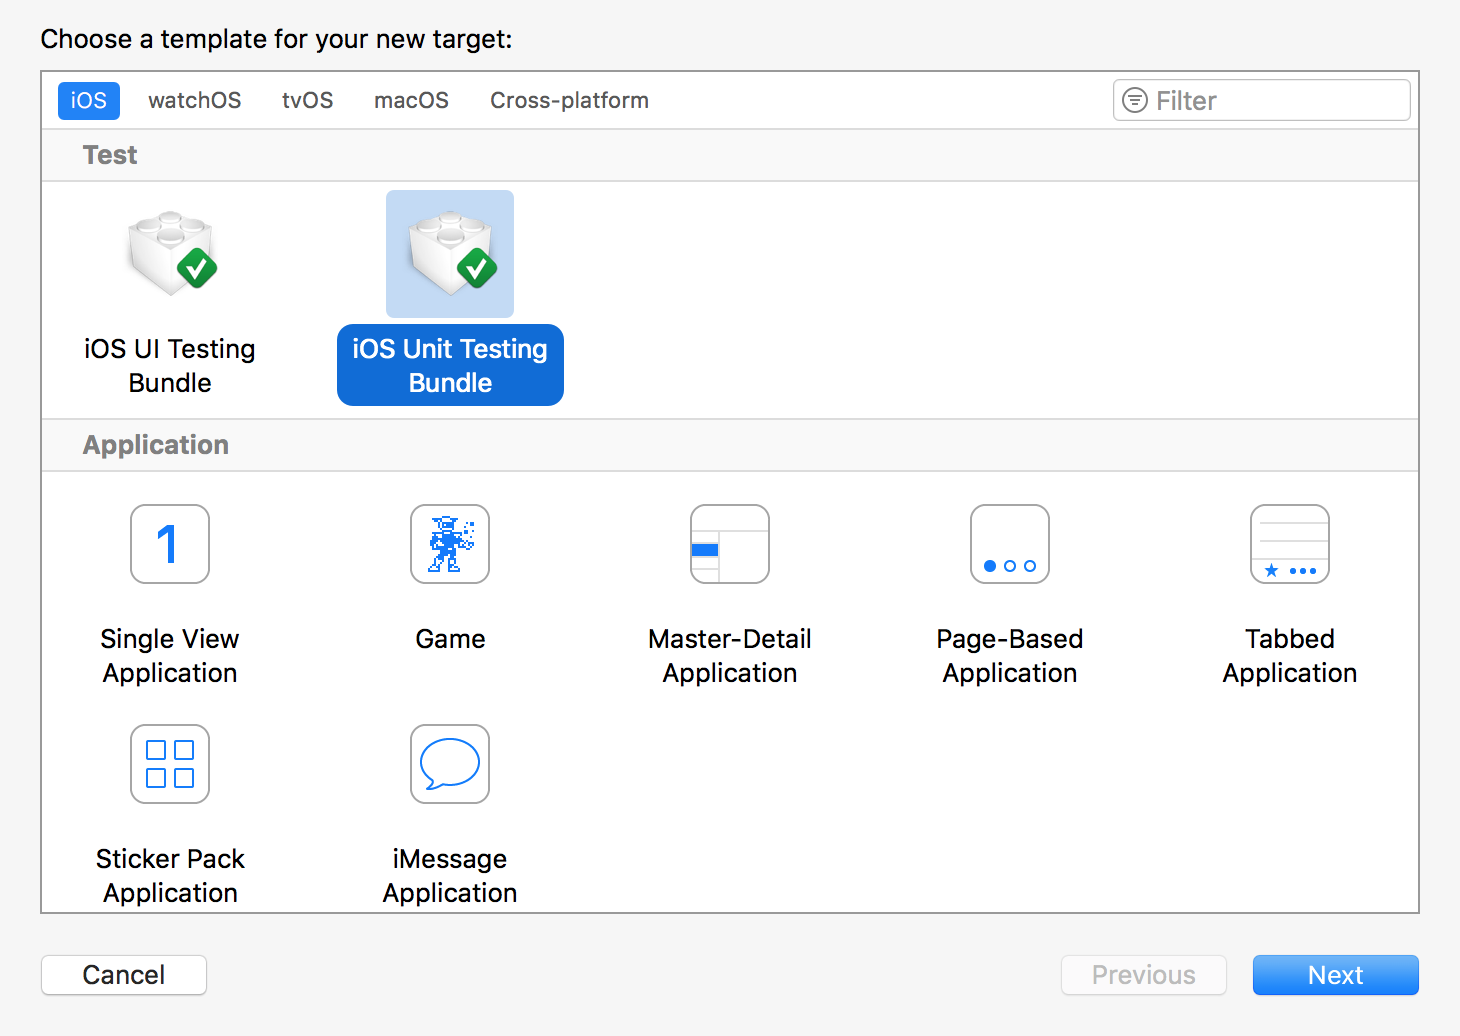
事前準備として、最初に「Editor -> Add Targets」と辿り、「iOS Unit Testing Bundle」を選択してユニットテストターゲットを追加しておきます。
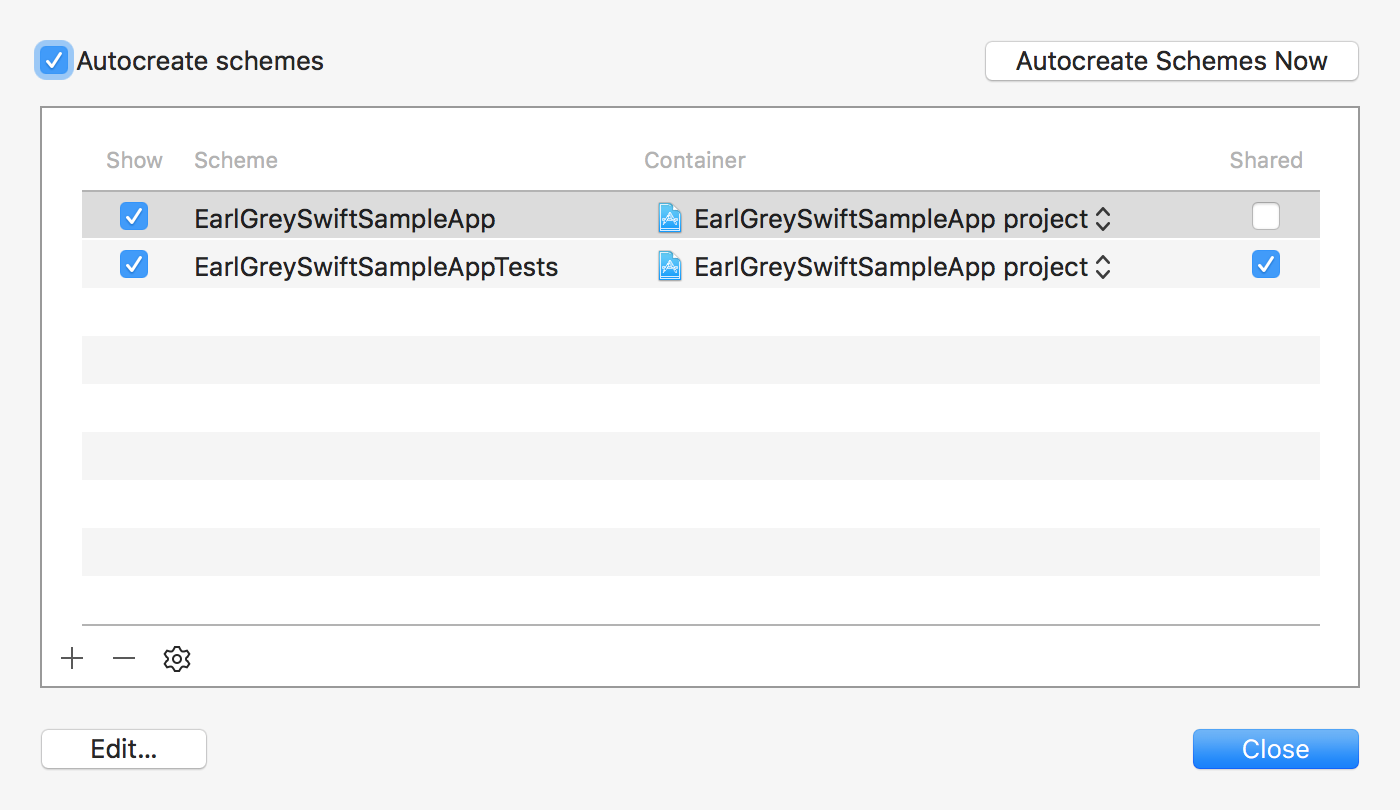
次に「Product -> Scheme -> Manage Scheme」と辿り、「+」ボタンからユニットテストターゲット用Shcemeを追加して、「Shared」オプションにチェックを入れて下さい(もちろん、ユニットテストターゲットの追加については、プロジェクト新規作成時に「Inclue Unit Tests」にチェックを入れることで実現しても良いです)。
以下、EarlGreySwiftSampleAppがアプリターゲット、EarlGreySwiftSampleAppTestsがユニットテストターゲットとして話を進めます。
earlgrey gemのインストール
現在のEarlGreyはRubyGems化されたearlgrey gemと後で述べるCarthageを組みわせて使用することにより、半自動的にXcodeに導入できるようになっています。まずは下記の通り、Bundlerを使ってearlgrey gemをインストールしておきます。
source "https://rubygems.org"
gem "earlgrey"
$ bundle install --path=vendor/bundle --binstubs=vendor/bin
XcodeプロジェクトへのEarlGreyの導入
Carhageと先ほどのearlgrey gemのコマンドを使って導入します。はじめにCarthageを実行します。
github "google/EarlGrey" "1.6.0"
$ carthage update EarlGrey --platform ios
**対象テストコードがObjective-Cベースである場合、**ここまででEarlGreyの導入は完了です。
**対象テストコードがSwiftベースである場合は、**さらに以下を実行します。
$ bundle exec earlgrey install --target=EarlGreySwiftSampleAppTests --swift_version=3.0
「target」オプションには対象となるユニットテストターゲット、「swift_version」オプションには使用するSwiftのバージョンを指定します。Swift 3系(3.0, 3.01, 3.0.2)を使用する際は3.0、Swift 2.3を使用する際は2.3を指定します。
EarlGreyは基本部分がObjective-Cで構成されており、このgemコマンドを実行することによりSwiftで必要となるラッパー用のファイルEarlGrey.swiftが追加されます。
テスト対象アプリの作成
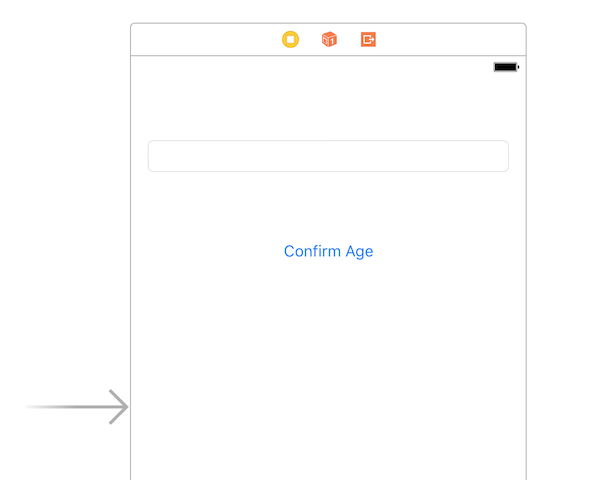
ここでは、0以上の整数が入力されることを期待したageというTextField、およびそのことを確認するためのconfirmAgeというUIButtonを持ったサンプルアプリを対象とします。
※以下、EarlGreyの使い方を簡単に理解してもらうために、UI的に微妙だったり、冗長なコードだったりしていますが、ご容赦ください:-)
アプリターゲットEarlGreySwiftSampleAppのViewController.swiftにコードを追加します。コード中(1)でコメントしているように、後のEarlGreyテストコードでUIを特定するためにaccessibilityIdentifierを指定する必要があります。なお、この値については、Storyboardを表示させた状態で(Interface Builderから)、Identitiy Inspectorから設定してもOKです。
import UIKit

class ViewController: UIViewController {

    @IBOutlet weak var age: UITextField!
    @IBOutlet weak var confirmAge: UIButton!

    override func viewDidLoad() {
        super.viewDidLoad()
        // (1) Needs to set accessibilityIdentifier for EarlGrey tests.
        self.age.accessibilityIdentifier = "ageTextField"
        self.confirmAge.accessibilityIdentifier = "confirmAgeButton"
    }

    @IBAction func confirmAge(_ sender: Any) {
        if let age = Int(age.text!), age >= 0 {
            let alertController = UIAlertController(title: "Confirmed", message: "The age that you input is \(age).", preferredStyle: .alert)
            alertController.addAction(UIAlertAction(title: "OK", style: .default) { _ in })
            self.present(alertController, animated: true, completion: nil)
        } else {
            let alertController = UIAlertController(title: "Error", message: "Input an integer greater than or equal to 0.", preferredStyle: .alert)
            alertController.addAction(UIAlertAction(title: "OK", style: .default) { _ in })
            self.present(alertController, animated: true, completion: nil)
        }
    }

}
テストコードの追加
ユニットテストターゲットEarlGreySwiftSampleAppTestsのEarlGreySwiftSampleAppTests.swiftにコードを追加します。grey_accessibilityIDによってaccessibilityIdentifierを指定していることに注目して下さい。
import XCTest
import EarlGrey
@testable import EarlGreySwiftSampleApp

class EarlGreySwiftSampleAppTests: XCTestCase {

    override func setUp() {
        super.setUp()
    }

    override func tearDown() {
        super.tearDown()
    }

    func testConfirmAge() {

        var age = "foo"
        // Tests for strings
        EarlGrey.select(elementWithMatcher: grey_accessibilityID("ageTextField"))
            .perform(GREYActions.action(forTypeText: age))
        EarlGrey.select(elementWithMatcher: grey_accessibilityID("confirmAgeButton"))
            .perform(grey_tap())
        EarlGrey.select(elementWithMatcher: grey_text("Error"))
            .assert(with: grey_sufficientlyVisible())
        EarlGrey.select(elementWithMatcher: grey_text("OK"))
            .perform(grey_tap())

        age = "-123"
        // Tests for integers less than 0
        EarlGrey.select(elementWithMatcher: grey_accessibilityID("ageTextField"))
            .perform(grey_clearText())
            .perform(GREYActions.action(forTypeText: age))
        EarlGrey.select(elementWithMatcher: grey_accessibilityID("confirmAgeButton"))
            .perform(grey_tap())
        EarlGrey.select(elementWithMatcher: grey_text("Error"))
            .assert(with: grey_sufficientlyVisible())
        EarlGrey.select(elementWithMatcher: grey_text("OK"))
            .perform(grey_tap())

        age = "20"
        // Test for integers greater than or equal to 0
        EarlGrey.select(elementWithMatcher: grey_accessibilityID("ageTextField"))
            .perform(grey_clearText())
            .perform(GREYActions.action(forTypeText: age))
        EarlGrey.select(elementWithMatcher: grey_accessibilityID("confirmAgeButton"))
            .perform(grey_tap())
        EarlGrey.select(elementWithMatcher: grey_text("Confirmed"))
            .assert(with: grey_sufficientlyVisible())
        EarlGrey.select(elementWithMatcher: grey_text("OK"))
            .perform(grey_tap())
    }

}
自動UIテストの実行
通常のユニットテストと同様にCmd + Uにより、テストを実行します。上記コードの通り、入力フィールドに対して、文字列、負の整数、正の整数を順番にテストしてUI自動テストが実行される様子を確認できると思います。
最後に
いかがでしたでしょうか?もしかしたら、テストするためにそれなりに事前準備必要じゃねーか?と思っている方もいらっしゃるかもしれません!?...が、以前は様々なXcode設定を手動を行う必要がありました。大きな進歩です。また、そんなことはどういでもいいくらい、十分な価値があるフレームワークだと私は思っています。気になる点があれば積極的にぜひコントリビュートしていきましょう😉
なお、もちろん、EarlGreyだけで全てのUIテストがカバーできるわけではありません。要所要所で必要に応じて他のテストツールを組み合わせて効率よく素敵なアプリ開発を進めていきたいですね🎵
-
正確にはEarlGrey 1.4.0からSwift 3には対応していましたが、当時は別途Objective-Cブリッジングヘッダを追加する必要があったり、Swift 3っぽくない表記(Swift 2っぽい表記をひきずったまま)でした。 ↩


