はじめに
生粋の Unrealer の皆さんは、Photoshop などの画像編集ソフトではなく、使い慣れた UMG でデザインしたくなることが稀によくあるかと思います。(?)
そこで本記事では、UMG で作成したウィジェットを PNG 等の画像ファイルとして出力する方法を説明します。
説明とかどうでもいいからプラグイン使わせろ!という方はこちらへどうぞ。
UE 4.27 - 5.3 で動作確認済みです。
実装例
上記のプラグインで実装している内容です。
UE 5.3 時点では、C++ が必須です。
#pragma once

#include "CoreMinimal.h"
#include "Engine/Texture.h"
#include "ImageWriteTypes.h"
#include "Kismet/BlueprintFunctionLibrary.h"
#include "WidgetToImageFunctionLibrary.generated.h"

class SWidget;

UCLASS()
class WIDGETTOIMAGE_API UWidgetToImageFunctionLibrary : public UBlueprintFunctionLibrary
{
	GENERATED_BODY()

public:
	static void ExportWidgetAsImage(
		TSharedRef<SWidget> Widget,
		const FString& Filename,
		const FVector2D& DrawSize,
		const float Scale = 1.f,
		const EDesiredImageFormat Format = EDesiredImageFormat::PNG,
		const bool bOverwriteFile = true,
		const bool bAsync = true,
		const TextureFilter Filter = TF_Bilinear,
		const bool bUseGammaCorrection = true);

	UFUNCTION(BlueprintCallable, Category = "WidgetToImage", meta = (AdvancedDisplay = 4))
	static void ExportWidgetAsImage(
		UUserWidget* Widget,
		const FString Filename,
		const FVector2D DrawSize,
		const float Scale = 1.f,
		const EDesiredImageFormat Format = EDesiredImageFormat::PNG,
		const bool bOverwriteFile = true,
		const bool bAsync = true,
		const TextureFilter Filter = TF_Bilinear,
		const bool bUseGammaCorrection = true);
};
#include "WidgetToImageFunctionLibrary.h"
#include "Blueprint/UserWidget.h"
#include "Engine/TextureRenderTarget2D.h"
#include "ImageWriteBlueprintLibrary.h"
#include "RenderingThread.h"
#include "Slate/WidgetRenderer.h"

void UWidgetToImageFunctionLibrary::ExportWidgetAsImage(TSharedRef<SWidget> Widget, const FString& Filename, const FVector2D& DrawSize, const float Scale /*= 1.f*/, const EDesiredImageFormat Format /*= EDesiredImageFormat::PNG*/, const bool bOverwriteFile /*= true*/, const bool bAsync /*= true*/, const TextureFilter Filter /*= TF_Bilinear*/, const bool bUseGammaCorrection /*= true*/)
{
	FWidgetRenderer* WidgetRenderer = new FWidgetRenderer(bUseGammaCorrection, false);

	if (UTextureRenderTarget2D* RenderTarget = FWidgetRenderer::CreateTargetFor(DrawSize, Filter, bUseGammaCorrection))
	{
		if (bUseGammaCorrection)
		{
			RenderTarget->bForceLinearGamma = true;
			RenderTarget->UpdateResourceImmediate();
		}

		WidgetRenderer->DrawWidget(RenderTarget, Widget, Scale, DrawSize, 0.f);

		::FlushRenderingCommands();

		FImageWriteOptions Options;
		Options.Format = Format;
		Options.bOverwriteFile = bOverwriteFile;
		Options.bAsync = bAsync;

		UImageWriteBlueprintLibrary::ExportToDisk(RenderTarget, Filename, Options);
	}

	::BeginCleanup(WidgetRenderer);
}

void UWidgetToImageFunctionLibrary::ExportWidgetAsImage(UUserWidget* Widget, const FString Filename, const FVector2D DrawSize, const float Scale /*= 1.f*/, const EDesiredImageFormat Format /*= EDesiredImageFormat::PNG*/, const bool bOverwriteFile /*= true*/, const bool bAsync /*= true*/, const TextureFilter Filter /*= TF_Bilinear*/, const bool bUseGammaCorrection /*= true*/)
{
	ExportWidgetAsImage(Widget->TakeWidget(), Filename, DrawSize, Scale, Format, bOverwriteFile, bAsync, Filter, bUseGammaCorrection);
}
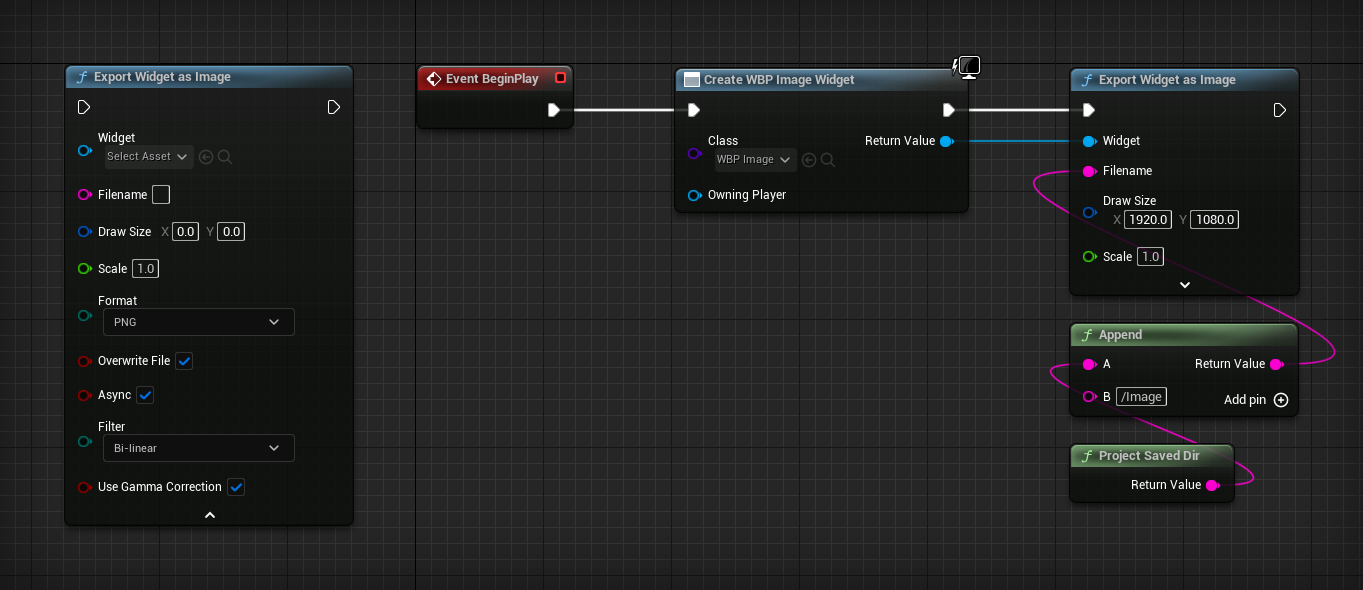
CreateWidget ノードで作成したウィジェットを、上記で作成した ExportWidgetAsImage ノードに渡すことで、ウィジェットを画像ファイルとして出力できます。
勿論ウィジェットに変更を加えてから出力することも可能です。
出力するウィジェットがエンジンの標準ではない独自の Slate Widget を使用している場合は、SWidget::OnPaint をオーバーライドして FSlateElement での描画処理を記述しないと画像が正しく出力されないため、注意。
解説
ウィジェットを画像ファイルとして出力する際の流れは、下記の通りです。
- UUserWidget から SWidget を取得する
- SWidget を UTextureRenderTarget2D に描画する
- UTextureRenderTarget2D を画像として出力する
1. UUserWidget から SWidget を取得する
UWidget::TakeWidget を使います。
Widget->TakeWidget()
2. SWidget を UTextureRenderTarget2D に描画する
エンジンの FWidgetRenderer というクラスに、このための関数 (FWidgetRenderer::DrawWidget) が用意されているので、これを利用します。
FWidgetRenderer* WidgetRenderer = new FWidgetRenderer(bUseGammaCorrection, false);
描画先の UTextureRenderTarget2D は、FWidgetRenderer::CreateTargetFor を使って作成すると楽です。
なお、ガンマ補正を使用する場合は個別に設定と更新が必要です。
if (UTextureRenderTarget2D* RenderTarget = FWidgetRenderer::CreateTargetFor(DrawSize, Filter, bUseGammaCorrection))
{
	if (bUseGammaCorrection)
	{
		RenderTarget->bForceLinearGamma = true;
		RenderTarget->UpdateResourceImmediate();
	}
作成した UTextureRenderTarget2D に対して、FWidgetRenderer::DrawWidget を実行します。
実行後は ::FlushRenderingCommands でレンダリングスレッドを待機する必要があります。
WidgetRenderer->DrawWidget(RenderTarget, Widget, Scale, DrawSize, 0.f);

::FlushRenderingCommands();
FWidgetRenderer は FDeferredCleanupInterface を継承しているので、破棄する際は ::BeginCleanup を使用します。
::BeginCleanup(WidgetRenderer);
WidgetRenderer の生成は、RenderTarget を作成する前に行う必要があります。
順番が逆になると、たまに画像が正しく出力されなくなります。どうして。
3. UTextureRenderTarget2D を画像として出力する
UImageWriteBlueprintLibrary::ExportToDisk で UTexture を画像ファイルとして出力できます。
オプションとして、ファイル形式 (PNG, JPG, BMP, EXR)、上書き保存するかどうか、非同期実行するかどうかを選択できます。
ちなみに、この関数は Blueprint でも使用可能です。
FImageWriteOptions Options;
Options.Format = Format;
Options.bOverwriteFile = bOverwriteFile;
Options.bAsync = bAsync;

UImageWriteBlueprintLibrary::ExportToDisk(RenderTarget, Filename, Options);
おわりに
ここまで説明した内容が実装されているプラグインは、こちらからダウンロード可能です。
また、UE マーケットプレイスにて無料のプラグインを他にも公開しているので、こちらもぜひ。
これであなたも脱フォトショ!(?)