Wordpress を Netlify CMS に置き換えたいので、ドキュメント熟読中。随時追加します。
Welcome
Getting Started
Netlify を使うためには、Web サイトの UI からでも、コマンドラインツールからでも操作できます。
Netlify can be used both from our web UI or by using our command line tools.
Web UI から使う場合には、https://app.netlify.com に進んでサインインしてください。
To start with the web UI, head to https://app.netlify.com and sign in.
Continuous Deployment
一ページだけのランディグページでは必要ないかもしれませんが、それより規模が大きいアプリケーションを作る場合には、おそらく static site generator を用いるか、もしくは grunt や gulp といったフロントエンド用のビルドツールを使うことになるはずです。
For anything larger than a one page landing, you really should be using a static site generator or a front-end build tool like grunt or gulp.
そういったものを使う場合、Netlify はこれらの連携と、それからデプロイをよりスムーズにする手助けをします。
If you’re using any of those, Netlify can make the process of collaborating and deploying much smoother.
Netlify は GitHub リポジトリと、あなたのサイトを紐付けます。紐付けられた GitHub にプッシュされるたび、Netlify はあなたが選んだツールによるbuild を走らせて、その結果をパワフルな CDN にプッシュします。
Netlify lets you link a GitHub repository to a site. Each time you push to GitHub, Netlify runs a build with your tool of choice and deploys the result to our powerful CDN.
Helpful Hints
新しいサイトを作る場合にも、それから今ある既存のサイトを Netlify に移す場合にも、次のことを念頭においていただくといいでしょう。
If you are creating a new site on Netlify, or just moving a pre-existing site onto the platform, it’s good to keep the following things in mind:
NODEJS (INCLUDING REACT)
お使いの static site generator が NodeJS 製の場合:
If the static site generator you are using is built with NodeJS:
package.json にビルドツールの名前が含まれているようにしてください。そのためにはターミナルで次のコマンドを実行します。(訳注:npm のインストール時に devDependency 等に記録されるようにすること)
Make sure your package.json contains the name of your tool. Do so by running the following command in your terminal:
npm install TOOLNAME --save
もし Project directory の名前がツールと同じものである場合、上記のコマンドは失敗します。ですから Project name は別のものにしてください。
If your project directory has the same name as your tool, the above command will fail. So make sure your project name is something different.
.nvmrc ファイルも用意しましょう。これをプロジェクトのルートに置き、Netlify に NodeJS のどのバーションを使えばいいかを指示します。そのためにターミナルで次のコマンドを実行します。
You also need a .nvmrc file at the root of your project to tell Netlify which version of NodeJS to use. In the terminal, enter this command:
node -v > .nvmrc
これで Netlify に NodeJS のどのバージョンを使うかを指示するファイルができました。ここで指定した Node のバージョンは nvm を使って動的にフェッチされます。またその Node はキャッシュされるのでそれによって build は早くなります。
To create a file to tell Netlify which version of Node.js to use. The version of node you use is dynamically fetched using nvm and then cached to speed up builds. If you don’t specify a version, we default to using node 8 as of this writing (March 2018).
RUBY
(訳注:Ruby 使ったことないので間違ってたら教えてください)
Ruby 製の static site generator を使っている場合には次のようにしてください。
If you are using a static site generator built with Ruby:
Gemfile と Gemfile.lock が必要です。これによって Netlify に、あなたが選んだツールが どの version なのかを伝えます。もしどちらか一つでもない場合には、次のコマンドをプロジェクトのルートディレクトリ位置でターミナルによって実行してください。
You need a Gemfile and a Gemfile.lock to tell Netlify which versions of your preferred tool to use. If there isn’t one, run the following command from the root directory of your project in the terminal:
bundle init
それによって生成された Gemfile をテキストエディタで開いてください。次の行を変更します。
Open the resulting Gemfile in your favorite text editor. Replace the following line:
# gem "ruby"
この行を次のように変更しましょう。
with this line:
gem "NAME_OF_YOUR_STATIC_SITE_GENERATOR"
# を消すことを忘れないようにしましょう。それから save も忘れずに。
Make sure you delete the #, then save.
次に次のコマンドを実行しましょう。
Now run this command:
bundle install
これによってあなたが選んだツールに必要な gem をインストールし、Gemfile.lock という名前のファイルも生成されます。このファイルが、Netlify にいつでも同じバージョンのツールをビルドに使用することを規定します。これによって予期せぬトラブルが起きることを防ぎます。
This will install the gem for the tool you’ve chosen and create a file called Gemfile.lock. This file will ensure that Netlify always uses the same version of your tool that you used to build your site, thus avoiding any nasty surprises.
また Ruby そのもののバージョンも指定することをおすすめします。Ruby のバージョンは /.ruby-version ファイルで指定できます。rvm がサポートする範囲のバージョンを選択してください。この記事を書いている時点では、以下のバージョンがインストールされており高速にビルドをすることができます。2.2.9 2.3.6 2.4.3
We also recommend specifying a version of Ruby that matches your build environment. You can set a Ruby version via a /.ruby-version file. You must choose from among rvm’s supported versions. As of this writing, the following versions are already installed and will create the fastest builds: 2.2.9 2.3.6 2.4.3
PYTHON
Python 製の static site generator を使用している場合には次のようにしてください。
If your static site generator is built with Python:
必須ではありませんが Python のための virtual environment を立てたほうがいいでしょう。その方法を知らない場合には次の指示に従ってください。
It’s usually a good idea (but not necessary) to set up a virtual environment for Python projects. If you don’t know how to do so, follow these directions.
Netlify が Python プラグインのどのバージョンを使えばいいのか確実にわかるようにしてください。そのためには requirements.txt というファイルを作ります。これをプロジェクトのルートディレクトリに置きましょう。
You want to make sure that Netlify knows exactly which versions of various Python plugins you are using. Do this by creating a file called requirements.txt in your project’s root directory:
pip freeze > requirements.txt
これで Netlify にどのバージョンの Python を使えばいいかを指示するためには、runtime.txt をプロジェクトのルートディレクトリに配置します。次のバージョンをサポートしています。 2.7, 3.4, 3.5, and 3.6
You can tell Netlify which version of Python to use to build your site by placing a runtime.txt file in your project’s root directory. We currently support versions 2.7, 3.4, 3.5, and 3.6.
Command Line Tools
Netlify のコマンドラインツールを使うことで、サイトをデプロイしたり、継続的デプロイメントの設定を、ターミナルからすることができます。
Netlify’s command line tools let you deploy sites or configure continuous deployment straight from the command line.
現在、新しく Node ベースの CLI を開発中ですが、それが完成するまでは netlifyctl を使用をオススメします。これはどんな OS でも依存なく動くものです。完全な説明については同リポジトリ内にある説明書を参照してください。
We’re currently working on a new and improved version of our Node-based CLI. Until then, we recommend using netlifyctl, which runs on any OS with no dependencies. You can find full instructions for netlifyctl in the repository documentation.
なにかおかしなことや、情報が古い内容をみつけた?
Notice something is incorrect or outdated?
いい目をしていらっしゃる。見つけてくれてありがとうございます。ぜひすぐにご連絡ください。こちらから連絡してくだい。
First off, great eye! We appreciate your discovery and want to ensure it gets addressed immediately. Please let us know here.
Continuous Deployment
Git repository と Netlify のサイトを結びつけ、常にこれを同期することで、Continuous deployment が機能します。
Continuous deployment works by connecting a git repository to a Netlify site and keeping the two in sync.
これは完全な static site でも機能しますし、static site generator や Grunt, Gulp, Broccoli といった front end build tool を使っている場合にもパワフルに機能します。
It works for plain static sites, but it’s even more powerful when you’re using a static site generator or a front end build tool like Grunt, Gulp or Broccoli.
Netlify はあなたが指定した build コマンドを実行し、その結果をデプロイします。これは git repository にプッシュされた際に、常に実行されます。
Netlify will run your build command and deploy the result whenever you push to your git repo.
- commit や push なしに deploy することはありません
- pull request によるコラボレーションを容易にします
- Git provider が提供する Web UI を使うことで、誤字脱字等をモバイルからも修正できます
- コードを編集しなくても、static site CMS や Netlify CMS を使うことでコンテンツを変更できます
- No deploying without committing and pushing first
- Easy collaboration through pull requests
- Fix a typo through your git provider’s web UI from your mobile
- Edit content without code by using a static site CMS, Netlify CMS
Branches & Deploys
DEFINITIONS
- Production branch: Git branch のうち、Netlify が build に使用する branch です。build した内容が、あなたのサイトに反映されます。
- Production deploy: Production branch からの deploy のことです。auto publishing が enable になっている場合には、新しい production deploy によって、あなたのサイトの
main URL のコンテンツが更新されます。 - Branch deploy: Production branch ではない branch から生成された deploy のことです。Branch deploy の内容が反映されるのは、branch の名前を prefix としてもつ URL です。例えば、staging という名前の branch だった場合、staging--yousitename.netlify.com に deploy されます。Netlify DNS を使用している場合には、branch に subdomain を与えることができるので、staging.yourcustomain.com に deploy されます。
- Deploy Preview: Pull request や merge request によって生成される deploy のことです。Request を承認した場合にどうなるかを確認することができます。Deploy preview が deploy される URL は、prefix として pull request や merge request の identifier number を持ちます。例えば、pull request #42 の場合には、deploy-preview-42--yousitename.com に Preview が自動的に deploy されます。
- Production branch: the Git branch that Netlify uses to build and deploy changes to your site’s main URL, for example www.yourcustomdomain.com and yoursitename.netlify.com.
- Production deploy: a deploy from the production branch. If auto publishing is enabled, each new production deploy will update what is published at your site’s main URL.
- Branch deploy: a deploy generated from a branch that is not your Production branch. Branch deploys are published to a URL which includes the branch name as a prefix. For example, if a branch is called staging, it will deploy to staging--yoursitename.netlify.com. If you use Netlify DNS, you can enable branch subdomains, so the staging branch example would deploy to staging.yourcustomdomain.com.
- Deploy Preview: Deploy generated from a pull request or merge request, building the site as it would be if the proposed changes were merged. Deploy Previews are published to a URL which has the prefix deploy-preview followed by the identifier number of the pull request or merge request. For example, pull request #42 will automatically trigger a Deploy Preview at deploy-preview-42--yoursitename.netlify.com.
BRANCH DEPLOY CONTROLS
Netlify は Git repository のどの branch を deploy するかを指定することができます。デフォルトでは site の production branch を変更があるたびに deploy します。またその branch に対する全ての pull/merge request の deploy preview を build します。
Netlify lets you control which branches in your Git repository you want to deploy. By default, Netlify deploys the site’s production branch after every change, and builds deploy previews for all pull/merge requests on that branch.
それ以外の branch に対しても branch deploy を生成するには、Settings > Build & deploy > Continuous Deployment > Deploy settings から Edit settings をクリックします。
To generate branch deploys for other branches in your repository, go to Settings > Build & deploy > Continuous Deployment > Deploy settings, then click Edit settings. You can choose to deploy all branches (including future branches), or select individual branches you would like to deploy.
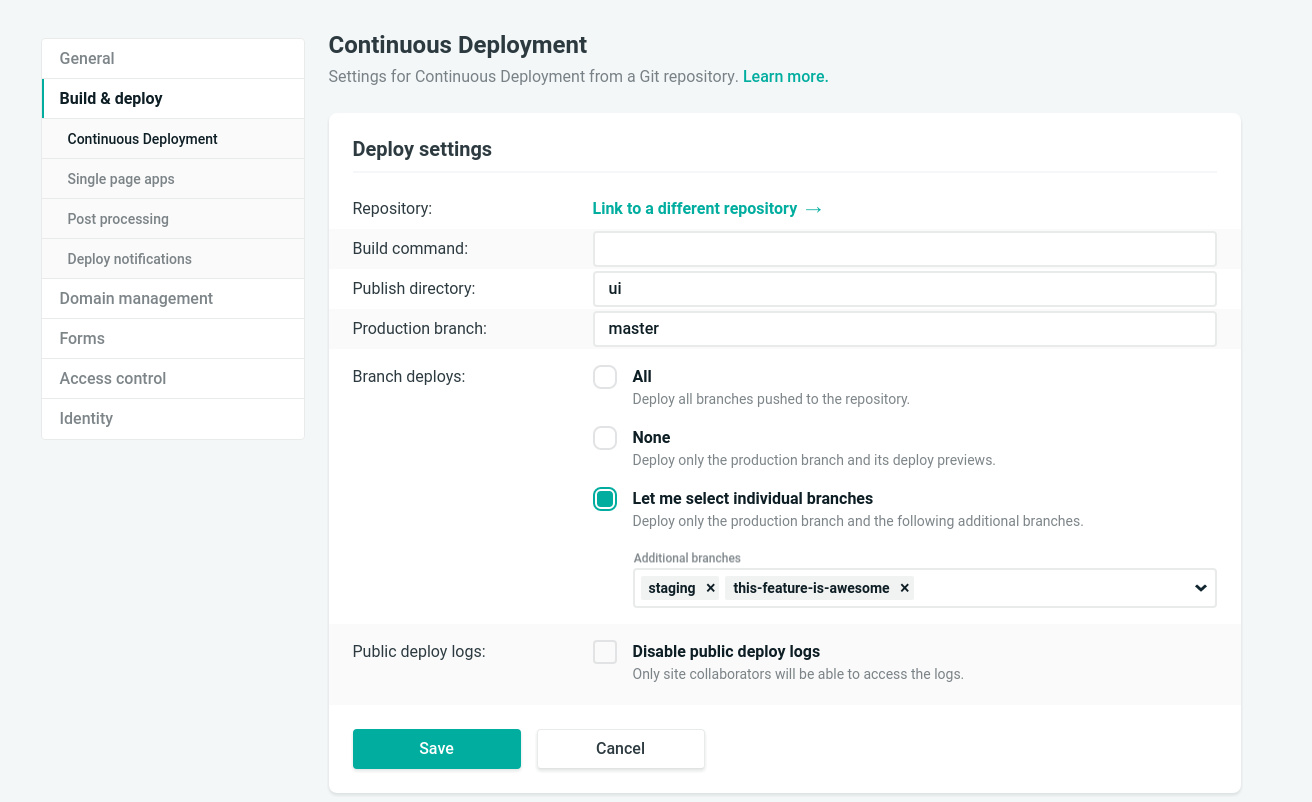
個別に deploy する branch を選択した場合、deploy したいブランチの名前を入力できます。まだ作っていないブランチも入力できます。
When selecting individual branches for deployment, type the name of each branch you want to deploy. You can also enter branch names you haven’t created yet.
branch deploy のための branch を選択すると、Netlify はそれらの branch に対する commit や pull/merge request の監視を始めます。変更がこれらの branch に push されると、新しい branch deploy や deploy preview ができるのを確認できます。
Once you select some or all of your branches for branch deploys, Netlify will start watching those branches for new commits and pull/merge requests. As soon as you start pushing changes to those branches, you’ll see new branch deploys and deploy previews.
Deploy Contexts
Deploy contexts are a way to tell Netlify how to build your site. They give you the flexibility to configure your site’s build depending on the context they are going to be deployed to.
Deploy context は Netlify に対して、どのように自分のサイトを build するかを伝える方法です。これによって
There are three predefined deploy contexts:
production: this context corresponds to the main site’s deployment, attached to the Git branch you set when the site is created.
deploy-preview: this context corresponds to the previews we build for Pull Requests and Merge Requests integrations.
branch-deploy: this context corresponds to deploys from branches that are not the site’s main production branch.
Besides these three predefined contexts, sites can use also branch names as custom deploy contexts. For example, a branch called staging will match a deploy context called staging.
Currently, deploy contexts allow you to override four options from your site’s settings. The build command, the base directory where your site is built from, the publish directory where the build puts the processed files, and the environment variables added to the build. All these options are overridden in a hierarchical order. The site’s global settings apply to each deploy, if we’re building the production site, and you change options in your production context, they will be overridden. Only options that are set explicitly are overridden, if you leave one out, the build will use the value of the global settings, or previous contexts. Environment variables are also overridden individually, for example, you can have access tokens as environment variables per context.
To configure deploy contexts, you must create a file called netlify.toml in the base of your Git repository. There, you can set as many contexts as you want to configure.