指定した間隔でデータを生成
0,1,2,3...とか1,3,5,7のようなデータを作る方法をまとめた。
■ start~stop区間をstep間隔でデータを生成する。
arange([start],stop,[step],[dtype])
start, step, dtypeは省略可能でstartを省略すると0からになる。
In [1]: import numpy as np

In [2]: X = np.arange(10)

In [3]: print X
[0 1 2 3 4 5 6 7 8 9]

In [4]: type(X)
Out[4]: numpy.ndarray

In [5]: X.dtype
Out[5]: dtype('int32')
dtypeを省略した場合は、10のように整数で指定するとint32になり、10.のように浮動小数点で指定するとfloat64になる。
dtype=np.float32のように指定すると、ほしい型でデータが作成される。
In [15]: X = np.arange(10)

In [16]: print X.dtype
int32

In [17]: X = np.arange(10.)

In [18]: print X.dtype
float64

In [19]: X = np.arange(10.,dtype=np.float32)

In [20]: print X.dtype
float32
start,stop,stepを指定した時の例は下記の通り。
In [22]: X = np.arange(1,10)

In [23]: print X
[1 2 3 4 5 6 7 8 9]

In [24]: X = np.arange(1,10,2)

In [25]: print X
[1 3 5 7 9]

In [26]: X = np.arange(9,0,-2)

In [27]: print X
[9 7 5 3 1]
rangeとxrangeについて
ちなみにnumpyのarangeではなく、rangeを使うとnumpy arrayではなくlistになるので注意。
list Yをnumpy arrayにしたいときは、np.array(Y)とするとよい。
numpy arrayの変数Xにlist Yを代入してもnumpy arrayにはならない(X=Y)。
また、xrangeを使った場合は、generatorが生成される。実際の値を取得したいときは、for文で使うかlist(Z)のようにする。
In [6]: Y = range(10)

In [7]: print Y
[0, 1, 2, 3, 4, 5, 6, 7, 8, 9]

In [8]: type(Y)
Out[8]: list

In [9]: Z = xrange(10)

In [10]: print Z
xrange(10)

In [11]: type(Z)
Out[11]: xrange

In [12]: list(Z)
Out[12]: [0, 1, 2, 3, 4, 5, 6, 7, 8, 9]
rangeとxrangeの違いは、rangeが一度にlistが生成されるのに対し、xrangeは1 loopに1回ずつ値が生成される。for文の途中でloopを抜けるような処理の場合に無駄な値の生成がなくなる。生成するlistが大きい場合はメモリと時間の節約になる。
In [13]: timeit for i in range(1000000): pass
10 loops, best of 3: 36.3 ms per loop

In [14]: timeit for i in xrange(1000000): pass
100 loops, best of 3: 16.4 ms per loop
■ start~stop区間をnum等分したデータを生成する
linspace(start,stop,num=50,endpoint=True,retstop=False,dtype=None)
例えば、60HzでデータをSamplingする場合の時刻tを作りたい時などに使う。
In [28]: t = np.linspace(0,1,60)

In [29]: print t
[ 0.          0.01694915  0.03389831  0.05084746  0.06779661  0.08474576
  0.10169492  0.11864407  0.13559322  0.15254237  0.16949153  0.18644068
  0.20338983  0.22033898  0.23728814  0.25423729  0.27118644  0.28813559
  0.30508475  0.3220339   0.33898305  0.3559322   0.37288136  0.38983051
  0.40677966  0.42372881  0.44067797  0.45762712  0.47457627  0.49152542
  0.50847458  0.52542373  0.54237288  0.55932203  0.57627119  0.59322034
  0.61016949  0.62711864  0.6440678   0.66101695  0.6779661   0.69491525
  0.71186441  0.72881356  0.74576271  0.76271186  0.77966102  0.79661017
  0.81355932  0.83050847  0.84745763  0.86440678  0.88135593  0.89830508
  0.91525424  0.93220339  0.94915254  0.96610169  0.98305085  1.        ]

In [30]: len(t)
Out[30]: 60
endpointをFalseにするとstopを含まないデータが生成される。下記の例だとデータの間隔は1/60=0.01666...になる。endpointを含めた時の間隔は1/59=0.01694になる。
In [31]: t = np.linspace(0,1,60,endpoint=False)

In [32]: print t
[ 0.          0.01666667  0.03333333  0.05        0.06666667  0.08333333
  0.1         0.11666667  0.13333333  0.15        0.16666667  0.18333333
  0.2         0.21666667  0.23333333  0.25        0.26666667  0.28333333
  0.3         0.31666667  0.33333333  0.35        0.36666667  0.38333333
  0.4         0.41666667  0.43333333  0.45        0.46666667  0.48333333
  0.5         0.51666667  0.53333333  0.55        0.56666667  0.58333333
  0.6         0.61666667  0.63333333  0.65        0.66666667  0.68333333
  0.7         0.71666667  0.73333333  0.75        0.76666667  0.78333333
  0.8         0.81666667  0.83333333  0.85        0.86666667  0.88333333
  0.9         0.91666667  0.93333333  0.95        0.96666667  0.98333333]

In [33]: len(t)
Out[33]: 60
retstep=Trueにすると、データの間隔を返してくれる。
In [34]: t = np.linspace(0,1,60,retstep=True)

In [35]: print t
(array([ 0.        ,  0.01694915,  0.03389831,  0.05084746,  0.06779661,
        0.08474576,  0.10169492,  0.11864407,  0.13559322,  0.15254237,
        0.16949153,  0.18644068,  0.20338983,  0.22033898,  0.23728814,
        0.25423729,  0.27118644,  0.28813559,  0.30508475,  0.3220339 ,
        0.33898305,  0.3559322 ,  0.37288136,  0.38983051,  0.40677966,
        0.42372881,  0.44067797,  0.45762712,  0.47457627,  0.49152542,
        0.50847458,  0.52542373,  0.54237288,  0.55932203,  0.57627119,
        0.59322034,  0.61016949,  0.62711864,  0.6440678 ,  0.66101695,
        0.6779661 ,  0.69491525,  0.71186441,  0.72881356,  0.74576271,
        0.76271186,  0.77966102,  0.79661017,  0.81355932,  0.83050847,
        0.84745763,  0.86440678,  0.88135593,  0.89830508,  0.91525424,
        0.93220339,  0.94915254,  0.96610169,  0.98305085,  1.        ]), 0.01694915254237288)

In [36]: print t[1]
0.0169491525424
■ start~stop区間をnum等分した対数データを生成する
logspace(start,stop,num=50,endpoint=True,base=10.0,dtype=None)
その他にはlinspaceのlog版でlogspaceというのもある。使い方は同じで違いはbase(底)が指定できるのとretstepが無いところ。
下記の例だと2から3をlinspaceで10等分にして底10の指数とした時と同じになる。
In [45]: t1 = np.logspace(2,3,10)

In [46]: print t1
[  100.           129.1549665    166.81005372   215.443469     278.25594022
   359.38136638   464.15888336   599.48425032   774.26368268  1000.        ]

In [47]: n = np.linspace(2,3,10)

In [48]: t2 = 10**n

In [49]: print t2
[  100.           129.1549665    166.81005372   215.443469     278.25594022
   359.38136638   464.15888336   599.48425032   774.26368268  1000.        ]

In [50]: t1 = np.logspace(2,3,10,base=np.e)

In [51]: print t1
[  7.3890561    8.25741109   9.22781435  10.3122585   11.52414552
  12.87845237  14.3919161   16.08324067  17.97332814  20.08553692]
■ 0で初期化されたnumpy arrayを生成する
zeros(shape,dtype=float,order='C')
In [52]: X = np.zeros(10)

In [53]: print X
[ 0.  0.  0.  0.  0.  0.  0.  0.  0.  0.]

In [54]: X = np.zeros((3,2))

In [55]: print X
[[ 0.  0.]
 [ 0.  0.]
 [ 0.  0.]]
■ 1で初期化されたnumpy arrayを生成する
ones(shape,dtype=None,order='C')
diagと合わせると単位行列が作れる。
In [56]: X = np.ones(10)

In [57]: print X
[ 1.  1.  1.  1.  1.  1.  1.  1.  1.  1.]

In [58]: X = np.ones((3,2))

In [59]: print X
[[ 1.  1.]
 [ 1.  1.]
 [ 1.  1.]]

In [60]: X = np.diag(np.ones(3))

In [61]: print X
[[ 1.  0.  0.]
 [ 0.  1.  0.]
 [ 0.  0.  1.]]
■ すでにあるnumpy arrayと同じサイズの0又は1で初期化されたnumpy arrayを作る
zeros_like(a,dtype=None,order='K',subok=True), ones_like(a,dtype=None,order='K',subok=True)
いちいちzeros(X.shape)としなくてもいいが、_likeと.shapeではさほど入力する文字数は変わらない。
dtypeもXのものが使われるのでそれを入れるともっと打つ文字数は短くなる。
In [62]: X = np.arange(9).reshape(3,3)

In [63]: print X
[[0 1 2]
 [3 4 5]
 [6 7 8]]

In [64]: Y = np.zeros_like(X)

In [65]: print Y
[[0 0 0]
 [0 0 0]
 [0 0 0]]
■ meshgridを作る
画像などの座標位置とか3次元グラフのX,Y軸の座標とかのIndexに使われるmeshgridを生成する。
つまり(0,0),(0,1)....(1,0),(1,1)....というデータを作るためのもの。
In [68]: X = np.mgrid[0:10:2]

In [69]: print X
[0 2 4 6 8]

In [70]: XY = np.mgrid[0:10:2,1:10:2]

In [71]: print XY
[[[0 0 0 0 0]
  [2 2 2 2 2]
  [4 4 4 4 4]
  [6 6 6 6 6]
  [8 8 8 8 8]]

 [[1 3 5 7 9]
  [1 3 5 7 9]
  [1 3 5 7 9]
  [1 3 5 7 9]
  [1 3 5 7 9]]]
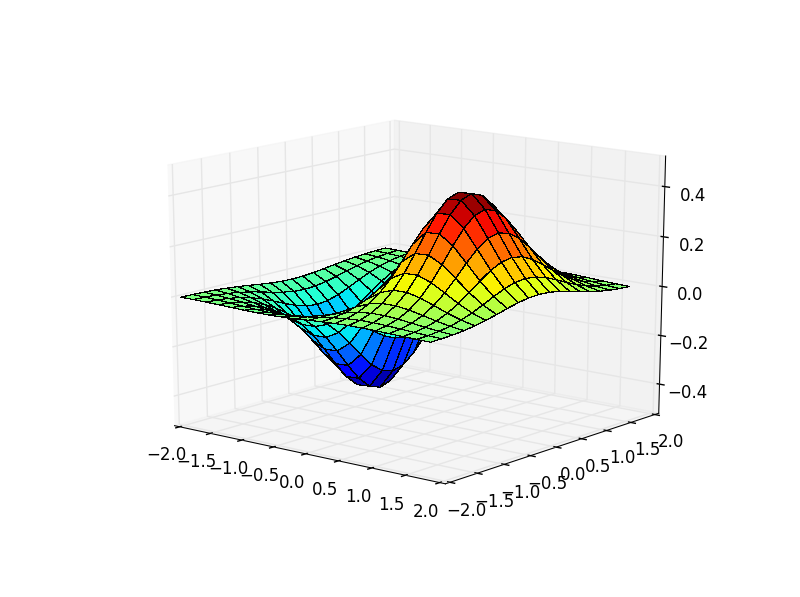
meshgridを使うとこんな感じのことができる。
In [84]: X,Y = np.mgrid[-2:2:0.2,-2:2:0.2]

In [85]: Z = X * np.exp(-X**2-Y**2)

In [86]: import matplotlib.pyplot as plt

In [87]: from mpl_toolkits.mplot3d import Axes3D

In [88]: from matplotlib import cm

In [89]: fig = plt.figure()

In [90]: ax = fig.gca(projection='3d')

In [91]: surf = ax.plot_surface(X, Y, Z, rstride=1, cstride=1, cmap=cm.jet,linewidth=0.1, antialiased=False)

In [92]: plt.show()
ちなみにogridというものもありこちらは一次元のデータを返す。ogridとmgridの違いは下記の通り。
In [93]: np.ogrid[0:10:2,1:10:2]
Out[93]:
[array([[0],
        [2],
        [4],
        [6],
        [8]]), array([[1, 3, 5, 7, 9]])]

In [94]: np.mgrid[0:10:2,1:10:2]
Out[94]:
array([[[0, 0, 0, 0, 0],
        [2, 2, 2, 2, 2],
        [4, 4, 4, 4, 4],
        [6, 6, 6, 6, 6],
        [8, 8, 8, 8, 8]],

       [[1, 3, 5, 7, 9],
        [1, 3, 5, 7, 9],
        [1, 3, 5, 7, 9],
        [1, 3, 5, 7, 9],
        [1, 3, 5, 7, 9]]])
