FlutterでFirebaseAuthを使う方法について書いていきたいと思います。
FlutterプロジェクトとFirebaseを結合する
基本的に上にのCodelabのCloud Firestoreを使う直前まで(Codelabでいうところの#7まで)やればFlutterからFirebaseに接続することができるようになります。
ですのでここでは割愛させていただきます。
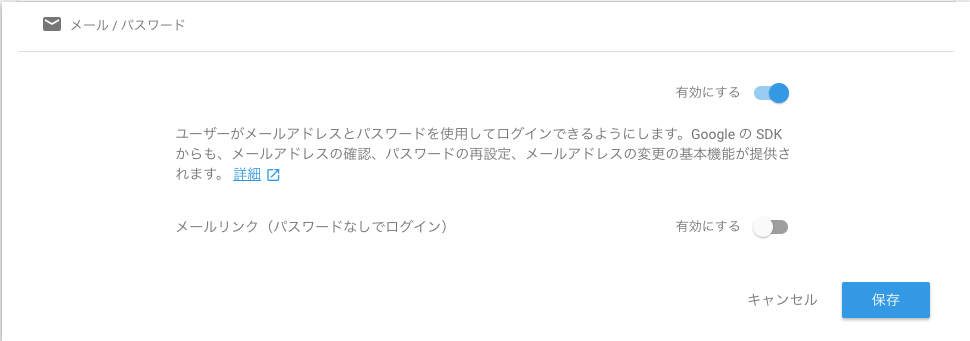
Firebaseの管理画面からパスワード認証を有効にする
この手順はどの環境でやっても同じだと思います。
Firebaseの管理画面を開く→Authenticationをクリック→ログイン方法タブをクリック→「メール/パスワード」をおしてパスワード認証を有効にする
pubspec.ymlを編集する
下記を追加しましょう。
dependencies:
  flutter:
    sdk: flutter
  firebase_auth: ^0.5.10
追加したら、
flutter packages get
を実行しましょう。
^0.5.10 のバージョンについては最新のものをお使いください。
下記のURLから確認できます。
実装する
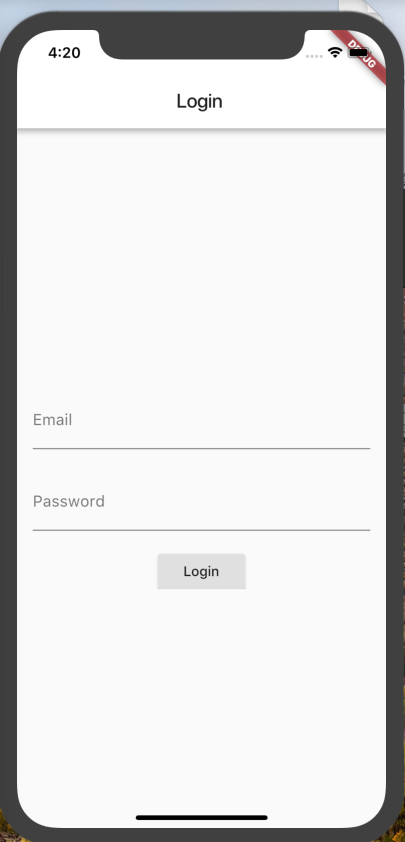
こんな画面をサンプルとして作成します。
final emailInputController = new TextEditingController();
final passwordInputController = new TextEditingController();

Widget _layoutBody() {
    return new Center(
      child: new Form(
        child: new SingleChildScrollView(
          padding: const EdgeInsets.symmetric(horizontal: 16.0),
          child: new Column(
            crossAxisAlignment: CrossAxisAlignment.stretch,
            children: <Widget>[
              const SizedBox(height: 24.0),
              new TextFormField(
                controller: emailInputController,
                decoration: const InputDecoration(
                  border: const UnderlineInputBorder(),
                  labelText: 'Email',
                ),
              ),
              const SizedBox(height: 24.0),
              new TextFormField(
                controller: passwordInputController,
                decoration: new InputDecoration(
                  border: const UnderlineInputBorder(),
                  labelText: 'Password',
                ),
                obscureText: true,
              ),
              const SizedBox(height: 24.0),
              new Center(
                child: new RaisedButton(
                  child: const Text('Login'),
                  onPressed: () {
                    var email = emailInputController.text;
                    var password = passwordInputController.text;
                    // ここにログイン処理を書く
                  },
                ),
              ),
            ],
          ),
        ),
      ),
    );
  }
とりあえずスクショの画面を作りたいって場合は Sccafold のbodyに上記のメソッドをコピペすればとりあえず動きます。
次に、実際にログイン処理を実装したメソッドを作成します。
Future<AuthResult> _signIn(String email, String password) async {
    final AuthResult result = await _firebaseAuth.signInWithEmailAndPassword(
        email: email, password: password);
    print("User id is ${result.user.uid}");
    return result;
  }
Flutterでは、 async await をよく使うみたいなのでこの機会に勉強しないといけないですね、、、
https://qiita.com/rana_kualu/items/f3dfcb8e7ef0cc9955d6
次に、上で作成したメソッドを呼んでみます。
new RaisedButton(~~~~~~~~~~~~ から抜粋します。
new Center(
    child: new RaisedButton(
      child: const Text('Login'),
      onPressed: () {
           var email = emailInputController.text;
           var password = passwordInputController.text;
           return _signIn(email, password)←こんな感じで呼ぶ
              .then((AuthResult result) => print(result.user))
              .catchError((e) => print(e));
           },
       ),
)
これでログインに成功するとアプリのuser情報がprintで表示されます。