はじめに
以前、以下の記事でエクセルファイルを送信して、その中の要素を返却するシンプルなAPIをSAMを使ってデプロイしました。
今回はもう少し実用性のあるようなものに変えたいなと思い、以下の要件でやってみようと思います。
- エクセルを送信する
- 更新したエクセルファイルが返却される
- 編集する内容は、以下のとおりとします。
- 会社名・商品名・単価・数量
- この情報で会社ごとに単価 × 数量 の売上金額を計算し、新しい「売上」という列を追加
- 編集する内容は、以下のとおりとします。
イメージはこんな感じです
| 会社名 | 商品名 | 単価 | 数量 | 売上金額(単価×数量)←ここを追加 |
|---|---|---|---|---|
| 会社A | 商品X | 500 | 10 | 5000 |
| 会社A | 商品Y | 300 | 20 | 6000 |
| 会社B | 商品Z | 1000 | 5 | 5000 |
| 会社B | 商品W | 500 | 10 | 5000 |
SAMでリソースをデプロイ
上記の記事で詳しく書いている部分が多いので、説明は割愛します。
まずファイル構成は以下のようになります。
変更点としては以下の2点です。それ以外はsam initで生成されたままとなっています。
-
hello_worldディレクトリをcompany_salesと名前を変えている -
data.xlsxを検証用に追加している
%tree
.
├── README.md
├── __init__.py
├── company_sales
│   ├── Dockerfile
│   ├── __init__.py
│   ├── __pycache__
│   │   ├── __init__.cpython-312.pyc
│   │   └── app.cpython-312.pyc
│   ├── app.py
│   └── requirements.txt
├── data.xlsx
├── events
│   └── event.json
├── samconfig.toml
├── template.yaml
└── tests
    ├── __init__.py
    ├── __pycache__
    │   └── __init__.cpython-312.pyc
    └── unit
        ├── __init__.py
        ├── __pycache__
        │   ├── __init__.cpython-312.pyc
        │   └── test_handler.cpython-312-pytest-7.4.4.pyc
        └── test_handler.py
次に以下のファイルの通りに変更し、pip install -r requirements.txtを実行します。(この作業が必要なのかは自信がない。)
requests
pandas
openpyxl
requests_toolbelt
urllib3<2
そして、template.yamlを以下の通りに変更します。
AWSTemplateFormatVersion: '2010-09-09'
Transform: AWS::Serverless-2016-10-31
Description: >
  python3.8

  Sample SAM Template for company-sales-1

# More info about Globals: https://github.com/awslabs/serverless-application-model/blob/master/docs/globals.rst
Globals:
  Function:
    Timeout: 10
    MemorySize: 128
    Description: エクセル操作するためのLambda関数

    # You can add LoggingConfig parameters such as the Logformat, Log Group, and SystemLogLevel or ApplicationLogLevel. Learn more here https://docs.aws.amazon.com/serverless-application-model/latest/developerguide/sam-resource-function.html#sam-function-loggingconfig.
    LoggingConfig:
      LogFormat: JSON
Resources:
  # HTTP APIの定義
  CompanySaleSumApi:
    Type: AWS::Serverless::Api
    Properties:
      StageName: default
      BinaryMediaTypes:
        - '*~1*'
  CompanySaleSumFunction:
    Type: AWS::Serverless::Function # More info about Function Resource: https://github.com/awslabs/serverless-application-model/blob/master/versions/2016-10-31.md#awsserverlessfunction
    Properties:
      PackageType: Image
      ImageUri: !Sub 'docker.io/${AWS::AccountId}.dkr.ecr.${AWS::Region}.amazonaws.com/company-sales-1:latest'
      Architectures:
      - x86_64
      Events:
        CompanySaleSum:
          Type: Api # More info about API Event Source: https://github.com/awslabs/serverless-application-model/blob/master/versions/2016-10-31.md#api
          Properties:
            RestApiId: !Ref CompanySaleSumApi
            Path: /company_sales_sum
            Method: any
    Metadata:
      Dockerfile: Dockerfile
      DockerContext: ./company_sales
      DockerTag: python3.8-v1

  ApplicationResourceGroup:
    Type: AWS::ResourceGroups::Group
    Properties:
      Name:
        Fn::Sub: ApplicationInsights-SAM-${AWS::StackName}
      ResourceQuery:
        Type: CLOUDFORMATION_STACK_1_0
  ApplicationInsightsMonitoring:
    Type: AWS::ApplicationInsights::Application
    Properties:
      ResourceGroupName:
        Ref: ApplicationResourceGroup
      AutoConfigurationEnabled: 'true'
Outputs:
  # CompanySaleSumApi is an implicit API created out of Events key under Serverless::Function
  # Find out more about other implicit resources you can reference within SAM
  # https://github.com/awslabs/serverless-application-model/blob/master/docs/internals/generated_resources.rst#api
  CompanySaleSumApi:
    Description: API Gateway endpoint URL for Prod stage for CompanySaleSum function
    Value: !Sub "https://${CompanySaleSumApi}.execute-api.${AWS::Region}.amazonaws.com/Prod/company_sales_sum/"
  CompanySaleSumFunction:
    Description: CompanySaleSum Lambda Function ARN
    Value: !GetAtt CompanySaleSumFunction.Arn
  CompanySaleSumFunctionIamRole:
    Description: Implicit IAM Role created for CompanySaleSum function
    Value: !GetAtt CompanySaleSumFunctionRole.Arn
次に、lambda_handlerを変更します。
今回は確認のためにとりあえず仮のものを配置します。
import json
import pandas as pd
import base64
from io import BytesIO

def lambda_handler(event, context):
    print("event", event)
    # Base64エンコードされたエクセルデータを取得
    body = event['body']
    print("body_data", body)

    # Base64デコードしてバイナリデータに変換
    excel_data = base64.b64decode(body)

    # BytesIOを使ってメモリ上でエクセルファイルを開く
    excel_file = BytesIO(excel_data)

    df = pd.read_excel(excel_file, engine='openpyxl')
    output = df.loc[:,:]
    print("output", output)

    # DataFrame を JSON に変換
    output_json = output.to_json(orient="records")  # レコード形式で変換
    print("output_json", output_json)

    # Lambda のレスポンスとして返す
    return {
        "statusCode": 200,
        "body": json.dumps({"output": json.loads(output_json)})  # JSON を辞書形式にして返す
    }
最後にsam buildを実行すると、以下のように成功すればオッケーです!
$ sam build
...
Successfully tagged companysalesumfunction:python3.8-v1
Build Succeeded
...
ここまでで叩いてみる
では、buildが成功したのでsam local start-apiを実行し、ローカルでAPIを起動します。
起動したらログに表示されているエンドポイントを以下のように叩いてみると、
curl -X POST \
     -F "file=@data.xlsx" \http://127.0.0.1:3001/company_sales_sum | jq
以下のように返却されました。(ちなみにjqを使っているので以下のように整形されています。)
{
  "output": [
    {
      "A1": "A2",
      "B1": "B2",
      "C1": "C2"
    },
    {
      "A1": "A3",
      "B1": "B3",
      "C1": "C3"
    }
  ]
}
余談ですが、
-Fは"Content-type:multipart/form-data"を含んでいるので、
-H "Content-Type: multipart/form-data"とわざわざつける必要はないようです。
本題に入る
さて、ここまでで準備が整ったので、ようやく本題に入ります。
今回実現したかったのは、以下の要件でした。
- エクセルを送信する
- 更新したエクセルファイルが返却される(編集する内容は、以下のとおり)
- 会社名・商品名・単価・数量
- 会社ごとに単価 × 数量 の売上金額を計算し、新しい「売上」という列を追加
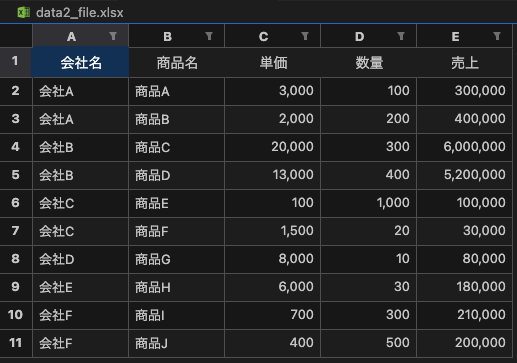
実際に使うデータは以下です。今回はこのデータを送ったらE列に売上が追加され、計算結果が入っているように実装します。
関数の実装
では、処理を実行するcompany_sales/app.pyを変更します。
import json
import pandas as pd
import base64
from io import BytesIO

def lambda_handler(event, context):
    try:
        print("Received event:", event)

        # Base64エンコードされたエクセルデータを取得
        body = event.get('body', '')
        if not body:
            raise ValueError("Request body is missing")

        # Base64デコードしてバイナリデータに変換
        excel_data = base64.b64decode(body)

        # メモリ上でエクセルファイルを開く
        excel_file = BytesIO(excel_data)
        df = pd.read_excel(excel_file, engine='openpyxl')

        # print("Original DataFrame:")
        # print(df)

        # 売上列を追加 (単価 × 数量)
        if '単価' in df.columns and '数量' in df.columns:
            df['売上'] = df['単価'] * df['数量']
        else:
            raise ValueError("Required columns '単価' and '数量' are missing in the input data")

        # 更新後のエクセルをメモリ上に保存
        output_excel = BytesIO()
        df.to_excel(output_excel, index=False, engine='openpyxl')
        output_excel.seek(0)  # ストリームの先頭に戻る

        # Base64エンコードして返す
        updated_excel_base64 = base64.b64encode(output_excel.read()).decode('utf-8')

        # Lambda のレスポンスとして返す
        return {
            "statusCode": 200,
            "headers": {
                "Content-Type": "application/json"
            },
            "body": json.dumps({
                "message": "Excel file updated successfully",
                "updated_excel": updated_excel_base64
            })
        }

    except Exception as e:
        print(f"Error: {e}")
        return {
            "statusCode": 500,
            "body": json.dumps({"error": str(e)})
        }
コードの解説
Content-Typeの取得
# ここは前半だけでも良いかもしれない
content_type = event['headers'].get('Content-Type') or event['headers'].get('content-type')
まず、eventのheadersのContent-Typeを取得しています。
multipart/form-data; boundary=------------------------LRnORwJpbu8sdgYHytGEgz
ちなみに、eventは以下のような情報が含まれています。(一部割愛)
{'body': '~~~~~~',
'headers': {'Accept': '*/*', 'Content-Length': '9650',
'Content-Type': 'multipart/form-data; boundary=~~~',
'Host': '127.0.0.1:3001',
'User-Agent': 'curl/8.9.1',
'X-Forwarded-Port': '3001',
'X-Forwarded-Proto': 'http'},
'httpMethod': 'POST',
'isBase64Encoded': True,
'multiValueHeaders': {'Accept': ['*/*'],
                      'Content-Length': ['9650'],
                      'Content-Type': ['multipart/form-data; boundary=~~~'],
'Host': ['127.0.0.1:3001'],
'User-Agent': ['curl/8.9.1'],
'X-Forwarded-Port': ['3001'],
'X-Forwarded-Proto': ['http']},
'multiValueQueryStringParameters': None,
'path': '/company_sales_sum',
'pathParameters': None,
'queryStringParameters': None,
'requestContext': {
...
}
...
リクエストボディをデコード
次に、また event からbodyとisBase64Encodedの値を取得します。
ここでbodyにはデータがエンコードされた値が入っていて、isBase64Encodedにはbooleanが入っています。メールや画像などは基本的にこれがTRUEになっています。
body = event['body']
if event.get('isBase64Encoded', False):
    body = base64.b64decode(body)
マルチパートデータを解析
さて、ここまででContent-Typeとbodyを取得できました。
ただし、body には、複数のデータパートが含まれていて、このままでは使えません。
なぜなら、bodyには様々なデータが含まれている可能性があり、それを使うために一旦仕分けして整理しないといけないからです。
そこで、boundary を使って、リクエストボディ内の異なるパート(フォームフィールドやファイル)を正しく解析する必要があります。
Content-Type ヘッダーには、リクエストが multipart/form-data であることに加え、どのようにデータが区切られているかを示す boundary が含まれています。
この情報を使うことで、以下のようにMultipartDecoder で body 内のデータが「どのように区切られているか」を特定し、それぞれに分割することができます。
multipart_data = decoder.MultipartDecoder(body, content_type)
MultipartDecoder は、こんな感じでいい感じにリクエストボディを分けてくれています。
- Content-Type ヘッダーに含まれる boundary を使い、リクエストボディを「異なるパート」に分割
- 分割されたパートを BodyPart オブジェクトに変換(このオブジェクトには、パートのヘッダー情報やデータ本体が含まれています。)
例えば、あるフォームから名前とプロフィール写真をアップロードするリクエストがあるとします。このフォームは、multipart/form-data 形式で送信されます。
以下はそのリクエストのデータの構造の簡略化です。
--boundary
Content-Disposition: form-data; name="name"

John Doe
--boundary
Content-Disposition: form-data; name="profile_picture"; filename="john_doe.jpg"
Content-Type: image/jpeg

<binary data of the image file>
--boundary--
このように、multipart/form-data のリクエストでは、複数のデータ(テキストフィールド、ファイルなど)が送られることもありますが、それぞれが boundary という区切りによって分けられているので、これを使うためにはそれぞれのデータパートごとに分ける必要があるわけです。
multipart_dataからデータを取り出す
では、先ほど取得したmultipart_dataの各パート(BodyPartオブジェクト)にはデータ等が格納されているので、これをforで回します。
excel_data = None
for part in multipart_data.parts:
    if part.headers.get(b'Content-Disposition', b'').find(b'filename') != -1:
        # ファイルデータを取得
        excel_data = part.content
        break
ここで、forの中でpartとpart.headersに何が入っているのか見てみると、以下のような値が入っていることが分かります。ちゃんとBodyPart object になっていますね!
# part
<requests_toolbelt.multipart.decoder.BodyPart object at 0x7ffff2ddf7c0>

# part.headers
{b'Content-Disposition': b'form-data; name="file"; filename="data.xlsx"', b'Content-Type': b'application/octet-stream'}
ファイルを判定する
ボディリクエストの下処理はできたので、あとはこのBody objectがファイル情報を持っているときに、それを使用すれば良さそうです。
したがって、以下のようにpart.headers.get(b'Content-Disposition', b'') で、そのパートのヘッダーを取得して、このヘッダーに 'filename' が含まれているかを調べいます。
filenameが含まれていれば、そのパートはファイルデータを含んでいるということになります。
part.headers.get(b'Content-Disposition', b'').find(b'filename') != -1:
# part.headrs
# {b'Content-Disposition': b'form-data; name="file"; filename="data.xlsx"', b'Content-Type': b'application/octet-stream'}
ファイルデータを取得する
最後に、part.content で、そのパートの実際のデータ本体(ファイルやテキスト)を取り出して、excel_data という変数に保存します。
ファイルが見つかったら、これ以上の処理は必要ないので break してループを終了します。
ファイル処理する
ここまで来れば、あとは pandas で好きなように処理して、返却するだけです。
今回は、単価と数量を掛けて、売上カラムを追加するという要件にしたので、以下のように処理します。
# メモリ上でエクセルファイルを開く
excel_file = BytesIO(excel_data)
df = pd.read_excel(excel_file, engine='openpyxl')

# 売上列を追加 (単価 × 数量)
if '単価' in df.columns and '数量' in df.columns:
    df['売上'] = df['単価'] * df['数量']
else:
    raise ValueError("Required columns '単価' and '数量' are missing in the input data")

# 更新後のエクセルをメモリ上に保存
output_excel = BytesIO()
df.to_excel(output_excel, index=False, engine='openpyxl')
output_excel.seek(0)
データを返却する
最後に処理したエクセルデータを以下のように返却します。
# レスポンスを返す
return {
    "statusCode": 200,
    "headers": {
        "Content-Type": "application/vnd.openxmlformats-officedocument.spreadsheetml.sheet",
        "Content-Disposition": "attachment; filename=updated_file.xlsx"
    },
    "body": base64.b64encode(output_excel.read()).decode('utf-8'),  # base64エンコード
    "isBase64Encoded": True  # base64エンコードを有効化
}
ここでは、Content-Typeにエクセルであることを示し、Content-Dispositionでattachmentとすることで、インラインで開くのではなくダウンロードするようにしています。その場合のファイル名はfilenameで指定しています。
"headers": {
    "Content-Type": "application/vnd.openxmlformats-officedocument.spreadsheetml.sheet",
    "Content-Disposition": "attachment; filename=updated_file.xlsx"
},
デプロイして確認
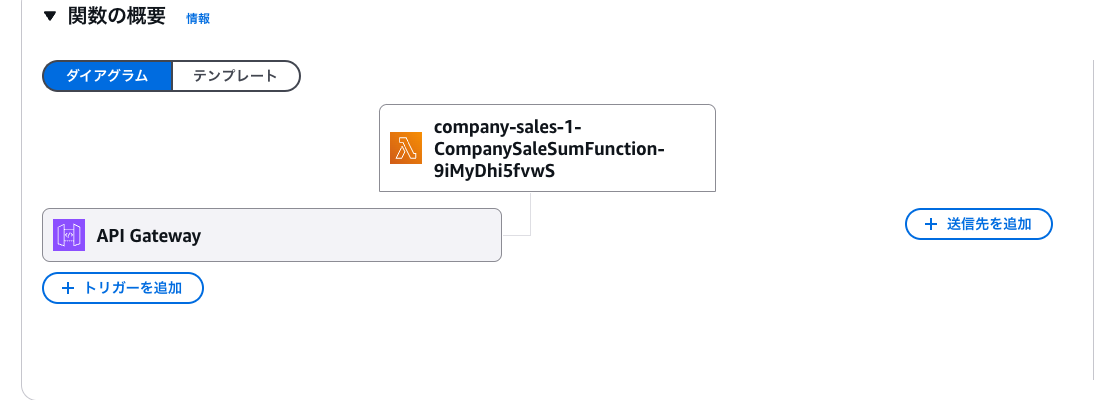
では、実際にデプロイしてエンドポイントにエクセルファイルを送って試してみます!
$ sam build
$ sam deploy -g --profile ~~~
では、エクセルファイルがあるディレクトリに移動して以下のように実行します。
curl -X POST \
     -F "file=@data.xlsx" \
     https://~~~.execute-api.ap-northeast-1.amazonaws.com/Stage/company_sales_sum \
     -o data2_file.xlsx --verbose
すると、カレントディレクトリにdata2_file.xlsxができました。
中身を見てみると、無事に売上が計算され、その値が売上カラムに追加されました!🥳

まとめ
実は予定としては、ダウンロードディレクトリにぽこっとダウンロードされる想定で実装していたのですが、-o で出力してしまったからか、ファイル作成する形となってしまいました。(リソースを削除してから -oが入らなかったかもと気づいたので、もし試した方いたら教えていただけると嬉しいです。。。🥺)
SAMを使い回せるので、以前作成したリソースをまた作るときはとても便利でした。SAMだと融通が効かない場面もあるようなので、CDKにもチャレンジしてみたいなと思いました!
pandasはYoutubeでざっと勉強しただけですが、使い方が非常に分かりやすく、こちらもかなり便利でした!
Pythonはライブラリが充実しているので、他にもopenpyxl や seleniumも使ってみようと思いました。
メモ書き程度ですが、Pandasの基本的な書き方をまとめているので使ったことない方はぜひ参考にしてみてください。
以下、個人的メモ
pythonメソッド
json.dumps
PythonオブジェクトをJSON形式の文字列に変換
import json

data = {"name": "Alice", "age": 25}
json_string = json.dumps(data)
print(json_string)  # 出力: {"name": "Alice", "age": 25}
f
フォーマット文字列を使用して変数や式を埋め込むことができる
name = "Alice"
print(f"Hello, {name}!")  # 出力: Hello, Alice!
b
バイト文字列リテラルを示し、文字列をバイト型で表現
byte_string = b"Hello, world!"
print(byte_string)  # 出力: b'Hello, world!'
【余談】ローカルで試せるだと。。。
これまでデプロイして、実際にAPIを叩いて試していたのですがコード修正してまたデプロイって面倒だなー、と思っていたら、なんとローカルでも実行できる!!と知りました。。。(もっと早く調べればよかった)
ということで、以下のコマンドを実行(3000ポートは別で使っていたので、3001を指定していますが、使っていない場合は-pの指定は不要です。)
sam local start-api -p 3001
すると、色々とメッセージが出てきた。
「ローカル用だから本番では使わないでね」とのこと。
しかも「関数の変更については自動的にすぐに反映するからリスタートとリロードは不要だよ。テンプレートの変更の場合はリスタートしてね。」と言っている。(ただ、自分の環境だと変更が反映されずbuildが必要だったので、困った。。。)
Containers Initialization is done.
Mounting CompanySaleSumFunction at http://127.0.0.1:3001/company_sales_sum [DELETE, GET, HEAD, OPTIONS, PATCH, POST, PUT]
You can now browse to the above endpoints to invoke your functions. You do not need to restart/reload SAM CLI while working on your functions, changes will be reflected instantly/automatically. If you used sam build
before running local commands, you will need to re-run sam build for the changes to be picked up. You only need to restart SAM CLI if you update your AWS SAM template
2025-01-21 18:28:35 WARNING: This is a development server. Do not use it in a production deployment. Use a production WSGI server instead.
 * Running on http://127.0.0.1:3001
2025-01-21 18:28:35 Press CTRL+C to quit
実際に書いてあるhttp://127.0.0.1:3001/company_sales_sumにcurl http://127.0.0.1:3001/company_sales_sumしてみると、返ってきた!
{"message": "hello world"}
しかもログまで出る。。。これで開発が捗りますね〜。

