書いてること
ラズパイでラジコンを作ったので、その方法をここに残します。
専用アプリ不要で手持ちのスマホがコントローラーになります。
完成品はこちら ↓
サーボモータをラズパイで制御して、Webサイト経由で操作するのできた! pic.twitter.com/7USpyYXTpx
— suo-takefumi (@zsipparu) February 28, 2021
構成図
全体の構成図です。
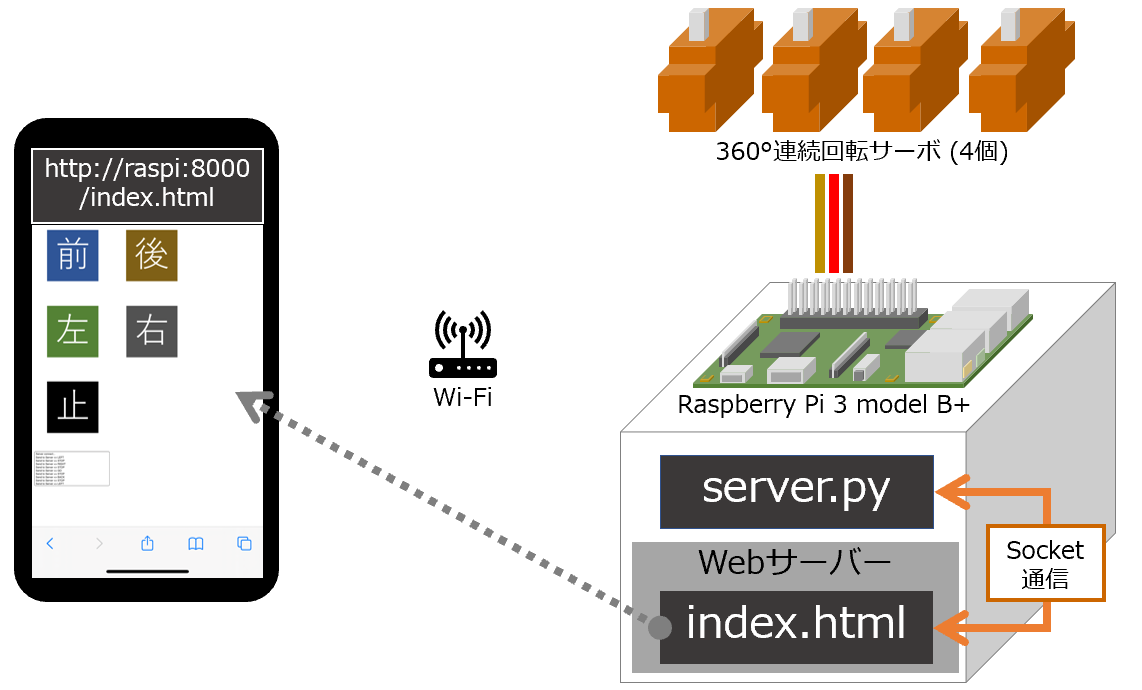
- ラズパイで4つのサーボモーターを制御
-
server.pyから制御信号を出す - ※Python3スクリプト
-
-
index.htmlとserver.pyはSocket通信 - http://{ラズパイ}:8000/index.htmlを開いたスマホがコントローラーになる
- <制御の流れ概要>
-
index.htmlから5パターンの信号(前進/後進/左回り/右回り/停止)を発信 -
server.pyがindex.htmlからの信号をもとにサーボモーターを制御
-
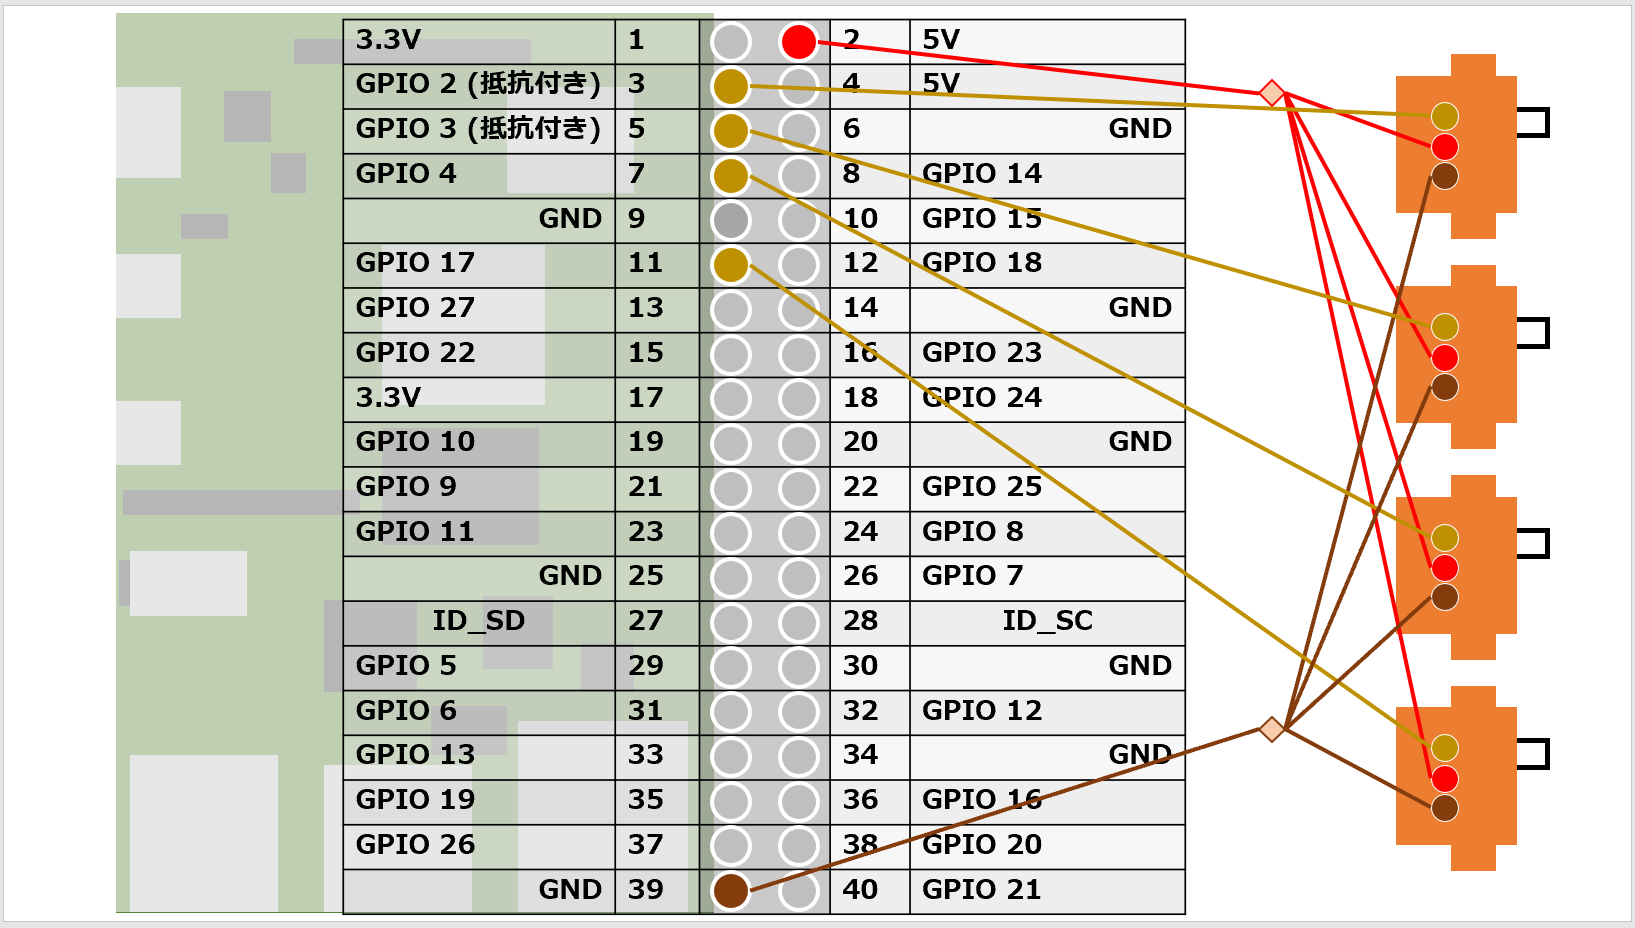
サーボモーターの配線はこちら
Raspberry Piの情報
$ lsb_release -a
No LSB modules are available.
Distributor ID: Raspbian
Description:    Raspbian GNU/Linux 10 (buster)
Release:        10
Codename:       buster

$ python3 -V
Python 3.7.3
スクリプト
スクリプトは全てラズパイの/home/pi/data/web配下に格納します。
ディレクトリ構成は以下のようになります。
ソケット通信については こちらのサイト を参考にさせて頂きました。
pi@raspi:~/data/web $ tree
.
├── images
│   ├── back.png
│   ├── go.png
│   ├── left.png
│   ├── right.png
│   └── stop.png
├── index.html
└── server.py
コントローラーになるindex.htmlのソースです。
index.htmlはSocket通信ではクライアント側になり、Socket通信のサーバー側となるserver.pyに対し5種類の信号(GO/BACK/LEFT/RIGHT/STOP)を送ります。
<!DOCTYPE html>
<html>/home/pi/data/web
<head>
  <meta http-equiv="Content-Type" content="text/html; charset=UTF-8">
  <title>コントローラー</title>
  </head>
<body>
  <img onclick="sendMessage('GO')"    src="images/go.png" />
  <img onclick="sendMessage('BACK')"  src="images/back.png" />
  <img onclick="sendMessage('LEFT')"  src="images/left.png" />
  <img onclick="sendMessage('RIGHT')" src="images/right.png" />
  <img onclick="sendMessage('STOP')"  src="images/stop.png" />
  <br />
  <!-- 出力 area -->
  <textarea id="messageTextArea" rows="10" cols="50"></textarea>
  <script type="text/javascript">
    var webSocket = new WebSocket("ws://192.168.3.19:9998"); // ウェブサーバを接続
    var messageTextArea = document.getElementById("messageTextArea"); // ウェブサーバから受信したデータを出力するオブジェクトを取得
    // ソケット接続すれば呼び出す関数。
    webSocket.onopen = function(message){
      messageTextArea.value += "Server connect...\n";
    };
    // ソケット接続が切ると呼び出す関数。
    webSocket.onclose = function(message){
      messageTextArea.value += "Server Disconnect...\n";
    };
    // ソケット通信中でエラーが発生すれば呼び出す関数。
    webSocket.onerror = function(message){
      messageTextArea.value += "error...\n";
    };
    // ソケットサーバからメッセージが受信すれば呼び出す関数。
    webSocket.onmessage = function(message){
      // 出力areaにメッセージを表示する。
      messageTextArea.value += "Recieve From Server => "+message.data+"\n";
    };

    function sendMessage(argVal){
      messageTextArea.value += "Send to Server => "+ argVal +"\n";
      webSocket.send(argVal); // WebSocketでtextMessageのオブジェクトの値をサーバに送信
    }

    // 通信を切断する。
    function disconnect(){
      webSocket.close();
    }
  </script>
</body>
</html>
サーバー側でサーボモーターを制御するserver.pyのソースです。
server.pyはindex.htmlから受信した信号(GO/BACK/LEFT/RIGHT/STOP)に応じモーターを制御します。
import asyncio
import websockets
import RPi.GPIO as GPIO
import time

GPIO.setmode(GPIO.BCM)

wheelPin = {
    "FrontRight": "2",
    "FrontLeft" : "3",
    "RearRight" : "17",
    "RearLeft"  : "4"
  }

wheelPwm = {
    "FrontRight": "",
    "FrontLeft" : "",
    "RearRight" : "",
    "RearLeft"  : ""
}

## 角度をラジアンに変換
def exchDegreeToRadian(argDegree):
    return 2.5 + (12.0 - 2.5) / 180 * (argDegree + 90)

## サーボモータ制御
def wheelControl(argFlg, argTerm):
    global wheelPwm
    act01 = exchDegreeToRadian( -90 )
    act02 = exchDegreeToRadian(  90 )
    act03 = exchDegreeToRadian(   0 )
    if(argFlg == "GO"):
        wheelPwm["FrontRight"].ChangeDutyCycle( act01 )
        wheelPwm["FrontLeft" ].ChangeDutyCycle( act01 )
        wheelPwm["RearRight" ].ChangeDutyCycle( act01 )
        wheelPwm["RearLeft"  ].ChangeDutyCycle( act01 )
    elif(argFlg == "BACK"):
        wheelPwm["FrontRight"].ChangeDutyCycle( act02 )
        wheelPwm["FrontLeft" ].ChangeDutyCycle( act02 )
        wheelPwm["RearRight" ].ChangeDutyCycle( act02 )
        wheelPwm["RearLeft"  ].ChangeDutyCycle( act02 )
    elif(argFlg == "STOP"):
        wheelPwm["FrontRight"].ChangeDutyCycle( act03 )
        wheelPwm["FrontLeft" ].ChangeDutyCycle( act03 )
        wheelPwm["RearRight" ].ChangeDutyCycle( act03 )
        wheelPwm["RearLeft"  ].ChangeDutyCycle( act03 )
    elif(argFlg == "LEFT"):
        wheelPwm["FrontRight"].ChangeDutyCycle( act01 )
        wheelPwm["FrontLeft" ].ChangeDutyCycle( act02 )
        wheelPwm["RearRight" ].ChangeDutyCycle( act01 )
        wheelPwm["RearLeft"  ].ChangeDutyCycle( act02 )
    elif(argFlg == "RIGHT"):
        wheelPwm["FrontRight"].ChangeDutyCycle( act02 )
        wheelPwm["FrontLeft" ].ChangeDutyCycle( act01 )
        wheelPwm["RearRight" ].ChangeDutyCycle( act02 )
        wheelPwm["RearLeft"  ].ChangeDutyCycle( act01 )

    time.sleep(argTerm)

#####################################################
# ここから処理を開始

## サーボモータの初期設定
for wheel in wheelPin:
    print("wheel={0} , pin={1}".format( wheel, wheelPin[wheel] ) )
    PinNo = int(wheelPin[wheel]) # GPIO
    GPIO.setup(PinNo, GPIO.OUT)
    wheelPwm[wheel] = GPIO.PWM(PinNo, 50)
    wheelPwm[wheel].start(0.0)

## ----------------------------------------##

# クライアント接続すると呼び出す
async def accept(websocket, path):
  while True:
    # クライアントからメッセージを待機
    data = await websocket.recv()
    print("receive : " + data)
    # クライアントでechoを付けて再送信
    #await websocket.send("echo : " + data)
    if data == "GO":
      wheelControl("GO", 0.1)
    elif data == "BACK":
      wheelControl("BACK", 0.1)
    elif data == "STOP":
      wheelControl("STOP", 0.1)
    elif data == "LEFT":
      wheelControl("LEFT", 0.1)
    elif data == "RIGHT":
      wheelControl("RIGHT", 0.1)

# WebSocketサーバー生成
start_server = websockets.serve(accept, "raspi203.local", 9998)

# 非同期でサーバを待機する。
asyncio.get_event_loop().run_until_complete(start_server)
asyncio.get_event_loop().run_forever()
以上で全ての準備が完了しました。
実行方法
2つコンソールを起動し、コンソール①ではWebサーバーを起動し、コンソール②ではserver.pyを実行します。
$ cd /home/pi/data/web
$ python3 -m http.server 8000
$ cd /home/pi/data/web
$ python3 server.py
実際の実行画面はこんな感じ
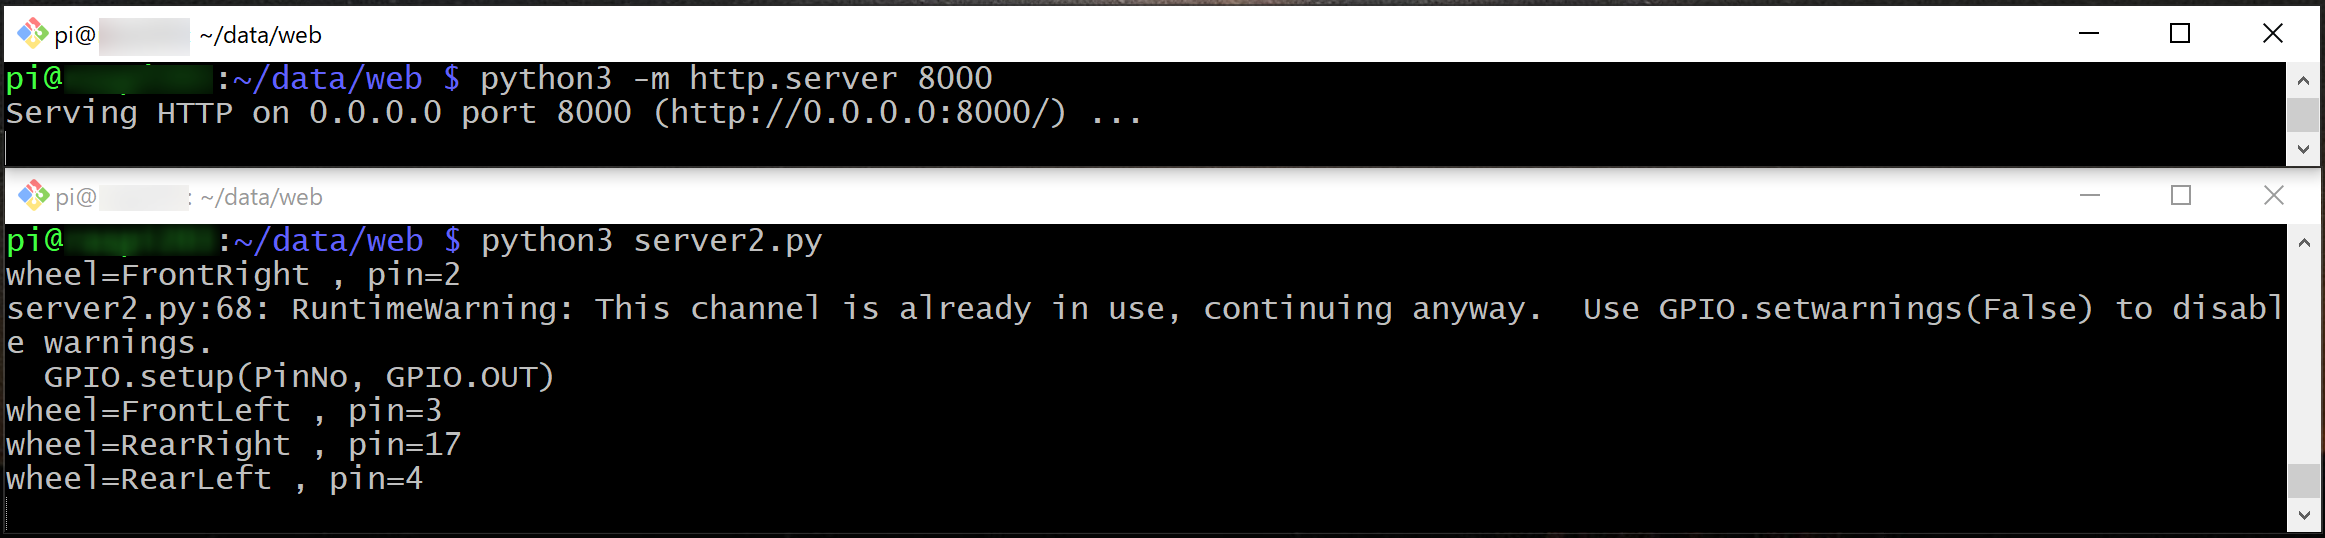
これでサービスが起動状態になりました。スマホなどでhttp://{ラズパイIP}:8000/index.htmlを開くとそのデバイスがコントローラーになります。
おわりに
今回は、とりあえずラズパイをラジコンにするまでを紹介しました。今後は、コントローラのUIをもっとリッチにするとか、ラジコンにカメラを搭載しコントローラ側に表示するとか、機能を盛り込んでいきます。