概要
Ruby on Rails Tutorial をひと通りやってみたけど、後半は難しすぎたのでもう少し簡単なのにチャレンジしようと思って作成しました。
参考にしたサイト
- Rails 5 + ActionCableで作る!シンプルなチャットアプリ(DHH氏のデモ動画より)
- rails5:Railsでチャットアプリが簡単にできちゃいます。メジャーアップデートを体験してみよう
- Ruby on Rails5.0.0.rc1のAction Cableを使ってチャットアプリを作ろう!
開発環境
- AWS Cloud9
$ uname -s -r -v -p -o
Linux 4.14.33-51.37.amzn1.x86_64 #1 SMP Thu May 3 20:07:43 UTC 2018 x86_64 GNU/Linux
$ ruby -v
ruby 2.4.1p111 (2017-03-22 revision 58053) [x86_64-linux]
$ rails -v
Rails 5.2.0
- bitbucket
- heroku
アプリケーションの作成およびバージョン管理設定
mlabchatという名前でアプリケーションを作成します。
mlabchatはアプリ名なので何でも大丈夫です。
備忘録も兼ねてますのでgitコマンドも入れてます。
バージョン管理を実施しない場合はもちろん実行する必要はありません。
$ rails new mlabchat
$ cd mlabchat
$ git init
$ git add .
$ git commit -m "1st COMMIT"
# 要bitbucketの事前登録
$ git remote add origin git@bitbucket.org:xxxxxx/mlabchat.git
$ git push -u origin --all
MVCについて
Ruby on Railsの基本中の基本 MVC + ルーターについて
コントローラの作成とルーティングの設定
showアクションをもつRoomsコントローラを作成し、コントローラーroomsのshowアクションをトップページ(root to:)に設定します。
# rails generate controller NAME [action] [options]
$ rails g controller rooms show
$ vi config/routes.rb
Rails.application.routes.draw do
  root to: 'rooms#show'
end
モデルの作成とデータベースのマイグレート
contentフィールド(内容)とnameフィールド(名前)をもつmessageモデルを作成し、データベースを作成します。
# rails generate model NAME [field[:type][:index] field[:type][:index]] [options]
$ rails g model message content:text name:string
$ cat /mlabchat/db/migrate/yyyymmddhhmmss_create_messages.rb # 参考
class CreateMessages < ActiveRecord::Migration[5.2]
  def change
    create_table :messages do |t|
      t.text :content
      t.string :name

      t.timestamps
    end
  end
end
$ rails db:migrate
ビューの作成
roomsコントローラーのshowアクションを編集して、Messageの配列をインスタンス変数に設定します。
大文字小文字単数系複数形に注意です。
$ vi app/controllers/rooms_controller.rb
class RoomsController < ApplicationController
  def show
    @messages = Message.all
  end
end
次にビューを作成します。
$ vi app/views/rooms/show.html.erb
<h1>mLab chat</h1>
<div id="messages">
  <%= render @messages %>
</div>
$ mkdir app/views/messages/
$ vi app/views/messages/_message.html.erb
<div class="message">
  <p>
    <%= "#{message.name} : #{message.content}(#{message.created_at.strftime('%Y/%m/%d %H:%M:%S')})" %>
  </p>
</div>
テスト用データの作成と動作確認
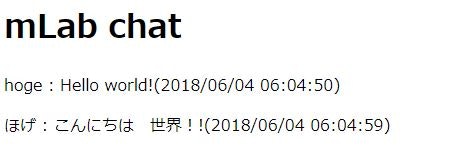
テストデータを入力して、アプリを起動します。
$ rails console
> Message.create! content: 'Hello world!', name: 'hoge'
> Message.create! content: 'こんにちは 世界!!', name: 'ほげ'
> quit
$ rails server
確認ができたら Ctrl+C を押下して、アプリを終了します。
チャンネルの作成
speakというアクションを持つ、Roomチャンネルを作成し、speakアクションの設定をします。
$ rails g channel room speak
$ vi app/assets/javascripts/channels/room.coffee
App.room = App.cable.subscriptions.create "RoomChannel",
  connected: ->

  disconnected: ->

  received: (data) ->

  speak: (name, content) ->
    @perform 'speak', {name: name, content: content}
$ vi app/channels/room_channel.rb
class RoomChannel < ApplicationCable::Channel
  def subscribed
    stream_from "room_channel"
  end

  def unsubscribed
  end

  def speak(message)
    Message.create!(name: message['name'], content: message['content'])
  end
end
JQueryの設定
rails5系でJQueryを使う際は自分でインストールする必要があるようでので追加します。
$ vi Gemfile
以下を追記
gem 'jquery-rails'
$ bundle install
$ vi app/assets/javascripts/application.js
以下を編集および追記
(略)
//= require jquery # 追記
//= require rails-ujs
//= require activestorage
//= require turbolinks
//= require_tree .
フォームの作成
フォームは前回作成したビューの中に追加します。
$ vi app/views/rooms/show.html.erb
<h1>mLab chat</h1>

<form>
  <label>名前</label>
  <input type="text" class="js-name" value="名無子">
  <br>
  <label>内容</label>
  <input type="text" class="js-content" data-behavior="room_speaker">
</form>

<div id="messages">
  <%= render @messages %>
</div>
「内容」の中でEnterキーが押されたときの処理とデータを受け取った時の処理を追加します。
$ vi app/assets/javascripts/channels/room.coffee
App.room = App.cable.subscriptions.create "RoomChannel",
  connected: ->

  disconnected: ->

  received: (data) ->
    $('#messages').prepend data['message']

  speak: (name, content) ->
    @perform 'speak', {name: name, content: content}

$(document).on 'keypress', '[data-behavior~=room_speaker]', (event) ->
  if event.keyCode is 13 # return = send
    App.room.speak($('.js-name').val(), $('.js-content').val())
    event.target.value = ''
    event.preventDefault()
コントローラーの内容(ソート順と表示数10件)を修正します。
$ vi app/controllers/rooms_controller.rb
class RoomsController < ApplicationController
  def show
    @messages = Message.all.order(created_at: :desc).limit(10)
  end
end
Messageモデルのコールバックを定義し、データが作成されたら非同期でブロードキャスト処理を実行するようにします
$ vi app/models/message.rb
class Message < ApplicationRecord
  after_create_commit { MessageBroadcastJob.perform_later self }
end
ジョブの作成
非同期でブロードキャストするためのジョブを作成します。
$ rails g job MessageBroadcast
$ vi app/jobs/message_broadcast_job.rb
class MessageBroadcastJob < ApplicationJob
  queue_as :default

  def perform(message)
    ActionCable.server.broadcast 'room_channel', message: render_message(message)
  end

  private
    def render_message(message)
      ApplicationController.renderer.render(partial: 'messages/message', locals: { message: message })
    end
end
動作確認とリポジトリへの登録
アプリを起動します。
$ rails server
ブラウザを二つ起動して、一人チャットを楽しんでください。
問題なければリポジトリに登録します。
$ git add .
$ git commit -a -m "ver.1.0"
$ git push -u origin --all
herokuサーバへデプロイ(追記)
Gemfileを事前準備としてGemfileを編集します。
DBをマイグレーションついでにリセットしました(リセットはあまり関係ない?)。
$ vi Gemfile

削除
# Easy installation and use of chromedriver to run system tests with Chrome
gem 'chromedriver-helper'

追記(上記で削除した2行をgroup :development, :test do内に追加)
group :development, :test do
  # Call 'byebug' anywhere in the code to stop execution and get a debugger console
  gem 'byebug', platforms: [:mri, :mingw, :x64_mingw]
  # Use sqlite3 as the database for Active Record
  gem 'sqlite3'
end

追記(まるごと追加)
group :production do
  gem 'pg'
end

$ bundle install --without production
$ rails db:migrate:reset
herokuも事前登録が必要ですが、ここでは触れません。
$ git add .
$ git commit -a -m "heroku"
$ git push -u origin --all
$ heroku login
$ heroku create mlabchat # ここはアプリ名
$ git push heroku master
$ heroku run rails db:migrate
ブラウザで動作確認したら、リロードしないと更新されない。
この記事に答えが書いてありました。
$ vi config/environment/production.rb
  # config.action_cable.allowed_request_origins = [ 'http://example.com', /http:\/\/example.*/ ]
 ↓
  config.action_cable.allowed_request_origins = [ /http:\/\/.*/ ]
$ vi config/cable.yml
(略)
production:
  # adapter: redis
  # url: redis://localhost:6379/1
  # channel_prefix: ac_test_production
  adapter: async
これでもう一度デプロイしたらうまくいきました!!
以上です。

