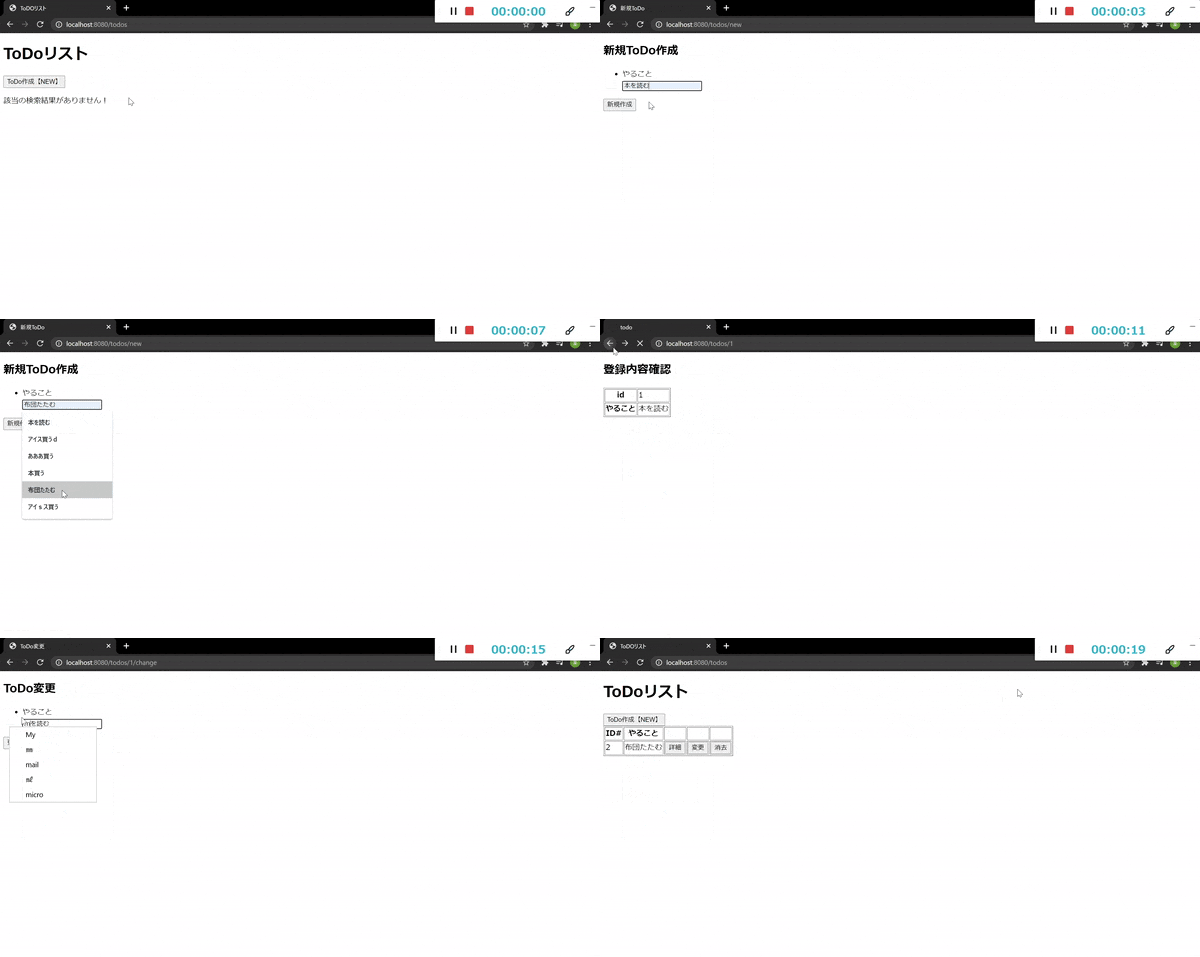
MyBatisを使ったToDoリストを作成します。
目標物はこれ↓

- やることを登録(blankは登録できない)
- やることを見る
- やることを変更
- やることを消去
以上ができる単純なアプリです。
作成した経緯
SpringBootのCRUDができる書籍はありますが、MyBatisを使ったものは少ないです。(ほぼJPAかJDBC)
また、BootstrapやJSが混ざったもの、HTMLが複雑なものも多く、私が理解しづらかったため、わかりやすくシンプルなものにしてみました。
対象者
- Controller、Service、Repositoryが何をしている何となくわかる人。
- CRUDが何かわかる人。
- JPAやJDBCがなんとなくわかる人。
- MyBatisを初めて使う人。
使っている環境
■OS : Windows10
■IDE : Eclipse
■Maven
■SpringBoot
■DB : MySQL8.0.22
MyBatisとは
簡単に言えばDBに接続してSQL文を実行してくれるものです。(O/Rマッパー)
JDBCより簡単で、JSPより細かいSQL文が実行できます。
今まではおそらくRepositoryクラスで作成されていたものが、今回はMapperクラスとなります。
XMLに書くこともできるのですが、今回は分かりやすいのでアノテーションに書いていきます。
(こっちの方が新しい書き方のようです)
1-1.pom.xml
今回DBはMySQL、O/RマッパーにMyBatis、バリデーション機能を使うので3つをapplicationに追加します。
		<dependency>
			<groupId>mysql</groupId>
			<artifactId>mysql-connector-java</artifactId>
			<scope>runtime</scope>
		</dependency>
		<dependency>
			<groupId>org.mybatis.spring.boot</groupId>
			<artifactId>mybatis-spring-boot-starter</artifactId>
			<version>2.1.4</version>
		</dependency>
         <dependency>
			<groupId>org.springframework.boot</groupId>
			<artifactId>spring-boot-starter-validation</artifactId>
		</dependency>
1-2.application.properties
MySQLへの接続をします。
# MySQLのDBのURL
spring.datasource.url=jdbc:mysql://localhost:3306/xxxxxxx?serverTimezone=JST

# name、password指定。
spring.datasource.username=root
spring.datasource.password=xxxxxxxx

# SpringBootを起動したときに実行したいSQL文を記述したパス
# schemaにはテーブルを作るSQLを入れておく
spring.datasource.schema=classpath:schema.sql

# これがないとputやdeleteでエラーになる
spring.mvc.hiddenmethod.filter.enabled=true
ご自身のMySQLの環境に合わせてください。
spring.mvc.hiddenmethod.filter.enabled=true がないとエラーになります。
ここで私はハマりましたww

htmlのhttpメソッドでdeleteとputを使っているので必要になります。
getとpostで書けば不要となります。
その場合はControllerのアノテーションも@GetMappingに揃えてください。
↓こちらを参考にさせていただきました。
https://qiita.com/kazuhiro1982/items/b8b9965fddf9c5507517
1-3.MySQLでテーブルを作る
CREATE TABLE IF NOT EXISTS todo (
  id bigint(20) NOT NULL AUTO_INCREMENT,
  task varchar(255) DEFAULT NULL,
  PRIMARY KEY (id)
);
特に難しいSQLではないですが
NOT EXISTSはもうテーブルが存在するなら、再度作らない。
AUTO_INCREMENTは連続した番号を付ける。
2-1.top.html(最初の画面)
<!DOCTYPE html>
<html xmlns:th="http://www.thymeleaf.org"
	xmlns:layout="http://www.ultraq.net.nz/thymeleaf/layout"
	layout:decorator="layout">
<meta charset="UTF-8">
<title>ToDOリスト</title>

</head>
<body>
	<h1>ToDoリスト</h1>
	<a th:href="@{/todos/new}">
		<button>ToDo作成【NEW】</button>
	</a>
	<div th:if="!${todo.size()}">
		<p>該当の検索結果がありません!</p>
	</div>
	<table th:if="${todo.size()}" border="1">
		<thead>
			<tr>
				<th>ID#</th>
				<th>やること</th>
				<th></th>
				<th></th>
				<th></th>
			</tr>
		</thead>
		<tbody>
			<tr th:each="todo:${todo}" th:object="${todo}">
				<!-- each;DBの情報をすべて出すまで繰り返す -->
				<td th:text="*{id}"></td>
				<td th:text="*{task}"></td>
				<td><a th:href="@{/todos/{id}(id=*{id})}">
						<button>詳細</button>
				</a></td>
				<td><a th:href="@{/todos/{id}/change(id=*{id})}"><button>変更</button></a></td>
				<td>
					<form th:action="@{/todos/{id}/delete(id=*{id})}"
						th:method="delete">
						<button>消去</button>
					</form>
				</td>
			</tr>
		</tbody>

	</table>
</body>
</html>
th:if="${todo.size()
todoが何も登録していないときは「該当の検索結果がありません!」と表示
th:each="todo:${todo}" th:object="${todo}
todoが全部終わるまで、todoの中身を表示
th:text="{id}" th:text="{task}"
todoの中身のidとtaskを表示
th:method="delete"
Controllerの@DeleteMappingに対応します。
get、post以外にも出てくるんです。
2-2.new.html(登録画面)
<!DOCTYPE html>
<html xmlns:th="http://www.thymeleaf.org"
	xmlns:layout="http://www.ultraq.net.nz/thymeleaf/layout"
	layout:decorator="layout">
<meta charset="UTF-8">
<title>新規ToDo</title>
</head>
<body>

	<h2>新規ToDo作成</h2>

	<form method="post" th:action="@{/todos/new}" th:object="${todo}">
		<ul>
			<li><label>やること</label> <br> <input type="text" id="task"
				name="task" th:field="*{task}" />

			</li>

		</ul>

		<button >新規作成</button>
	</form>
</body>
</html>
th:action="@{/todos/new}" th:object="${todo}" th:field="*{task}"
objectのtodoの中に、taskを詰めて、controllerのtodos/newに渡します。
2-3.show.html(確認画面)
<!DOCTYPE html>
<html xmlns:th="http://www.thymeleaf.org"
	xmlns:layout="http://www.ultraq.net.nz/thymeleaf/layout"
	layout:decorator="layout">
<meta charset="UTF-8">
<title>todo</title>

</head>
<body>
	<h2>登録内容確認</h2>
	<div th:object="${todo}">
		<table border="1">

			<tr>
				<th>id</th>
				<td><div th:text="*{id}"></div></td>
			</tr>
			<tr>
				<th>やること</th>
				<td><div ><div th:text="*{task}"></div></div></td>
			</tr>

		</table>
	</div>

</body>
</html>
todoの中身のidとtaskを表示します。
2-4.change.html(変更画面)
<!DOCTYPE html>
<html xmlns:th="http://www.thymeleaf.org"
	xmlns:layout="http://www.ultraq.net.nz/thymeleaf/layout"
	layout:decorator="layout">
<meta charset="UTF-8">
<title>ToDo変更</title>

</head>
<body>

	<h2>ToDo変更</h2>

	<form th:action="@{/todos/put/{id}(id=*{id})}" th:method="put"
		th:object="${todo}">
		<!-- 入力したやつをtodoの中にいれて使える -->

		<ul>
			<li><label>やること</label> <br> <input type="text" id="todo"
				name="todo" th:field="*{task}" /> <!-- fieldはramen.shopとかにしてHTMLで使える -->
		</ul>
		<button>更新</button>

	</form>
</body>
</html>
todoの中身を入れ替えます。ほぼnew.htmlと同様です。
th:action="@{/todos/put/{id}(id=*{id})}" th:method="put" th:object="${todo}"
taskを詰め直したtodoをcontrollerの/todos/put/{id}(id={id})に渡します。
URLが該当のidになるようにしているので、{id}(id={id}となっています。
deleteと同じく、Controllerの@@PutMappingに対応します。
残りは次の記事へ
https://qiita.com/sumichan/items/a53e223c2a727cae26a4