概要
C#でSNMPメッセージのデコーディングの実装のためのSNMP受信メッセージの見える化を行うまでの一連の記事でSNMPメッセージのエンコード処理とUDP送信処理、SNMPメッセージの受信処理までの実装を行いました。
今回は受信したSNMPメッセージをのデコードを行います。受信したSNMPメッセージもASN.1のBERでエンコードされていますので、BERのルールに従って受信したバイト配列のデータをデコードしていきます。
なお、ここでは「1.3.6.1.2.1.1.5」(sysName)を取得するGetNextメッセージのレスポンスのデコードをするのに必要最低限のデコードメソッドのみを作成しています。
AsnValueにParseメソッド追加
前回までに作成しているAsnValueクラスに静的メソッドとしてParseメソッドを追加します。
引数は解析対象のデータ
    public abstract class AsnValue
    {
        public abstract List<byte> GetBytes();
        public abstract byte GetTag();

        public static List<byte> GetFieldLengthByte(int length)
        {
            if (length < 128)
            {
                return new byte[] { (byte)length }.ToList();
            }
            else
            {
                List<byte> result = new List<byte>();
                for (; ; )
                {
                    int amari = length % 256;
                    int sho = length / 256;
                    result.Insert(0, (byte)amari);
                    if (sho == 0)
                    {
                        break;
                    }
                    length = sho;

                }
                result.Insert(0, (byte)(result.Count + 0b10000000));
                return result;
            }

        }

        public static int GetLength(byte[] data, int startIndex, out int lengthlength)
        {
            byte first = data[startIndex];
            if (first < 128)
            {
                lengthlength = 1;
                return (int)first;
            }else
            {
                lengthlength = first - 0b10000000;
                int length = 0;
                for (int i = 0; i < lengthlength; i++)
                {
                    length += length * 256;
                    length += data[startIndex + 1 + i];
                }
                return length;
            }
        }


        public static AsnValue Parse(byte[] data, ref int index)
        {
            if (index >= data.Length)
            {
                return null;
            }

            byte tag = data[index];

            int lengthlength;
            int dataLength = GetLength(data, index + 1, out lengthlength);

            byte[] valueByteData = data.Skip(index + 1 + lengthlength).Take(dataLength).ToArray();
            index = index + 1 + lengthlength + dataLength;

            switch (tag)
            {
                case IntegerValue.TAGTYPE:
                    return IntegerValue.Parse(valueByteData);
                case NullValue.TAGTYPE:
                    return NullValue.Parse(valueByteData);
                case OctestStringValue.TAGTYPE:
                    return OctestStringValue.Parse(valueByteData);
                case ObjectIdentifierValue.TAGTYPE:
                    return ObjectIdentifierValue.Parse(valueByteData);
                case SequenceValue.TAGTYPE:
                    return SequenceValue.Parse(valueByteData, tag);
                case SnmpDataValue.TAGTYPE_GETRESPONSE:
                case SnmpDataValue.TAGTYPE_GETREQUEST:
                case SnmpDataValue.TAGTYPE_GETNEXTREQUEST:
                    return SnmpDataValue.Parse(valueByteData, tag);
                default:
                    throw new AsnParseException(tag);
            }

        }
1バイト目のTAG値を取得してTAG値に応じて、型に応じた値クラスのParse処理を起動しています。
各値クラスのParse処理にはデータ部分のバイトのみを引数として渡しています。
なるべく分岐処理とループ処理を書かないように心がけていますが、TAG値に応じた分岐処理だけは残りました。
GetLengthは、TLVのL(Length)の部分、データのバイト数の取得をしています。またLengthを表すデータは1バイトを超える場合もありますので、Lengthデータ自体の長さを呼び出し元に返しています。
これにより、データ部分が何バイト目から開始されるかが分かります。
整数型のデコード
これまでに実装済のIntegerValueクラスにParseメソッドを追加しました。
バイトオーダーが受信メッセージはBigEndianになっているためLittleEndianに反転後に、BigIntegerで一気に整数に変換しています。
public class IntegerValue : AsnValue
    {
        public const byte TAGTYPE = 0x02;

        public BigInteger Value { get; set; }

        public IntegerValue(BigInteger value)
        {
            this.Value = value;
        }
        public override List<byte> GetBytes()
        {
            List<Byte> result = new List<byte>();
            byte[] data = Value.ToByteArray();
            result.Add(GetTag());
            result.AddRange(GetFieldLengthByte(data.Length));
            result.AddRange(data.Reverse().ToList());

            return result;
        }

        public override byte GetTag()
        {
            return TAGTYPE;
        }

        public static AsnValue Parse(byte[] valueByteData)
        {

            // バイトオーダーをBigEndienからLittle Endienに変換してからBigIntegerを生成
            BigInteger value = new BigInteger(valueByteData.Reverse().ToArray());

            return new IntegerValue(value);

        }
OCTET STRINGのデコード
エンコードど逆にASCIIエンコーディングでデコードしています。
なお、OCTET STRINGは必ずしもASCIIエンコードでデコードできるとは限りませんが、今回はsysNameの取得のみ実施していますので、ASCIIエンコードを実施しています。sysName以外ではバイナリデータとしてデコードする必要がある場合もあります。
    public class OctestStringValue : AsnValue
    {
        public const byte TAGTYPE = 0x04;

        public String OctestString {get; set;}

        public OctestStringValue(String value)
        {
            this.OctestString = value;
        }
        public override List<byte> GetBytes()
        {
            List<byte> result = new List<byte>();
            result.Add(GetTag());

            byte[] data = Encoding.ASCII.GetBytes(OctestString);

            result.AddRange(GetFieldLengthByte(data.Length));
            result.AddRange(data.ToList());

            return result;
        }

        public override byte GetTag()
        {
            return TAGTYPE;
        }

        public static AsnValue Parse(byte[] valueByteData)
        {
            string value = Encoding.ASCII.GetString(valueByteData);

            AsnValue result = new OctestStringValue(value);

            return result;

        }
    }
Object Identifierのデコード
Object Identifierのデコードが一番難しいのですが、前回までの記事でObject Identifierのエンコードの説明をしているので、その逆を実施するだけです。まずは各バイトの8ビット目の値が1の場合は8ビット目が0になるバイトまでで1つの整数を表しています。
各バイトの8ビット目を0とする7ビットで128進数の各位の数字を表しています。
また、1バイト目は特別なルールがあり、Object Identifierの1つ目 x 40 + 2つ目の値となっているため分解しています。
    public class ObjectIdentifierValue : AsnValue
    {
        public const byte TAGTYPE = 0x06;

        public String Oid {get; set; }

        public override byte GetTag()
        {
            return TAGTYPE;
        }

        public ObjectIdentifierValue(String Oid)
        {
            this.Oid = Oid;
        }

        public override List<byte> GetBytes()
        {
            // OIDをピリオドで区切って数値配列に分けて格納する。
            int[] values = Oid.Split('.').Select(int.Parse).ToArray();

            List<byte> result = new List<byte>();

            // 1個目、2個目
            result.AddRange(ConvByte(ParseXY(values[0], values[1])));
            for (int i = 2; i < values.Length; i++)
            {
                result.AddRange(ConvByte(values[i]));
            }
            result.InsertRange(0, GetFieldLengthByte(result.Count));

            result.Insert(0, GetTag());

            return result;
        }


        public static List<byte> ConvByte(int param)
        {
            List<byte> result = new List<byte>();
            int value = param;
            int i = 0;

            for (; ; )
            {
                int amari = value % 128;
                int sho = value / 128;
                result.Insert(0, (byte)(amari + (i == 0 ? 0 : 0x80)));
                if (sho == 0)
                {
                    break;
                }
                value = sho;
                i++;

            }
            return result;
        }
        private static List<int> ParseByte(byte[] data)
        {
            List<int> result = new List<int>();
            List<int> tmpList = new List<int>();

            foreach (byte b in data)
            {
                if (b >= 128)
                {
                    tmpList.Add(b - 0x80);
                } else
                {
                    tmpList.Add(b);
                    tmpList.Reverse();
                    int tmpValue = 0;
                    for (int i = 0; i < tmpList.Count; i++)
                    {
                        tmpValue += tmpList[i] * (int)Math.Pow(128, i);
                    }
                    result.Add(tmpValue);
                    tmpList = new List<int>();
                }
            }

            return result;
        }

        private int ParseXY(int first, int second)
        {
            return (first * 40 + second);
        }

        public static AsnValue Parse(byte[] valueByteData)
        {
            List<int> oidList = ParseByte(valueByteData);
            int sho = oidList[0] / 40;
            int amari = oidList[0] % 40;
            oidList.RemoveAt(0);
            oidList.Insert(0, amari);
            oidList.Insert(0, sho);

            String value = String.Join(".", oidList);

            return new ObjectIdentifierValue(value);

        }
NULL型のデコード
public class NullValue : AsnValue
    {
        public const byte TAGTYPE = 0x05;

        public NullValue() { }

        public override byte GetTag()
        {
            return TAGTYPE;
        }

        public override List<byte> GetBytes()
        {
            return new byte[] { GetTag(), 0x00 }.ToList();
        }

        public static AsnValue Parse(byte[] valueData)
        {
            return new NullValue();
        }

    }
SEQUENCE型のデコード
子要素をループでデコードしてじリストに格納していきます。
    public class SequenceValue : AsnValue
    {
        public const byte TAGTYPE = 0x30;

        private byte tag;

        public List<AsnValue> AsnValues { get; set; }

        public SequenceValue()
        {
            AsnValues = new List<AsnValue>();
            this.tag = TAGTYPE;
        }
        public SequenceValue(byte tag)
        {
            AsnValues = new List<AsnValue>();
            this.tag = tag;

        }

        public override List<byte> GetBytes()
        {
            List<byte> result = new List<byte>();

            foreach (AsnValue value in AsnValues)
            {
                result.AddRange(value.GetBytes());
            }
            result.InsertRange(0, GetFieldLengthByte(result.Count()));
            result.Insert(0, GetTag());

            return result;

        }

        public override byte GetTag()
        {
            return tag;
        }

        public void SetTag(byte tag)
        {
            this.tag = tag;
        }

        public static AsnValue Parse(byte[] valueByteData, byte tag)
        {
            SequenceValue result = new SequenceValue(tag);

            int index = 0;
            for(; ; )
            {
                AsnValue value = AsnValue.Parse(valueByteData, ref index);
                if (value == null)
                {
                    break;
                }
                result.AsnValues.Add(value);
            }
            return result;
        }

    }
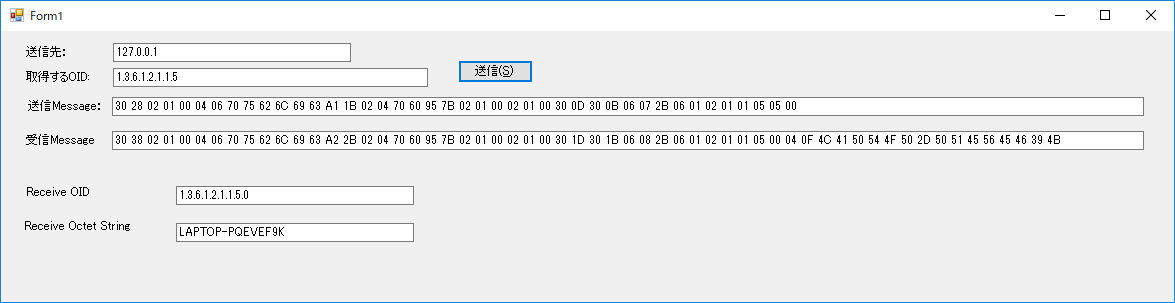
使用例
下記のような画面を作成して受信メッセージのデコードをしていきます。
送信メッセージの作成は前回までで実施済ですので、そちらの解説を参考にしてください。

        private void ReceiveCallback(IAsyncResult ar)
        {
            UdpClient udp = (UdpClient)ar.AsyncState;

            IPEndPoint remoteHost = null;
            byte[] receiveData;
            try
            {
                receiveData = udp.EndReceive(ar, ref remoteHost);
            }
            catch (SocketException ex)
            {
                ShowReceiveMessage(ex.Message);
                return;
            }
            catch (ObjectDisposedException ex)
            {
                ShowReceiveMessage(ex.Message);
                return;
            }

            ShowReceiveMessage(BitConverter.ToString(receiveData).Replace("-", " "));

            int index = 0;
            AsnValue value = AsnValue.Parse(receiveData, ref index);

            ShowReceiveValue(value);

            // 非同期受信開始
            udp.BeginReceive(ReceiveCallback, udp);
        }
受信メッセージの処理部分を変更しています。
受信したメッセージをAsnValue.Parse処理を起動してでコートしています。
デコード済のメッセージをShowReceiveValueで画面のテキストボックスに表示します。
SNMPのメッセージの階層構造に従って、子要素をたどっていってます。SNMPの階層構造はWiresharkなどでのパケットキャプチャを見ると分かりやすいです。
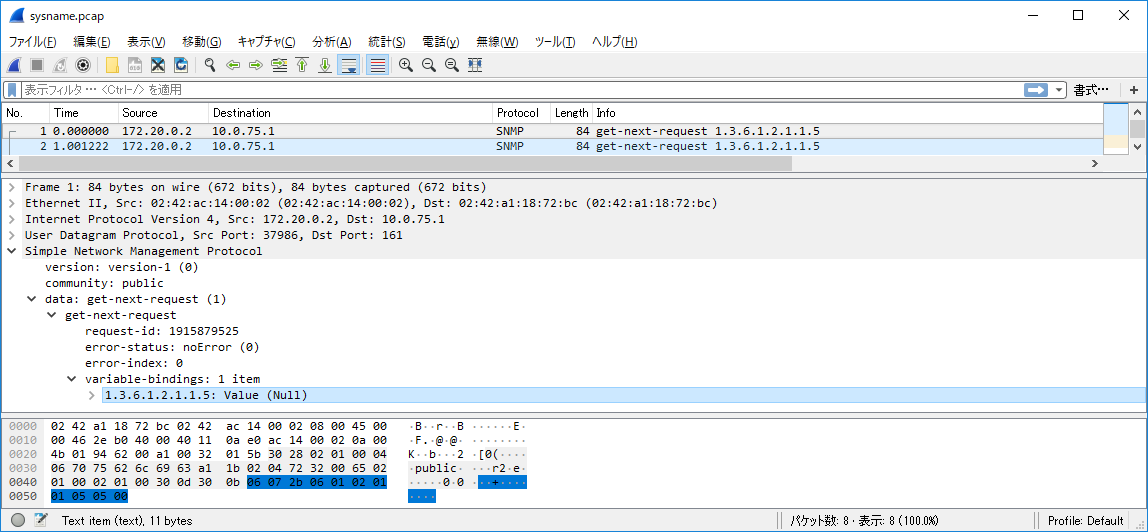
下記のような階層構造になっています。()内の数字は子要素内のインデックス番号です。
ルート
 ├バージョン
 ├コミュニティ名
 └GetNextRequest(2)
   ├リクエストID
   ├エラーステータス
   ├エラーインデックス
   └Bindings(3)
     └Binding(0)
       ├OID
       └取得値
        delegate void ShowReceiveValueDelegate(AsnValue value);

        void ShowReceiveValue(AsnValue value)
        {
            if (InvokeRequired)
            {
                // 別スレッドから呼び出された場合
                Invoke(new ShowReceiveValueDelegate(ShowReceiveValue), value);
                return;
            }


            if (!(value is SequenceValue)) {
                return;
            }
            SequenceValue snmpMessage = (SequenceValue)value;
            SequenceValue c1 = (SequenceValue)snmpMessage.AsnValues[2];

            SequenceValue c2 = (SequenceValue)c1.AsnValues[3];
            SequenceValue c3 = (SequenceValue)c2.AsnValues[0];

            ObjectIdentifierValue oidValue = (ObjectIdentifierValue)c3.AsnValues[0];
            OctestStringValue octetStringValue = (OctestStringValue)c3.AsnValues[1];

            textBox1.Text = oidValue.Oid;
            textBox2.Text = octetStringValue.OctestString;


        }
実行結果は下記の画面となります。
Windows10 のSNMPのエージェント機能を有効にしています。
その方法は前回までの記事に記載していますので参照お願いします。
最後に
デコードしたAsnValueの階層構造がどのようになっているかは、Visual Studioのデバッグモードでデコードされた変数をウォッチして確認が可能ですので、ここまでの解説で実際に実装して試すことが出来た方は是非デバッグモードでデコード結果を確認することをおすすめします。自分の目で確かめることにより、さらに他の型のデコード処理を自分で追加することもできるようになるかと思います。
例外クラス
public class AsnParseException : Exception
    {
        public AsnParseException(int expectedTagType)
        {
            this.ExpectedTagType = expectedTagType;
        }
        public int ExpectedTagType { get; set; }
    }