- 2019/12/03 Spring Security 5.2リリースに伴い、記事を大幅に修正しました
- 2020/09/04
RefreshTokenOAuth2AuthorizedClientProviderではなくDefaultRefreshTokenTokenResponseClientを使う方法に全面的に書き換えました。併せて、Spring Security 5.3にアップデートしました
前提
認可サーバーはKeycloak、クライアントやリソースサーバーをSpring Security 5.3で作成しています。
関連記事
OAuth 2.0でアクセストークンをリフレッシュする方法
OAuth 2.0の仕様では、下記のように書かれています。
POST /token HTTP/1.1
Host: server.example.com
Authorization: client_idとclient_secretによるBasic認証
Content-Type: application/x-www-form-urlencoded

grant_type=refresh_token&refresh_token=リフレッシュトークン
つまり、
- トークンエンドポイントにPOSTでリクエストを送信
- パラメーターは
grant_type=refresh_tokenとrefresh_token=リフレッシュトークン -
client_idとclient_secretによるBasic認証が必要
正確に言うと、Authorizationヘッダーついては詳細には仕様で触れられていないようです。しかし、多くの認可サーバーではクライアントのBasic認証は必須です。
DefaultRefreshTokenTokenResponseClient でアクセストークンをリフレッシュ
Spring Security 5.1以前でリフレッシュするためには、 RestTemplate などを使ってトークンエンドポイントにアクセスするコードを自分で書く必要がありました。
5.2で導入された DefaultRefreshTokenTokenResponseClient クラスの getTokenResponse() メソッドを使うと、簡単にリフレッシュ処理を記述できます。
DefaultRefreshTokenTokenResponseClient クラスを使うには、普通に new でインスタンスを生成します。
DefaultRefreshTokenTokenResponseClient tokenResponseClient =
    new DefaultRefreshTokenTokenResponseClient();
このクラスはフィールドとして RestTemplate を持っています。リフレッシュ処理時には、この RestTemplate が認可サーバーのトークンエンドポイントにアクセスします。
トークンエンドポイントのURLは、Spring Bootの場合はapllication.yamlに指定されたものが使われます(
spring.security.oauth2.client.provider.プロバイダー名.token-uriプロパティ、またはIssuer URIから返ってくる値に含まれるURL)
この RestTemplate にはタイムアウトなどが設定されていませんので、タイムアウトが設定された RestTemplate を別途作成して、 setRestOperations() で代入したほうが良いでしょう。併せて、必要な HttpMessageConverter 実装なども設定します。
RestTemplate restTemplate = restTemplateBuilder
    // 接続確立までのタイムアウト設定
    .setConnectTimeout(Duration.ofMillis(300))
    // レスポンスが返ってくるまでのタイムアウト設定
    .setReadTimeout(Duration.ofMillis(300))
    // 必要なエラーハンドラーの設定
    .errorHandler(new OAuth2ErrorResponseErrorHandler())
    // 必要なHttpMessageConverterの設定
    .messageConverters(
        new OAuth2AccessTokenResponseHttpMessageConverter(),
        new OAuth2ErrorHttpMessageConverter(),
        new FormHttpMessageConverter())
    .build();
tokenResponseClient.setRestOperations(restTemplate);
- 以前この記事で紹介していた
RefreshTokenOAuth2AuthorizedClientProviderには、RestTemplateにタイムアウトを設定する手段がありません。なので、このクラスは使わない方がよいと思い、記事を修正しました。- 今回設定しているタイムアウト時間(300ms)は、サンプルとしてのいい加減な時間です。実務では、プロジェクトの状況に応じて適切な時間を設定してください。
getTokenResponse() メソッドは、引数として OAuth2RefreshTokenGrantRequest を必要とします(これもSpring Security 5.2で新規に追加されたクラスです)。
OAuth2AuthorizedClient currentAuthorizedClient = getAuthorizedClient();
ClientRegistration clientRegistration = currentAuthorizedClient.getClientRegistration();
OAuth2RefreshTokenGrantRequest tokenRequest =
    new OAuth2RefreshTokenGrantRequest(clientRegistration,
        currentAuthorizedClient.getAccessToken(),
        currentAuthorizedClient.getRefreshToken());
getTokenResponse() メソッドを実行すると、新しいアクセストークンを保持する OAuth2AccessTokenResponse が返ってきます。
OAuth2AccessTokenResponse tokenResponse =
    tokenResponseClient.getTokenResponse(tokenRequest);
リフレッシュ後のアクセストークンをSpring Securityに認識させる
アクセストークンを表す OAuth2AccessToken は、 OAuth2AuthorizedClient が保持しています(OAuth2AuthorizedClient#getAccessToken() メソッドで取得可能)。
そして OAuth2AuthorizedClient は、 OAuth2AuthorizedClientService が管理しています。
OAuth2AuthorizedClientServiceはインタフェースで、デフォルトの実装はインメモリで保持するInMemoryOAuth2AuthorizedClientServiceです。Spring Boot環境では、Auto ConfigurationによりBean定義済みになっています。
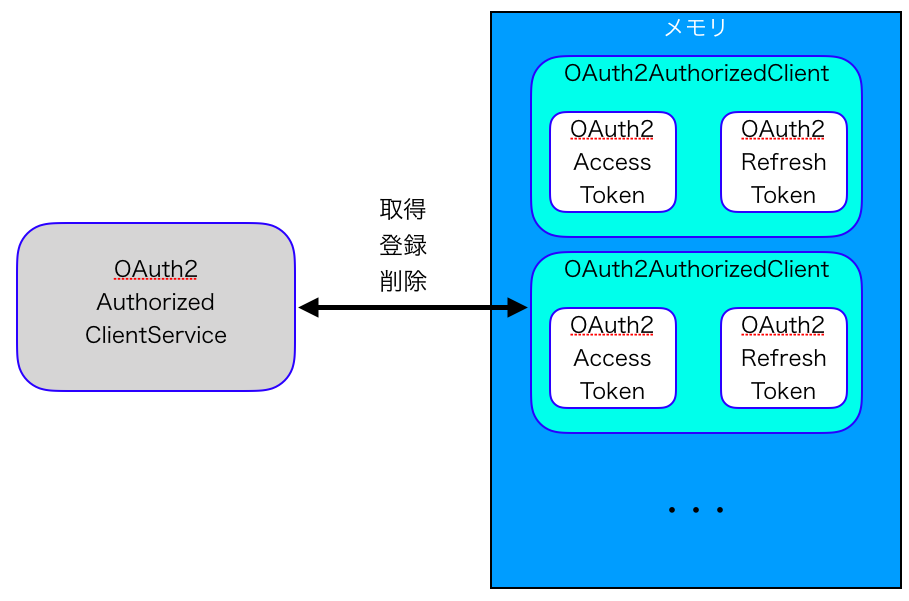
OAuth2AuthorizedClientService には3つメソッドがあり、それぞれ OAuth2AuthorizedClient を取得・登録・削除を行います。
| 操作 | メソッド |
|---|---|
| 取得 | <T extends OAuth2AuthorizedClient> T loadAuthorizedClient(String clientRegistrationId, String principalName) |
| 登録 | void saveAuthorizedClient(OAuth2AuthorizedClient authorizedClient, Authentication principal) |
| 削除 | void removeAuthorizedClient(String clientRegistrationId, String principalName) |
ということで、リフレッシュ後のアクセストークンをSpring Securityに認識させるには
- 既存の
OAuth2AuthorizedClientを削除する - リフレッシュ後の
OAuth2AuthorizedClientを登録する
という手順になります。
1. 既存の OAuth2AuthorizedClient を削除する
OAuth2AuthorizedClient currentAuthorizedClient = ...;
authorizedClientService.removeAuthorizedClient(
    currentAuthorizedClient.getClientRegistration().getRegistrationId(),
    currentAuthorizedClient.getPrincipalName());
2. リフレッシュ後の OAuth2AuthorizedClient を登録する
OAuth2AuthenticationToken authentication = getAuthentication();
OAuth2AuthorizedClient newAuthorizedClient = new OAuth2AuthorizedClient(
    clientRegistration, authentication.getName(),
    tokenResponse.getAccessToken(), tokenResponse.getRefreshToken());
authorizedClientService.saveAuthorizedClient(newAuthorizedClient, authentication);
コードの全体像
こちらになります。
ちなみに
Spring WebFluxの WebClient を使うと、トークンのリフレッシュなどは自動でやってくれます。
こちらを参照→ https://speakerdeck.com/masatoshitada/oauth2-with-spring-security?slide=45
リファレンス -> https://docs.spring.io/spring-security/site/docs/current/reference/htmlsingle/#servlet-webclient