環境
Windows PowerShell 2.0 (Windows 7)
Microsoft Excel 2010
コード
test.ps1
# 実行中のパス取得/移動
$path = Split-Path -Parent $MyInvocation.MyCommand.Path
Set-Location $path

# エクセルファイル作成
$excel = New-Object -ComObject Excel.Application
$excel.Visible = $False

# ワークブック作成
$book = $excel.Workbooks.Add()
$sheet = $excel.Worksheets.Item(1)

# 書きこみ
$sheet.Cells.Item( 3, 2) = "あいうえお"
$sheet.Cells.Item( 3, 3) = "かきくけこ"
$sheet.Cells.Item( 3, 4) = "さしすせそたちつてと"

# セルの背景色変更
$sheet.Cells.Item( 3, 2).Interior.ColorIndex = 3
$sheet.Cells.Item( 3, 3).Interior.ColorIndex = 4

# 列を自動幅調整
$null = $sheet.Columns.AutoFit()

# 日時に応じて名前をつけて保存
$date = Get-Date
$book.SaveAs($path + "\" + $date.ToString("yyyyMMdd_HHmmss_") + "test.xlsx")
$excel.Quit()
$excel = $null
[GC] ::Collect()
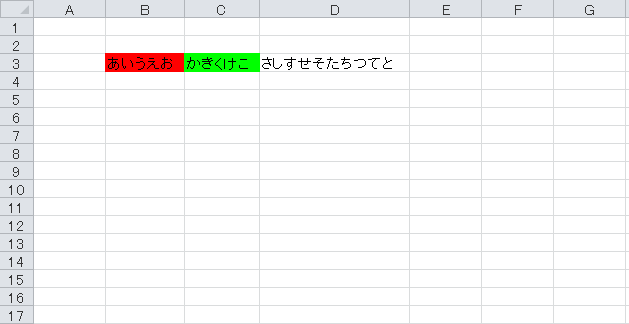
出力
test.ps1 と同じディレクトリにエクセルファイルができていて、
下記のような内容になっているはず。
(カラーインデックスの設定値によっては背景色が違うかも)