前回の投稿で、PulumiでデプロイされるTypeScript製Cloud FunctionsをES2019にする小技について書きました。そこで示したPulumiのスクリプトは、Google Cloud PlatformのStorage、Cloud Functionsの2つのスタックにまたがり、4つのリソースを組み合わせて構成するインフラでした。
この投稿では、こうした複数のスタックや複数のリソースにまたがる設定を「コンポーネント」という形でとりまとめ、その設定を再利用できるようにする方法を紹介します。
取りまとめる前のPulumiスクリプト
まず、複数のスタックにまたがるPulumiスクリプトがどんなものか見ておきます。ちょっと長くなりますが、次のような感じです。
import * as pulumi from "@pulumi/pulumi";
import * as gcp from "@pulumi/gcp";
import packlist from "npm-packlist";

// Cloud Functions APIを有効化する
const cloudFunctionsService = new gcp.projects.Service(
  "cloudFunctionsService",
  {
    disableDependentServices: true,
    service: "cloudfunctions.googleapis.com",
  }
);

// helloWorldパッケージのZIPの内容を定義する
const assetArchive = new pulumi.asset.AssetArchive(
  packlist({ path: "./helloWorld" }).then((files) => {
    const map: pulumi.asset.AssetMap = {};
    for (const file of files) {
      map["./" + file] = new pulumi.asset.FileAsset("./helloWorld/" + file);
    }
    return map;
  })
);

// Cloud Functionsの関数のZIP置き場をStorageに作る
const cloudfunctionsBucket = new gcp.storage.Bucket("cloudfunctions");

// helloWorldパッケージのZIPをStorageにアップロードする
const helloWorldZip = new gcp.storage.BucketObject("helloWorld", {
  bucket: cloudfunctionsBucket.name,
  name: "helloWorld.zip",
  source: assetArchive,
});

// デプロイする関数のインフラ構成定義
const helloWorldFunction = new gcp.cloudfunctions.Function(
  "helloWorldFunction",
  {
    name: "helloWorld",
    runtime: "nodejs12",
    sourceArchiveBucket: cloudfunctionsBucket.name,
    sourceArchiveObject: helloWorldZip.name,
    triggerHttp: true,
    entryPoint: "helloWorld",
  },
  { dependsOn: cloudFunctionsService }
);

// helloWorld関数を誰でも呼び出せるようにする設定
const helloWorldInvoker = new gcp.cloudfunctions.FunctionIamMember(
  "helloWorldInvoker",
  {
    cloudFunction: helloWorldFunction.name,
    role: "roles/cloudfunctions.invoker",
    member: "allUsers",
  }
);

// デプロイ後に表示する情報
export const functionUrl = helloWorldFunction.httpsTriggerUrl;
各部分の細かい説明は、前回の投稿に書いてあるので割愛しますが、やりたいことは「ひとつのTypeScript製の関数をCloud Functionsにデプロイしたい」というものです。
なので、もう一つ別にTypeScriptの関数をデプロイしようとなると、これと同じコードを量産しないといけなくなります。さすがに、それは辛いので避けたいものです。
複数のスタックにまたがる設定をまとめて再利用可能にする「コンポーネント」
Pulumiには、コンポーネントという概念があります。これは、複数のスタックにまたがる設定をまとめ上げ、再利用可能にするものです。
ここからは、Pulumiコンポーネントの作り方を、上のコードを改修しながら説明していきます。
まず、コンポーネントを作るために、コンポーネントを書き込むファイルをひとつ作ります。上の例では、「TypeScriptの関数をCloud Functionsに配置する」が目的なので、そこから重要キーワードを抜粋して「TypescriptFunction」コンポーネントと名付けることにします。なので、作るファイルもそれに合わせて、typescriptFunction.tsにします。
次に、pulumi.ComponentResourceを継承したクラスをそこに定義します:
export class TypeScriptFunction extends pulumi.ComponentResource {
  constructor(
    name: string,
    args?: TypeScriptFunctionArgs,
    opts?: pulumi.ComponentResourceOptions
  ) {
    super("gcp:cloudfunctions:TypeScriptFunction", name, {}, opts);
  }
}

export type TypeScriptFunctionArgs = {}
このTypeScriptFunctionがコンポーネントになるわけですが、コンポーネントクラスのコンストラクタは、親クラスのコンストラクタを呼び出すようにする必要があります。親クラスのコンストラクタの第一引数が、コンポーネントの名前になります。名前はグローバルでかぶらない名前にする必要があります。プロジェクトローカルで再利用するコンポーネントであれば、projectName:components:ComponentNameのようにするのがいいと思います。今回作るコンポーネントはプロジェクトを超えて再利用したいので、"gcp:cloudfunctions:TypeScriptFunction"といったプロジェクト固有でない感じの名前にしました。
コンポーネントクラスでまとめるスタックやリソースの定義は、コンストラクタの続きに書いていきます。移行元のコードがあるなら、ほぼコピペするだけでできます。完成するとこんな感じになります:
import * as pulumi from "@pulumi/pulumi";
import * as gcp from "@pulumi/gcp";
import packlist from "npm-packlist";

export class TypeScriptFunction extends pulumi.ComponentResource {
  readonly bucket: gcp.storage.Bucket;
  readonly bucketObject: gcp.storage.BucketObject;
  readonly function: gcp.cloudfunctions.Function;
  readonly invoker: gcp.cloudfunctions.FunctionIamMember;

  constructor(
    name: string,
    {
      path,
      bucket: bucketArgs,
      bucketObject: bucketObjectArgs,
      function: functionArgs,
      invoker,
    }: TypeScriptFunctionArgs,
    opts?: pulumi.ComponentResourceOptions
  ) {
    super("gcp:cloudfunctions:TypeScriptFunction", name, {}, opts);

    // Cloud Functionsの関数のZIP置き場をStorageに作る
    this.bucket = new gcp.storage.Bucket(name, bucketArgs, { parent: this });

    // パッケージのZIPの内容を定義する
    const asset = new pulumi.asset.AssetArchive(
      packlist({ path }).then((files) => {
        const map: pulumi.asset.AssetMap = {};
        for (const file of files) {
          map["./" + file] = new pulumi.asset.FileAsset(path + "/" + file);
        }
        return map;
      })
    );

    // パッケージのZIPをStorageにアップロードする
    this.bucketObject = new gcp.storage.BucketObject(
      name,
      {
        ...bucketObjectArgs,
        bucket: this.bucket.name,
        source: asset,
      },
      { parent: this }
    );

    // デプロイする関数のインフラ構成定義
    this.function = new gcp.cloudfunctions.Function(
      name,
      {
        ...functionArgs,
        sourceArchiveBucket: this.bucket.name,
        sourceArchiveObject: this.bucketObject.name,
      },
      { parent: this }
    );

    // 特に指定がなければ、関数を誰でも呼び出せるようにする設定
    this.invoker =
      invoker ??
      new gcp.cloudfunctions.FunctionIamMember(
        name,
        {
          cloudFunction: this.function.name,
          role: "roles/cloudfunctions.invoker",
          member: "allUsers",
        },
        { parent: this }
      );
  }
}

export type TypeScriptFunctionArgs = {
  readonly path: string;
  readonly bucket?: gcp.storage.BucketArgs;
  readonly bucketObject?: Omit<
    gcp.storage.BucketObjectArgs,
    "bucket" | "source"
  >;
  readonly function: Omit<
    gcp.cloudfunctions.FunctionArgs,
    "sourceArchiveBucket" | "sourceArchiveObject" | "sourceRepository"
  >;
  readonly invoker?: gcp.cloudfunctions.FunctionIamMember;
};
移行元のコードと異なる点は、次のとおりです。
- リソース名が変数になる。
helloWorldなど、元コードではハードコーディングされていたリソース名が変数になります。これは当然そうなるのが分かると思います。 -
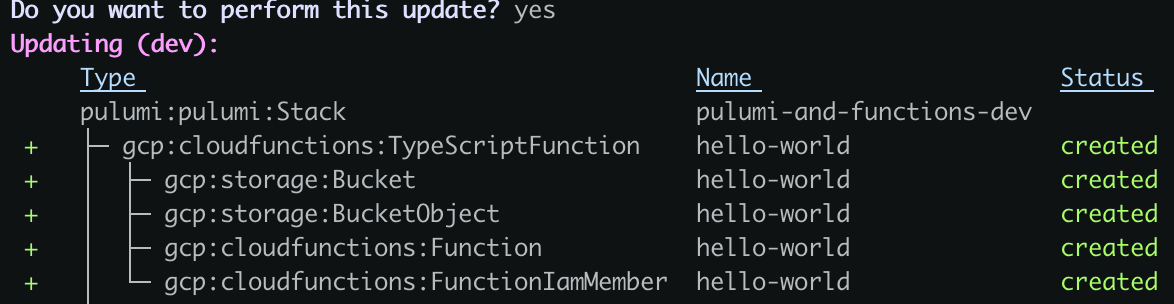
{ parent: this }の追加。これは、各リソース親がTypeScriptFunctionコンポーネントであることをPulumiに教えるためのものです。これを指定しなくても動きますが、指定することで、pulumi up時のプレビューや、Pulumiのダッシュボードでツリーで表示されるようになるので分かりやすくなります。
pulumi up時のプレビュー↓
Pulumiダッシュボード↓

- 各リソースの設定が変数になる。共通化する必要のない設定は変数にして、コンポーネントクラスのコンストラクタで受け取るようにします。
- 各リソースはコンポーネントオブジェクトのプロパティにする。こうしておくことで、
TypeScriptFunctionを利用するコードから各リソースの情報を参照できるようになります。
コンポーネントを利用する
コンポーネントは他のPulumiのAPIと同じように使います。
import * as gcp from "@pulumi/gcp";
import { TypeScriptFunction } from "./typescriptFunction";

// Cloud Functions APIを有効化する
const cloudFunctionsService = new gcp.projects.Service(
  "cloudFunctionsService",
  {
    disableDependentServices: true,
    service: "cloudfunctions.googleapis.com",
  }
);

// 作ったコンポーネントを使う
const helloWorldFunction = new TypeScriptFunction(
  "hello-world",
  {
    path: "./helloWorld",
    function: {
      runtime: "nodejs12",
      triggerHttp: true,
      entryPoint: "helloWorld",
    },
  },
  { dependsOn: cloudFunctionsService }
);

// デプロイ後に表示する情報
export const functionUrl = helloWorldFunction.function.httpsTriggerUrl;
コンポーネント化する前のコードと比べるとだいぶすっきりしました。もうひとつTypeScriptのCloud Functionを作りたい場合は、次の部分だけを増やしていけば良くなります:
const helloWorldFunction = new TypeScriptFunction(
  "hello-world",
  {
    path: "./helloWorld",
    function: {
      runtime: "nodejs12",
      triggerHttp: true,
      entryPoint: "helloWorld",
    },
  },
  { dependsOn: cloudFunctionsService }
);
これで、同じようなコードをコピペして増やしていく必要も無くなります。