以下のリファレンスはCode GeniusさんのBallGameにて演習した結果をまとめたものです。CodeGeniusさんありがとうございます!
0. 基本いろいろ
0.1 Unityの基本
(1) Unityで作成されたゲームは以下の階層構造
Project(ゲームタイトル) > Scene(ステージ) > Object > Script > Method > 変数
(2) ゲーム内の全ての物体(光源やカメラを含む)は全てObject
(3) Objectに性質や動きを与えるためにはComponentをつける(アタッチする)必要がある。ScriptもComponentの一種。
(4) Objectの状態、できることは全てInspectorで確認できる。
0.2 UnityにおけるC#

0.3 Assetのインポート
Assetのインポート方法は以下3通り
Standard Asset: メニューバーの「Assets」→「Import Package」
Asset Store: メニューバーの「Window」→「Asset Store」→「Asset Store」タブ
Asset Store以外からダウンロードしたAsset: Projectの適当なフォルダで右クリック → 「Import New Asset」
0.4 メソッドや変数へのアクセス
別のオブジェクト「Sphere」内のスクリプト「Count」を呼びだし、Count内の「SetCount」メソッドと「num」変数を呼び出す場合。
	GameObject refObj;

	void Start() {
		refObj = GameObject.Find( "Sphere" );
		// ↑オブジェクトを名前で検索し、変数に格納
	}

	void Update() {
		if( Input.GetMouseButtonDown( 0 ) ) {
			// オブジェクト.GetComponent<スクリプト名>()で呼び出し、変数に格納
 			Count ct = refObj.GetComponent<Count>();
			// 「スクリプト名.メソッド名」、「スクリプト名.変数名」で呼びだし。
			ct.SetCount( 91 );
			var ct_num = ct.num;
		}
	}
1. オブジェクトの性質
1.1 色をつける
ProjectのCreateからMaterialを作成
	→MaterialのInspectorで色を指定 →MaterialをObjectにアタッチ
1.2 重力をつける、バウンドさせる
重力:	InspectorのAdd Component内Phisics内のRigidbodyをクリック
		→Inspector内Use Gravityにチェック
バウンド: ProjectのCreateからPhysic Materialを作成
		→Inspector内Bouncinessを1に変更
			→Physic MaterialをObjectにアタッチ
1.3 位置、向き、大きさを変える
TransformのPosition, Rotation, Scaleを変更することでそれぞれ位置、向き、大きさを変更できる。
1.4 2つのオブジェクトを切り替える
以下スクリプトをemptyオブジェクト等にアタッチし、InspectorのObjA,ObjBに切り替え対象のオブジェクト2つを指定する。
[SerializeField] private GameObject ObjA;
[SerializeField] private GameObject ObjB;

void Update () {
	// 1キーの押下でObjAとObjBを切り替える。
	If(Input.GetKeyDown("1")) {
		ObjA.SetActive(!ObjA.activeSelf);
		ObjB.SetActive(!ObjB.activeSelf);
	}
}
1.5 目的地の向きを取得する
private Vector3 destination;	// 目的地

void Update () {
   // 1キーの押下でObjAとObjBを切り替える。
   If(Input.GetKeyDown("1")) {
   	ObjA.SetActive(!ObjA.activeSelf);
   	ObjB.SetActive(!ObjB.activeSelf);
   }
}
2.オブジェクトを動かす
2.1 自動で回転させる
void Update(){
	transform.Rotate(new Vector3(0,0,90) * Time.deltaTime);
}
2.2.a キーボードの十字キーで動かす(AddForce)
	public float moveSpeed;	// Inspectorで速度を指定する必要あり
	private Rigidbody rb;

	void Start(){
		rb = GetComponent<Rigidbody>();
	}

	void Update(){
		float moveH = Input.GetAxis(“Horizontal”);
		float moveV = Input.GetAxis(“Vertical”);
		Vector3 movement = new Vector3(moveH, 0, moveV);
		rb.AddForce(movement * moveSpeed);
	}
2.2.b キーボードの十字キーで動かす(Translate)
public float moveSpeed;

void Update () {
        float moveH = Input.GetAxis("Horizontal");
        float moveV = Input.GetAxis("Vertical");
        Vector3 movement = new Vector3(moveH, 0, moveV)*Time.deltaTime;
        this.gameObject.transform.Translate(movement);
}
2.3 キャラクタの向きの変更
private Vector3 velocity;

void Update () {
	velocity = new Vector3 (Input.GetAxis ("Horizontal"), 0f, Input.GetAxis ("Vertical"));
	transform.LookAt(transform.position + velocity);
	// 現在地(transform.position)に進行方向(velocity(型はVector3))を足すことで移動先の方向になる。
}
2.4 オブジェクトを瞬間移動(ワープ)させる
transform.position = new Vector3(-3, 0.5f, -3);
2.5 オブジェクトをジャンプさせる(「2.2 キーボードの十字キーで動かす」の記載済みを前提として)
public float jumpSpeed;

void Update(){
	if(Input.GetButtonDown(“Jump”)){
		rb.velocity = vector3.up * jumpSpeed;
	}
}
※ InspectorでjumpSpeedを指定する必要あり。
※ このままだと空中ジャンプ可能。
2.6 オブジェクトを一定の距離で往復させる
private Vector3 pos;

void Start(){
	pos = transform.position;
}

void Update(){
	this.gameObject.transform.position = new Vector3(pos.x, pos.y + Mathf.PingPong(Time.time, 5), pos.z);
}
2.7 ユーザオブジェクトを追いかけてくる敵オブジェクトを作る
(1) 敵オブジェクトのInspector中のAddComponentで、「Nav Mesh Agent」をクリック
(2) 以下のスクリプトを敵オブジェクトにアタッチ
using UnityEngine.AI;

public GameObject target;
private NavMeshAgent agent;

void Start(){
	agent = GetComponent<NavMeshAgent>();
}

void Update(){
	agent.destination = target.transform.position;
}
(3) 敵オブジェクトのInspector中の「Target」にユーザオブジェクトをドラッグ
(4) 床オブジェクト(Plane)のInspector中の「Static」にチェック
(5) メニューバー中の「Window」→「Navigation」をクリック
(6) 床オジェクトのInspectorの右隣にあるNavigation中「Bake」タブをクリック後、その中の「Bake」ボタンをクリック
※ Inspector内「Nav Mesh Agent」の「Speed」で追跡速度を設定できる。同様に「Stopping Distance」で敵を手前で止める事が可能。
2.8 Nav Mesh Agent(上記2.7)の障害となるオブジェクトを作る
(1) 障害物オブジェクトのNavigation中の「Object」をクリック
(2) 「Navigation Static」にチェック
(3) 「Navigation Area」を「Not Walkable」に変更
(4) 「Bake」タブをクリック→その中の「Clear」ボタンをクリック→「Bake」ボタンをクリック
3. オブジェクト間の衝突判定
3.0 "OnTriggerEnter"と"OnCollisionEnter"の違い
- OnTriggerEnter :すり抜けるときに判定
- いずれか一方のオブジェクトのRigidbodyにIsTriggerチェックが必要
- OnCollisionEnter :衝突の反発時に判定
※ 上記いずれの場合でも、いずれかのオブジェクトにRigidbodyのアタッチが必要。
※ ゲーム内のオブジェクトの種類による使い分けに関しては「Unityにおける衝突判定まとめ」が明快
3.1 ぶつかった相手を破壊する
	void OnTriggerEnter(Collider other){
		// もしもぶつかった相手に「Coin」タグがついていれば
		if(other.CompareTag(“Coin”)){
			// ぶつかった相手を破壊する
			Destroy(other.gameObject);
		}
	}
※ OnTriggerEnterの相手であるCoinの「Collider」の「Is Trigger」にチェックが必要
3.2 ぶつかった相手を加速
	void OnTriggerEnter (Collider other){
		other.gameObject.GetComponet<Rigidbody>().AddForce(new Vector3(0,10, 30),ForceMode.VelocityChange);
	}
※ このスクリプトをアタッチしたオブジェクトの「Collider」の「Is Trigger」にチェックが必要
3.3 ぶつかった相手の大きさを変える
public Vector3 scale;

	void OnTriggerEnter(Collider other){
		other.gameObject.transform.localScale = new Vector3(scale.x, scale.y, scale.z)
	}
※ このスクリプトをアタッチしたオブジェクトの「Collider」の「Is Trigger」にチェックが必要。大きさをInspectorで指定する必要あり。
3.4 ぶつかった相手には影響(物理的)を与えるが自身は物理現象を無視
rigidBodyの「Is Kinematic」に チェックをつける。
※ 以下スクリプトのようにIs Kinematicの有効・無効を設定可能。
rb.isKinematic = false;
4. 画像・音関連
4.1 画像データの利用
インポートした画像は「Texture Type」をInspectorにて「Sprite(2D and UI)」に 変換する必要がある。
画像はオブジェクトにアタッチしないと利用できない。
4.2 効果音を鳴らす
public AudioClip coinGet;

 void OnTriggerEnter(Collider other){
		if(other.CompareTag(“Coin”)){
			AudioSorce.PlayClipAtPoint(coinGet, transform.position);
		}
	}
※ あらかじめインポートした音声ファイルをInspectorのcoinGetにアタッチする必要がある。
4.3 BGMを流す
(1) 音を出すオブジェクト(例えばMainCamera)のInspector内「Add Component」→ 「Audio」→「AudioSource」
(2) 上記オブジェクトのInspector内「Audio Clip」に音源ファイルをドラッグ
5. シーン関連
5.1 ゲームクリア・ゲームオーバーなどの大きなロゴ入りシーンの作成
(1) Hierarchyの「Create」→「UI」→「Canvas」
(2)「Canvas」右クリック→「UI」→「Image」
(3) ImageのInspector中「Source Image」にロゴ画像をドラッグ
5.2 得点等(例:取得コイン枚数)でシーン移動(以下ではGameClearシーンへ移動)
using UnityEngine.SceneManagement;

	private int coinCount;

	void OnTriggerEnter(Collider other){
		if(other.CompareTag(“Coin”)){
			coinCount += 1;
			if(coinCount == 2)
				SceneManager.LoadScene(“GameClear”);
		}
	}
※ Build SettingsでGameClearシーンの利用を設定する必要がある。
5.3 ボタンをクリックしてシーン移動(以下は”Title”シーンから”Main”シーンへ移動)
(1) TitleシーンにてHierarchyの「Create」→「UI」→「Canvas」
(2)「Canvas」右クリック→「UI」→「Button」
(3) 下記スクリプトをCanvasにアタッチ
using UnityEngine.SceneManagement;

	public void OnStartButtonClicked(){
		SceneManager.LoadScene(“Main”);
	}
(4) ButtonのInspector中「On Click( )」の「+」をクリック
(5) 出現した空欄にCanvasをドラッグ
(6) 「On Click( )」の「No Function」をクリック →「GameStart」を選択 → 「OnStartButtonClicked( )」をクリック
5.4 一定時間経過後にシーン移動 (今回はTitleシーンに移動)
一定時間経過後にシーン移動 (今回はTitleシーンに移動)
using UnityEngine.SceneManagement;

	public int timeCount;

	void Start(){
		Invoke( “GoTitle”, timeCount);
	}

	void GoTitle(){
		SceneManager.LoadScene(“Title”);
	}
※ 何秒後にシーン移動するかInspectorで指定する必要あり。
※ Build SettingsでTitleシーンの利用を設定する必要あり。
5.5 画面上に残り時間を表示し、時間が0になったらGameOverシーンに移動
(1) Hierarchyの「Create」→「UI」→「Canvas」
(2)「Canvas」右クリック→「UI」→「Text」
(3)「Text」の名前を「TimeLabel」に変更。配置位置やフォント等に関してはLesson19 参照
(4) 以下スクリプトをMainCameraにアタッチ
using UnityEngine.UI;
using UnityEngine.SceneManagement;

public Text timeLabel;
public float timeCount;

void Update(){
	timeCount -= Time.deltaTime;
	timeLabel.text = “TIME;” +timeCount.ToString(“0”);

	if(timeCount <0){
		SceneManager.LoadScene(“GameOver”);
	}
}
(5) MainCameraのInspector内のTimeLabelの空欄にHierarchy内のCanvasのTimeLabelをドラッグ。
(6) MainCameraのInspector内のTimeCountに持ち時間(秒)を指定。
5.6 シーン遷移後画面が暗い場合の対処法
暗くなってしまうシーンで以下作業を実施
(1) メニューバーの「Window」→「Lighting」→ 「Settings」をクリック
(2) 「Global maps」をクリック
(3) 「Auto Genetrate」のチェックを外して→「Generate Lighting」をクリック→シーン名のフォルダが生成される。
6. Humanoid & その他アニメーション関連
6.1 Humanoid設定
人型の3Dモデルをアニメーションさせる場合は事前に
「prefabのInspector中のRig内のAnimation TypeをHumanoidに変更」
しておく。これにより汎用のHumanoidアニメーションを利用できるようになる。
6.2 Animator Controllerの作成
(1) Hierarchyの「Create」 → 「Animator Controller」
(2) アニメーションを設定したいオブジェクトのInspector中のAnimatorにアタッチ
6.3 AnimatorControllerのstate(状態)とtransition(遷移)を作成
(1) Animatorタブをクリックし、下図のとおり「Create State」→「Empty」をクリックし新規の「state(状態)」を生成する。

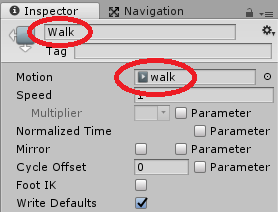
(2) 生成したNew StateのInspector内でStateの名称を変更し、Motionを設定する。
(3) transition(遷移)の起点となるstateで右クリック→「Make Transition」で生成した矢印を終点となるstateへドラッグ。
6.4 アニメーションパラメータ(遷移のトリガとなる変数)を作成し、遷移条件を指定
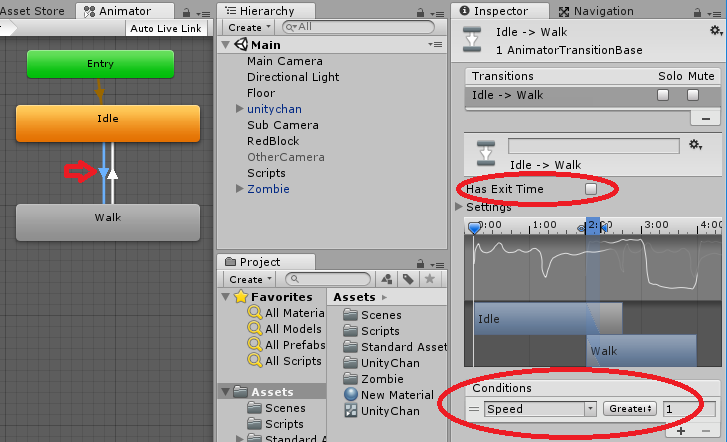
(1) Animation部左上の「Parameters」→「+」→「float」を選択し、生成された「New Float」の名前を変更する(本例ではSpeedとした)。
(2) 遷移条件を指定するTransitionのInspector内のConditionsを追加・設定する。併せて機敏に遷移させるために「Has Exit Time」のチェックをはずす(下図参照)。
6.5 スクリプトからアニメーションパラメータを変更
private Animator animator;

void Start () {
	animator = GetComponent <Animator> ();
}

void Update () {
	if(velocity.magnitude > 0.1f){				// velocity.magnitudeはベクトルの大きさのみを取り出す
		animator.SetFloat("Speed", velocity.magnitude);
	} else {
		animator.SetFloat("Speed", 0f);
	}
}
6.6 キャラクタの手に物を持たせる: ボーンの特定部位の子としてアイテムを設定
(1) 対象オブジェクトのprefabのInspector内、Rigを選択し、Animation TypeをHumanoidを選択した後にConfigureをクリック。

(2) Doneをクリック。

(3) Hierarchy内の対象オブジェクトのボーンが階層表示されるようになる。
(4) ボーン内の特定部位を親としてアイテムを子に設定すれば、親の位置・角度に対してアイテムが相対表示される。
7. カメラ関連
7.1 カメラにオブジェクトを追いかけさせる
スクリプトをカメラにアタッチ
InspectorでTargetを指定する必要あり
	public GameObject target;
	private Vector3 offset;

	void Start(){
		offset = transform.position – target.transform.position;
	}

	void Update(){
		transform.position = target.transform.position + offset;
	}
Follow Targetコンポーネント、Smooth Followコンポーネントをアタッチする方法もある。
7.2 サブカメラ(衛星画像風)の設置
下図のようなサブカメラ画面を実装する。

(1) HierarchyのCreateからCameraを追加。名称をSubCameraとする。
(2) SubCameraのInspectorからAdd Componentで「Follow Target」をアタッチ。Targetにユーザキャラクタを指定。
(3) 下図を参考にSubCameraの位置、向き、カメラ画面の場所大きさを指定。

7.3 CullingMask:オブジェクトのレイヤーごとに可視・不可視を設定
下例では不可視化を設定する。
(1) いずれかのオブジェクトのInspectorからLayer→「Add Layer」をクリック。

(2) User Layer8以降のいずれかに新しいレイヤーを作成(本例ではUser Layer10にInvisibleという名前で作成)

(3) オブジェクトのLayerとしてInvisibleを設定。
(4) CameraのInspector中、Culling MaskをEverythingから変更。Invisibleのチェックを外す。