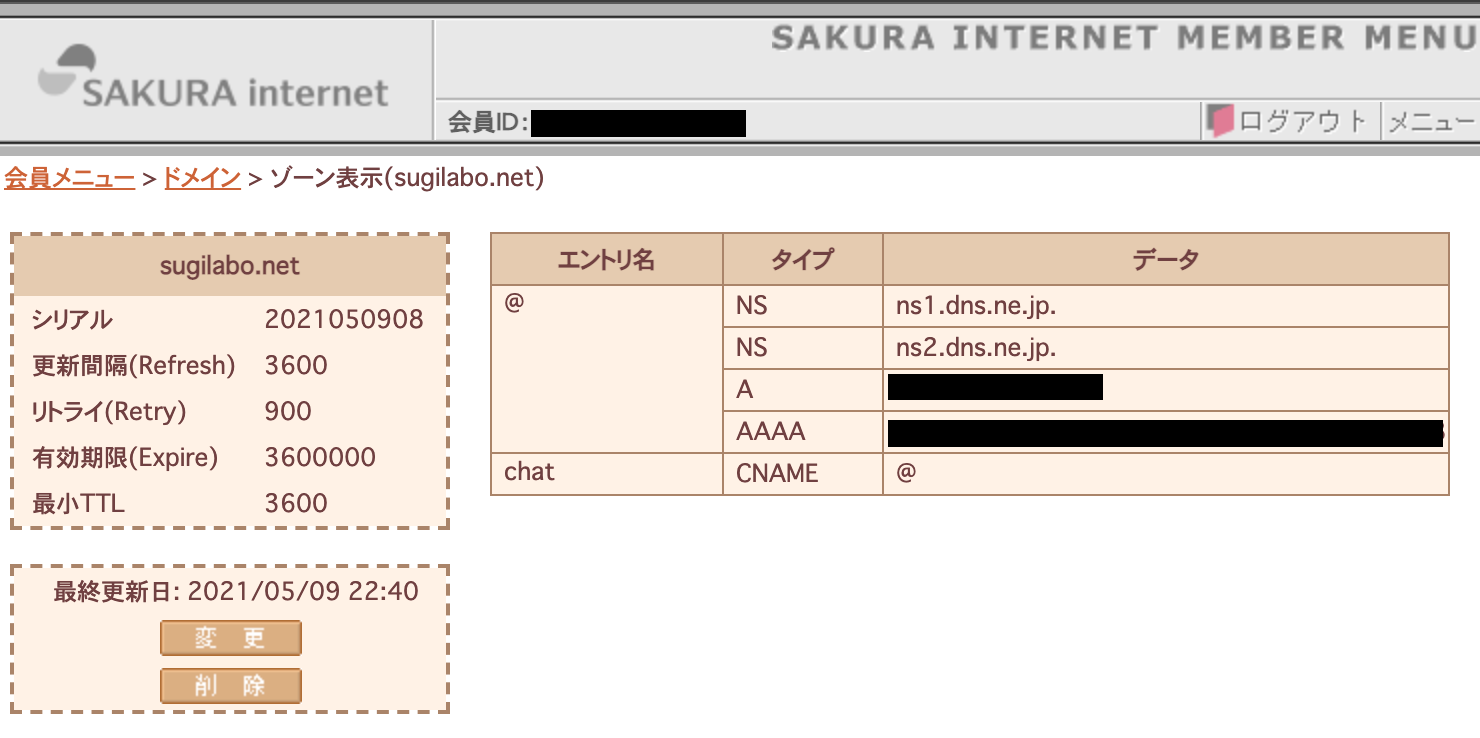
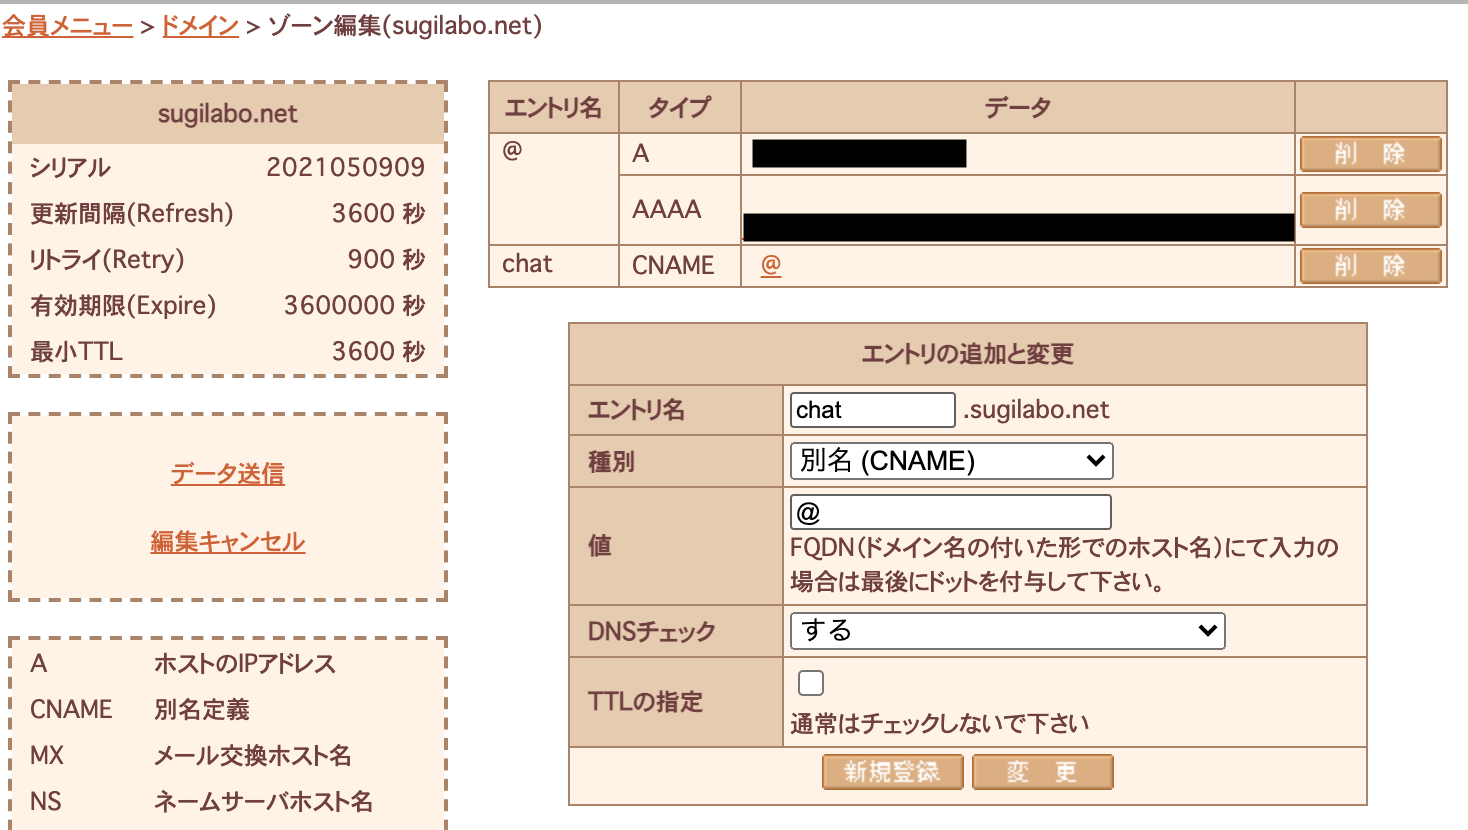
さくらドメイン側でサブドメインの設定をする
左側の「変更」を選択
[エントリ名] → サブドメイン名(例 https:// chat.abcde.net/ など) ←自由に決めて良い!
[種別] → 別名(CNAME) ←決まり!
終わったら[新規登録]を選択後、[データ送信]を選択!
CertbotでSSL発行
$ sudo certbot --nginx -d chat.abcde.net
-d から右側はさっきエントリ名で入力した文字ね!(例:chat.abcde.net)
※注意! 「https://」や「http://」はここでは入力しない
Please choose whether or not to redirect HTTP traffic to HTTPS, removing HTTP access.
- - - - - - - - - - - - - - - - - - - - - - - - - - - - - - - - - - - - - - - -
1: No redirect - Make no further changes to the webserver configuration.
2: Redirect - Make all requests redirect to secure HTTPS access. Choose this for
new sites, or if you're confident your site works on HTTPS. You can undo this
change by editing your web server's configuration.
- - - - - - - - - - - - - - - - - - - - - - - - - - - - - - - - - - - - - - - -
Select the appropriate number [1-2] then [enter] (press 'c' to cancel): 1
ここでは暗号化していない「http://」で接続してきた人を「https://」に自動的に移動させるかどうかを聞いています。
1 → 自動的に移動させない
2 → 自動的に移動させる
IMPORTANT NOTES:
 - Congratulations! Your certificate and chain have been saved at:
   /etc/letsencrypt/live/chat.abcde.net/fullchain.pem
   Your key file has been saved at:
   /etc/letsencrypt/live/chat.abcde.net/privkey.pem
   Your cert will expire on 2021-08-07. To obtain a new or tweaked
   version of this certificate in the future, simply run certbot again
   with the "certonly" option. To non-interactively renew *all* of
   your certificates, run "certbot renew"
 - If you like Certbot, please consider supporting our work by:

   Donating to ISRG / Let's Encrypt:   https://letsencrypt.org/donate
   Donating to EFF:                    https://eff.org/donate-le
発行が完了したら[fullchain.pem]と[privkey.pem]のパスを使うのでメモしよう
上記の例:
[/etc/letsencrypt/live/chat.abcde.net/fullchain.pem]
と
[/etc/letsencrypt/live/chat.abcde.net/privkey.pem]
をメモ
リバースプロキシを設定しよう!
sudo vim /etc/nginx/conf.d/rproxy.conf
でリバースプロキシの設定ファイルを作成しよう
# Upstreams
upstream backend {
    server 127.0.0.1:3000;
}

# HTTPS Server
server {
    listen 443;
    server_name chat.abcde.net; ←ここ変更して

    # You can increase the limit if your need to.
    client_max_body_size 200M;

    error_log /var/log/nginx/rocketchat.access.log;

    ssl on;
    ssl_certificate /etc/letsencrypt/live/chat.abcde.net/fullchain.pem; ←ここ変更して
    ssl_certificate_key /etc/letsencrypt/live/chat.abcde.net/privkey.pem; ←ここ変更して
    ssl_protocols TLSv1 TLSv1.1 TLSv1.2; # don’t use SSLv3 ref: POODLE

    location / {
        proxy_pass http://backend/;
        proxy_http_version 1.1;
        proxy_set_header Upgrade $http_upgrade;
        proxy_set_header Connection "upgrade";
        proxy_set_header Host $http_host;

        proxy_set_header X-Real-IP $remote_addr;
        proxy_set_header X-Forwarded-For $proxy_add_x_forwarded_for;
        proxy_set_header X-Forward-Proto http;
        proxy_set_header X-Nginx-Proxy true;

        proxy_redirect off;
    }
}
※編集は[ i ]キーで出来ます。
3つ変更してもらいます
-
サブドメインのリンクを書いてください。(例:chat.abcde.net)
※ここでも「https://」や「http://」は書かない -
メモしたパスを移しましょう。 ファイル名が[fullchain.pem][privkey.pem]で別れているのでそれぞれの場所に書いてください
終了する際は
- [esc]キーで編集モードを終了して
- [:wq]を入力して変更を保存して終了
nginxの再起動!
sudo systemctl restart nginx
長くなりましたがお疲れさまでした。Rocket.chatのスマホアプリはSSL化していないと使えないので面戸くださいですが、やり取り(メッセージ)が暗号化されていないともっと危険なので重要な作業です!
参考にしたサイト

