はじめに
Oracle Cloud Infrastructure(以下OCI)は、サーバレスアーキテクチャで重要な役割を担う、FaaS サービスの Oracle Functions が提供されています。Oracle Functions を動かすときには、OCI 側のリソースの操作をすることが多いと思います。
(例)
- Object Storage へファイルを格納
- インスタンスの一覧取得
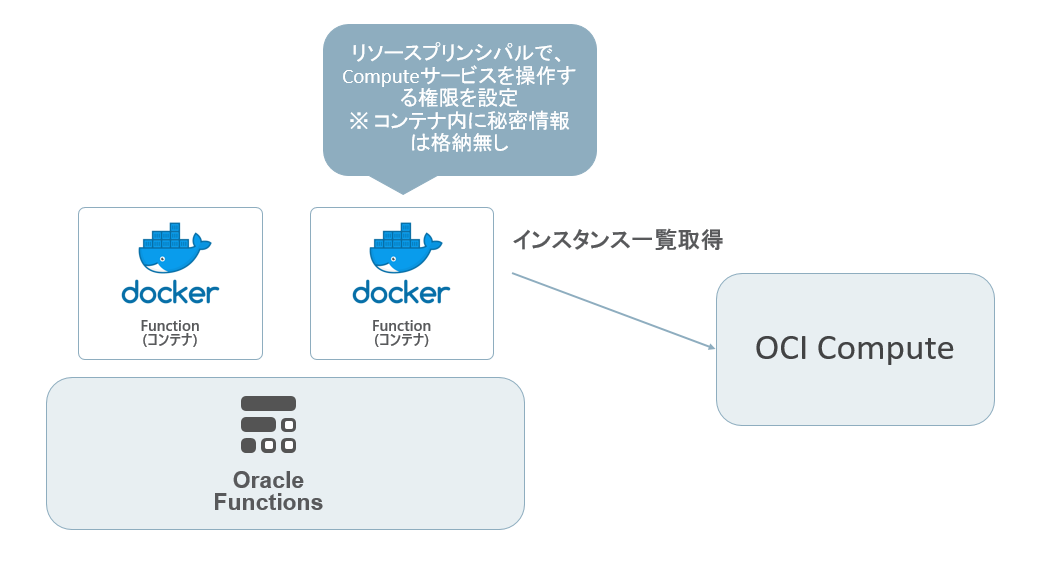
上記で挙げた例を実現するためには、OCI の SDK を使用してプログラミングをするのがベーシックなやり方になります。OCI の SDK を実行する時に、リソースプリンシパルを使用することで、Oracle Functons の実行環境(コンテナ)の中に、秘密鍵やパスワードといったクレデンシャル情報を格納する必要がなくなるため、セキュリティが高くなるメリットがあります。
今回の記事では、Go言語の OCI SDK を使用して、リソースプリンシパルを活用し、インスタンスの名前一覧を出力する Function を作成する手順を紹介します。
概要図
Functions の作成
まず、Functions を動かす準備が出来ていない場合は、以下の Doucment や Quick Start Guide を参考にして、事前準備をします。
Preparing for Oracle Functions
https://docs.cloud.oracle.com/iaas/Content/Functions/Concepts/functionsprerequisites.htm
Quick Start Guide
https://www.oracle.com/webfolder/technetwork/tutorials/infographics/oci_faas_gettingstarted_quickview/functions_quickview_top/functions_quickview/index.html
Function を動かす準備が出来たら、リソースプリンシパルを使用して、インスタンス名を取得するコードをプログラミングします。以下にサンプルコードを記載します。GitHub にもアップロードしています。
GitHub : https://github.com/Sugi275/oci-gosdk-resource-principal-samplecode/blob/master/func.go
Sample Code
package main

import (
	"github.com/oracle/oci-go-sdk/common"
	"context"
	_ "encoding/json"
	"fmt"
	"os"
	"io"

	fdk "github.com/fnproject/fdk-go"
	"github.com/oracle/oci-go-sdk/core"
	"github.com/oracle/oci-go-sdk/common/auth"
)

func main() {
	fdk.Handle(fdk.HandlerFunc(myHandler))
	// reader := os.Stdin
	// writer := os.Stdout
	// myHandler(context.TODO(), reader, writer)
}

func myHandler(ctx context.Context, in io.Reader, out io.Writer) {

	provider, err := auth.ResourcePrincipalConfigurationProvider()

	if err != nil {
		fmt.Println(err)
		return
	}

	compartmentID := os.Getenv("COMPARTMENT_ID")

	request := core.ListInstancesRequest{
		CompartmentId: &compartmentID,
		LifecycleState: core.InstanceLifecycleStateRunning,
	}

	fmt.Println(request)

	client, err := core.NewComputeClientWithConfigurationProvider(provider)

	if err != nil {
		fmt.Println(err)
		return
	}

	// Override the region, this is an optional step.
	// the InstancePrincipalsConfigurationProvider defaults to the region
	// in which the compute instance is currently running
	client.SetRegion(string(common.RegionAPTokyo1))

	listInstancesResponse, err := client.ListInstances(context.Background(), request)

	if err != nil {
		fmt.Println(err)
		return
	}

	for _, item := range listInstancesResponse.Items {
		fmt.Printf("list of Compute Instance: %s \n", *item.DisplayName)
	}
}
ポイントは、25行目の以下の箇所です。go-oci-sdk の common.auth から、ResourcePrincipalConfigurationProvider() 関数を使って、リソースプリンシパルを使用した provider を生成します。これにより、後の手順で設定する権限設定が、リソースプリンシパルを経由して付与されます。
provider, err := auth.ResourcePrincipalConfigurationProvider()
上記のサンプルコードを作成後、Oracle Functios へ Function を Deploy します。Sample Code を作成したディレクトリ上にいることを確認します
> ls -la
total 28
drwxrwxr-x  3 ubuntu ubuntu 4096 Aug 28 10:20 ./
drwxrwxr-x 10 ubuntu ubuntu 4096 Aug 27 12:20 ../
-rw-rw-r--  1 ubuntu ubuntu 1370 Aug 28 10:19 func.go
-rw-r--r--  1 ubuntu ubuntu  103 Aug 28 10:19 func.yaml
drwxrwxr-x  8 ubuntu ubuntu 4096 Aug 28 10:21 .git/
-rw-r--r--  1 ubuntu ubuntu   11 Aug 28 09:35 go.mod
-rw-rw-r--  1 ubuntu ubuntu   97 Aug 24 18:03 README.md
Function の Deploy を行います
fn --verbose deploy --app susugiya
サンプルコードは、 Compartment の OCID を環境変数として渡す設定としているため、以下のコマンドで環境変数を設定します
fn config func susugiya resource_principal_sample COMPARTMENT_ID "ocid1.compartment.oc1..secret"
Function の Deploy を実施すると、 OCI のコンソール画面上に表示されます。
OCI コンソールのメニューから、Developper Services > Functions を選択します。
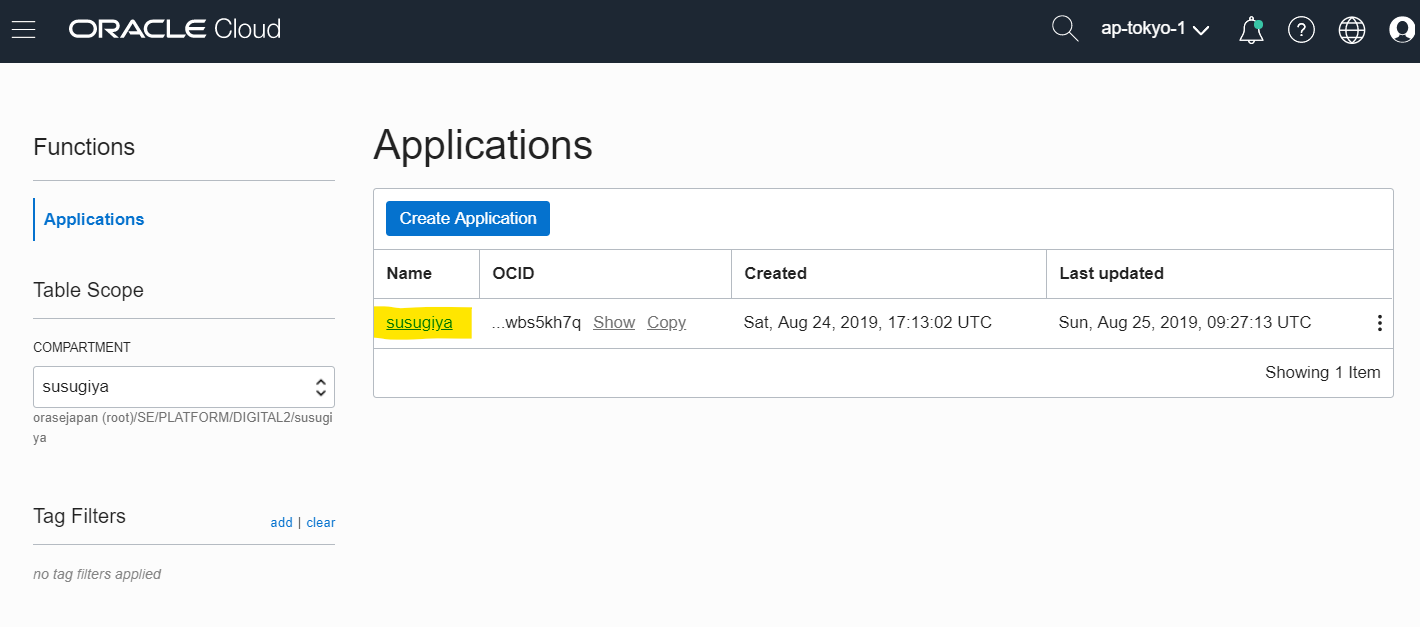
私の環境で、事前に作成していた Application の名前を選択します。
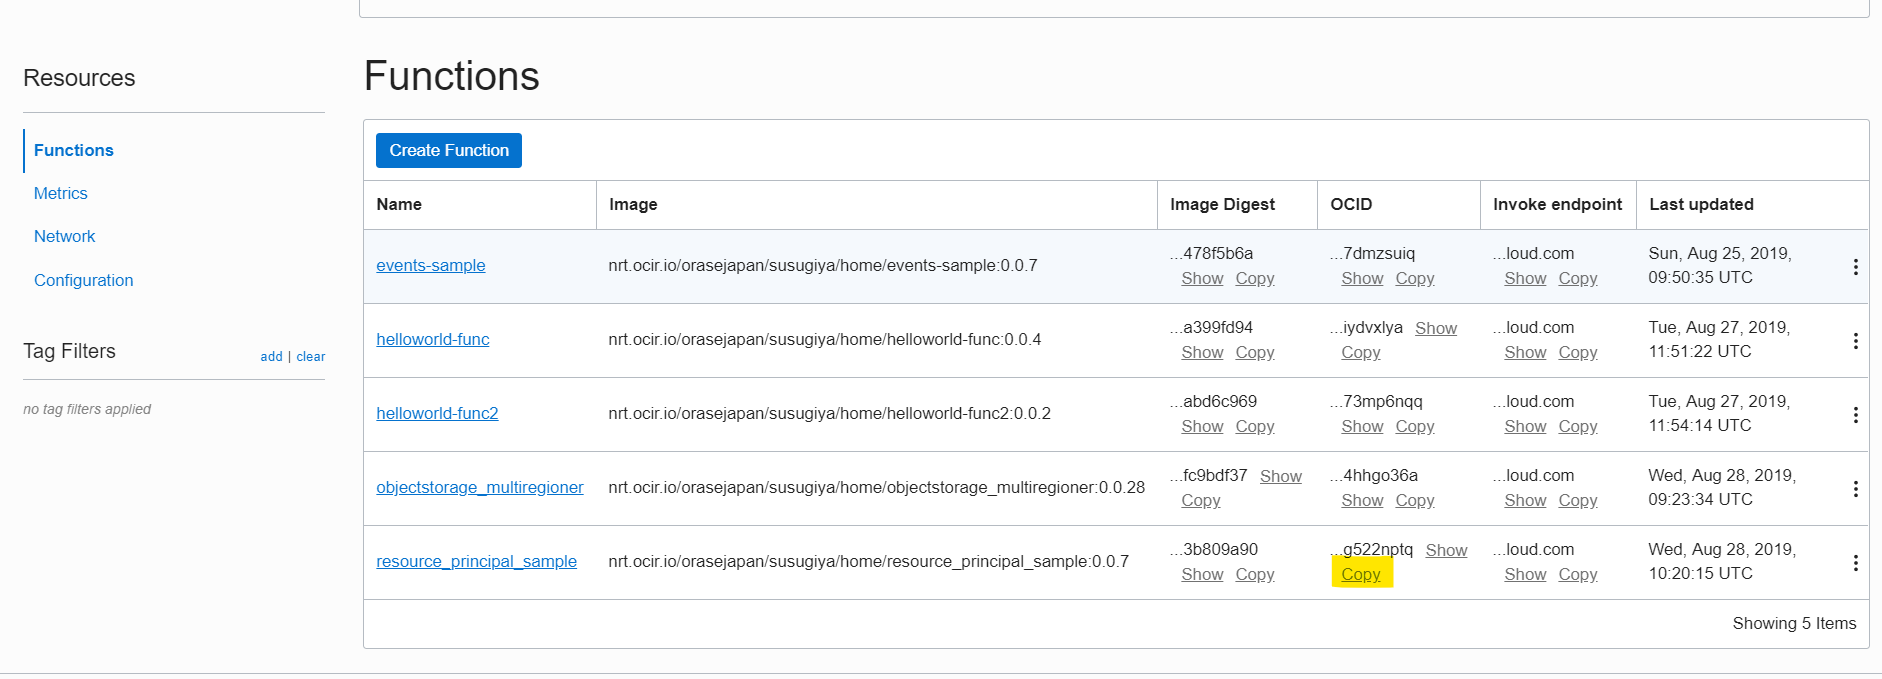
resource_principal_sample の Function が表示されているため、OCID の Copy を選択します。
functions の OCID例 : ocid1.fnfunc.oc1.ap-tokyo-1.aaaaaaaaadbucwrz375qjw6jghtngmj2h5k6vu4hhke5s7aqe2jsg522nptq
Dynamic Group の作成
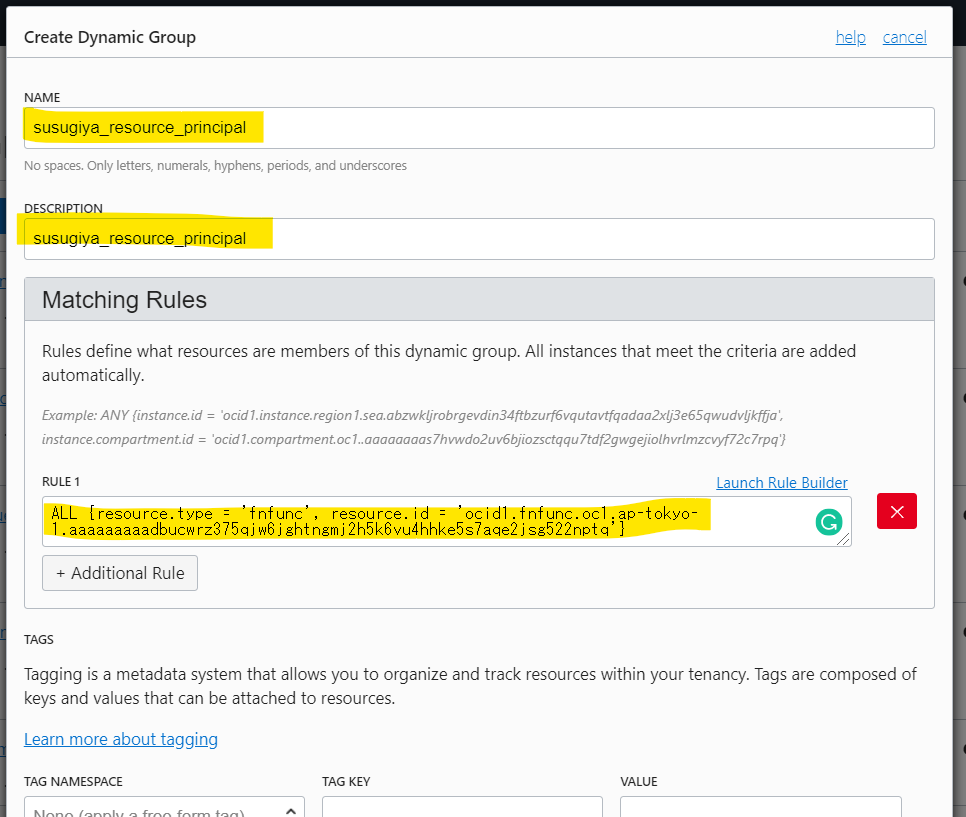
OCI のメニューから、Identity > Dynamic Groups へ移動し、 Create Dynamic Group を押します
以下のパラメータを入力します
- NAME : susugiya_resource_principal
- DESCRIPTIN : susugiya_resource_principal
Rule に以下の文字列を入力します。resource.id の部分は、作成した Function の OCID を指定します。
ALL {resource.type = 'fnfunc', resource.id = 'ocid1.fnfunc.oc1.ap-tokyo-1.aaaaaaaaadbucwrz375qjw6jghtngmj2h5k6vu4hhke5s7aqe2jsg522nptq'}
Policyの設定
Indentity > Policies へ移動し、 Create Policyを押します
- NAME : susugiya_resource_principal_policy
- DESCRIPTION : susugiya_resource_principal_policy
- STATEMENTを以下の文字列で指定します。 Dynamic Group で作成した名前を指定して、
instance-family(Computeサービス) をmanage(全操作可能) な権限を付与しています
Allow dynamic-group susugiya_resource_principal to manage instance-family in compartment susugiya
実行
ここまで設定することで、特定の OCID を持つ Funciton に、Dynamic Group と Policy を使用して、instance-family (Computeサービス) を管理する権限を付与しました。
invokeコマンドで、function を実行します
> fn invoke susugiya resource_principal_sample
Oracle Functions の Logging 設定で、syslog を使用して、Papertrail へ出力するように設定をしています。
Papertrail への出力例
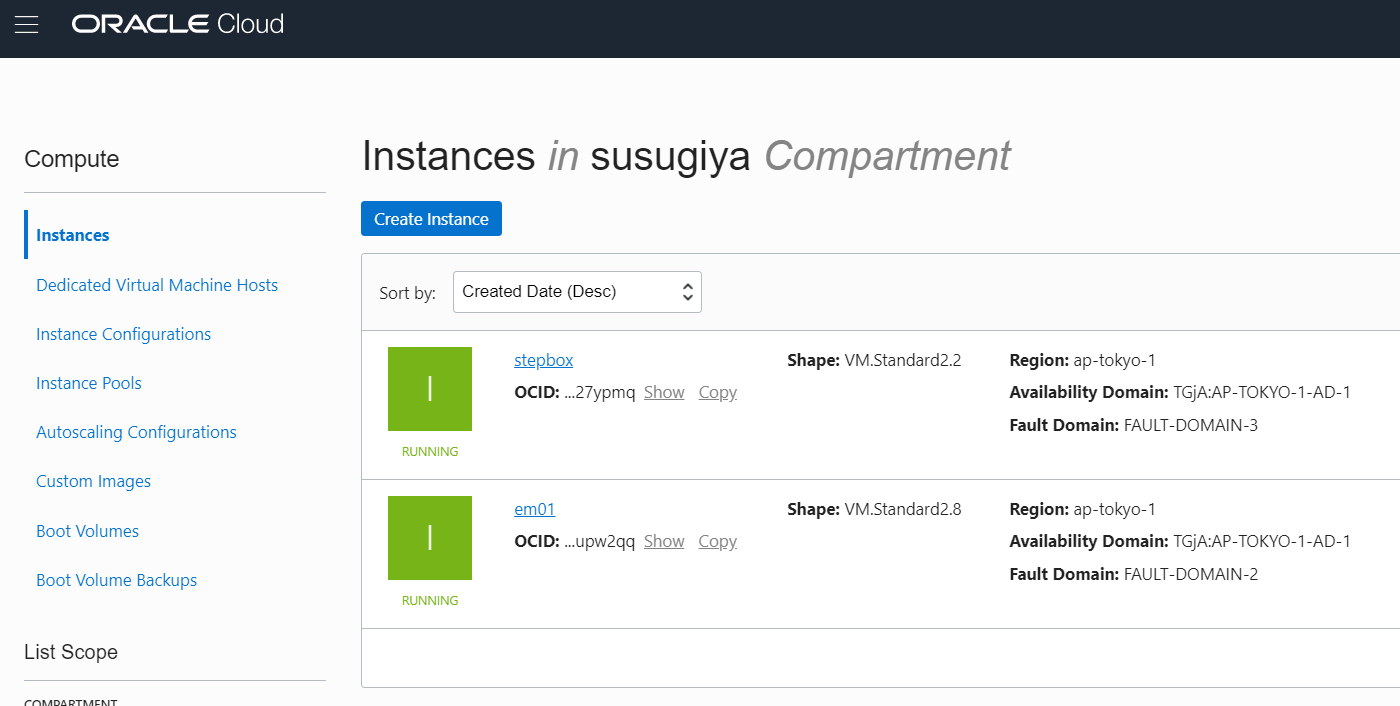
list of Compute Instance の後に、em01 と stepbox と表示されています。
これは、指定した Compartment ID で RUNNING 状態で稼働しているコンピュートインスタンスの一覧を表示しています
URL
Accessing Other Oracle Cloud Infrastructure Resources from Running Functions
https://docs.cloud.oracle.com/iaas/Content/Functions/Tasks/functionsaccessingociresources.htm
Sample Code
https://github.com/oracle/oci-go-sdk/tree/master/example/example_resource_principal_function
