はじめに
OpenVPN は GPL ライセンスで公開されているオープンソースの VPN ソフトウェアです。自宅からセキュアに会社の環境に接続したい、といった時に使用できます。
インターネット上にある OpenVPN の情報は、Client から直接 OpenVPN Server に接続するものをよく見ます。ただ、本社と各事業所といった単位でセキュアな VPN を構築したい場合、全ての端末に OpenVPN Client をインストールするのは手間が掛かります。
そこで、OpenVPN Server や Client をルーターとすることで、各拠点間の接続をシンプルに実現出来ます。site-to-site 接続と呼ばれてる方法です。site-to-site 接続の情報はそれほど無かったので検証をしました。その時の手順を備忘録として残しておきます。
検証に使ったプラットフォームは Oracle Cloud ですが、オンプレミスでも他 Public Cloud でも基本的な手順は変わりません。一部、Oracle Cloud に特化した内容があるため、環境に合わせて適宜読み替えてください。
構成図
Oracle Cloud 上で site-to-site 接続を検証した時の構成図です。この環境は削除済みのため Public IP は使っていません。OpenVPN の設定ファイルの中に Public IP を書く欄があるため、分かりやすくするために、Public IP の情報も残しておきます。

VCN Site 1, VCN Site 2 と書いている部分は、本社や営業所などの拠点のイメージです。拠点間は OpenVPN Server と OpenVPN Client で VPNトンネリングを張っています。VPNトンネリングの裏側は、インターネットを通っています。Site 1 と Site 2 の Private Subnet に置いている VM 同士が、OpenVPN を経由して互いに疎通出来る環境を作っていきます。
仮想マシン作成
OpenVPN Server, OpenVPN Client は、CentOS 7 で作っていきます。OpenVPN が動作するサーバーであれば OS は何でもいいと思います。Oracle Cloud で適当に作ります。
Firewall設定
CentOS 7 の Firewalld は止めます。Oracle Cloud 側でファイアウォール設定をしているためです。
sudo systemctl stop firewalld
sudo systemctl disable firewalld
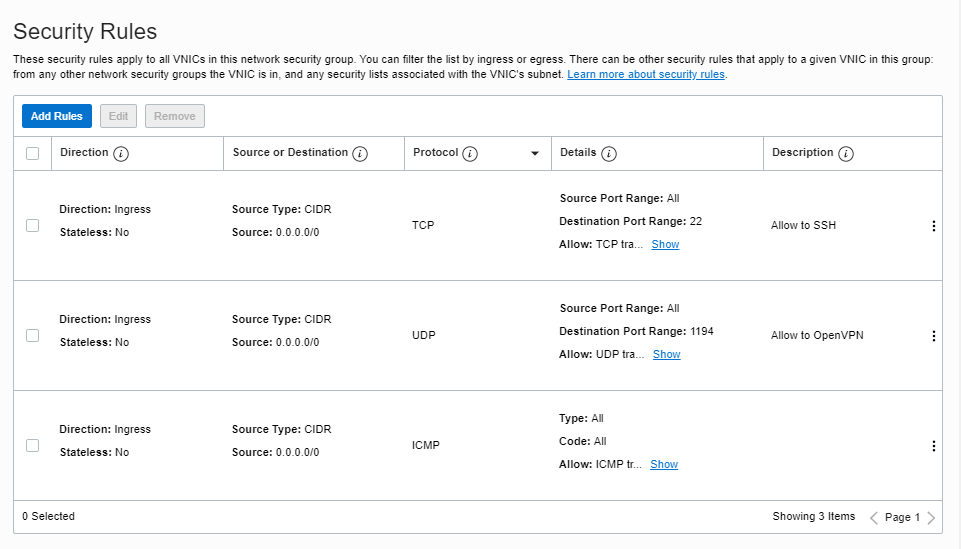
Oracle Cloud 側の ファイアウォール設定はこんな感じです。Site 1, Site 2 共に、UDP 1194 を許可します。OpenVPN ではこのポートを使います。OpenVPN の設定で変更出来るので、デフォルトのポートから変えたい場合はこちらも合わせて変更します。
OpenVPN Install (Server, Client 両方で実施)
EPEL Repository から、OpenVPN と証明書を簡単にするための easy-rsa をインストールします。
sudo yum install openvpn easy-rsa -y
依存関係とバージョンはこんな感じです。
============================================================================================================================
 Package                          Arch                      Version                           Repository               Size
============================================================================================================================
Installing:
 easy-rsa                         noarch                    3.0.7-1.el7                       epel                     43 k
 openvpn                          x86_64                    2.4.9-1.el7                       epel                    524 k
Installing for dependencies:
 pkcs11-helper                    x86_64                    1.11-3.el7                        epel                     56 k

Transaction Summary
============================================================================================================================
証明書設定(Server 側で実施)
OpenVPN は証明書ベースで認証をするため、認証局の設定をしていきます。root ユーザーへスイッチします。
sudo su -
ディレクトリを作って、easy-rsa ディレクトリ一式をコピーします。
mkdir /etc/openvpn/easy-rsa
cp /usr/share/easy-rsa/3.0.7/* /etc/openvpn/easy-rsa/ -R
cd /etc/openvpn/easy-rsa
PKI ディレクトリの初期化をします。
./easyrsa init-pki
実行例
[root@vpn1 easy-rsa]# ./easyrsa init-pki

init-pki complete; you may now create a CA or requests.
Your newly created PKI dir is: /etc/openvpn/easy-rsa/pki


[root@vpn1 easy-rsa]#
CA証明書を作成します。余談ですが、この方法だと CA証明書の有効期限はデフォルトの10年です。期間を変更したい場合は、このあたり を参考にしてみるとよいでしょう。
./easyrsa build-ca
実行例
パスフレーズは長めの物を入れておきましょう
[root@vpn1 easy-rsa]# ./easyrsa build-ca
Using SSL: openssl OpenSSL 1.0.2k-fips  26 Jan 2017

Enter New CA Key Passphrase:<任意のパスフレーズを入力>
Re-Enter New CA Key Passphrase:<任意のパスフレーズを入力>
Generating RSA private key, 2048 bit long modulus
.......................................+++
...........................+++
e is 65537 (0x10001)
You are about to be asked to enter information that will be incorporated
into your certificate request.
What you are about to enter is what is called a Distinguished Name or a DN.
There are quite a few fields but you can leave some blank
For some fields there will be a default value,
If you enter '.', the field will be left blank.
-----
Common Name (eg: your user, host, or server name) [Easy-RSA CA]: <任意の名前を入力> (sugiと入力した)

CA creation complete and you may now import and sign cert requests.
Your new CA certificate file for publishing is at:
/etc/openvpn/easy-rsa/pki/ca.crt


[root@vpn1 easy-rsa]#
ここに CA証明書 が生成されます。
[root@vpn1 pki]# ls -la /etc/openvpn/easy-rsa/pki/ca.crt
-rw-------. 1 root root 1143 Jun  6 12:13 /etc/openvpn/easy-rsa/pki/ca.crt
Diffie-Hellman Parameter を生成します。
./easyrsa gen-dh
実行例
[root@vpn1 easy-rsa]# ./easyrsa gen-dh
Using SSL: openssl OpenSSL 1.0.2k-fips  26 Jan 2017
Generating DH parameters, 2048 bit long safe prime, generator 2
This is going to take a long time
..................................................................................................................+.......................................................................................................................+..........................................................................................................................................................................+...........................................................................................................................................................+.....+...................................................+............................................................................................................................+..........................................+..................................................................................................................................................................................++*++*

DH parameters of size 2048 created at /etc/openvpn/easy-rsa/pki/dh.pem


[root@vpn1 easy-rsa]#
ここに生成されます。
[root@vpn1 pki]# ls -la /etc/openvpn/easy-rsa/pki/dh.pem
-rw-------. 1 root root 424 Jun  6 12:15 /etc/openvpn/easy-rsa/pki/dh.pem
OpenVPN Server 用の証明書と秘密鍵を生成します。パスフレーズは、前入れたものと同じものを入れます。
./easyrsa build-server-full server_r nopass
実行例
[root@vpn1 easy-rsa]# ./easyrsa build-server-full server_r nopass
Using SSL: openssl OpenSSL 1.0.2k-fips  26 Jan 2017
Generating a 2048 bit RSA private key
........................................................+++
...+++
writing new private key to '/etc/openvpn/easy-rsa/pki/easy-rsa-19203.5w2rGG/tmp.5Nld7Y'
-----
Using configuration from /etc/openvpn/easy-rsa/pki/easy-rsa-19203.5w2rGG/tmp.n6iMCq
Enter pass phrase for /etc/openvpn/easy-rsa/pki/private/ca.key:
Check that the request matches the signature
Signature ok
The Subject's Distinguished Name is as follows
commonName            :ASN.1 12:'server_r'
Certificate is to be certified until Sep  9 12:20:01 2022 GMT (825 days)

Write out database with 1 new entries
Data Base Updated

[root@vpn1 easy-rsa]#
サーバー用証明書はここに自動生成されます。
[root@vpn1 pki]# ls -la /etc/openvpn/easy-rsa/pki/issued/server_r.crt
-rw-------. 1 root root 4525 Jun  6 12:20 /etc/openvpn/easy-rsa/pki/issued/server_r.crt
サーバー用秘密鍵はここに自動生成されます。
 [root@vpn1 pki]# ls -la /etc/openvpn/easy-rsa/pki/private/server_r.key
-rw-------. 1 root root 1704 Jun  6 12:19 /etc/openvpn/easy-rsa/pki/private/server_r.key
OpenVPN Client 用の証明書と秘密鍵を生成します。パスフレーズは、前入れたものと同じものを入れます。
./easyrsa build-client-full client1 nopass
実行例
[root@vpn1 easy-rsa]# ./easyrsa build-client-full client1 nopass
Using SSL: openssl OpenSSL 1.0.2k-fips  26 Jan 2017
Generating a 2048 bit RSA private key
.............+++
......+++
writing new private key to '/etc/openvpn/easy-rsa/pki/easy-rsa-23789.LUA8zM/tmp.kSR0HK'
-----
Using configuration from /etc/openvpn/easy-rsa/pki/easy-rsa-23789.LUA8zM/tmp.OwLUEr
Enter pass phrase for /etc/openvpn/easy-rsa/pki/private/ca.key:
Check that the request matches the signature
Signature ok
The Subject's Distinguished Name is as follows
commonName            :ASN.1 12:'client1'
Certificate is to be certified until Sep  9 22:26:28 2022 GMT (825 days)

Write out database with 1 new entries
Data Base Updated

[root@vpn1 easy-rsa]#
Client 証明書はここに自動生成されます。
[root@vpn1 easy-rsa]# ls -la /etc/openvpn/easy-rsa/pki/issued/client1.crt
-rw-------. 1 root root 4403 Jun  6 22:26 pki/issued/client1.crt
Client 秘密鍵はここに自動生成されます。
[root@vpn1 easy-rsa]# ls -la /etc/openvpn/easy-rsa/pki/private/client1.key
-rw-------. 1 root root 1704 Jun  6 22:26 pki/private/client1.key
OpenVPNの設定(Server側)
OpenVPN 側で設定ファイルのテンプレートを提供しています。OpenVPN Server のテンプレートをコピーします。
cp -p /usr/share/doc/openvpn-2.4.9/sample/sample-config-files/server.conf /etc/openvpn/server_r.conf
編集します。
vim /etc/openvpn/server_r.conf
中身
[78,79,80行目(変更):ca証明書、サーバ証明書、秘密鍵の指定]
ca /etc/openvpn/easy-rsa/pki/ca.crt
cert /etc/openvpn/easy-rsa/pki/issued/server_r.crt
key /etc/openvpn/easy-rsa/pki/private/server_r.key  # This file should be kept secret

[85行目(変更):乱数(DH)パラメータの指定]
dh /etc/openvpn/easy-rsa/pki/dh.pem

[101行目:仮想ネットワークの指定(TUNモードの時に指定)]
server 10.8.0.0 255.255.255.0

[142行目(変更):Client 側から通信させたい、Server側のLANセグメントを指定(TUNモードの時に指定)]
push "route 10.0.0.0 255.255.255.0"
push "route 10.0.255.0 255.255.255.0"

[155行目(変更) : Server 側から通信させたい、Client側のLANセグメントを指定]
client-config-dir ccd
route 192.168.0.0 255.255.0.0

[274,275行目(変更):ユーザ権限の設定]
user nobody
group nobody

[287行目(変更):ステータスログ]
status /var/log/openvpn/openvpn-status.log

[296行目(変更):稼働ログ]
log         /var/log/openvpn/openvpn.log
log-append  /var/log/openvpn/openvpn.log
Server 側から、Client側へ通信したいときの CIDR を指定します。client1という名前は、Client 証明書を作ったときの名前と同じものを指定します。
mkdir /etc/openvpn/ccd
touch /etc/openvpn/ccd/client1
echo "iroute 192.168.0.0 255.255.0.0" > /etc/openvpn/ccd/client1
log出力先を作成します。
mkdir /var/log/openvpn/
TLSキーの作成をします。
openvpn --genkey --secret /etc/openvpn/ta.key
作成されました。
[root@vpn1 openvpn]# ls -la /etc/openvpn/ta.key
-rw-------. 1 root root 636 Jun  6 23:00 /etc/openvpn/ta.key
OpenVPN Server をテスト起動確認してみます。次のコマンドを実行します。Shell には何も表示されません。
openvpn /etc/openvpn/server_r.conf
別の Shell を開いて、次のlogが出力されていればOKです。
末尾の Initialization Sequence Completed を確認するとよいでしょう。
[root@vpn1 openvpn]# cat /var/log/openvpn/openvpn.log
Sat Jun  6 23:01:16 2020 OpenVPN 2.4.9 x86_64-pc-linux-gnu [SSL (OpenSSL)] [LZO] [LZ4] [EPOLL] [MH/PKTINFO] [AEAD] built on Jun  6 2020
Sat Jun  6 23:01:16 2020 library versions: OpenSSL 1.0.2k-fips  26 Jan 2017, LZO 2.06
Sat Jun  6 23:01:16 2020 Diffie-Hellman initialized with 2048 bit key
Sat Jun  6 23:01:16 2020 Outgoing Control Channel Authentication: Using 160 bit message hash 'SHA1' for HMAC authentication
Sat Jun  6 23:01:16 2020 Incoming Control Channel Authentication: Using 160 bit message hash 'SHA1' for HMAC authentication
Sat Jun  6 23:01:16 2020 ROUTE_GATEWAY 10.0.0.1/255.255.255.0 IFACE=ens3 HWADDR=02:00:17:00:f0:3a
Sat Jun  6 23:01:16 2020 TUN/TAP device tun0 opened
Sat Jun  6 23:01:16 2020 TUN/TAP TX queue length set to 100
Sat Jun  6 23:01:16 2020 /usr/sbin/ifconfig tun0 10.8.0.1 pointopoint 10.8.0.2 mtu 1500
Sat Jun  6 23:01:16 2020 /usr/sbin/route add -net 10.8.0.0 netmask 255.255.255.0 gw 10.8.0.2
Sat Jun  6 23:01:16 2020 Could not determine IPv4/IPv6 protocol. Using AF_INET
Sat Jun  6 23:01:16 2020 Socket Buffers: R=[212992->212992] S=[212992->212992]
Sat Jun  6 23:01:16 2020 UDPv4 link local (bound): [AF_INET][undef]:1194
Sat Jun  6 23:01:16 2020 UDPv4 link remote: [AF_UNSPEC]
Sat Jun  6 23:01:16 2020 GID set to nobody
Sat Jun  6 23:01:16 2020 UID set to nobody
Sat Jun  6 23:01:16 2020 MULTI: multi_init called, r=256 v=256
Sat Jun  6 23:01:16 2020 IFCONFIG POOL: base=10.8.0.4 size=62, ipv6=0
Sat Jun  6 23:01:16 2020 IFCONFIG POOL LIST
Sat Jun  6 23:01:16 2020 Initialization Sequence Completed
OpenVPN Server の状態をみてみましょう。
tun0 interface が自動生成されています。VPNトンネル用のインターフェースです。
[root@vpn1 openvpn]# ip -d a
1: lo: <LOOPBACK,UP,LOWER_UP> mtu 65536 qdisc noqueue state UNKNOWN group default qlen 1000
    link/loopback 00:00:00:00:00:00 brd 00:00:00:00:00:00 promiscuity 0 numtxqueues 1 numrxqueues 1 gso_max_size 65536 gso_max_segs 65535
    inet 127.0.0.1/8 scope host lo
       valid_lft forever preferred_lft forever
    inet6 ::1/128 scope host
       valid_lft forever preferred_lft forever
2: ens3: <BROADCAST,MULTICAST,UP,LOWER_UP> mtu 9000 qdisc mq state UP group default qlen 1000
    link/ether 02:00:17:00:f0:3a brd ff:ff:ff:ff:ff:ff promiscuity 0 numtxqueues 16 numrxqueues 2 gso_max_size 65536 gso_max_segs 65535
    inet 10.0.0.3/24 brd 10.0.0.255 scope global dynamic ens3
       valid_lft 72578sec preferred_lft 72578sec
    inet6 fe80::17ff:fe00:f03a/64 scope link
       valid_lft forever preferred_lft forever
3: tun0: <POINTOPOINT,MULTICAST,NOARP,UP,LOWER_UP> mtu 1500 qdisc pfifo_fast state UNKNOWN group default qlen 100
    link/none  promiscuity 0
    tun numtxqueues 1 numrxqueues 1 gso_max_size 65536 gso_max_segs 65535
    inet 10.8.0.1 peer 10.8.0.2/32 scope global tun0
       valid_lft forever preferred_lft forever
    inet6 fe80::f9cb:9b7a:86e5:1651/64 scope link flags 800
       valid_lft forever preferred_lft forever
ルーティングテーブルはこんな感じです。Client 側へのルート情報も自動的に入っています。
[opc@vpn1 ~]$ ip r
default via 10.0.0.1 dev ens3
10.0.0.0/24 dev ens3 proto kernel scope link src 10.0.0.3
10.8.0.0/24 via 10.8.0.2 dev tun0
10.8.0.2 dev tun0 proto kernel scope link src 10.8.0.1
169.254.0.0/16 dev ens3 proto static scope link
169.254.0.0/16 dev ens3 scope link metric 1002
192.168.0.0/16 via 10.8.0.2 dev tun0
テスト実行した openvpn を Ctrl+C で止めます。
一旦ログファイルを削除します。
rm /var/log/openvpn/*
Service の起動(Server側)
コマンドで毎回実行するのはしんどいので、Systemd で管理されているサービスから起動します。まずは、statusで確認します。
[root@vpn1 openvpn]# systemctl status openvpn@server_r
● openvpn@server_r.service - OpenVPN Robust And Highly Flexible Tunneling Application On server_r
   Loaded: loaded (/usr/lib/systemd/system/openvpn@.service; disabled; vendor preset: disabled)
   Active: inactive (dead)
起動します。
systemctl start openvpn@server_r
statusを見ます。running となっていればOKです。
[root@vpn1 openvpn]# systemctl status openvpn@server_r
● openvpn@server_r.service - OpenVPN Robust And Highly Flexible Tunneling Application On server_r
   Loaded: loaded (/usr/lib/systemd/system/openvpn@.service; disabled; vendor preset: disabled)
   Active: active (running) since Sat 2020-06-06 23:13:09 GMT; 1min 29s ago
 Main PID: 24498 (openvpn)
   Status: "Initialization Sequence Completed"
   CGroup: /system.slice/system-openvpn.slice/openvpn@server_r.service
           └─24498 /usr/sbin/openvpn --cd /etc/openvpn/ --config server_r.conf

Jun 06 23:13:09 vpn1 systemd[1]: Starting OpenVPN Robust And Highly Flexible Tunneling Application On server_r...
Jun 06 23:13:09 vpn1 systemd[1]: Started OpenVPN Robust And Highly Flexible Tunneling Application On server_r.
自動起動するように enable もしておきます。
systemctl enable openvpn@server_r
Server から Client へ必要なファイルのコピー
OpenVPN Server で作成したクライアント証明書などを、OpenVPN Client へコピーします。
Server で実施
必要なファイルは次の4種類です。
- ca証明書(ca.crt)
- クライアント証明書(client1.crt)
- クライアント秘密鍵(client1.key)
- TSL認証キー(ta.key)
適当に一個にまとめて SCP します。
mkdir /home/opc/toclient
sudo cp -p /etc/openvpn/easy-rsa/pki/ca.crt /home/opc/toclient
sudo cp -p /etc/openvpn/easy-rsa/pki/issued/client1.crt /home/opc/toclient
sudo cp -p /etc/openvpn/easy-rsa/pki/private/client1.key /home/opc/toclient
sudo cp -p /etc/openvpn/ta.key /home/opc/toclient
確認
[root@vpn1 toclient]# ls -la /home/opc/toclient/
total 20
drwxrwxr-x. 2 opc  opc    72 Jun  7 00:40 .
drwx------. 8 opc  opc   171 Jun  6 23:23 ..
-rw-------. 1 root root 1143 Jun  6 12:13 ca.crt
-rw-------. 1 root root 4403 Jun  6 22:26 client1.crt
-rw-------. 1 root root 1704 Jun  6 22:26 client1.key
-rw-------. 1 root root  636 Jun  6 23:00 ta.key
chmod
chmod 660 /home/opc/toclient/*
chown opc: /home/opc/toclient/*
scp
scp /home/opc/toclient/* opc@168.138.219.164:/home/opc/toclient/
Clientで実施
権限設定をして適当に配置します。
chmod 600 /home/opc/toclient/*
chown root: /home/opc/toclient/*
mkdir /etc/openvpn/clientfiles
cp -p /home/opc/toclient/* /etc/openvpn/clientfiles
確認
[root@vpn2 clientfiles]# ls -la /etc/openvpn/clientfiles
total 20
drwxr-xr-x. 2 root root   72 Jun  7 00:47 .
drwxr-xr-x. 5 root root   53 Jun  7 00:47 ..
-rw-------. 1 root root 1143 Jun  7 00:43 ca.crt
-rw-------. 1 root root 4403 Jun  7 00:43 client1.crt
-rw-------. 1 root root 1704 Jun  7 00:43 client1.key
-rw-------. 1 root root  636 Jun  7 00:43 ta.key
OpenVPNの設定(Client側)
OpenVPN Client 側で OpenVPN の設定をします。
cp -p /usr/share/doc/openvpn-2.4.9/sample/sample-config-files/client.conf /etc/openvpn/client.conf
設定ファイルの編集
vim /etc/openvpn/client.conf
中身
[42行目: OpenVPN Server 側の Public IP とPort番号を指定]
remote 158.101.144.119 1194

[62-63行目]
user nobody
group nobody

[88-90行目: 各種証明書のファイルの指定]
ca /etc/openvpn/clientfiles/ca.crt
cert /etc/openvpn/clientfiles/client1.crt
key /etc/openvpn/clientfiles/client1.key

[108行目: ta keyの指定]
tls-auth /etc/openvpn/clientfiles/ta.key 1

[末尾: Log設定]
# for logging
status      /var/log/openvpn/openvpn-status.log
log         /var/log/openvpn/openvpn.log
log-append  /var/log/openvpn/openvpn.log
log出力先のディレクトリを作成します。
mkdir /var/log/openvpn/
テスト起動確認をします。Shell には何も表示されません
openvpn /etc/openvpn/client.conf
openvpn.log に次のような内容が出力されていればOKです。 Initialization Sequence Completed を確認するとよいでしょう。
[root@vpn2 openvpn]# cat /var/log/openvpn/openvpn.log
Sun Jun  7 01:00:19 2020 OpenVPN 2.4.9 x86_64-redhat-linux-gnu [Fedora EPEL patched] [SSL (OpenSSL)] [LZO] [LZ4] [EPOLL] [PKCS11] [MH/PKTINFO] [AEAD] built on Apr 24 2020
Sun Jun  7 01:00:19 2020 library versions: OpenSSL 1.0.2k-fips  26 Jan 2017, LZO 2.06
Sun Jun  7 01:00:19 2020 Outgoing Control Channel Authentication: Using 160 bit message hash 'SHA1' for HMAC authentication
Sun Jun  7 01:00:19 2020 Incoming Control Channel Authentication: Using 160 bit message hash 'SHA1' for HMAC authentication
Sun Jun  7 01:00:19 2020 TCP/UDP: Preserving recently used remote address: [AF_INET]158.101.144.119:1194
Sun Jun  7 01:00:19 2020 Socket Buffers: R=[212992->212992] S=[212992->212992]
Sun Jun  7 01:00:19 2020 UDP link local: (not bound)
Sun Jun  7 01:00:19 2020 UDP link remote: [AF_INET]158.101.144.119:1194
Sun Jun  7 01:00:19 2020 NOTE: UID/GID downgrade will be delayed because of --client, --pull, or --up-delay
Sun Jun  7 01:00:19 2020 TLS: Initial packet from [AF_INET]158.101.144.119:1194, sid=eebce14a fa20d5c9
Sun Jun  7 01:00:19 2020 VERIFY OK: depth=1, CN=sugi
Sun Jun  7 01:00:19 2020 VERIFY KU OK
Sun Jun  7 01:00:19 2020 Validating certificate extended key usage
Sun Jun  7 01:00:19 2020 ++ Certificate has EKU (str) TLS Web Server Authentication, expects TLS Web Server Authentication
Sun Jun  7 01:00:19 2020 VERIFY EKU OK
Sun Jun  7 01:00:19 2020 VERIFY OK: depth=0, CN=server_r
Sun Jun  7 01:00:19 2020 Control Channel: TLSv1.2, cipher TLSv1/SSLv3 ECDHE-RSA-AES256-GCM-SHA384, 2048 bit RSA
Sun Jun  7 01:00:19 2020 [server_r] Peer Connection Initiated with [AF_INET]158.101.144.119:1194
Sun Jun  7 01:00:21 2020 SENT CONTROL [server_r]: 'PUSH_REQUEST' (status=1)
Sun Jun  7 01:00:21 2020 PUSH: Received control message: 'PUSH_REPLY,route 10.0.0.0 255.255.255.0,route 10.0.255.0 255.255.255.0,route 10.8.0.1,topology net30,ping 10,ping-restart 120,ifconfig 10.8.0.6 10.8.0.5,peer-id 0,cipher AES-256-GCM'
Sun Jun  7 01:00:21 2020 OPTIONS IMPORT: timers and/or timeouts modified
Sun Jun  7 01:00:21 2020 OPTIONS IMPORT: --ifconfig/up options modified
Sun Jun  7 01:00:21 2020 OPTIONS IMPORT: route options modified
Sun Jun  7 01:00:21 2020 OPTIONS IMPORT: peer-id set
Sun Jun  7 01:00:21 2020 OPTIONS IMPORT: adjusting link_mtu to 1624
Sun Jun  7 01:00:21 2020 OPTIONS IMPORT: data channel crypto options modified
Sun Jun  7 01:00:21 2020 Data Channel: using negotiated cipher 'AES-256-GCM'
Sun Jun  7 01:00:21 2020 Outgoing Data Channel: Cipher 'AES-256-GCM' initialized with 256 bit key
Sun Jun  7 01:00:21 2020 Incoming Data Channel: Cipher 'AES-256-GCM' initialized with 256 bit key
Sun Jun  7 01:00:21 2020 ROUTE_GATEWAY 192.168.0.1/255.255.255.0 IFACE=ens3 HWADDR=02:00:17:00:70:f2
Sun Jun  7 01:00:21 2020 TUN/TAP device tun0 opened
Sun Jun  7 01:00:21 2020 TUN/TAP TX queue length set to 100
Sun Jun  7 01:00:21 2020 /sbin/ip link set dev tun0 up mtu 1500
Sun Jun  7 01:00:21 2020 /sbin/ip addr add dev tun0 local 10.8.0.6 peer 10.8.0.5
Sun Jun  7 01:00:21 2020 /sbin/ip route add 10.0.0.0/24 via 10.8.0.5
Sun Jun  7 01:00:21 2020 /sbin/ip route add 10.0.255.0/24 via 10.8.0.5
Sun Jun  7 01:00:21 2020 /sbin/ip route add 10.8.0.1/32 via 10.8.0.5
Sun Jun  7 01:00:21 2020 GID set to nobody
Sun Jun  7 01:00:21 2020 UID set to nobody
Sun Jun  7 01:00:21 2020 WARNING: this configuration may cache passwords in memory -- use the auth-nocache option to prevent this
Sun Jun  7 01:00:21 2020 Initialization Sequence Completed
[root@vpn2 openvpn]#
OpenVPN Client 側のインターフェースを確認します。tun0インターフェースが自動生成されています。
[root@vpn2 openvpn]# ip -d a
1: lo: <LOOPBACK,UP,LOWER_UP> mtu 65536 qdisc noqueue state UNKNOWN group default qlen 1000
    link/loopback 00:00:00:00:00:00 brd 00:00:00:00:00:00 promiscuity 0 numtxqueues 1 numrxqueues 1 gso_max_size 65536 gso_max_segs 65535
    inet 127.0.0.1/8 scope host lo
       valid_lft forever preferred_lft forever
    inet6 ::1/128 scope host
       valid_lft forever preferred_lft forever
2: ens3: <BROADCAST,MULTICAST,UP,LOWER_UP> mtu 9000 qdisc mq state UP group default qlen 1000
    link/ether 02:00:17:00:70:f2 brd ff:ff:ff:ff:ff:ff promiscuity 0 numtxqueues 16 numrxqueues 2 gso_max_size 65536 gso_max_segs 65535
    inet 192.168.0.2/24 brd 192.168.0.255 scope global dynamic ens3
       valid_lft 64860sec preferred_lft 64860sec
    inet6 fe80::17ff:fe00:70f2/64 scope link
       valid_lft forever preferred_lft forever
3: tun0: <POINTOPOINT,MULTICAST,NOARP,UP,LOWER_UP> mtu 1500 qdisc pfifo_fast state UNKNOWN group default qlen 100
    link/none  promiscuity 0
    tun numtxqueues 1 numrxqueues 1 gso_max_size 65536 gso_max_segs 65535
    inet 10.8.0.6 peer 10.8.0.5/32 scope global tun0
       valid_lft forever preferred_lft forever
    inet6 fe80::4a5c:25cb:daf:1eb3/64 scope link flags 800
       valid_lft forever preferred_lft forever
[root@vpn2 openvpn]#
ルーティングテーブルを確認します。Site 1 側へのルーティング情報が含まれています。
[root@vpn2 openvpn]# ip r
default via 192.168.0.1 dev ens3
10.0.0.0/24 via 10.8.0.5 dev tun0
10.0.255.0/24 via 10.8.0.5 dev tun0
10.8.0.1 via 10.8.0.5 dev tun0
10.8.0.5 dev tun0 proto kernel scope link src 10.8.0.6
169.254.0.0/16 dev ens3 proto static scope link
169.254.0.0/16 dev ens3 scope link metric 1002
192.168.0.0/24 dev ens3 proto kernel scope link src 192.168.0.2
テスト実行した openvpn を Ctrl+C で止めます。一旦ログファイルを削除します。
rm /var/log/openvpn/*
Service の起動(Client側)
Client 側も Systemd で起動しましょう。まずは status
[root@vpn1 openvpn]# systemctl status openvpn@client
● openvpn@server_r.service - OpenVPN Robust And Highly Flexible Tunneling Application On server_r
   Loaded: loaded (/usr/lib/systemd/system/openvpn@.service; disabled; vendor preset: disabled)
   Active: inactive (dead)
start
systemctl start openvpn@client
status で running を確認
[root@vpn2 openvpn]# systemctl status openvpn@client
● openvpn@client.service - OpenVPN Robust And Highly Flexible Tunneling Application On client
   Loaded: loaded (/usr/lib/systemd/system/openvpn@.service; disabled; vendor preset: disabled)
   Active: active (running) since Sun 2020-06-07 01:25:07 GMT; 7s ago
 Main PID: 13503 (openvpn)
   Status: "Initialization Sequence Completed"
   CGroup: /system.slice/system-openvpn.slice/openvpn@client.service
           └─13503 /usr/sbin/openvpn --cd /etc/openvpn/ --config client.conf

Jun 07 01:25:07 vpn2 systemd[1]: Starting OpenVPN Robust And Highly Flexible Tunneling Application On client...
Jun 07 01:25:07 vpn2 systemd[1]: Started OpenVPN Robust And Highly Flexible Tunneling Application On client.
enable
systemctl enable openvpn@client
OpenVPN 同士 疎通確認
ここまで設定すると、OpenVPN 同士は VPN トンネルが張られて互いに疎通が出来ます。
Server to Client
tun0 インターフェースへの疎通が出来ることを確認します。
[opc@vpn1 toclient]$ ping 10.8.0.6
PING 10.8.0.6 (10.8.0.6) 56(84) bytes of data.
64 bytes from 10.8.0.6: icmp_seq=1 ttl=64 time=0.362 ms
64 bytes from 10.8.0.6: icmp_seq=2 ttl=64 time=0.231 ms
64 bytes from 10.8.0.6: icmp_seq=3 ttl=64 time=0.214 ms
Client → Server
tun0 インターフェースへの疎通が出来ることを確認します。
[root@vpn2 openvpn]# ping 10.8.0.1
PING 10.8.0.1 (10.8.0.1) 56(84) bytes of data.
64 bytes from 10.8.0.1: icmp_seq=1 ttl=64 time=0.246 ms
64 bytes from 10.8.0.1: icmp_seq=2 ttl=64 time=0.215 ms
64 bytes from 10.8.0.1: icmp_seq=3 ttl=64 time=0.336 ms
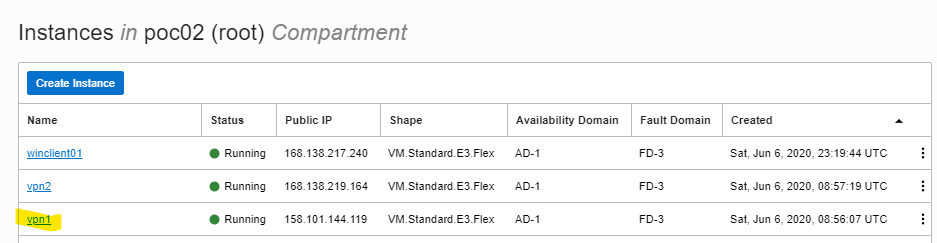
vNIC の Souce/Dest Check無効
ここからは、Oracle Cloud の固有の設定です。Oracle Cloud では、Compute Instance から送付されるパケットの宛先と送信元をチェックしています。Compute Instance から送付されたパケットの送付元が、Compute Instance ではなかったら何かがおかしいと判断して、パケットを遮断します。しかし、今回の OpenVPN Server や Client は、自分自身がルーターの役割を担うため、このチェックを無効にします。
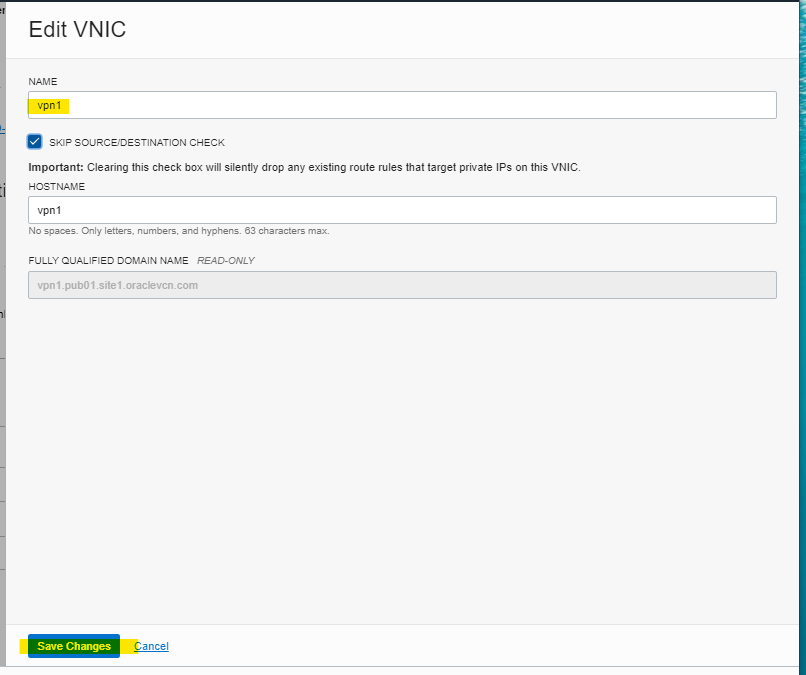
OpenVPN Server, Client の両方とも実施が必要です。画像の例は OpenVPN Server の画面遷移を紹介します。
Edit

チェックを入れて Save
Client 側も忘れずに実施しましょう。
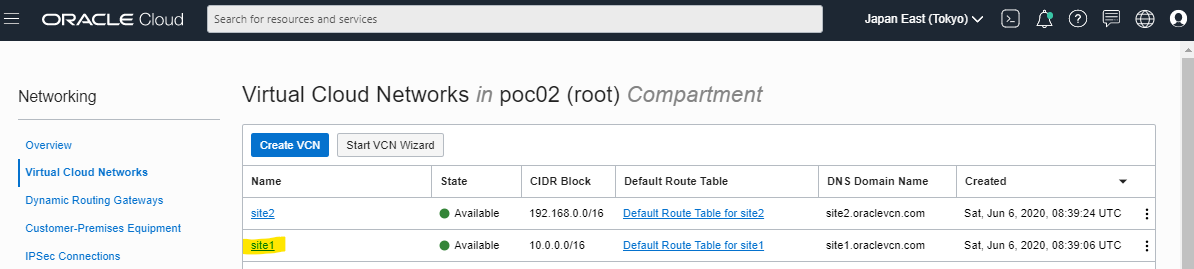
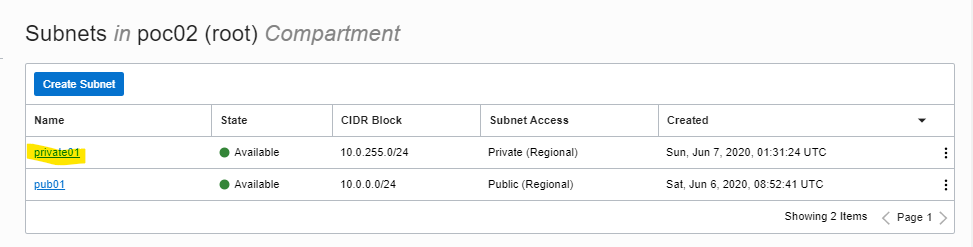
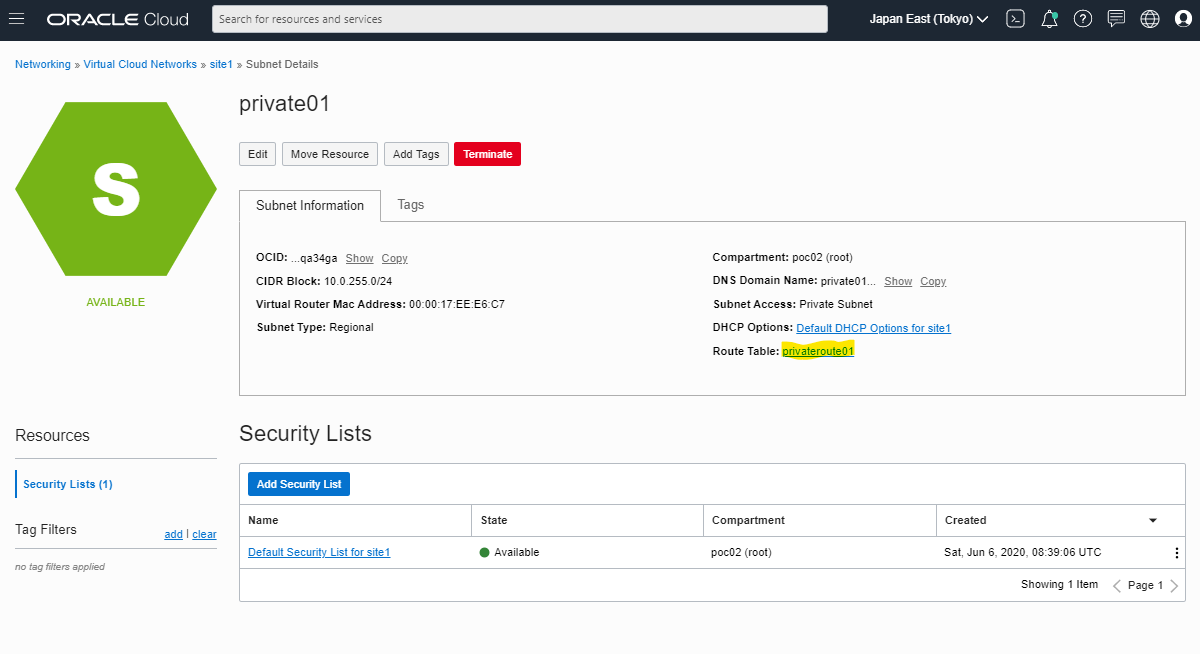
Route Table
次は Oracle Cloud 側のルーティング設定です。Oracle Cloud 側の仮想ネットワーク(VCN)側でもルーティング情報を持っています。互いの Site 間の通信は、OpenVPN 同士で通信しないといけないため、この設定が必要です。
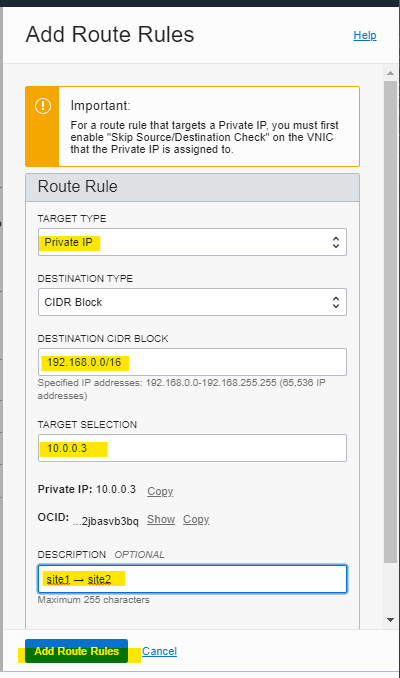
次の画像の例は Site1(Server側) から Site2(Client側) へ通信するときに、OpenVPN Server を経由するルールを指定しています。
詳細画面へ移動
詳細画面へ移動
ルール追加

Add
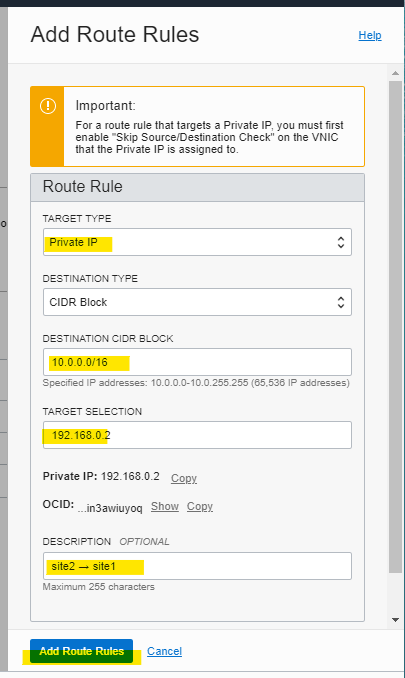
Client 側も忘れずに実施しましょう
参考 : Client 側の設定
OpenVPNでIPフォワードの許可 (Server, Client 両方で実施)
ens3 インターフェースから来たパケットを、tun0 インターフェースへレスポンスするために、IPフォワードを許可する設定をします。sysctl のファイルでカーネルパラメータを編集します。
sudo vim /etc/sysctl.conf
末尾に追加します。
net.ipv4.ip_forward=1
読み込みます。
sudo sysctl -p
疎通確認
ここまで全ての設定が完了しました。まず、構成図を確認しましょう。

Site1VM と Site2VM 間で Ping が通ること、SSH が出来ることを確認します。まずは Ping です。正常に通信が出来ます。
無負荷状態だと平均 0.353 ms ですね。Site1 と Site2 の距離が近いはずなので、こんなもんかなという気がします。
[opc@vpn1hoge ~]$ sudo ping -i 0.1 192.168.255.2
PING 192.168.255.2 (192.168.255.2) 56(84) bytes of data.
64 bytes from 192.168.255.2: icmp_seq=1 ttl=62 time=0.641 ms
64 bytes from 192.168.255.2: icmp_seq=2 ttl=62 time=0.349 ms
64 bytes from 192.168.255.2: icmp_seq=3 ttl=62 time=0.427 ms
64 bytes from 192.168.255.2: icmp_seq=4 ttl=62 time=0.332 ms
64 bytes from 192.168.255.2: icmp_seq=5 ttl=62 time=0.326 ms
64 bytes from 192.168.255.2: icmp_seq=6 ttl=62 time=0.390 ms
略
64 bytes from 192.168.255.2: icmp_seq=68 ttl=62 time=0.367 ms
64 bytes from 192.168.255.2: icmp_seq=69 ttl=62 time=0.351 ms
64 bytes from 192.168.255.2: icmp_seq=70 ttl=62 time=0.382 ms
64 bytes from 192.168.255.2: icmp_seq=71 ttl=62 time=0.311 ms
^C
--- 192.168.255.2 ping statistics ---
71 packets transmitted, 71 received, 0% packet loss, time 7000ms
rtt min/avg/max/mdev = 0.305/0.353/0.641/0.048 ms
[opc@vpn1hoge ~]$
SSH も正常に出来ます。
[opc@vpn1hoge ~]$ ssh opc@192.168.255.2
Last login: Sun Jun  7 06:37:15 2020 from 10.0.255.2
[opc@vpn2hoge ~]$
なお、Site1VM のインターフェースは次の内容です。
[opc@vpn1hoge ~]$ ip -d a
1: lo: <LOOPBACK,UP,LOWER_UP> mtu 65536 qdisc noqueue state UNKNOWN group default qlen 1000
    link/loopback 00:00:00:00:00:00 brd 00:00:00:00:00:00 promiscuity 0 numtxqueues 1 numrxqueues 1 gso_max_size 65536 gso_max_segs 65535
    inet 127.0.0.1/8 scope host lo
       valid_lft forever preferred_lft forever
    inet6 ::1/128 scope host
       valid_lft forever preferred_lft forever
2: ens3: <BROADCAST,MULTICAST,UP,LOWER_UP> mtu 9000 qdisc mq state UP group default qlen 1000
    link/ether 02:00:17:00:78:71 brd ff:ff:ff:ff:ff:ff promiscuity 0 numtxqueues 16 numrxqueues 2 gso_max_size 65536 gso_max_segs 65535
    inet 10.0.255.2/24 brd 10.0.255.255 scope global dynamic ens3
       valid_lft 71802sec preferred_lft 71802sec
    inet6 fe80::17ff:fe00:7871/64 scope link
       valid_lft forever preferred_lft forever
ルーティングテーブルはこれです。デフォルトルート → VCN Route Table → OpenVPN Server → OpenVPN Client → Site2VM へ疎通してそうなことが想像できます。
[opc@vpn1hoge ~]$ ip r
default via 10.0.255.1 dev ens3
10.0.255.0/24 dev ens3 proto kernel scope link src 10.0.255.2
169.254.0.0/16 dev ens3 proto static scope link
169.254.0.0/16 dev ens3 scope link metric 1002
参考URL
日本語 OpenVPN
https://www.openvpn.jp/
How To Install
https://www.openvpn.jp/document/how-to/
Site-To-Site VPN Routing Explained In Detail
https://openvpn.net/vpn-server-resources/site-to-site-routing-explained-in-detail/
Site-to-Site VPN on a Single Host Using OpenVPN
https://medium.com/@bjammal/site-to-site-vpn-on-a-single-host-using-openvpn-e9c5cdb22f92
CentOS7でVPNサーバを作ってみた(tun編)・・・サーバ起動まで
https://qiita.com/horus19761108/items/9c7879149218d9325c5e
OpenVPN site to site setup
https://zeldor.biz/2010/12/openvpn-site-to-site-setup/
memo : VyOS
https://www.creationline.com/lab/5191