概要
CentOS7.1を使用して、iSCSIのターゲット(ストレージ領域を提供する側)を構築します。
本当はFCで構築したかったのですが、自宅にSAN環境を作るのは許しが出なかったのであきらめました(´-`)
自宅にマシンルームが欲しい。。
以下URLを参考にしました。
http://linux-iscsi.org/wiki/Targetcli
http://linux-iscsi.org/wiki/ISCSI
http://snia-j.org/tech/nas/hakusho/hakusho1.html
http://sugakun.blog.fc2.com/blog-entry-2.html
http://techblog.clara.jp/2014/09/good-cost-performance-strage_iscsi-vol2-iscsi-contsruction/
http://enakai00.hatenablog.com/entry/2015/12/02/090114
手順
targetcliインストール
iSCSIのターゲット側に必要なtargetcliをインストールします。
[root@share-storage ~]# yum -y install targetcli
backstore定義
backstoreとは、ディスクにアクセスするための方法を定義します。
4種類の方法を指定することが出来ます。
1.FILEIO (Linux VFS devices)
任意のファイルを指定できます。ファイルを指定することで、
ファイルの裏側にあるブロックデバイスをバックアップする動作になります。
2.IBLOCK (Linux BLOCK devices)
ブロックデバイスを指定します。
通常、この指定方法が最もパフォーマンスが出る、と言われております。
3.PSCSI (Linux pass-through SCSI devices)
/proc/scsi/scsiに表示されるデバイスを提供する?よくわからないので、IBLOCKで良い気がします
4.Memory Copy RAMDISK (Linux RAMDISK_MCP)
自身のメモリを消費してRAM Diskとして利用します
2のIBLOCKの方式でターゲットを構成していきます。
参考:http://linux-iscsi.org/wiki/LIO#Backstores
iBlockで公開するブロックデバイスをfdisk -lコマンドで確認します。
「/dev/sdb」のブロックデバイス約400GBを公開します。
[root@share-storage ~]# fdisk -l

Disk /dev/sda: 17.2 GB, 17179869184 bytes, 33554432 sectors
Units = sectors of 1 * 512 = 512 bytes
Sector size (logical/physical): 512 bytes / 512 bytes
I/O サイズ (最小 / 推奨): 512 バイト / 512 バイト
Disk label type: dos
ディスク識別子: 0x0002053c

デバイス ブート      始点        終点     ブロック   Id  システム
/dev/sda1   *        2048     1026047      512000   83  Linux
/dev/sda2         1026048    33554431    16264192   8e  Linux LVM

Disk /dev/sdb: 429.5 GB, 429496729600 bytes, 838860800 sectors
Units = sectors of 1 * 512 = 512 bytes
Sector size (logical/physical): 512 bytes / 512 bytes
I/O サイズ (最小 / 推奨): 512 バイト / 512 バイト


Disk /dev/mapper/centos-root: 14.9 GB, 14889779200 bytes, 29081600 sectors
Units = sectors of 1 * 512 = 512 bytes
Sector size (logical/physical): 512 bytes / 512 bytes
I/O サイズ (最小 / 推奨): 512 バイト / 512 バイト


Disk /dev/mapper/centos-swap: 1719 MB, 1719664640 bytes, 3358720 sectors
Units = sectors of 1 * 512 = 512 bytes
Sector size (logical/physical): 512 bytes / 512 bytes
I/O サイズ (最小 / 推奨): 512 バイト / 512 バイト
targetcliコマンドでiSCSIの設定を行っていきます。
引数無しで実行するとコマンドプロンプトが出て、対話的な設定が可能です。
なお、対話的な設定はexitで抜けることが出来ます。
[root@share-storage ~]# targetcli
Warning: Could not load preferences file /root/.targetcli/prefs.bin.
targetcli shell version 2.1.fb41
Copyright 2011-2013 by Datera, Inc and others.
For help on commands, type 'help'.
/>
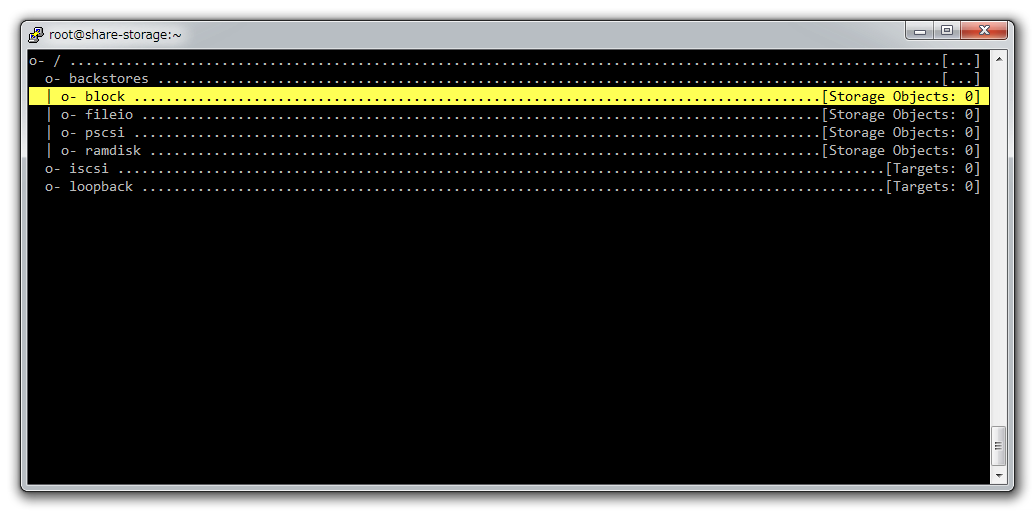
lsコマンドで、現在のtargetcliの状態を確認します。
何も定義していないので、まっさらな状態です。
/> ls
o- / ............................................................................................................. [...]
  o- backstores .................................................................................................. [...]
  | o- block ...................................................................................... [Storage Objects: 0]
  | o- fileio ..................................................................................... [Storage Objects: 0]
  | o- pscsi ...................................................................................... [Storage Objects: 0]
  | o- ramdisk .................................................................................... [Storage Objects: 0]
  o- iscsi ................................................................................................ [Targets: 0]
  o- loopback ............................................................................................. [Targets: 0]
/>
cdコマンドで"/backstores/block"へ移動し、createコマンドでblockの作成を行います。
cdコマンドを単体で実行すると、移動先のディレクトリをキーボードの上下キーで選択する事が出来るので
楽に移動できます。
/> cd
上下キーで移動先を選択して、エンターキーで移動できます。
createコマンドでブロックデバイス用のbackstoreを作成します。
name=任意の名前
dev=iSCSIとして公開するブロックデバイス名
を指定します。
/backstores/block> create name=block_backend_sdb dev=/dev/sdb
Created block storage object block_backend_sdb using /dev/sdb.
/backstores/block>
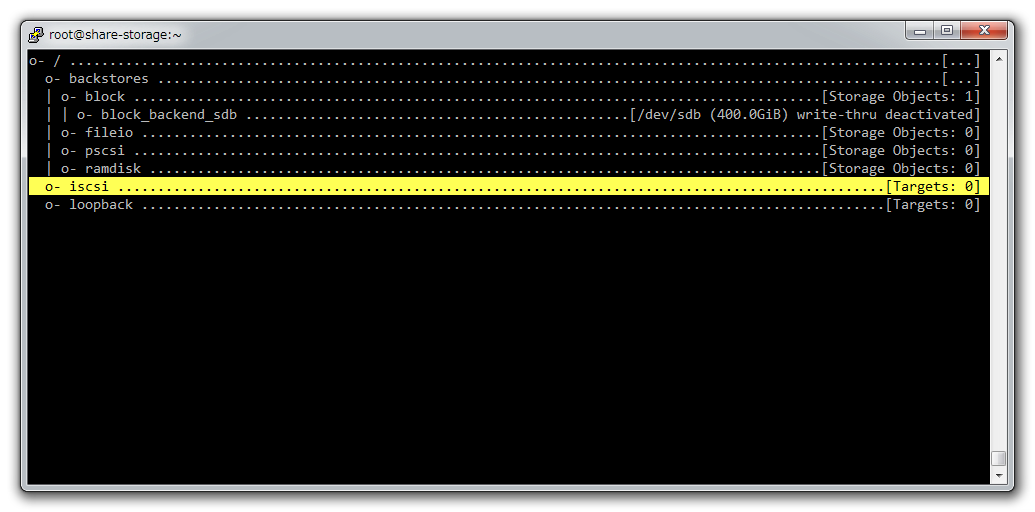
lsコマンドで確認します。
「block_backend_sdb」が新規作成されたことが確認できます。
/> ls
o- / ............................................................................................................. [...]
  o- backstores .................................................................................................. [...]
  | o- block ...................................................................................... [Storage Objects: 1]
  | | o- block_backend_sdb ................................................ [/dev/sdb (400.0GiB) write-thru deactivated]
  | o- fileio ..................................................................................... [Storage Objects: 0]
  | o- pscsi ...................................................................................... [Storage Objects: 0]
  | o- ramdisk .................................................................................... [Storage Objects: 0]
  o- iscsi ................................................................................................ [Targets: 0]
  o- loopback ............................................................................................. [Targets: 0]
/>
iSCSI Target情報の作成
cdコマンド(引数無)で「/iscsi」に移動します。
createコマンドでiSCSIターゲットを作成します。
引数無しで実行すると、自動的にIQNが設定されますが、
管理しやすいようにIQNのルールに従って任意で設定します。
IQN(iSCSI Qualified Name)とは
イニシエータやターゲットを一意に識別するための名前のことです。
iSCSIストレージに接続するには、ターゲットIQNを知っている必要があります。
IQNは重複してはいけないため、ネーミングルールが定義されています。
ネーミングルールを無視しても接続できそうですが、ちゃんと従いましょう。
ざっくり↓のルールです。
「iqn.年-月.ドメイン名:任意の名前」
RFC3720難しいことがつらつら記載されています。
興味あれば確認してみてください(投げやり)
それではcreateコマンドでIQNを指定してターゲット情報を作成します。
作成完了後、lsコマンドで確認しています。
/iscsi> create iqn.2015-12.local.mylabo:share-storage
Created target iqn.2015-12.local.mylabo:share-storage.
Created TPG 1.
Global pref auto_add_default_portal=true
Created default portal listening on all IPs (0.0.0.0), port 3260.
/iscsi>
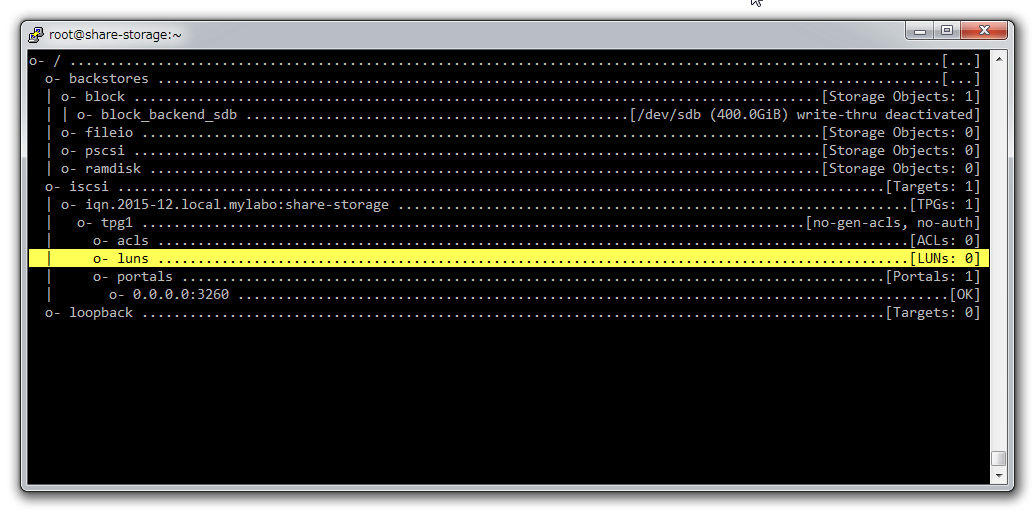
/iscsi> ls /
o- / ............................................................................................................. [...]
o- backstores .................................................................................................. [...]
| o- block ...................................................................................... [Storage Objects: 1]
| | o- block_backend_sdb ................................................ [/dev/sdb (400.0GiB) write-thru deactivated]
| o- fileio ..................................................................................... [Storage Objects: 0]
| o- pscsi ...................................................................................... [Storage Objects: 0]
| o- ramdisk .................................................................................... [Storage Objects: 0]
o- iscsi ................................................................................................ [Targets: 1]
| o- iqn.2015-12.local.mylabo:share-storage ................................................................ [TPGs: 1]
| o- tpg1 ................................................................................... [no-gen-acls, no-auth]
| o- acls .............................................................................................. [ACLs: 0]
| o- luns .............................................................................................. [LUNs: 0]
| o- portals ........................................................................................ [Portals: 1]
| o- 0.0.0.0:3260 ......................................................................................... [OK]
o- loopback ............................................................................................. [Targets: 0]
/iscsi>
backstoreとiSCSI targetの紐付け設定
cdコマンドで、先ほど作成した「iqn.2015-12.local.mylabo:share-storage」の下にある「tpg1/luns」に移動します。
createコマンドで、backstoreとiSCSI targetの紐付け設定をします。
createの後に作成したbackstoreを指定します。
デフォルトのNetworl Portal として「0.0.0.0:3260」が定義されていますので、
このまま、どのIPアドレス宛にもアクセス可能なようにしときます。
/iscsi/iqn.20...age/tpg1/luns> create /backstores/block/block_backend_sdb
Created LUN 0.
/iscsi/iqn.20...age/tpg1/luns>
/iscsi/iqn.20...age/tpg1/luns> ls /
o- / ............................................................................................................. [...]
  o- backstores .................................................................................................. [...]
  | o- block ...................................................................................... [Storage Objects: 1]
  | | o- block_backend_sdb .................................................. [/dev/sdb (400.0GiB) write-thru activated]
  | o- fileio ..................................................................................... [Storage Objects: 0]
  | o- pscsi ...................................................................................... [Storage Objects: 0]
  | o- ramdisk .................................................................................... [Storage Objects: 0]
  o- iscsi ................................................................................................ [Targets: 1]
  | o- iqn.2015-12.local.mylabo:share-storage ................................................................ [TPGs: 1]
  |   o- tpg1 ................................................................................... [no-gen-acls, no-auth]
  |     o- acls .............................................................................................. [ACLs: 0]
  |     o- luns .............................................................................................. [LUNs: 1]
  |     | o- lun0 ................................................................. [block/block_backend_sdb (/dev/sdb)]
  |     o- portals ........................................................................................ [Portals: 1]
  |       o- 0.0.0.0:3260 ......................................................................................... [OK]
  o- loopback ............................................................................................. [Targets: 0]
/iscsi/iqn.20...age/tpg1/luns>
ACLの設定
最後にACLを定義しますが、これには、接続を許可するイニシエーター名が必要になります。
今回の例では、VMware ESXiの2つからアクセスしたいので、
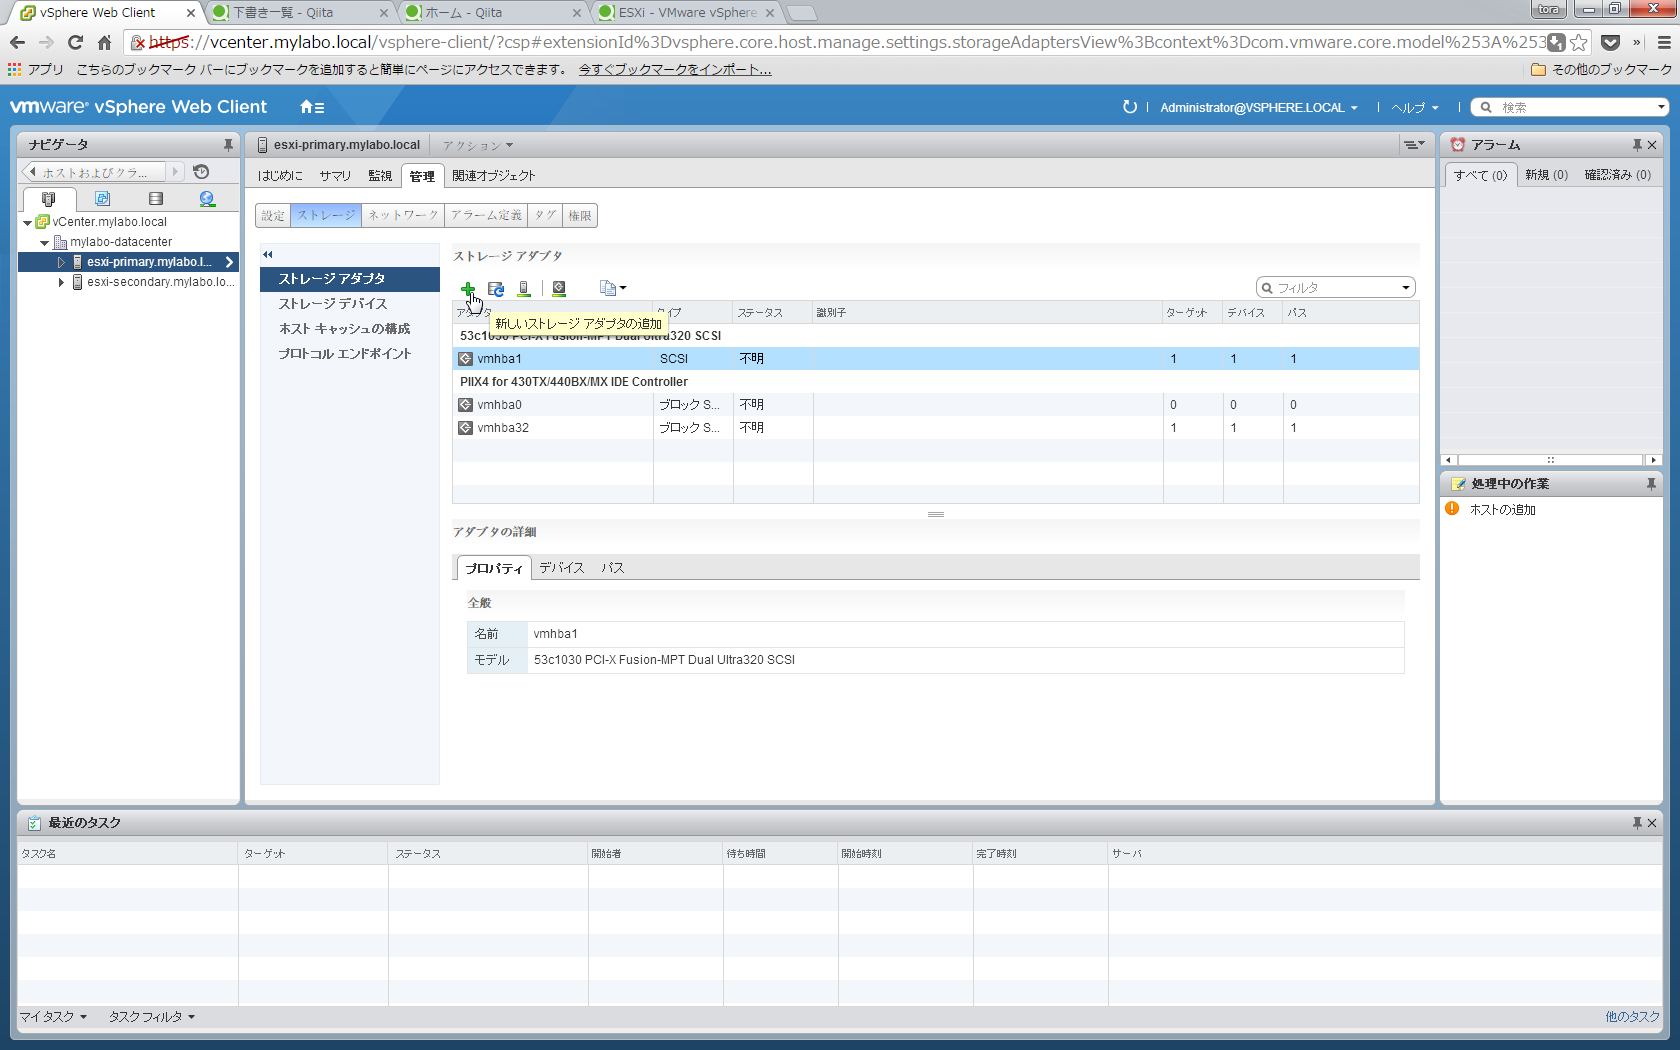
ESXi側でiSCSIアダプタを追加していなかったので、ついでに追加します。
「esxi-primary」「esxi-secondary」の2台のESXiについて、追加します。
vSphere Web Clientにログインし、「ホストおよびクラスタ」をクリックします。
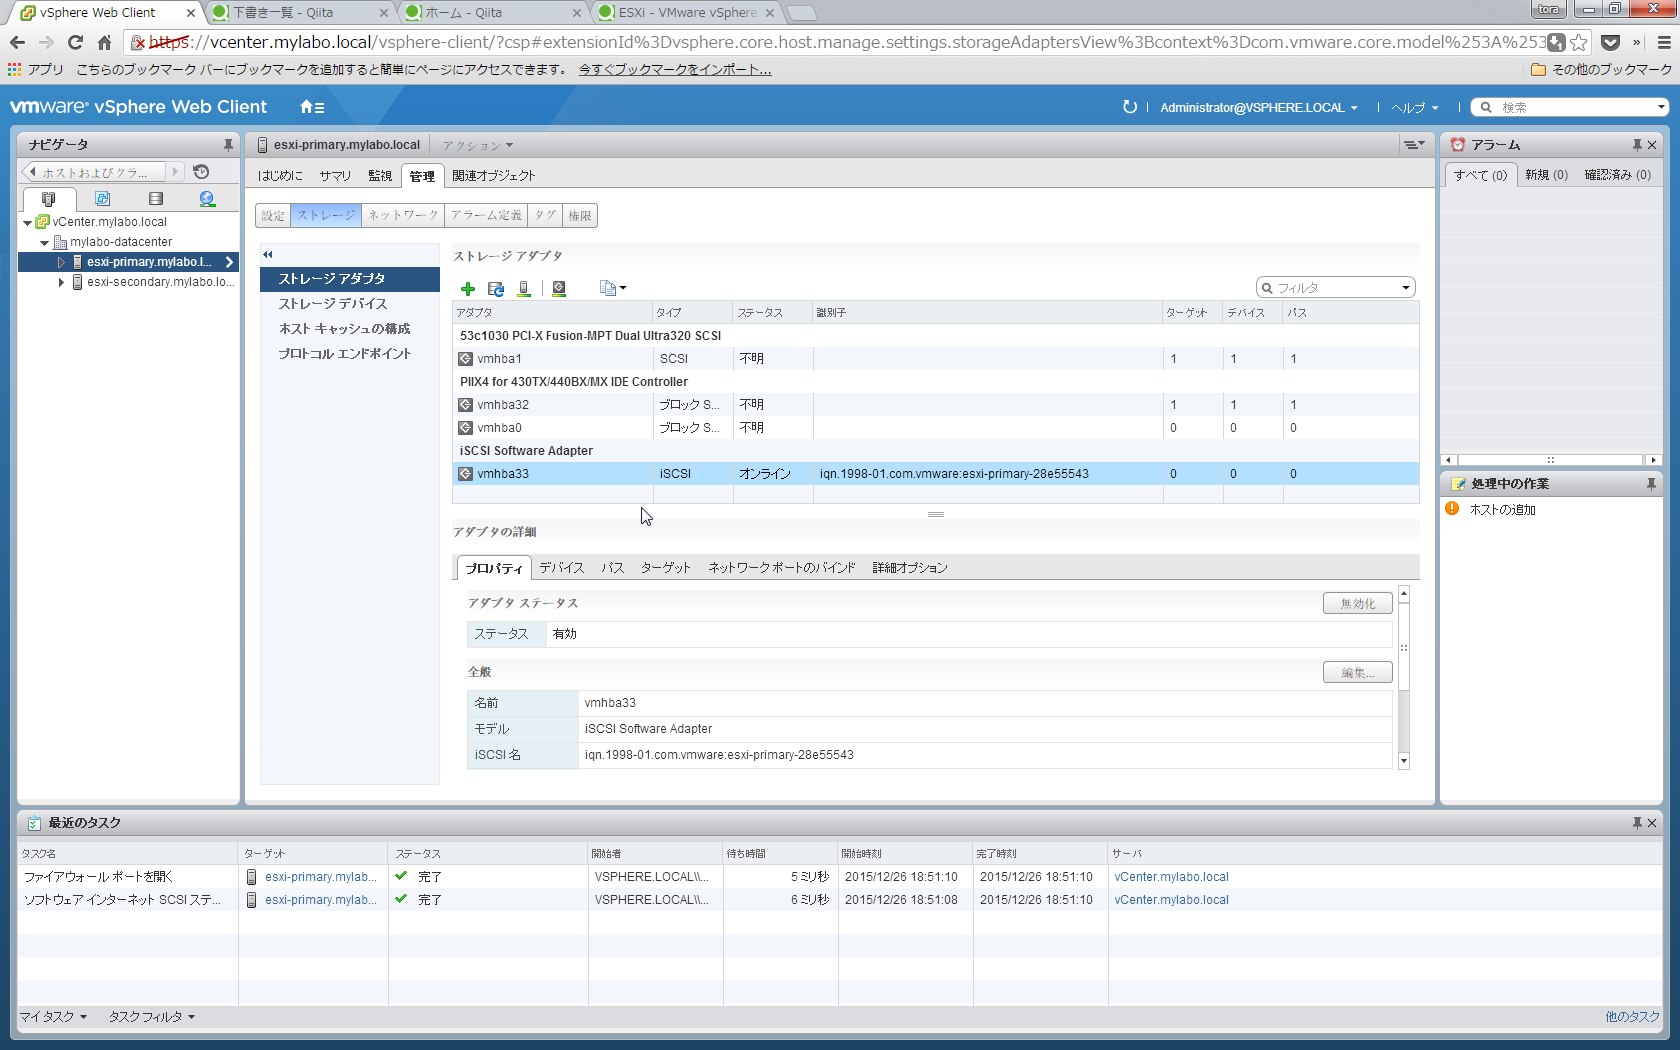
「esxi-primary」を選択して、「新しいストレージアダプタの追加」をクリックします。
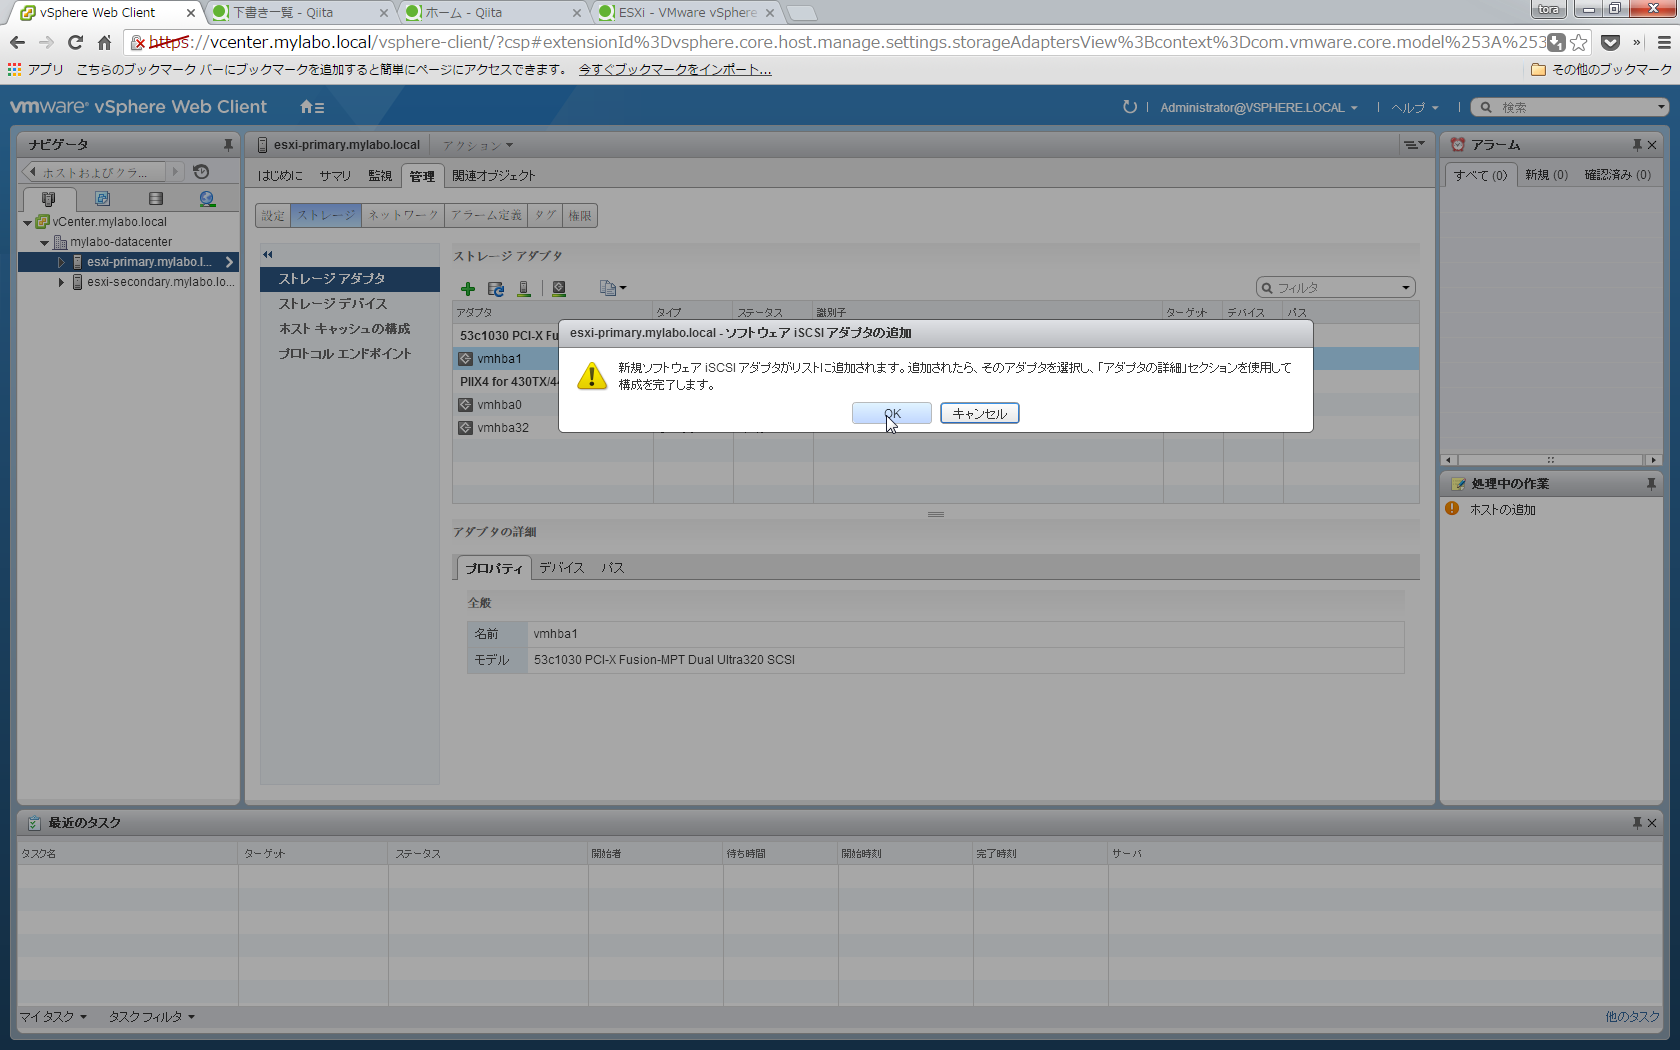
「ソフトウェアiSCSIアダプタ」をクリックします。

OK!
「esxi-primary」にiSCSIアダプタが構成されました。デフォルトで有効になっているので、アクセス可能です。
画面下にあるiSCSI名がIQNです。メモりましょう。
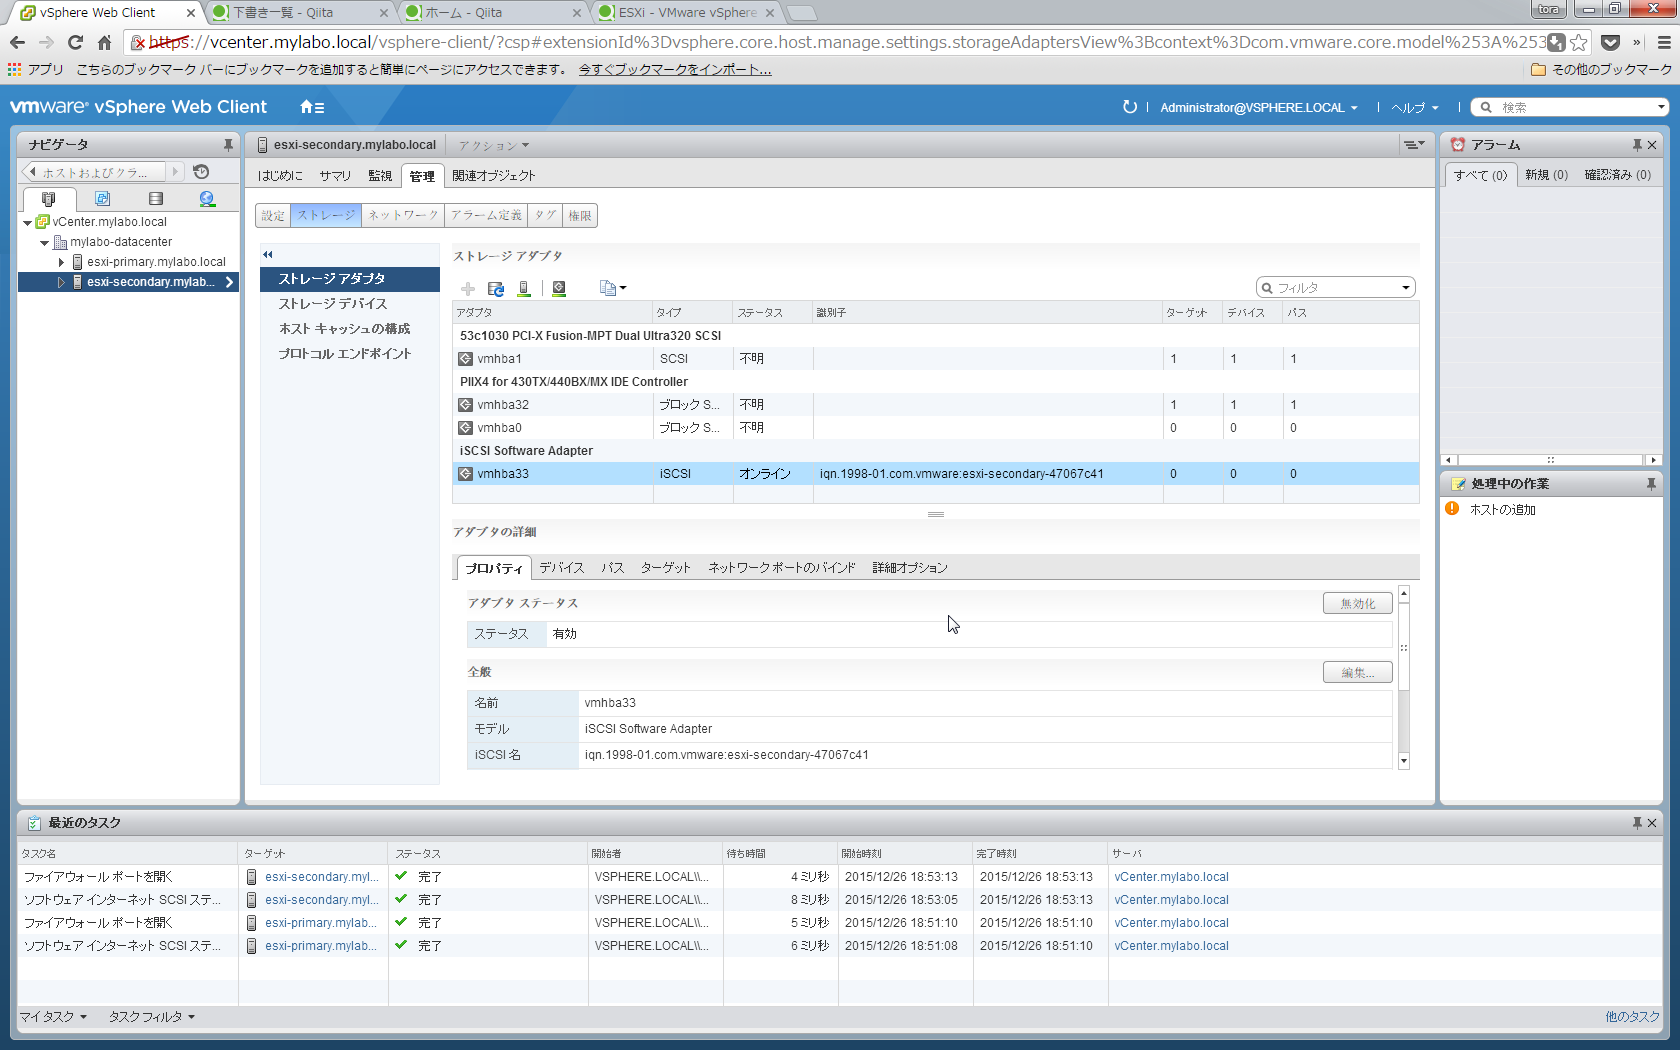
「esxi-secondary」にも同様に追加します。
iSCSI名をメモりましょう。
memo
iqn.1998-01.com.vmware:esxi-primary-28e55543
iqn.1998-01.com.vmware:esxi-secondary-47067c41
それではaclを設定していきます。
cdコマンドで移動します。
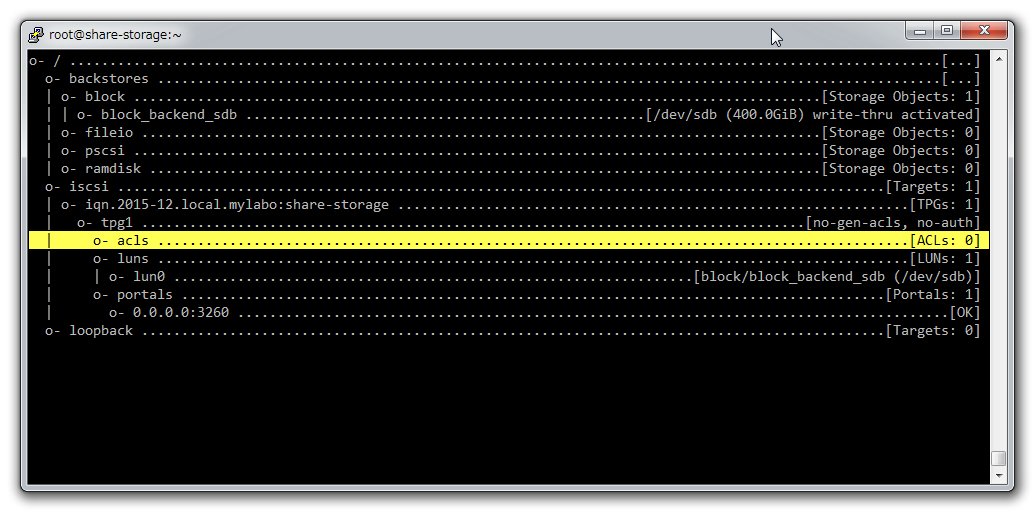
createコマンドで先ほどmemoしたIQNを指定します。
/iscsi/iqn.20...age/tpg1/acls> create iqn.1998-01.com.vmware:esxi-primary-28e55543
Created Node ACL for iqn.1998-01.com.vmware:esxi-primary-28e55543
Created mapped LUN 0.
/iscsi/iqn.20...age/tpg1/acls> create iqn.1998-01.com.vmware:esxi-secondary-47067c41
Created Node ACL for iqn.1998-01.com.vmware:esxi-secondary-47067c41
Created mapped LUN 0.
/iscsi/iqn.20...age/tpg1/acls>
/iscsi/iqn.20...age/tpg1/acls> ls /
o- / ............................................................................................................. [...]
  o- backstores .................................................................................................. [...]
  | o- block ...................................................................................... [Storage Objects: 1]
  | | o- block_backend_sdb .................................................. [/dev/sdb (400.0GiB) write-thru activated]
  | o- fileio ..................................................................................... [Storage Objects: 0]
  | o- pscsi ...................................................................................... [Storage Objects: 0]
  | o- ramdisk .................................................................................... [Storage Objects: 0]
  o- iscsi ................................................................................................ [Targets: 1]
  | o- iqn.2015-12.local.mylabo:share-storage ................................................................ [TPGs: 1]
  |   o- tpg1 ................................................................................... [no-gen-acls, no-auth]
  |     o- acls .............................................................................................. [ACLs: 2]
  |     | o- iqn.1998-01.com.vmware:esxi-primary-28e55543 ............................................. [Mapped LUNs: 1]
  |     | | o- mapped_lun0 ......................................................... [lun0 block/block_backend_sdb (rw)]
  |     | o- iqn.1998-01.com.vmware:esxi-secondary-47067c41 ........................................... [Mapped LUNs: 1]
  |     |   o- mapped_lun0 ......................................................... [lun0 block/block_backend_sdb (rw)]
  |     o- luns .............................................................................................. [LUNs: 1]
  |     | o- lun0 ................................................................. [block/block_backend_sdb (/dev/sdb)]
  |     o- portals ........................................................................................ [Portals: 1]
  |       o- 0.0.0.0:3260 ......................................................................................... [OK]
  o- loopback ............................................................................................. [Targets: 0]
/iscsi/iqn.20...age/tpg1/acls>
設定の保存
saveconfigコマンドで設定を保存します。
ルートディレクトリで実行します。
保存後、exitで抜けます。
/iscsi/iqn.20...age/tpg1/luns> cd /
/>
/> saveconfig
Last 10 configs saved in /etc/target/backup.
Configuration saved to /etc/target/saveconfig.json
/>
/> exit
Global pref auto_save_on_exit=true
Last 10 configs saved in /etc/target/backup.
Configuration saved to /etc/target/saveconfig.json
targetの起動
サービスを有効にして、自動起動もONにします。
[root@share-storage ~]# systemctl enable target
ln -s '/usr/lib/systemd/system/target.service' '/etc/systemd/system/multi-user.target.wants/target.service'
[root@share-storage ~]#
[root@share-storage ~]# systemctl start target
[root@share-storage ~]# systemctl status target
target.service - Restore LIO kernel target configuration
   Loaded: loaded (/usr/lib/systemd/system/target.service; enabled)
   Active: active (exited) since 土 2015-12-26 17:21:13 JST; 17s ago
  Process: 12145 ExecStart=/usr/bin/targetctl restore (code=exited, status=0/SUCCESS)
 Main PID: 12145 (code=exited, status=0/SUCCESS)

12月 26 17:21:13 share-storage.nylabo.local systemd[1]: Starting Restore LIO kernel target configuration...
12月 26 17:21:13 share-storage.nylabo.local target[12145]: No saved config file at /etc/target/saveconfig.json, o...ing
12月 26 17:21:13 share-storage.nylabo.local systemd[1]: Started Restore LIO kernel target configuration.
Hint: Some lines were ellipsized, use -l to show in full.
firewalldの設定
firewalldを使用してiSCSIポート(TCP:3260)を解放します。
参考にしました
http://qiita.com/shrkw/items/8410e9cb65eb789a40e1
現在の状態を確認します。
「eno16777984」のインターフェースを使用しており、
通信可能なサービスは3種類です「dhcpv6-client dns ssh」
[root@share-storage ~]# firewall-cmd --list-all
public (default, active)
  interfaces: eno16777984
  sources:
  services: dhcpv6-client dns ssh
  ports:
  masquerade: no
  forward-ports:
  icmp-blocks:
  rich rules:

[root@share-storage ~]#
追加できるサービス定義一覧を確認します。
iSCSIの定義はされていないので、手動で定義します。
[root@share-storage ~]# firewall-cmd --get-services
RH-Satellite-6 amanda-client bacula bacula-client dhcp dhcpv6 dhcpv6-client dns ftp high-availability http https imaps ipp ipp-client ipsec kerberos kpasswd ldap ldaps libvirt libvirt-tls mdns mountd ms-wbt mysql nfs ntp openvpn pmcd pmproxy pmwebapi pmwebapis pop3s postgresql proxy-dhcp radius rpc-bind samba samba-client smtp ssh telnet tftp tftp-client transmission-client vnc-server wbem-https
[root@share-storage ~]#
既存のhttpを定義しているxmlファイルをコピーして、iscsi.xmlを作成します。
[root@share-storage ~]# cp /usr/lib/firewalld/services/http.xml /etc/firewalld/services/iscsi.xml
[root@share-storage ~]#
[root@share-storage ~]# cd /etc/firewalld/services/
[root@share-storage services]#
[root@share-storage services]# ls -la
合計 8
drwxr-x---. 2 root root   22 12月 26 20:11 .
drwxr-x---. 5 root root 4096 12月 20 15:30 ..
-rw-r-----. 1 root root  353 12月 26 20:11 iscsi.xml
[root@share-storage services]#
[root@share-storage services]# vi iscsi.xml
[root@share-storage services]#
[root@share-storage services]# cat iscsi.xml
<?xml version="1.0" encoding="utf-8"?>
<service>
  <short>iscsi</short>
  <description>iscsi</description>
  <port protocol="tcp" port="3260"/>
</service>
[root@share-storage services]#
リロードして有効化したのちに、有加できるサービス定義一覧を確認します。
ちゃんとiscsiが追加されています。
[root@share-storage services]# firewall-cmd --reload
success
[root@share-storage services]#
[root@share-storage services]# firewall-cmd --get-services
RH-Satellite-6 amanda-client bacula bacula-client dhcp dhcpv6 dhcpv6-client dns ftp high-availability http https imaps ipp ipp-client ipsec iscsi kerberos kpasswd ldap ldaps libvirt libvirt-tls mdns mountd ms-wbt mysql nfs ntp openvpn pmcd pmproxy pmwebapi pmwebapis pop3s postgresql proxy-dhcp radius rpc-bind samba samba-client smtp ssh telnet tftp tftp-client transmission-client vnc-server wbem-https
[root@share-storage services]#
publicゾーンにiscsiを追加します。
[root@share-storage services]# firewall-cmd --list-services --zone=public  --permanent
dhcpv6-client dns ssh
[root@share-storage services]#
[root@share-storage services]#
[root@share-storage services]# firewall-cmd --add-service=iscsi --zone=public --permanent
success
[root@share-storage services]#
[root@share-storage services]# firewall-cmd --list-services --zone=public  --permanent
dhcpv6-client dns iscsi ssh
[root@share-storage services]# firewall-cmd --reload
success
[root@share-storage services]#
使用しているインターフェースにも追加されています。
[root@share-storage services]# firewall-cmd --list-all
public (default, active)
  interfaces: eno16777984
  sources:
  services: dhcpv6-client dns iscsi ssh
  ports:
  masquerade: no
  forward-ports:
  icmp-blocks:
  rich rules:

[root@share-storage services]#
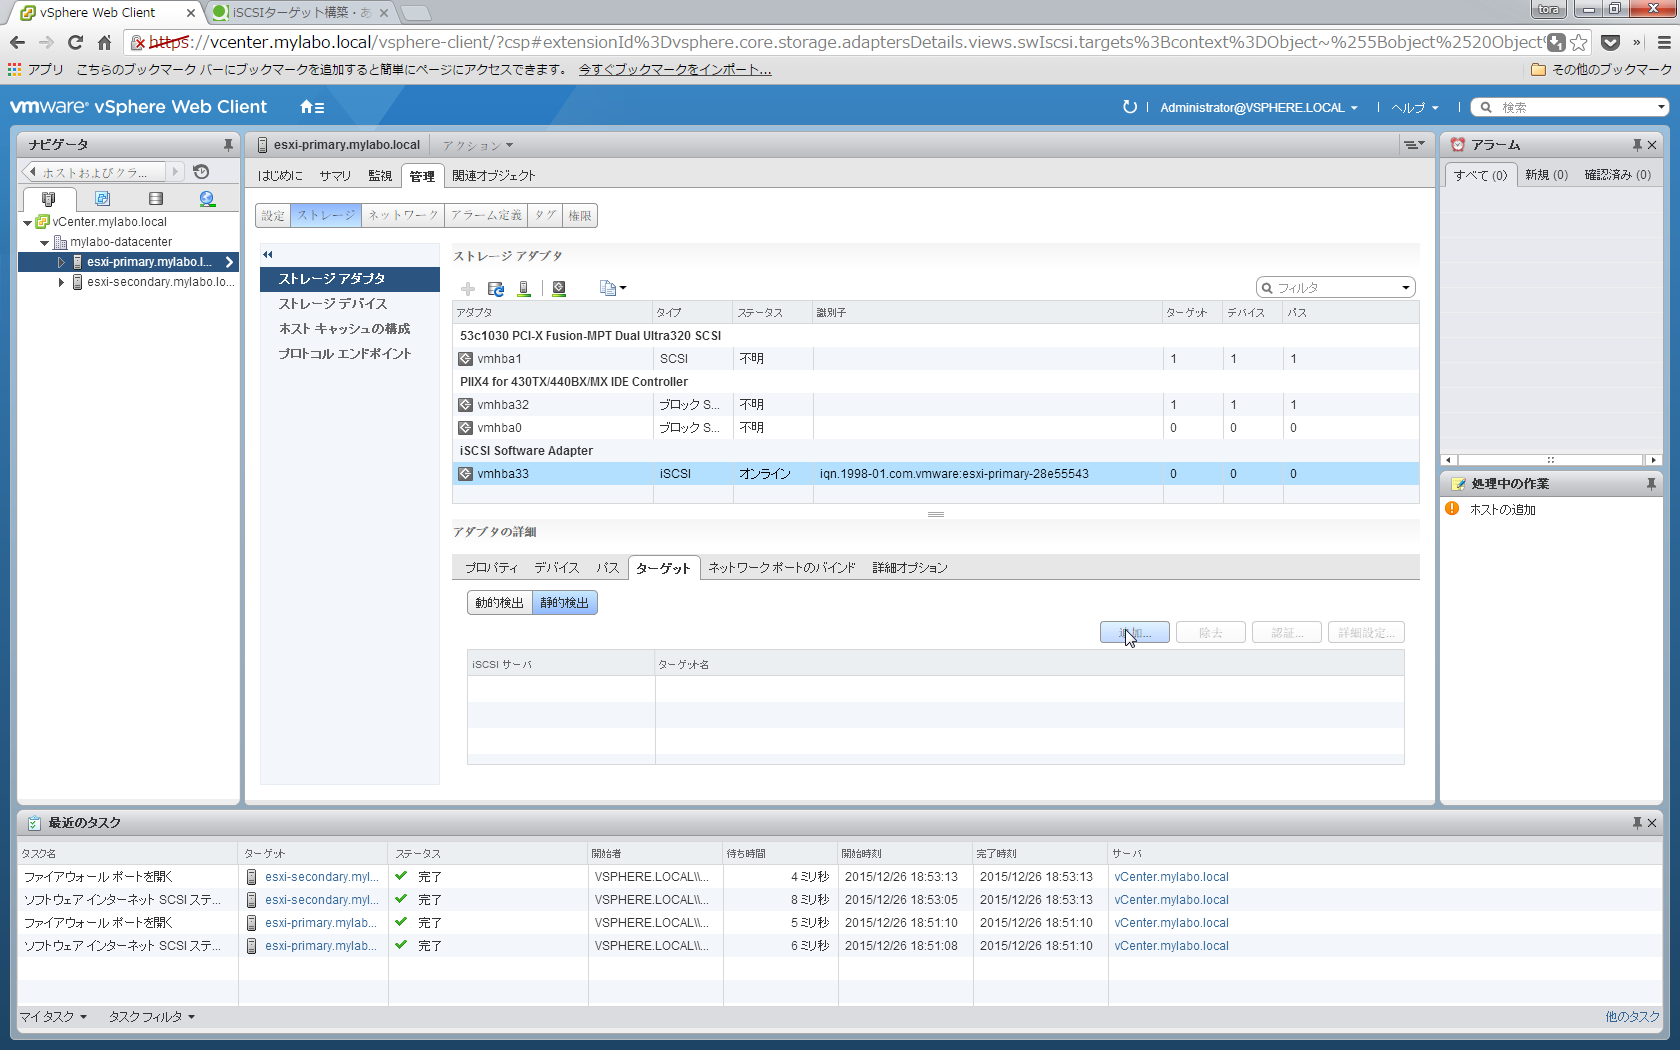
ESXiから認識確認
iSCSIアダプタを追加した画面へ行き、iSCSIアダプタを選択し、
画面下にある[ターゲット]タブから、[静的検出]を選択し、「追加」をクリックします。
iSCSIターゲットの情報を入力します。
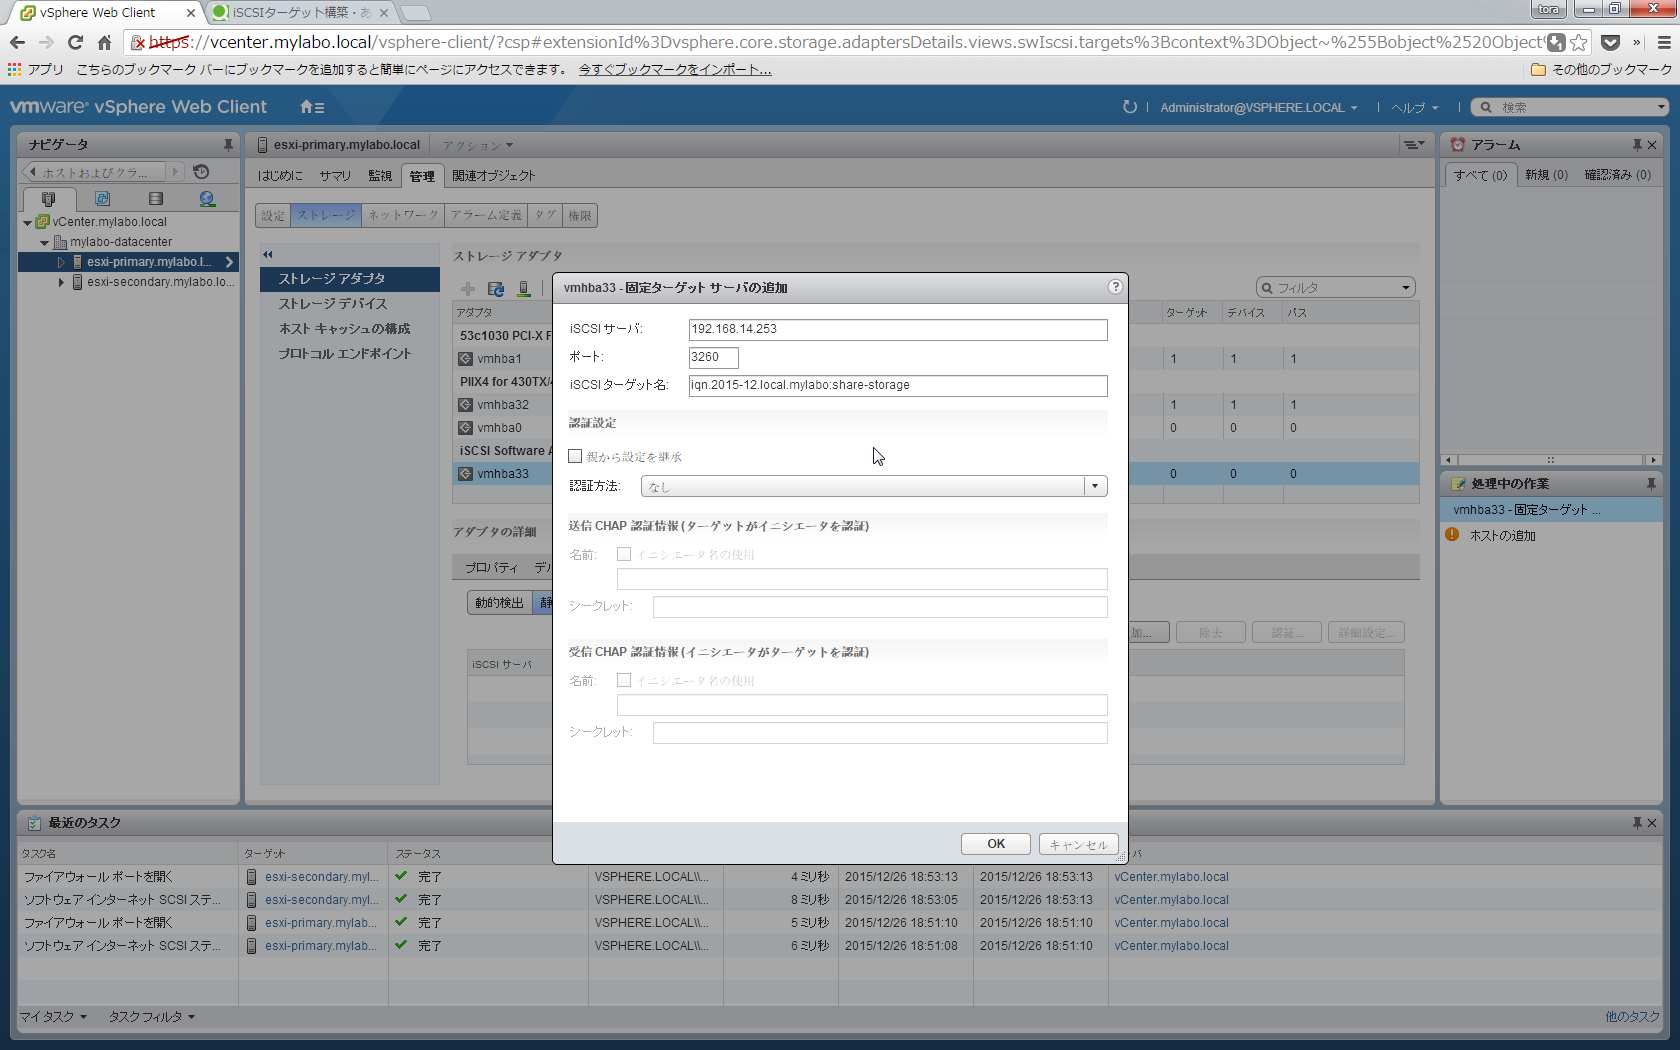
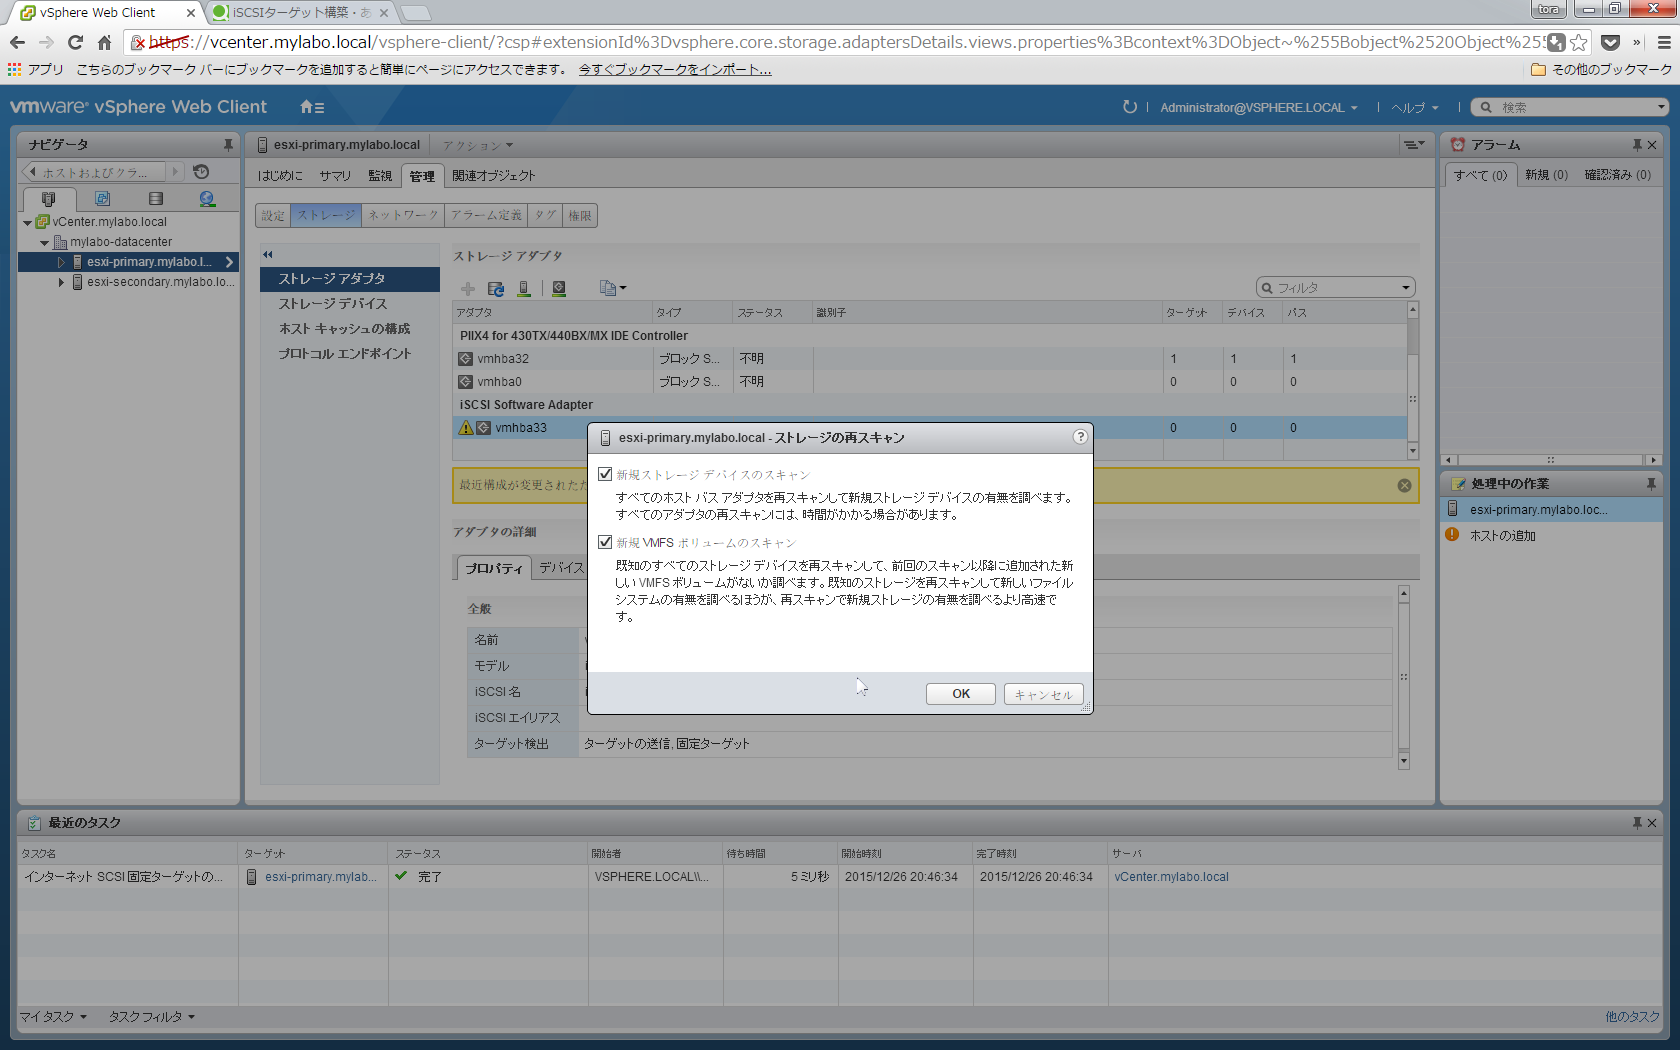
設定後、再度スキャンしてください、とメッセージが表示されるので、再スキャンをします。
デフォルトのまま「OK」をクリックします。
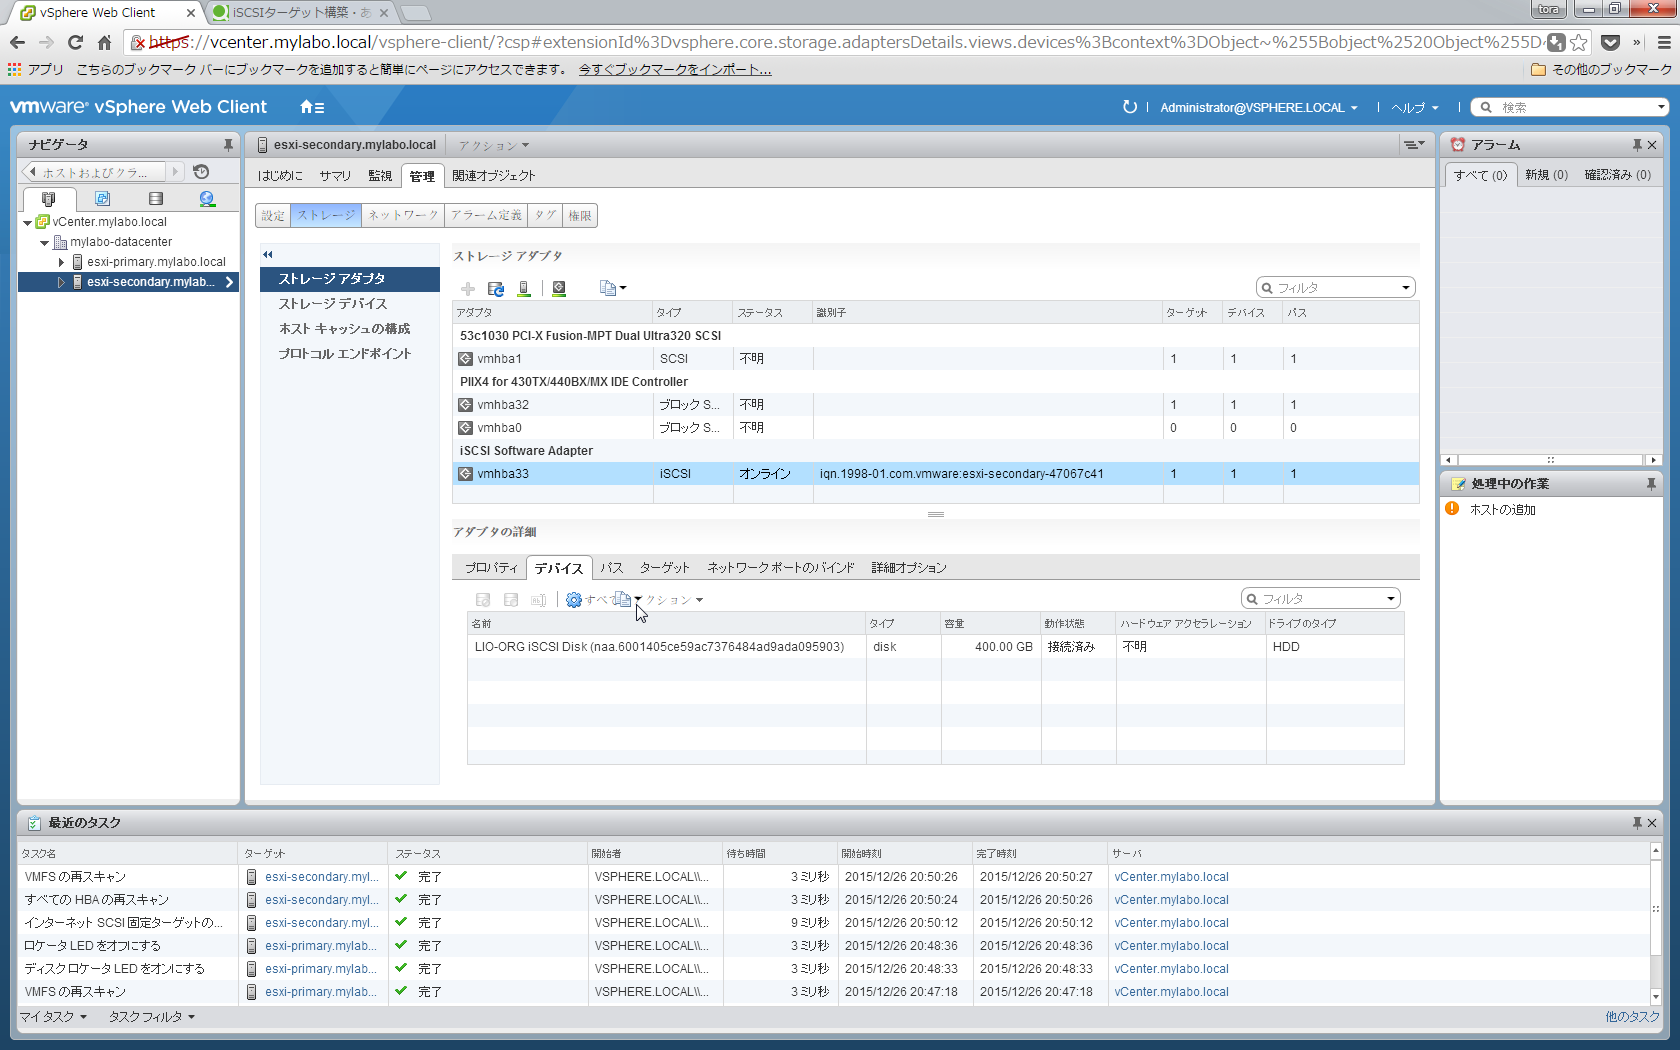
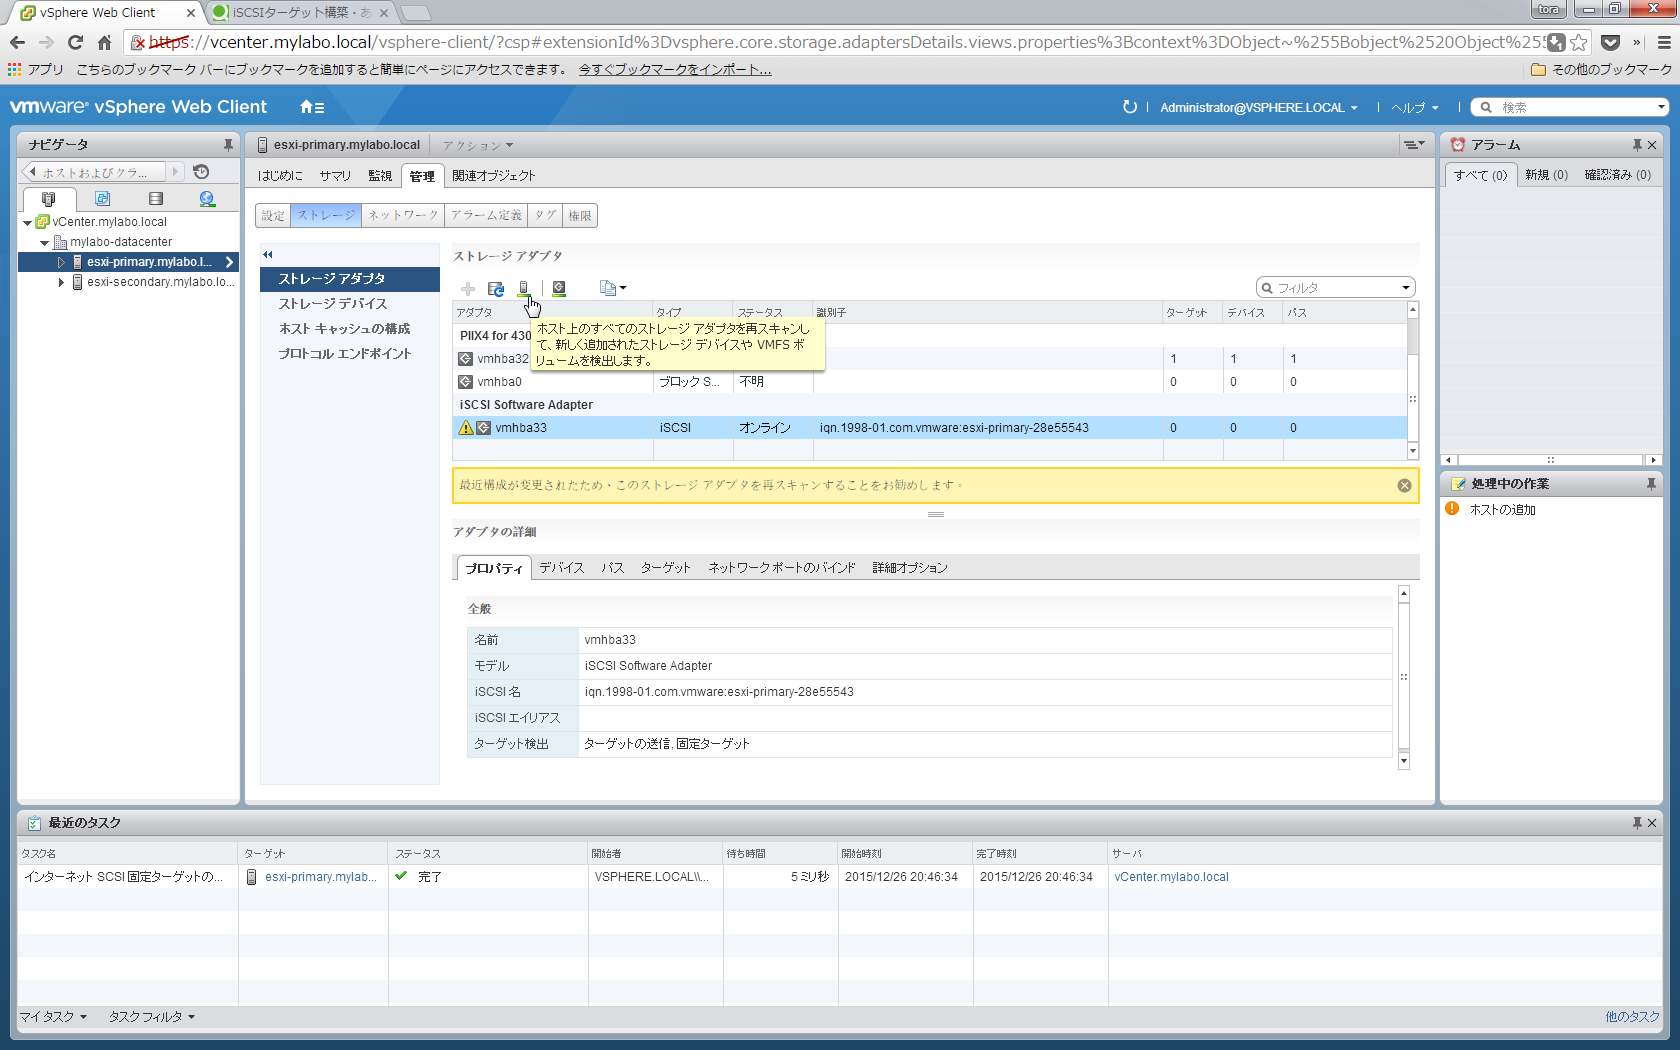
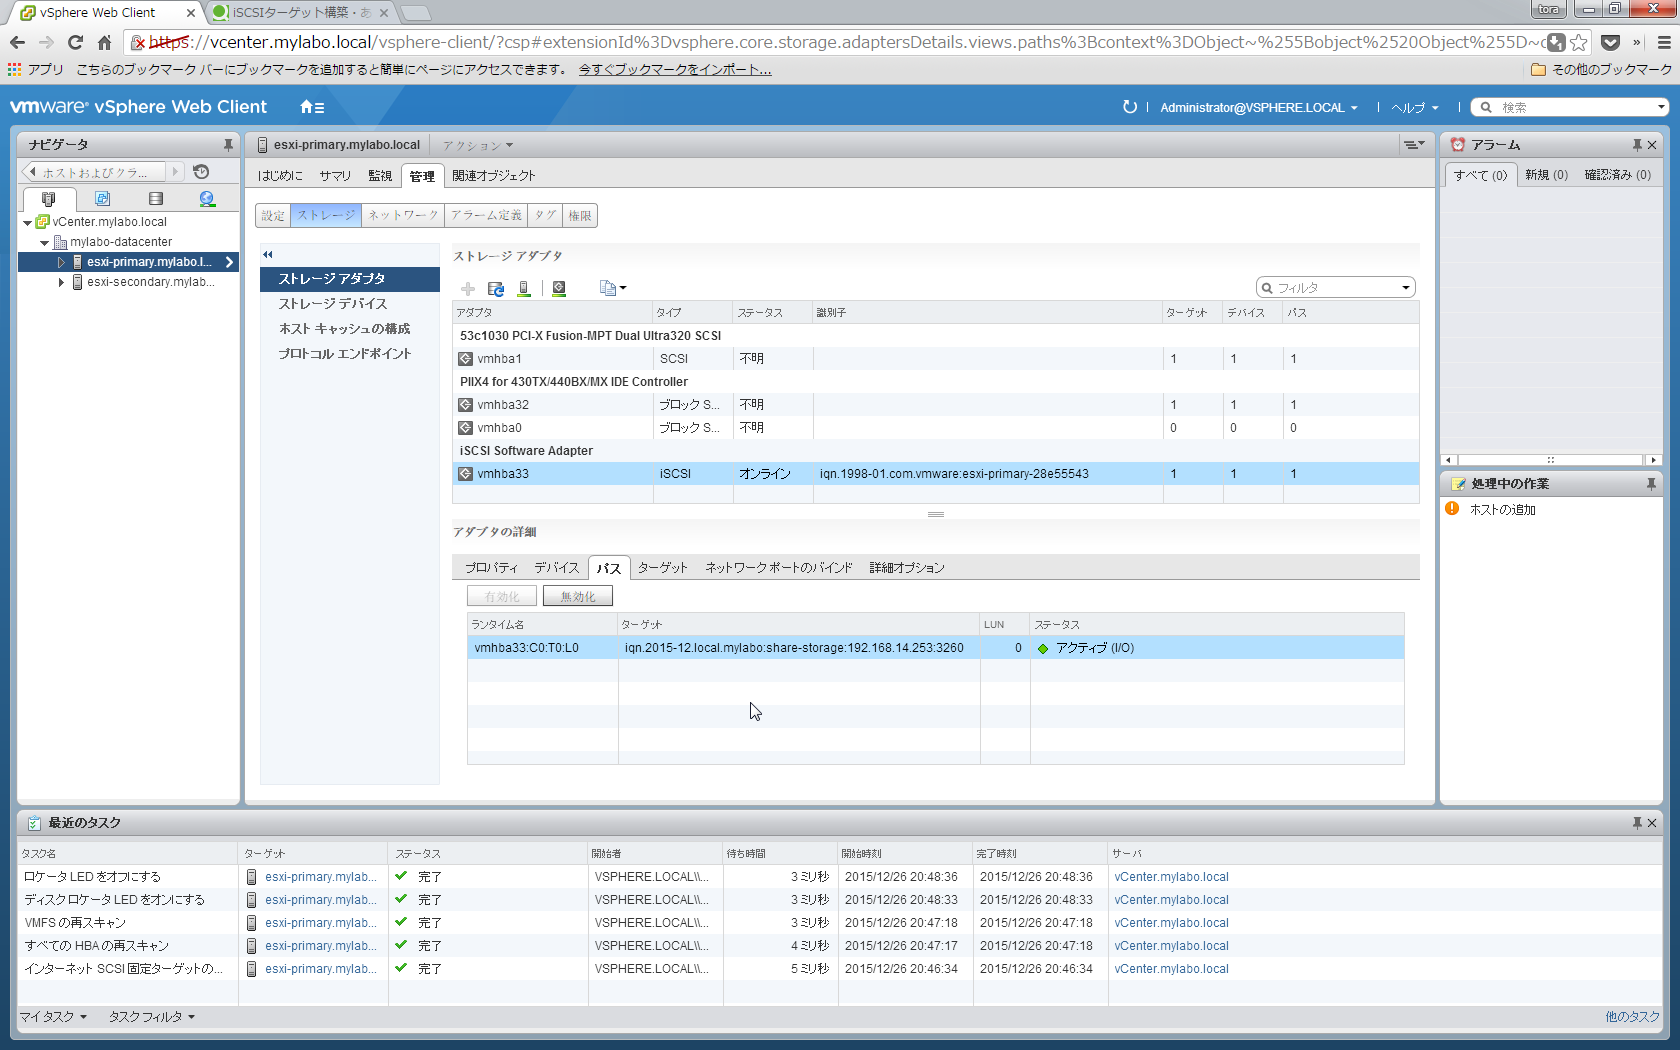
スキャン完了したら、iSCSIのデバイスが確認できました!
画面下にある[デバイス]タブに、追加したデバイスが見えます。

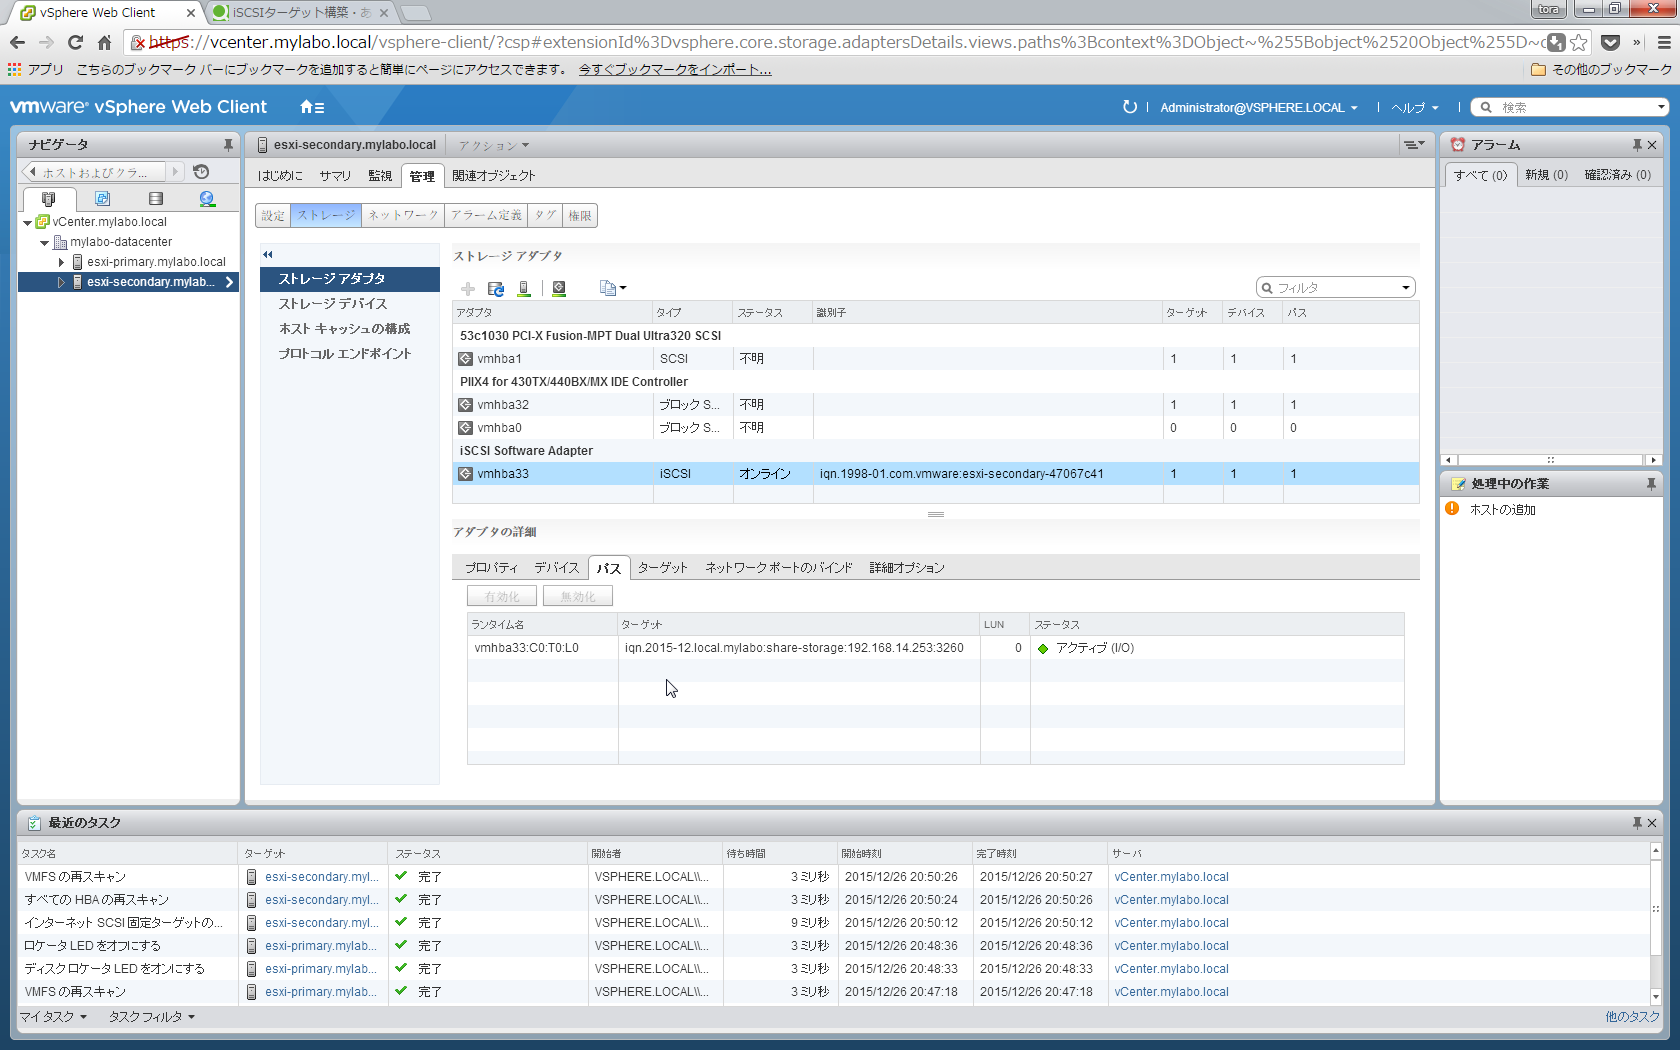
隣の[パス]タブでも確認が出来ます。
2台目のESXiでも同様に追加します。