はじめに
独自ライブラリを開発するとき、CodeArtifact を利用することで 簡単に共有や管理出来ます。
例えば、CodeArtifact はバージョン管理が出来るため、特定の Lambda 関数ではバージョン 1 の共通ライブラリを使いながら、別の Lambda 関数ではバージョン 2 の共通ライブラリを利用できます。また、独自ライブラリは Public にインターネットで誰でも触れる状況にはしたくありません。特定のユーザーのみ利用を許可させる認証認可機能も利用できます。セキュアな状態を維持しながら、適切に管理できる特徴があります。
といいつつ、CodeArtifact の具体的な利用法がわからないところがあったので、簡単に試してみました。
環境情報
- Lambda 関数で CodeArtifact 上の独自ライブラリを利用する
- 言語は Python
CodeArtifact : Domain
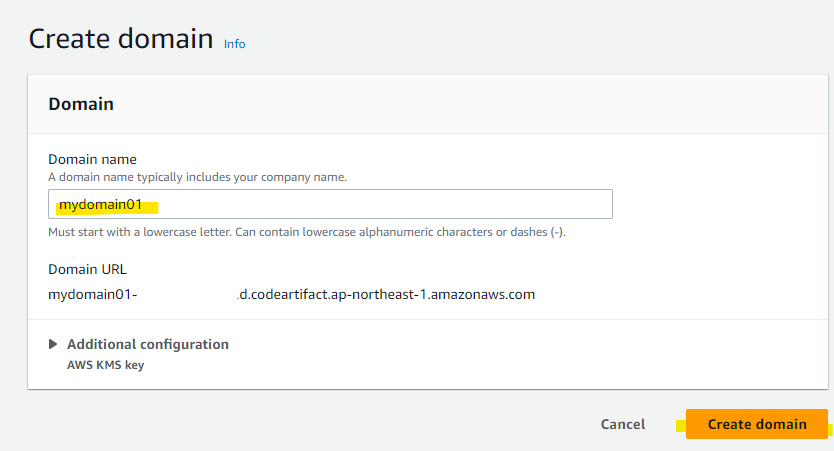
まず、CodeArtifact の設定からしていきます。CodeArtifact でドメインを作成します。ドメインは複数の Repository を管理する、論理的な概念です。

適当な名前を入れて作成します。
CodeArtifact : Repository
次に、ドメインの中で Repository を作成します。

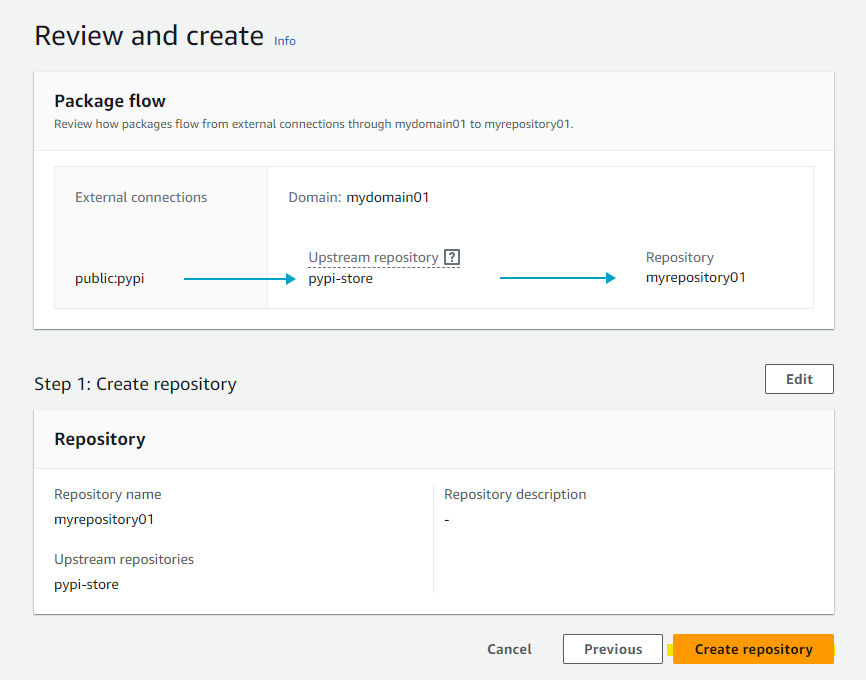
Public upstream repositories に pypi-store を指定します。このように指定することで、CodeArtifact に存在しない通常のパッケージをインストールできるようにします。ただ、PyPI で公開されている通常のパッケージを CodeArtifact にキャッシュすることになるので、料金が増えてしまう点は考慮ポイントです。
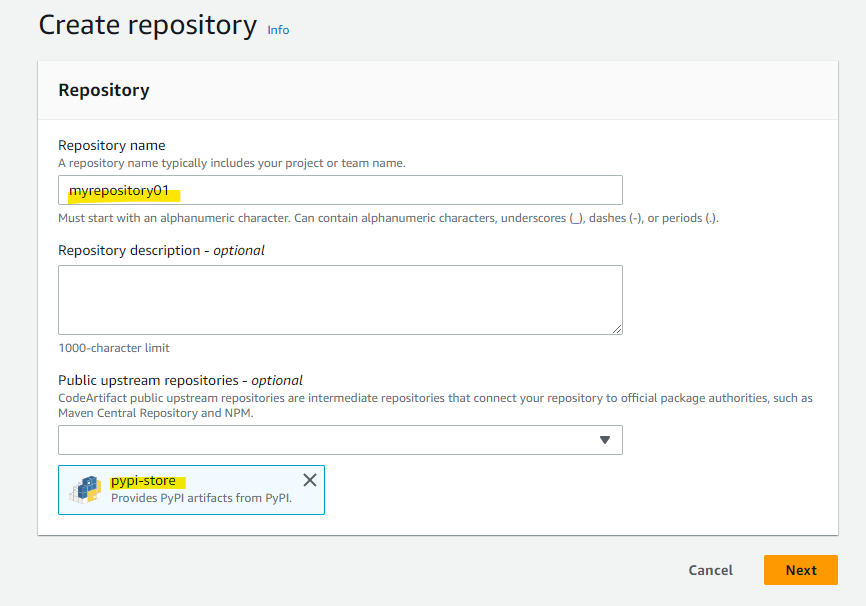
Create repository を押します。
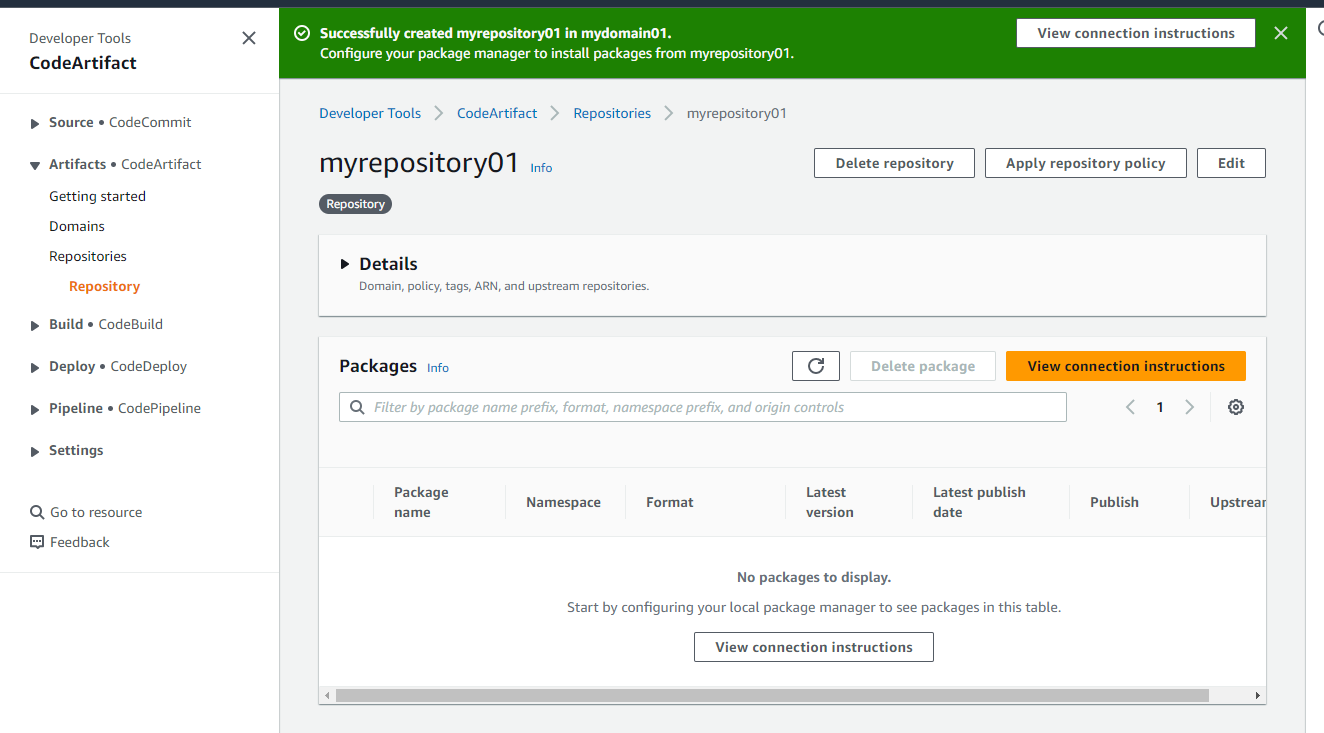
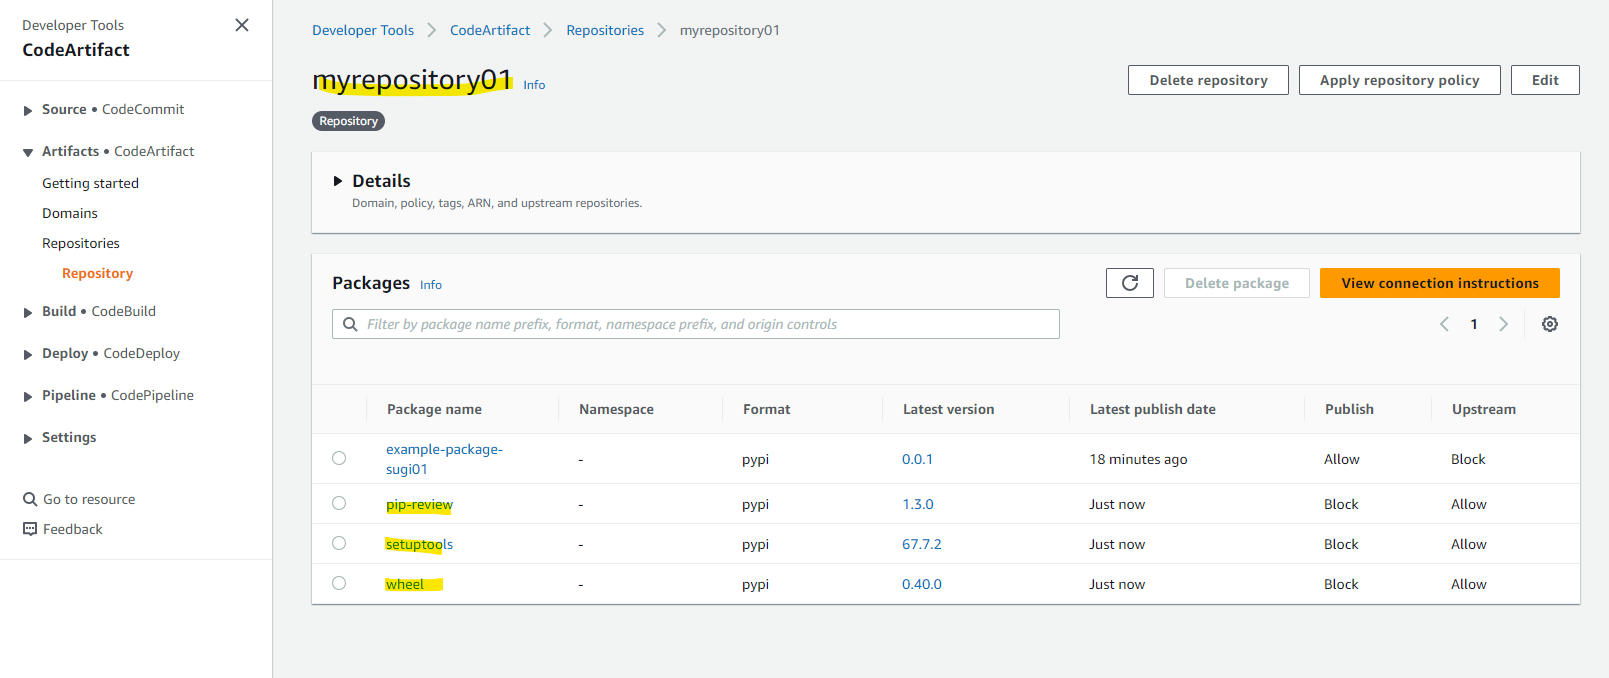
Repository が作成されました。
独自ライブラリの準備
手元の開発環境で、CodeArtifact にアップロードする独自ライブラリを準備していきます。Python で公開されている次の Document に沿って準備をしていきます。
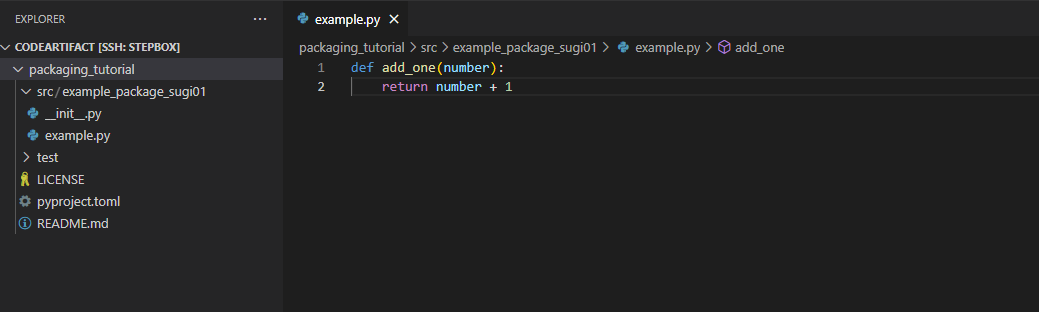
独自のライブラリを作成するために、次のディレクトリ構造を作成します。example_package_sugi01 は、独自ライブラリの名前になり、実際利用するときの import の名前になります。良い感じの名前を指定しましょう。
mkdir packaging_tutorial
mkdir packaging_tutorial/src
mkdir packaging_tutorial/src/example_package_sugi01
touch packaging_tutorial/src/example_package_sugi01/__init__.py
touch packaging_tutorial/src/example_package_sugi01/example.py
このようなディレクトリ構造になりました。
> tree
.
└── packaging_tutorial
    └── src
        └── example_package_sugi01
            ├── example.py
            └── __init__.py

3 directories, 2 files
__init__.py は、import 周りの挙動を指定します。次の内容に書き換えます。
from example_package_sugi01.example import *

example.py は、独自ライブラリとしてロジックを実装するファイルです。add_one 関数をサンプルとして実装します。数字を 1 加算するだけの関数です。
def add_one(number):
    return number + 1

他に、パッケージングに必要なファイルやディレクトリを作成します。
mkdir packaging_tutorial/test
touch packaging_tutorial/LICENSE
touch packaging_tutorial/pyproject.toml
touch packaging_tutorial/README.md
こんな構成になりました。
> tree
.
└── packaging_tutorial
    ├── LICENSE
    ├── pyproject.toml
    ├── README.md
    ├── src
    │   └── example_package_sugi01
    │       ├── example.py
    │       └── __init__.py
    └── test

4 directories, 5 files
pyproject.toml を開いて、次のように指定します
- name : ディレクトリの名前と同じものを指定します。これが、独自ライブラリの名前になります。
- version : バージョンを指定します。
[build-system]
requires = ["hatchling"]
build-backend = "hatchling.build"

[project]
name = "example_package_sugi01"
version = "0.0.1"
authors = [
  { name="sugi", email="sugi@example.com" },
]
description = "A small example package"
readme = "README.md"
requires-python = ">=3.7"
classifiers = [
    "Programming Language :: Python :: 3",
    "License :: OSI Approved :: MIT License",
    "Operating System :: OS Independent",
]

[project.urls]
"Homepage" = "https://example.com"
"Bug Tracker" = "https://example.com"
README.md を作成します。Python Document のサンプルから持ってきました。
# Example Package

This is a simple example package. You can use
[Github-flavored Markdown](https://guides.github.com/features/mastering-markdown/)
to write your content.
LICENSE を作成します。Python Document のサンプルから持ってきました。
Copyright (c) 2018 The Python Packaging Authority

Permission is hereby granted, free of charge, to any person obtaining a copy
of this software and associated documentation files (the "Software"), to deal
in the Software without restriction, including without limitation the rights
to use, copy, modify, merge, publish, distribute, sublicense, and/or sell
copies of the Software, and to permit persons to whom the Software is
furnished to do so, subject to the following conditions:

The above copyright notice and this permission notice shall be included in all
copies or substantial portions of the Software.

THE SOFTWARE IS PROVIDED "AS IS", WITHOUT WARRANTY OF ANY KIND, EXPRESS OR
IMPLIED, INCLUDING BUT NOT LIMITED TO THE WARRANTIES OF MERCHANTABILITY,
FITNESS FOR A PARTICULAR PURPOSE AND NONINFRINGEMENT. IN NO EVENT SHALL THE
AUTHORS OR COPYRIGHT HOLDERS BE LIABLE FOR ANY CLAIM, DAMAGES OR OTHER
LIABILITY, WHETHER IN AN ACTION OF CONTRACT, TORT OR OTHERWISE, ARISING FROM,
OUT OF OR IN CONNECTION WITH THE SOFTWARE OR THE USE OR OTHER DEALINGS IN THE
SOFTWARE.
独自ライブラリのビルド
これで独自ライブラリをビルドする準備が整いました。ビルドするために、PyPA の build コマンドの最新をインストールします。
pip install --upgrade build
cd で、プロジェクトのディレクトリの中に移動
cd packaging_tutorial/
この場所で build コマンドを実行します。
> ls -la
total 12
drwxr-xr-x 4 ec2-user docker   83 Apr 28 10:40 ./
drwxr-xr-x 3 ec2-user docker   32 Apr 28 10:15 ../
-rw-r--r-- 1 ec2-user docker 1073 Apr 28 10:46 LICENSE
-rw-r--r-- 1 ec2-user docker  518 Apr 28 10:45 pyproject.toml
-rw-r--r-- 1 ec2-user docker  170 Apr 28 10:46 README.md
drwxr-xr-x 3 ec2-user docker   36 Apr 28 10:16 src/
drwxr-xr-x 2 ec2-user docker    6 Apr 28 10:40 test/
ビルドします。
python3 -m build
実行例
> python3 -m build
* Creating venv isolated environment...
* Installing packages in isolated environment... (hatchling)
* Getting build dependencies for sdist...
* Building sdist...
* Building wheel from sdist
* Creating venv isolated environment...
* Installing packages in isolated environment... (hatchling)
* Getting build dependencies for wheel...
* Building wheel...
Successfully built example_package_sugi01-0.0.1.tar.gz and example_package_sugi01-0.0.1-py3-none-any.whl
dist ディレクトリが自動生成され、ビルド後のファイルが出来上がりました。
> tree
.
├── dist
│   ├── example_package_sugi01-0.0.1-py3-none-any.whl
│   └── example_package_sugi01-0.0.1.tar.gz
├── LICENSE
├── pyproject.toml
├── README.md
├── src
│   └── example_package_sugi01
│       ├── example.py
│       └── __init__.py
└── test

4 directories, 7 files
独自ライブラリのアップロード
独自ライブラリが出来上がったので、これを CodeArtifact にアップロードします。
AWS CLI を使って、CodeArtifact にログインをします。
aws codeartifact login --tool twine --domain mydomain01 --repository myrepository01
実行例
> aws codeartifact login --tool twine --domain mydomain01 --repository myrepository01
Successfully configured twine to use AWS CodeArtifact repository https://mydomain01-xxxxxxxxxxxx.d.codeartifact.ap-northeast-1.amazonaws.com/pypi/myrepository01/
Login expires in 12 hours at 2023-04-28 11:15:00+09:00
このログインコマンドの結果、~/.pypirc ファイルが自動生成されました。pip コマンドの向き先 repository が定義されています。CodeArtifact の Endpoint となっています。
> cat ~/.pypirc
[distutils]
index-servers =
        pypi
        codeartifact

[codeartifact]
repository = https://mydomain01-xxxxxxxxxxxx.d.codeartifact.ap-northeast-1.amazonaws.com/pypi/myrepository01/
username = aws
password = secret-dayo!
CodeArtifact に独自ライブラリをアップロードするために、twine コマンドをインストールします。
pip install --upgrade twine
CodeArtifact に、独自ライブラリをアップロードします。
twine upload -r codeartifact dist/*
実行例
> twine upload -r codeartifact dist/*
Uploading distributions to https://mydomain01-xxxxxxxx.d.codeartifact.ap-northeast-1.amazonaws.com/pypi/myrepository01/
Uploading example_package_sugi01-0.0.1-py3-none-any.whl
100% ━━━━━━━━━━━━━━━━━━━━━━━━━━━━━━━━━━━━━━━━ 5.9/5.9 kB • 00:00 • ?
Uploading example_package_sugi01-0.0.1.tar.gz
100% ━━━━━━━━━━━━━━━━━━━━━━━━━━━━━━━━━━━━━━━━ 4.9/4.9 kB • 00:00 • ?
CodeArtifact にアップロードされました!

独自ライブラリを pip でインストール
ここまでの手順で、CodeArtifact 経由で独自ライブラリを管理できるようになりました。
次は、実際に利用する側の手順を検証していきましょう。独自ライブラリを利用するために、これも AWS CLI を使ったログインをします。アップロードするときのログインとは別物なので注意しましょう。
aws codeartifact login --tool pip --domain mydomain01 --repository myrepository01
実行例
> aws codeartifact login --tool pip --domain mydomain01 --repository myrepository01
Successfully configured pip to use AWS CodeArtifact repository https://mydomain01-xxxxxxxxxxxx.d.codeartifact.ap-northeast-1.amazonaws.com/pypi/myrepository01/
Login expires in 12 hours at 2023-04-28 23:14:02+09:00
ログインの結果、~/.config/pip/pip.conf ファイルが自動生成されています。
> cat ~/.config/pip/pip.conf
[global]
index-url = https://aws:secret@mydomain01-xxxxxxxxxxxx.d.codeartifact.ap-northeast-1.amazonaws.com/pypi/myrepository01/simple/
これで pip コマンドで、CodeArtifact 上の独自ライブラリのインストールが可能です。
pip install example_package_sugi01
実行例
> pip install example_package_sugi01
Looking in indexes: https://aws:****@mydomain01-xxxxxxxxxxxx.d.codeartifact.ap-northeast-1.amazonaws.com/pypi/myrepository01/simple/
Collecting example_package_sugi01
  Downloading https://mydomain01-xxxxxxxxxxxx.d.codeartifact.ap-northeast-1.amazonaws.com/pypi/myrepository01/simple/example-package-sugi01/0.0.1/example_package_sugi01-0.0.1-py3-none-any.whl (2.4 kB)
Installing collected packages: example_package_sugi01
Successfully installed example_package_sugi01-0.0.1
なお、ログインしていない環境だと次のようにエラーになります。CodeArtifact にしか独自ライブラリが無いので、公開はされていません。
$ pip install example_package_sugi01
Defaulting to user installation because normal site-packages is not writeable
ERROR: Could not find a version that satisfies the requirement example_package_sugi01 (from versions: none)
ERROR: No matching distribution found for example_package_sugi01
なお、CodeArtifact を設定するとき、PyPI を Upstream として指定したので、公開されている普通のライブラリのインストールも出来ます。
pip install pip-review
実行例
- インストール可能
> pip install pip-review
Looking in indexes: https://aws:****@mydomain01-xxxxxxxxxxxx.d.codeartifact.ap-northeast-1.amazonaws.com/pypi/myrepository01/simple/
Collecting pip-review
  Downloading https://mydomain01-xxxxxxxxxxxx.d.codeartifact.ap-northeast-1.amazonaws.com/pypi/myrepository01/simple/pip-review/1.3.0/pip-review-1.3.0.tar.gz (6.6 kB)
  Installing build dependencies ... done
  Getting requirements to build wheel ... done
  Preparing metadata (pyproject.toml) ... done
Requirement already satisfied: packaging in /home/ec2-user/.pyenv/versions/3.9.3/lib/python3.9/site-packages (from pip-review) (21.3)
Requirement already satisfied: pip in /home/ec2-user/.pyenv/versions/3.9.3/lib/python3.9/site-packages (from pip-review) (23.1.2)
Requirement already satisfied: pyparsing!=3.0.5,>=2.0.2 in /home/ec2-user/.pyenv/versions/3.9.3/lib/python3.9/site-packages (from packaging->pip-review) (3.0.9)
Building wheels for collected packages: pip-review
  Building wheel for pip-review (pyproject.toml) ... done
  Created wheel for pip-review: filename=pip_review-1.3.0-py3-none-any.whl size=6542 sha256=f644003f51446d226575083a3bb5be5d5a9f686be39ea5f47fee77e3ea8e4999
  Stored in directory: /home/ec2-user/.cache/pip/wheels/3d/78/0a/f7269b0d1e4c2d4e39e99de5afccbc7259b624560cb0811b96
Successfully built pip-review
Installing collected packages: pip-review
Successfully installed pip-review-1.3.0
Upstream から取得したライブラリが、CodeArtifact の Repository に入っています。
独自ライブラリを利用してみる
適当に Python プログラムを作って、CodeArtifact 上の独自ライブラリを import してみましょう。
関係ないディレクトリに移動します。
cd ~/temp/python
適当に test-codeartifact.py を作成します。
- import で指定する
example_package_sugi01が CodeArtifact 上の独自ライブラリの名前ですね。
import example_package_sugi01

addednum = example_package_sugi01.add_one(1)
print (addednum)
実行
python test-codeartifact.py
実行例 : 2 と数字が返ってきました。無事に独自ライブラリが利用できています。
> python test-codeartifact.py
2
requirement.txt から利用
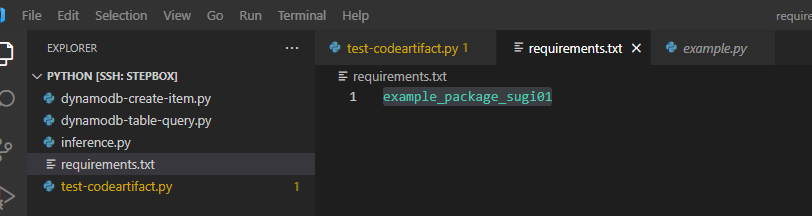
次に、requirement.txt から利用できるかも確認します。こんな感じで定義します。
example_package_sugi01
pip install を行います。
pip install -r requirement.txt
無事にインストールできました。
> pip install -r requirements.txt
Looking in indexes: https://aws:****@mydomain01-xxxxxxxxxxxx.d.codeartifact.ap-northeast-1.amazonaws.com/pypi/myrepository01/simple/
Collecting example_package_sugi01 (from -r requirements.txt (line 1))
  Using cached https://mydomain01-xxxxxxxxxxxx.d.codeartifact.ap-northeast-1.amazonaws.com/pypi/myrepository01/simple/example-package-sugi01/0.0.2/example_package_sugi01-0.0.2-py3-none-any.whl (2.5 kB)
Installing collected packages: example_package_sugi01
Successfully installed example_package_sugi01-0.0.2
SAM から利用
次に、SAM CLI からも利用してみます。
まず、sam init でプロジェクトを適当に作成します。
- codearifact-test という名前で作成
sam init
sam 配下の requirements.txt に、独自ビルドしたライブラリ名を指定します。
requests
example_package_sugi01

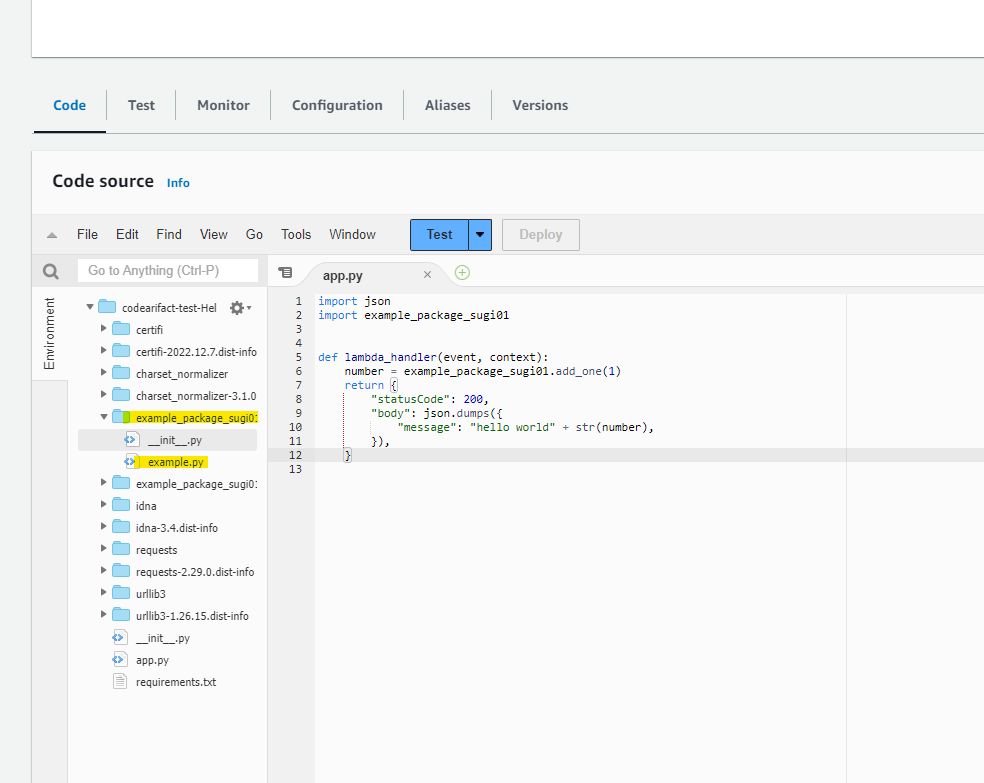
app.py の中身をこんな感じにします。import で独自ライブラリを利用します。
import json
import example_package_sugi01


def lambda_handler(event, context):
    number = example_package_sugi01.add_one(1)
    return {
        "statusCode": 200,
        "body": json.dumps({
            "message": "hello world" + str(number),
        }),
    }
sam build を行います。
cd codearifact-test/
sam build
sam local invoke で、ローカル環境で普通に実行が出来ました。
- hello world2 と返ってきています
> sam local invoke -e events/event.json
Invoking app.lambda_handler (python3.9)
Local image is up-to-date
Using local image: public.ecr.aws/lambda/python:3.9-rapid-x86_64.

Mounting /home/ec2-user/samdir/codearifact-test/.aws-sam/build/HelloWorldFunction as /var/task:ro,delegated inside runtime container
START RequestId: b0187973-212b-4924-9c04-450f449c43a9 Version: $LATEST
{"statusCode": 200, "body": "{\"message\": \"hello world2\"}"}END RequestId: b0187973-212b-4924-9c04-450f449c43a9
REPORT RequestId: b0187973-212b-4924-9c04-450f449c43a9  Init Duration: 0.12 ms  Duration: 63.31 ms      Billed Duration: 64 ms  Memory Size: 128 MB     Max Memory Used: 128 MB
このまま deploy を行います。
sam deploy --no-confirm-changeset
デプロイされていて、独自ライブラリがパッケージ内に収められていることがわかります。
ブラウザからアクセスすると想定通り、独自ライブラリが利用されている様子がわかります。

参考 URL
Python の独自パッケージを作成して AWS CodeArtifact に登録してみた
https://dev.classmethod.jp/articles/upload-custome-package2codeartifact/#toc-5
Using Python packages in CodeBuild
https://docs.aws.amazon.com/codeartifact/latest/ug/using-python-packages-in-codebuild.html
AWS CodeArtifact でプライベートリポジトリを作ろう
https://qiita.com/hayao_k/items/d55576a2920cb859901c
特定のパッケージだけ AWS CodeArtifact からインストールしたい – pip の場合
https://dev.classmethod.jp/articles/install-private-package-from-codeartifact/#toc-1