はじめに
AWS Elastic Disaster Recovery (AWS DRS) を利用することで、オンプレミスやクラウドベースのアプリケーションの最新コピーを AWS 上に保持することができます。現在利用しているシステムが物理的に障害が発生したときに、最新コピーを利用して AWS 上で構成できるディザスターリカバリーが実現できます。
DRS のネットワーク構成図を AWS Document から引用します。

- DR 対策を行いたいサーバーに、AWS Replication Agent をインストールする
- Agent をインストールしたサーバーから、継続的に AWS 側にブロックレベルでデータがレプリケーションされる
- 移行元サーバーは継続的に動作をさせながら、レプリケーションをしてくれるため、導入に伴うダウンタイムなどは最小限に抑えられる。
今回は、オンプレミス (Virtual Box) に CentOS 7 を稼働させ、DRS でフェールオーバーするための手順を確認していきましょう。
CentOS 7 を Virtual Box で建てる
一番手軽に準備できるのが Cent OS 7 だったので、これを使って検証をしていきます。
以下の URL からインストール用の ISO ファイルをダウンロードします。
- CentOS-7-x86_64-DVD-2009.iso
Nginx Install
Virtual Box で作成した CentOS がコピーされるか確認するために Nginx をインストールします。
Nginx の Repository 設定
cat <<'EOF' > /etc/yum.repos.d/nginx.repo
[nginx-stable]
name=nginx stable repo
baseurl=http://nginx.org/packages/centos/$releasever/$basearch/
gpgcheck=1
enabled=1
gpgkey=https://nginx.org/keys/nginx_signing.key
module_hotfixes=true

[nginx-mainline]
name=nginx mainline repo
baseurl=http://nginx.org/packages/mainline/centos/$releasever/$basearch/
gpgcheck=1
enabled=0
gpgkey=https://nginx.org/keys/nginx_signing.key
module_hotfixes=true
EOF
Nginx Install
sudo yum install nginx -y
Nginx の起動
systemctl restart nginx
systemctl enable nginx
firewalld の停止
systemctl stop firewalld
systemctl disable firewalld
Python3 Install
Replication Agent を導入するために Python をインストールします。
yum install https://repo.ius.io/ius-release-el7.rpm -y
インストール
yum install python36 -y
version確認
[root@localhost ~]# python3 --version
Python 3.6.8
DRS の設定
レプリケーション元の環境が準備できたので、DRS の設定をしていきます。DRS の画面を開き、Set default replication settings を選択します。

Replication Server が稼働する Subnet や Instance Type などを指定します。Replication Server は、レプリケーションを管理するためのサーバーです。DR 先の復旧用サーバーではないので注意してください。

デフォルトのまま Next を押します。

デフォルトのまま設定します
Next を押します。

Create を押します。

Settings の画面に反映されました。

Replication Agent をインストール
オンプレミスの CentOS 上に、Replication Agent をインストールします。インストーラーをダウンロードします。
wget -O ./aws-replication-installer-init.py https://aws-elastic-disaster-recovery-ap-northeast-1.s3.ap-northeast-1.amazonaws.com/latest/linux/aws-replication-installer-init.py
インストーラーを実行します
sudo python3 aws-replication-installer-init.py
リージョン名や、AccessKey などを入力します。
実行例
[root@localhost ~]# sudo python3 aws-replication-installer-init.py
The installation of the AWS Replication Agent has started.
AWS Region Name: ap-northeast-1
AWS Access Key ID: xxxxxxxxx
AWS Secret Access Key: xxxxxxxxxx

Identifying volumes for replication.
Choose the disks you want to replicate. Your disks are: /dev/sda
To replicate some of the disks, type the path of the disks, separated with a comma (for example, /dev/sda, /dev/sdb). To replicate all disks, press Enter:Identified volume for replication: /dev/sda of size 20 GiB
All volumes for replication were successfully identified.
Downloading the AWS Replication Agent onto the source server... Finished.
Installing the AWS Replication Agent onto the source server... Finished.
Syncing the source server with the Elastic Disaster Recovery Console... Finished.
The following is the source server ID: s-6c46ea61acd36bfb1.
The AWS Replication Agent was successfully installed.
[root@localhost ~]#
Agent がインストールされると、自動的に裏側でレプリケーションが走ります。
AWS のマネージメントコンソールにある Source Server に、コピーされていることが表示されます。
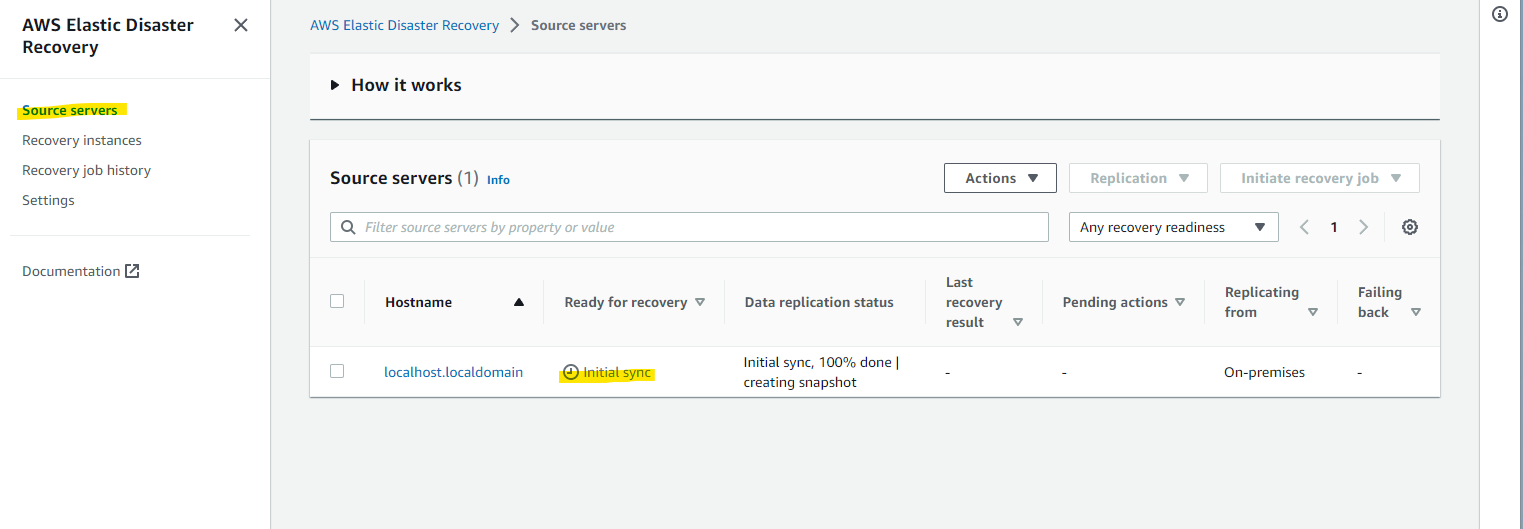
一定時間後、Ready ステータスに変わります。Ready になれば、DR ができる状態になります。Agent をインストールするだけなので、かなり楽に DR が構成できることがわかります。

Launch Template の変更
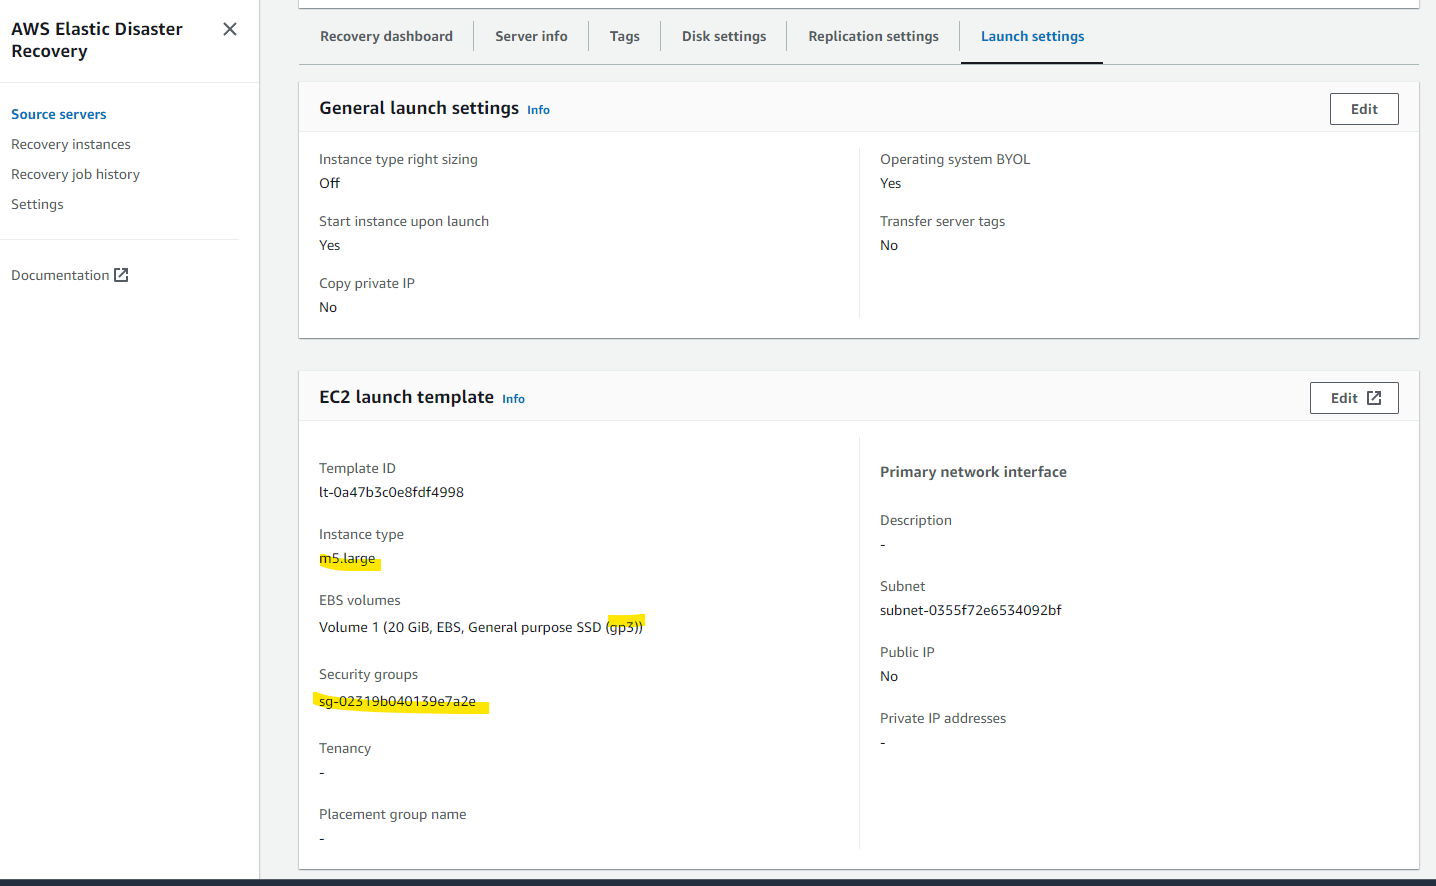
復旧用インスタンスに使われる Launch Template が自動的に生成されています。インスタンスタイプなどは調整したいため、Instance type right sizing を Edit します。

None を選択します。
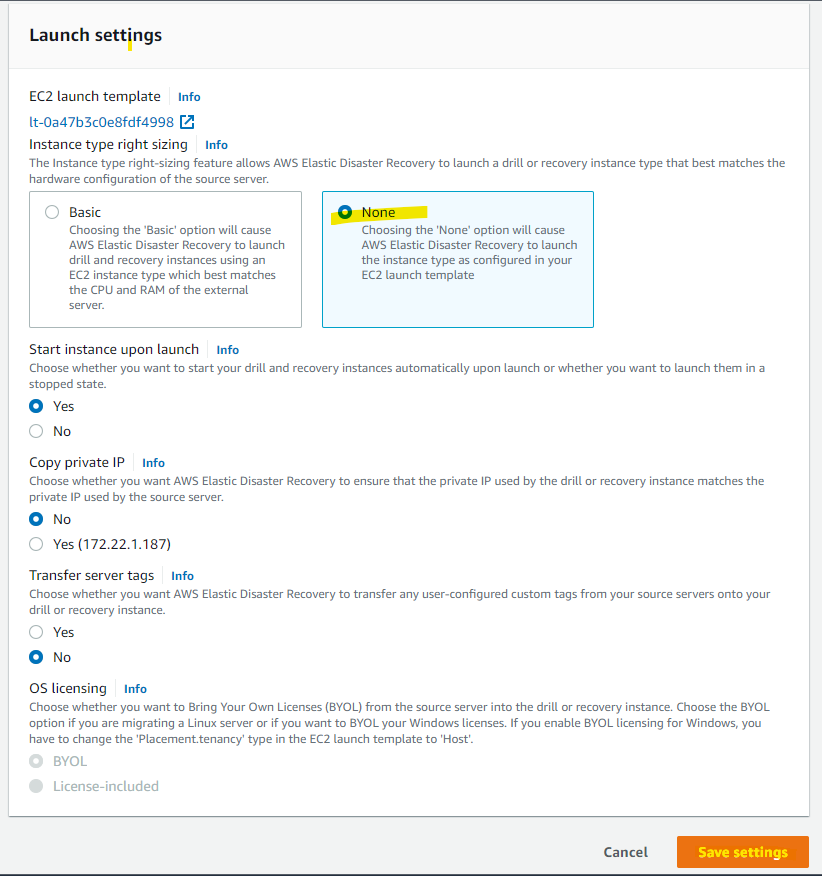
Launch Template を編集していきます。
インスタンスタイプや、Key Pair を指定します。

稼働するインスタンスのネットワークを指定します。

EBS の Type を gp3 に指定します。

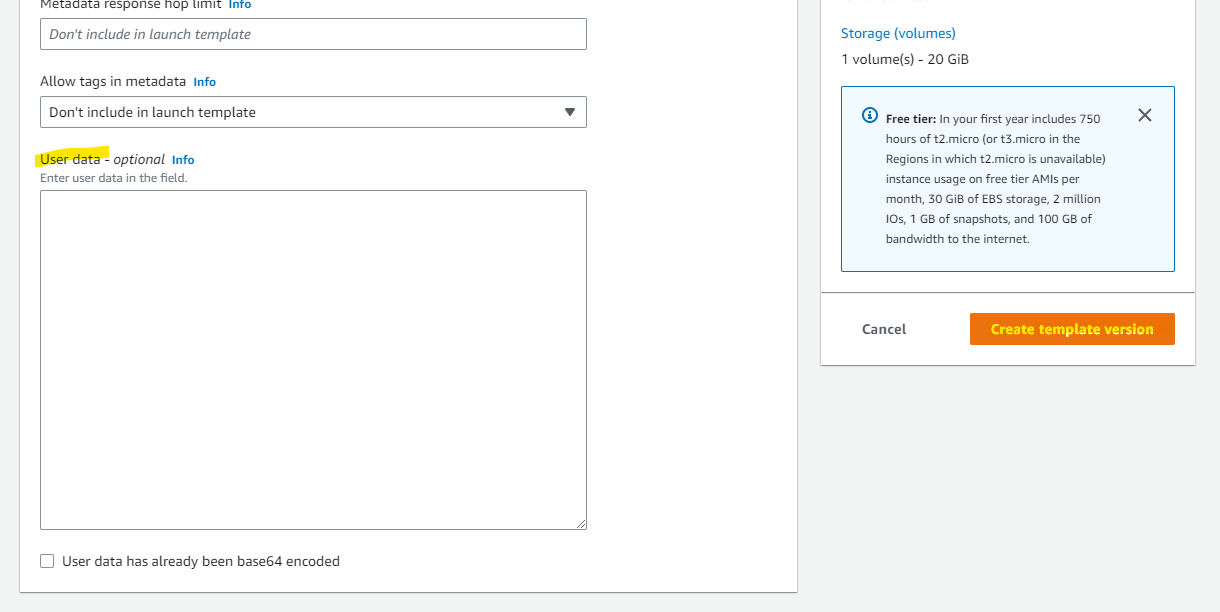
user data も指定可能です。今回は空白のまま Create を押します。
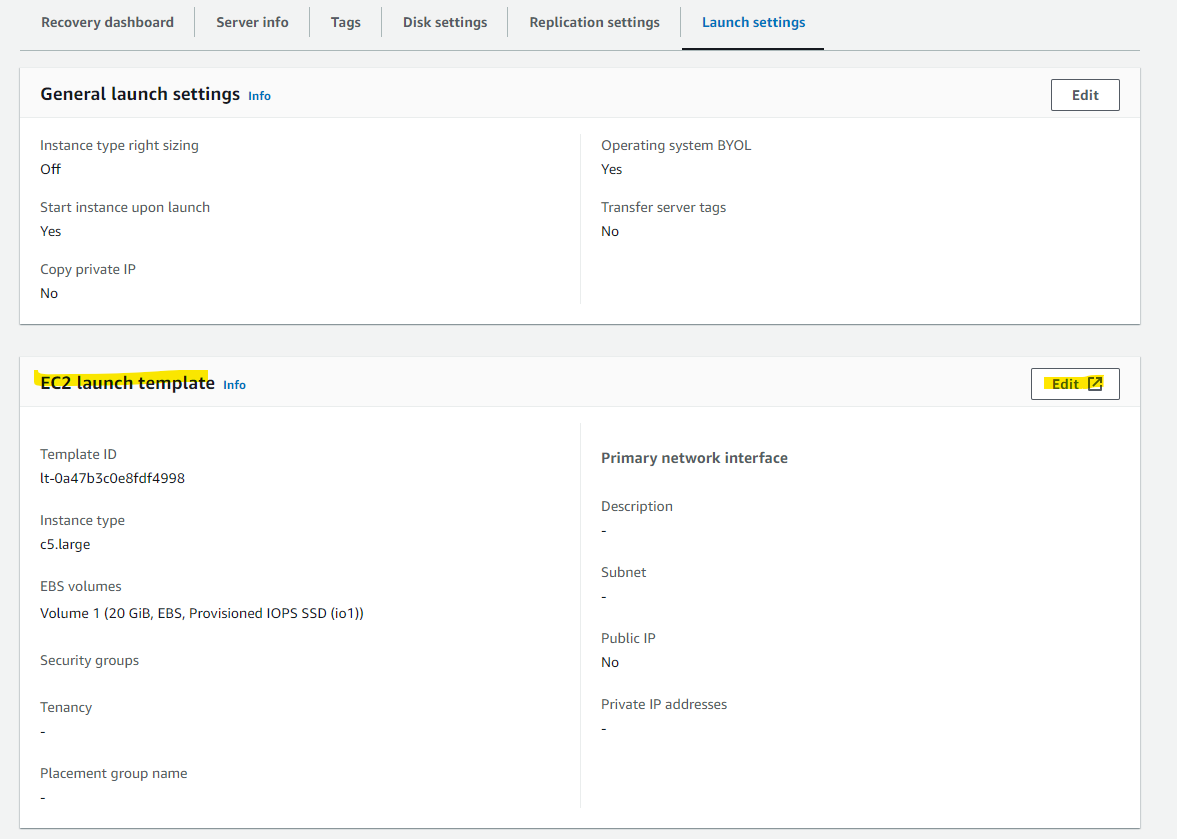
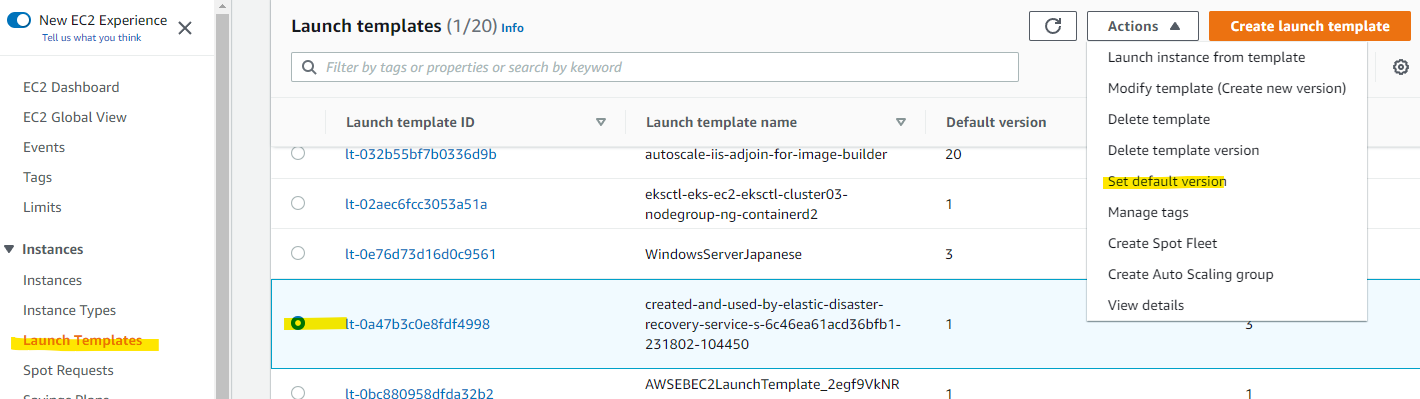
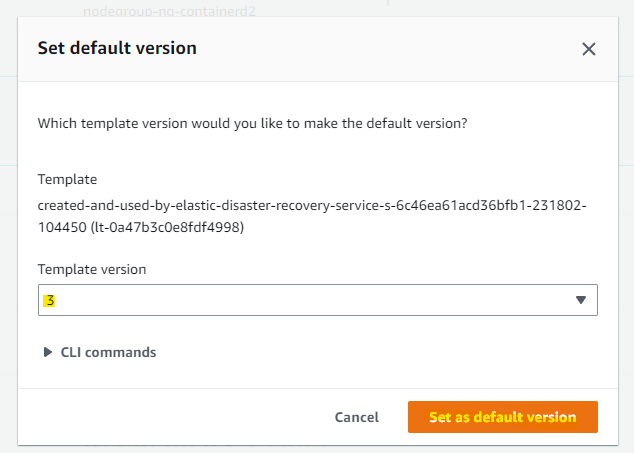
Launch Template の Default Version を変更します。
最新に変更します。
Default Version を変更したことで、DRS 側の画面にも反映されました。
フェールオーバーのテスト
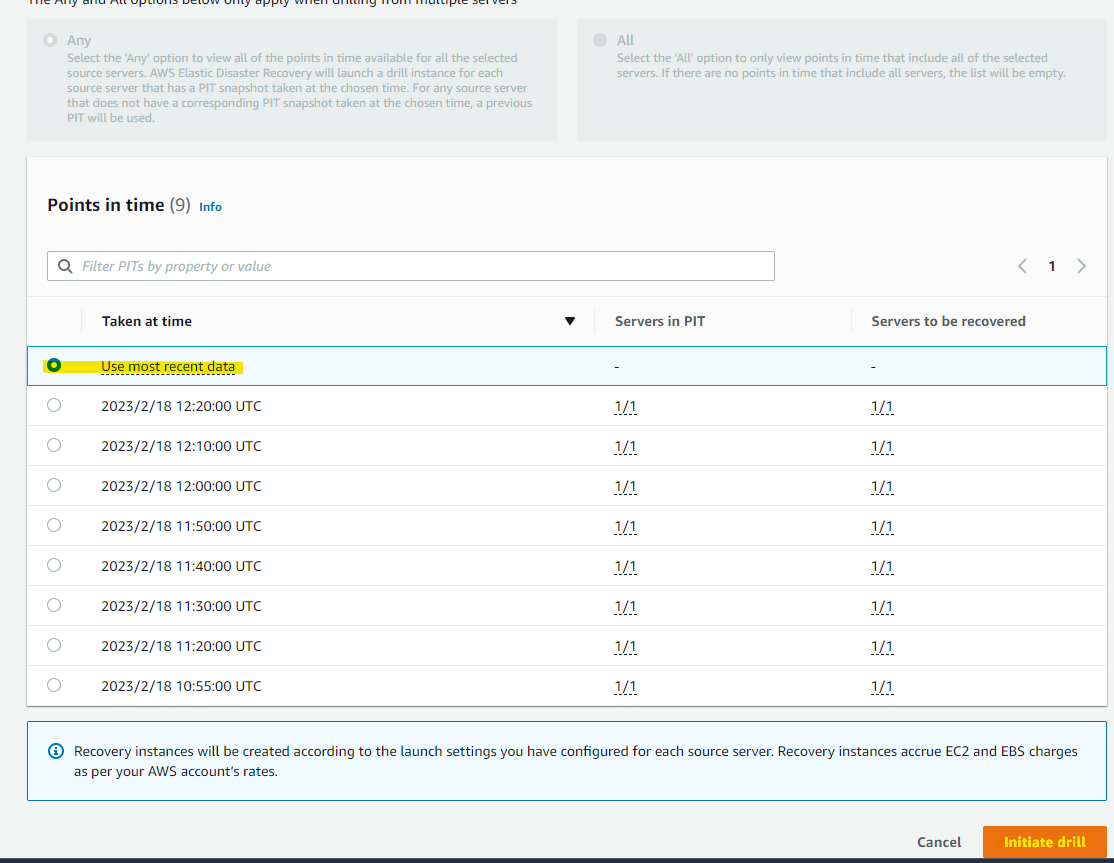
ここまででフェールオーバーの準備ができました。DRS の画面の中で、initiate recovery drill を選択します。drill は、DR のテストの時に利用する選択肢です。

どの時点のデータを使って DR として復元するか指定します。最新のデータを指定します。
Recovery Job が作成されました。

一定時間後、もともとオンプレミスで稼働していた CentOS が EC2 Instance として稼働していることがわかります。

アクセス確認
SSH でアクセスします。
ssh root@10.0.1.104
IP アドレスの設定が自動的に DHCP に変わっている
[root@ip-10-0-1-59 network-scripts]# cat /etc/sysconfig/network-scripts/ifcfg-ens5
DEVICE="ens5"
BOOTPROTO="dhcp"
ONBOOT="yes"
TYPE="Ethernet"
USERCTL="yes"
PEERDNS="yes"
IPV6INIT="no"
PERSISTENT_DHCLIENT="1"
ENA Driver が自動インストールされている
[root@ip-10-0-1-59 network-scripts]# modinfo ena
filename:       /lib/modules/3.10.0-1160.83.1.el7.x86_64/kernel/drivers/net/ethernet/amazon/ena/ena.ko.xz
version:        2.0.3K
license:        GPL
description:    Elastic Network Adapter (ENA)
author:         Amazon.com, Inc. or its affiliates
retpoline:      Y
rhelversion:    7.9
srcversion:     32812372D800D26A96C983E
alias:          pci:v00001D0Fd0000EC21sv*sd*bc*sc*i*
alias:          pci:v00001D0Fd0000EC20sv*sd*bc*sc*i*
alias:          pci:v00001D0Fd00001EC2sv*sd*bc*sc*i*
alias:          pci:v00001D0Fd00000EC2sv*sd*bc*sc*i*
depends:
intree:         Y
vermagic:       3.10.0-1160.83.1.el7.x86_64 SMP mod_unload modversions
signer:         CentOS Linux kernel signing key
sig_key:        83:3D:E5:B7:97:C7:F1:86:0D:1F:EA:C8:06:B6:DA:FE:D0:78:F0:69
sig_hashalgo:   sha256
parm:           debug:Debug level (0=none,...,16=all) (int)
Nginx が稼働しており、ブラウザから表示が可能

フェールバックのために、テストファイルを作成しておきましょう。
[root@ip-10-0-1-59 ~]# pwd
/root
[root@ip-10-0-1-59 ~]# ls -la
total 192
dr-xr-x---.  3 root root    263 Feb 18 08:33 .
dr-xr-xr-x. 17 root root    224 Feb 18 01:22 ..
-rw-------.  1 root root   1331 Feb 18 01:23 anaconda-ks.cfg
-rw-r-----.  1 root root 134796 Feb 18 05:44 aws_replication_agent_installer.log
-rw-r--r--.  1 root root  27442 Feb  7 08:27 aws-replication-installer-init.py
-rw-------.  1 root root   2137 Feb 18 08:08 .bash_history
-rw-r--r--.  1 root root     18 Dec 28  2013 .bash_logout
-rw-r--r--.  1 root root    176 Dec 28  2013 .bash_profile
-rw-r--r--.  1 root root    176 Dec 28  2013 .bashrc
-rw-r--r--.  1 root root    100 Dec 28  2013 .cshrc
-rw-------.  1 root root     41 Feb 18 08:04 .lesshst
drwxr-----.  3 root root     19 Feb 18 02:02 .pki
-rw-r--r--.  1 root root    129 Dec 28  2013 .tcshrc
-rw-r--r--.  1 root root      0 Feb 18 08:33 text.txt
フェールバック
DR 先である AWS 環境から、もともとの環境にフェールバックすることができます。
まず、Failball Client として ISO イメージをダウンロードします。
- Region 名は環境に合わせて変更してください
https://aws-elastic-disaster-recovery-ap-northeast-1.s3.ap-northeast-1.amazonaws.com/latest/failback_livecd/aws-failback-livecd-64bit.iso
この ISO イメージを使って、Virtual Box 上で仮想マシンを作成します。

仮想マシンを起動中に F12 を押して、BIOS の画面を開きます。CD-ROM boot を選択します。
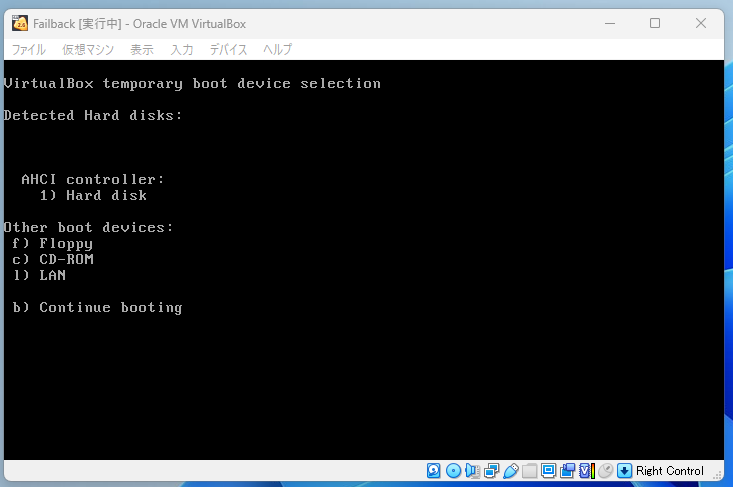
すると、次の画面が起動します。

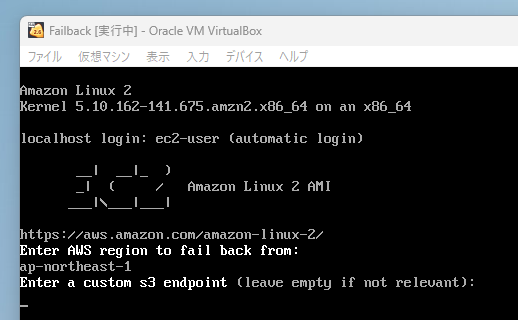
まず、対象の AWS Region 名を入力します。
ap-northeast-1

S3 の Endpoint を入力する画面です。Public なものを利用するときは、このまま空白でエンターを押します。
AWS の Access Key ID, Secret Key を入れます。(コピペができないし、画面に表示もされないので入力ミスが多発してつらかった・・・。)

DRS の Custom Endpoint は空白のまま入れます。

Recovery Instance の Instance ID を入れます。

どのディスクにコピーするか聞かれます。このままエンターを押します。

レプリケーションが始まります。

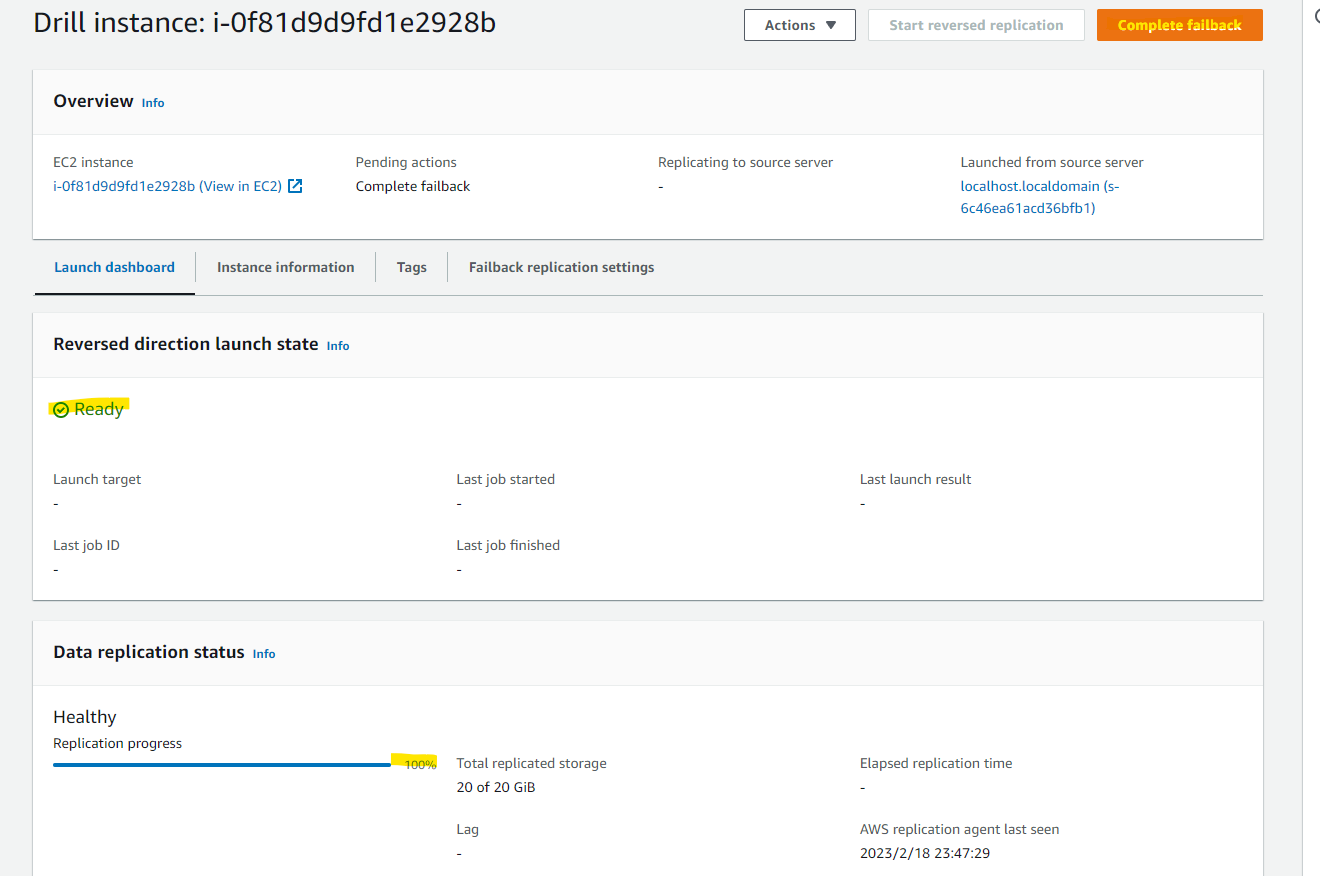
DRS の画面では、Recovery Instance が Synchronizing となっています。
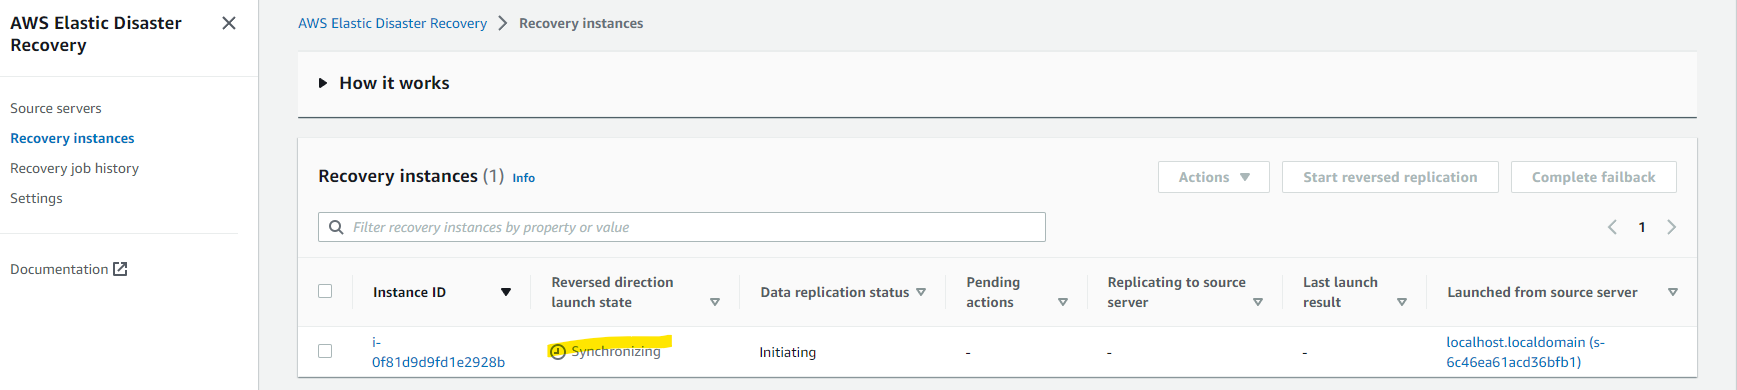
Failback のレプリケーションの進捗具合がわかります。

ネットワークのコネクションができた。

レプリケーションが開始された旨がわかります。

レプリケーションの進捗度合が更新されています。

レプリケーションが完了しました。

Complete failback を押します。
Complete を押します。

自動的に、フェールバック先のマシンが再起動します。

AWS 上で作成した test.txt ファイルが、きちんと復元されています。
[root@localhost ~]# ls -la
total 192
dr-xr-x---.  3 root root    263 Feb 18 08:33 .
dr-xr-xr-x. 17 root root    224 Feb 18 01:22 ..
-rw-------.  1 root root   1331 Feb 18 01:23 anaconda-ks.cfg
-rw-r-----.  1 root root 134796 Feb 18 05:44 aws_replication_agent_installer.log
-rw-r--r--.  1 root root  27442 Feb  7 08:27 aws-replication-installer-init.py
-rw-------.  1 root root   2137 Feb 18 08:08 .bash_history
-rw-r--r--.  1 root root     18 Dec 28  2013 .bash_logout
-rw-r--r--.  1 root root    176 Dec 28  2013 .bash_profile
-rw-r--r--.  1 root root    176 Dec 28  2013 .bashrc
-rw-r--r--.  1 root root    100 Dec 28  2013 .cshrc
-rw-------.  1 root root     41 Feb 18 08:04 .lesshst
drwxr-----.  3 root root     19 Feb 18 02:02 .pki
-rw-r--r--.  1 root root    129 Dec 28  2013 .tcshrc
-rw-r--r--.  1 root root      0 Feb 18 08:33 text.txt
nginx が稼働しています
[root@localhost ~]# systemctl status nginx
● nginx.service - nginx - high performance web server
   Loaded: loaded (/usr/lib/systemd/system/nginx.service; enabled; vendor preset: disabled)
   Active: active (running) since Sat 2023-02-18 09:51:45 EST; 4min 20s ago
     Docs: http://nginx.org/en/docs/
  Process: 956 ExecStart=/usr/sbin/nginx -c /etc/nginx/nginx.conf (code=exited, status=0/SUCCESS)
 Main PID: 970 (nginx)
   CGroup: /system.slice/nginx.service
           ├─970 nginx: master process /usr/sbin/nginx -c /etc/nginx/nginx.conf
           └─972 nginx: worker process

Feb 18 09:51:45 localhost.localdomain systemd[1]: Starting nginx - high performance web server...
Feb 18 09:51:45 localhost.localdomain systemd[1]: Can't open PID file /var/run/nginx.pid (yet?) after start: No s...tory
Feb 18 09:51:45 localhost.localdomain systemd[1]: Started nginx - high performance web server.
Hint: Some lines were ellipsized, use -l to show in full.

Recovery Instance は、AWS 上に残り続けているので、いらなければ削除しましょう。

検証を通じてわかったこと
-
サポート OS がこの Document に書かれている
-
DRS を利用するための必要な条件が、次の Document に整理されている。
-
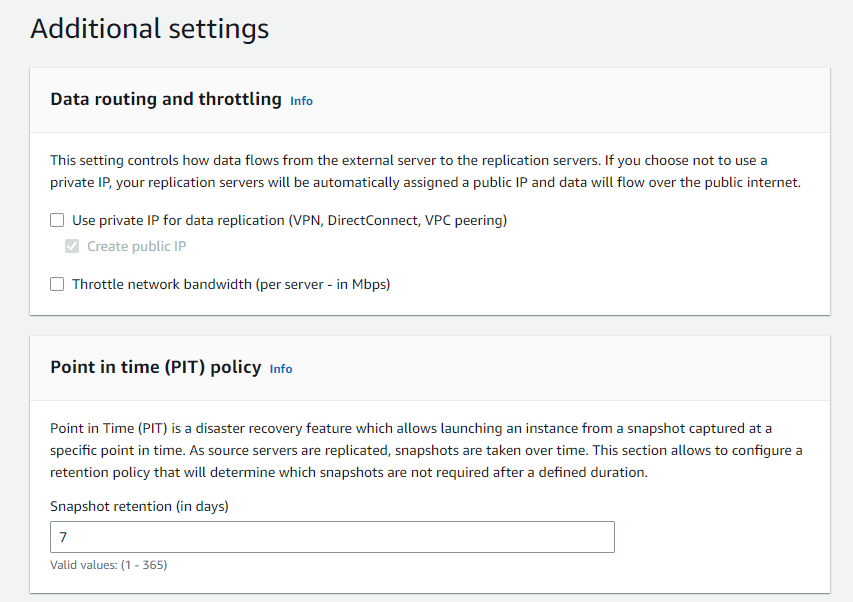
レプリケーションを実行する際のネットワーク転送量を制限する機能がある。サーバーあたりの bandwitch を、DRS の画面で設定可能。
-
レプリケーションを実施して出来上がった Source Server を使って、定期的に DR が正常に稼働するか試すことができる。Drill の機能を使うことで、レプリケーションを維持しながら一時的にサーバーを立ち上げて動作確認が可能
-
Drill を実行してインスタンスを復元したあとに 再度 Drill を実行すると、初回で復元されたインスタンスは自動的に削除される。
-
DR 先の復旧インスタンスの先の状況
- オンプレミスで root に対する SSH を許可していたので、DR 先の AWS でも root で SSH が可能
- IP アドレスの設定が自動的に DHCP に変わっている。ただ、設定ファイルなどを書き換えてくれるわけではないので、必要に応じてファイルの書き換えなどが発生する
- ENA Driver が自動インストールされている
-
基本的には復旧先の EC2 インスタンスで Private IP アドレスの変更は発生する前提で設計するのが良いと思う
- DR 元のネットワーク構成を想像すると、オフィスのネットワークとデータセンターのネットワークを閉域網などで接続していることが考えられる。
- その時に、DR 先である AWS も、Direct Connect や Site-to-Site VPN で Private Network を構成することが考えられる
- Private Network では IP アドレスの重複は許されないため、基本的には AWS は別の CIDR で構成して事前に接続しておく
- そのため、DR 対象のインスタンスは基本的に IP アドレスが変わる
-
DR 先から、元環境にもどすための Failback が可能
- 元の環境でサーバーを復旧したあとに、Failback Client の ISO イメージを使ってデータを元に戻す方法がある。
- Failback Client ISO をブートすると、AWS の SecretKey や Access Key を入力する画面がある。コピペができるわけではないので、大量のサーバーを Failback すると手作業が多くなる。
- https://docs.aws.amazon.com/ja_jp/drs/latest/userguide/failback-performing-on-prem.html
-
Failback したあとに、基本的には再度 Replication Agent の再インストールが必要
-
DRS では、DR 元のサーバーの識別のために Mac Address が使われている。
-
物理的な障害を想定すると、Mac Address は変わることもあるため、基本的には Replication Agent の再インストールが必要となる。
-
https://docs.aws.amazon.com/drs/latest/userguide/installation-requiremets.html
-
Ensure MAC address stability – ensure that the MAC addresses of the source servers do not change upon a reboot or any other common changes in your network environment. Elastic Disaster Recovery calculates the unique ID of the source server from the MAC address. When a MAC address changes, Elastic Disaster Recovery is no longer able to correctly identify the source server. Consequently, replication will stop. If this happens, you will need to reinstall the AWS Replication Agent and start replication from the beginning.
-