はじめに
Application Discovery Service を利用すると、オンプレミス環境にあるサーバー情報を自動的に収集が出来ます。「サーバー一覧」「CPU, Memory, ストレージの情報」「CPU, Memory, ストレージ, ネットワークの利用率」「EC2 に移行するときのおすすめインスタンスタイプ」などを取得できるため、移行の時の判断材料にできます。
Application Discovery Service を使って情報収集をするときには、2 つの方法があります
- agent :
- オンプレミスのサーバーに agent をインストールして情報を収集
- 物理マシン、仮想マシン問わず情報を取得出来て便利
- agent をすべてのマシンにインストールする手間がある
- agentless :
- VMware vSphere で稼働している仮想マシンの情報を vCenter から情報を取得
- 専用の仮想アプライアンスを VMware 環境に構築することで、agent の導入が不要
- Hyper-V や KVM など、VMware 以外の仮想基盤の場合は agentless が利用できない。
2 つの方式の詳細な比較は、以下の Document に記載があります。
今回は、agent をインストールするタイプの方法を紹介します。
Migration Hub のホームリージョンを選択
Application Discovery Service を利用するために、Migration Hub でホームリージョンを選択する必要があります。ホームリージョンの選択自体には、それほど大きなデメリットはないと思います。東京リージョンを選びます。
AWS マネジメントコンソールで、Migration Hub の Settings を開いて、ホームリージョンを選択します。

Application Discovery Service 用の IAM User を作成
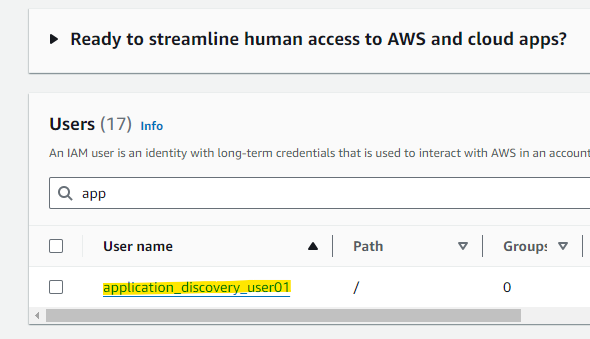
Application Discovery の Agent をインストールするときに、IAM User を紐づけます。そのために、IAM の Users ページから、Create user を押します。

適当に名前を指定して、Next を押します。

AWSApplicationDiscoveryAgentAccess を付与します。

Create

作成した IAM User の詳細画面を開きます。
Create access key を押します。

Next を押します。
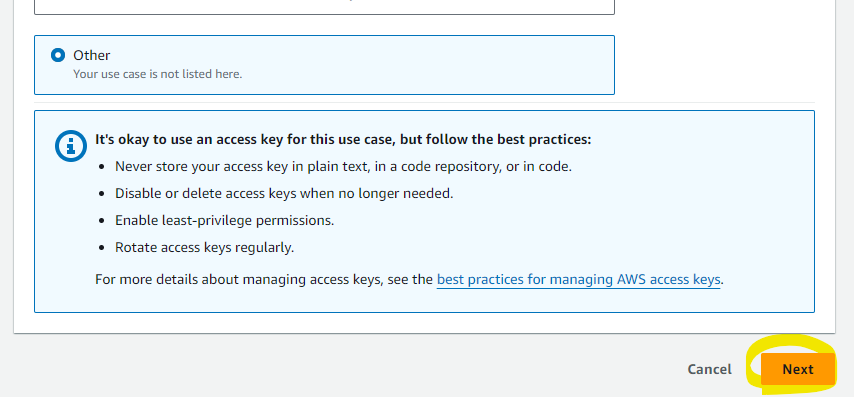
Create で作成される Key を手元で控えておきます。

Windows Server 2022 に agent をインストール
今回は、Windows Server 2022 と CentOS 7 を対象に検証します。まずは Windows からです。
以下の URL からインストーラーをダウンロードして、収集対象のサーバーにコピーします。
https://s3.us-west-2.amazonaws.com/aws-discovery-agent.us-west-2/windows/latest/AWSDiscoveryAgentInstaller.exe
この exe ファイルはダブルクリックしないで、コマンドプロンプトからコマンドを実行してインストールをします。 ダブルクリックをしてしまった場合は、アンインストールが必要なのでご注意ください。
コマンドプロンプトを管理者権限で開きます。

exe ファイルを格納しているディレクトリに移動します。
cd C:\Users\Administrator\Desktop\Application Discovery Service
以下のコマンドでインストールをします。リージョン、Access Key,、Secret Key は環境に合わせて書き換えてください。
.\AWSDiscoveryAgentInstaller.exe REGION="ap-northeast-1" KEY_ID="aws-access-key-id" KEY_SECRET="aws-secret-access-key" /quiet
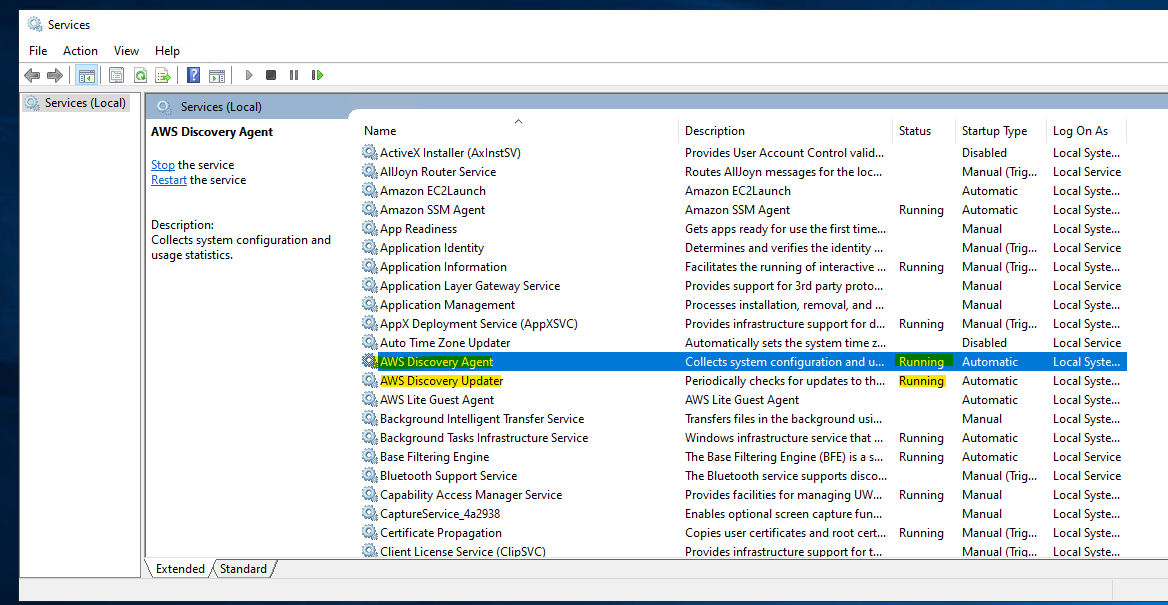
コマンドの結果は何も表示されないので、インストールされているか確認するために Service List 画面をひらきます。AWS Discovery Agent や AWS Discovery Updater が Running 状態になっていれば OK です。
Agent のログファイルは以下のディレクトリに自動作成されています。
C:\ProgramData\AWS\AWS Discovery\Logs

CentOS 7 に agent をインストール
Cent OS 7.9 のマシンにも agent をインストールします。
$ cat /etc/redhat-release
CentOS Linux release 7.9.2009 (Core)
作業用ディレクトリを作成します。
mkdir discoveryAgent
cd discoveryAgent/
agent のインストーラーをダウンロードします。
curl -o ./aws-discovery-agent.tar.gz https://s3-us-west-2.amazonaws.com/aws-discovery-agent.us-west-2/linux/latest/aws-discovery-agent.tar.gz
解凍
tar -xzf aws-discovery-agent.tar.gz
以下のコマンドでインストールを行います。
sudo bash install -r ap-northeast-1 -k aws-access-key-id -s aws-secret-access-key
実行例
**************************************************
    INIT PHASE
**************************************************
Distribution type of the machine is centos.
Distribution of the machine is CentOS Linux.
Revision of the distribution is 7.
There is no existing version of the AWS Discovery Agent on the machine.
Using rpm and yum for package management. Expected agent package name is aws-discovery-agent.rpm.
Installing using local file /home/centos/discoveryAgent/aws-discovery-agent.rpm


**************************************************
    INSTALL AGENT PHASE
**************************************************
Installing agent with rpm...
Created symlink from /etc/systemd/system/multi-user.target.wants/aws-discovery-daemon.service to /usr/lib/systemd/system/aws-discovery-daemon.service.
Validating install arguments and writing configuration to /etc/opt/aws/discovery/config


**************************************************
    FINISH PHASE
**************************************************

Notice:
By installing the Amazon Discovery Agent, you agree that your use is subject to the terms of your existing
AWS Customer Agreement or other agreement with Amazon Web Services, Inc. or its affiliates governing your
use of AWS services. You may not install and use the Amazon Discovery Agent unless you have an account in
good standing with AWS.
*  *  *
Current running agent reports version as: 2.0.2222.0
This install script was created to install agent version: 2.0.2222.0
In most cases, these version numbers should be the same.
[centos@ip-10-0-2-126 discoveryAgent]$
systemctl に setvice として登録されています。
$ sudo systemctl status aws-discovery-daemon
● aws-discovery-daemon.service - AWS Discovery Agent: Collects system configuration and usage statistics for AWS Discovery.
   Loaded: loaded (/usr/lib/systemd/system/aws-discovery-daemon.service; enabled; vendor preset: disabled)
   Active: active (running) since Sun 2024-05-05 16:43:24 UTC; 1min 6s ago
 Main PID: 16011 (aws-discoveryd)
   CGroup: /system.slice/aws-discovery-daemon.service
           └─16011 /opt/aws/discovery/aws-discoveryd nodaemon

May 05 16:43:24 ip-10-0-2-126.ap-northeast-1.compute.internal systemd[1]: Started AWS Discovery Agent: Collects system co...y..
Hint: Some lines were ellipsized, use -l to show in full.
log file はこちらです。
/var/log/aws/discovery
less でログファイルを開けます。
sudo less /var/log/aws/discovery/aws-discovery-daemon-0.log
Migration Hub で確認
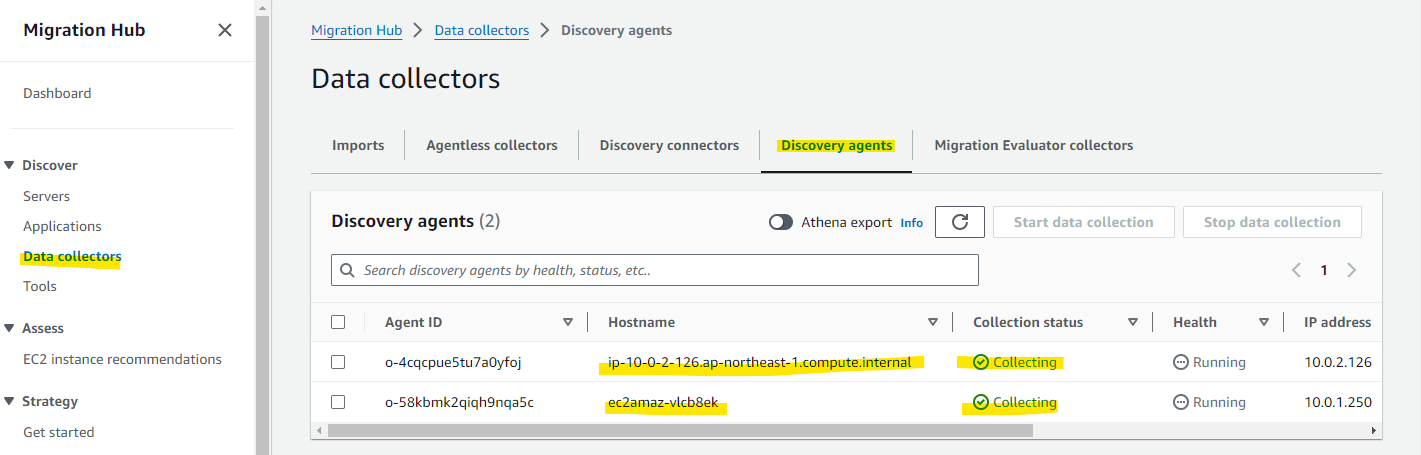
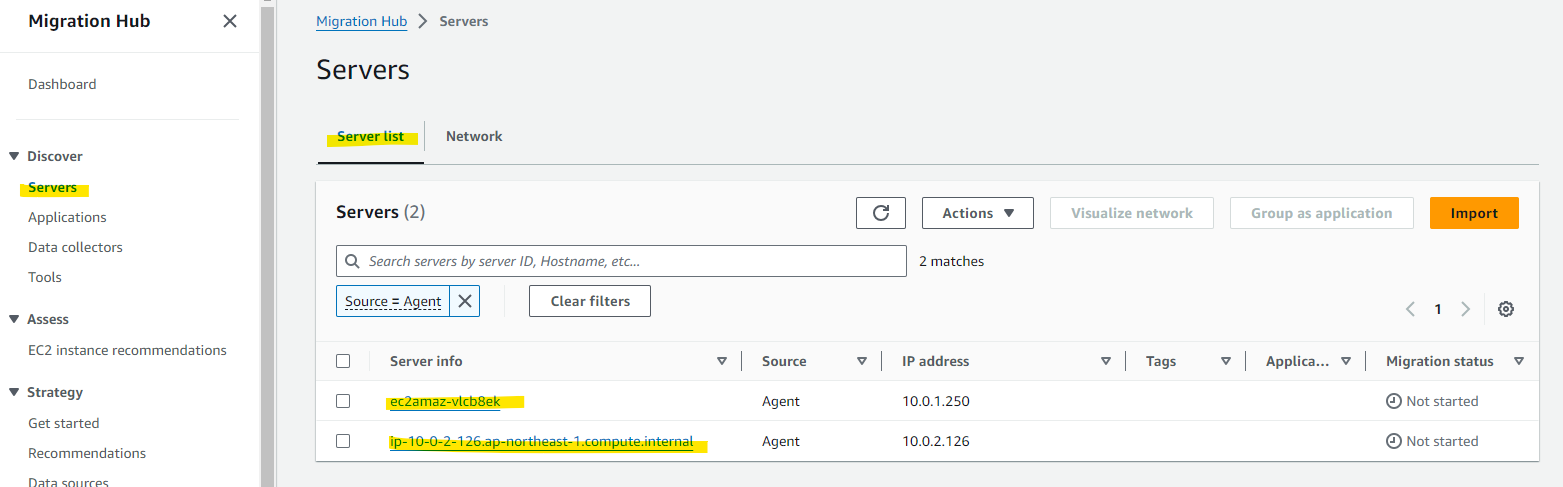
agent をインストールしたあと、収集された情報は Migration Hub で確認できます。
agent の一覧画面から、Health 状態を確認できます。Status が Collecting になっていれば OK です。
収集している Server の詳細を確認したい場合は、Servers からサーバーを選択します。
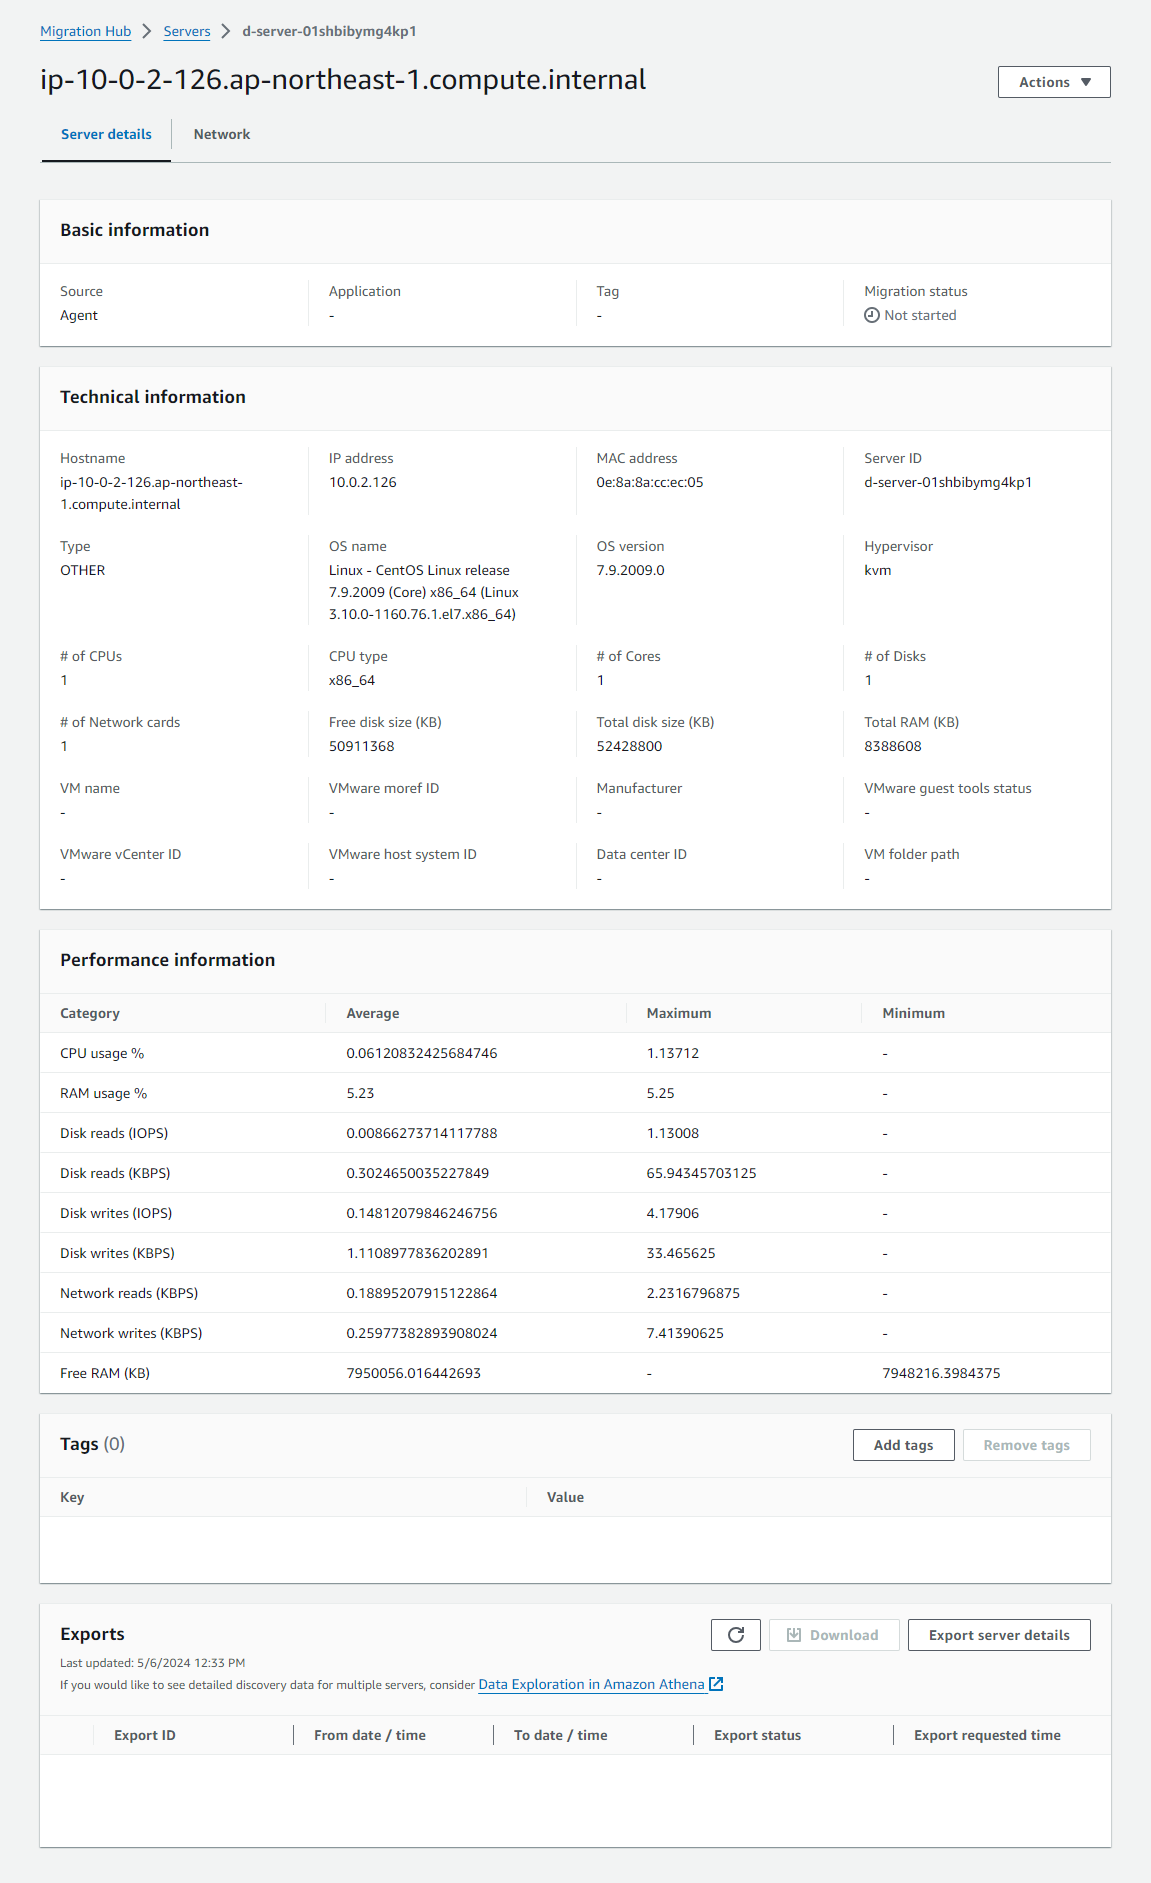
agent インストールしてから 30 分ほどは、CPU 使用率、メモリ使用率、Disk の空き容量などは確認できます。30 分ほど待機しましょう。

30 分くらい待機すると、CPU 利用率などが確認できるようになりました。Windows Server 2022 の詳細画面です。

CentOS の詳細画面です。
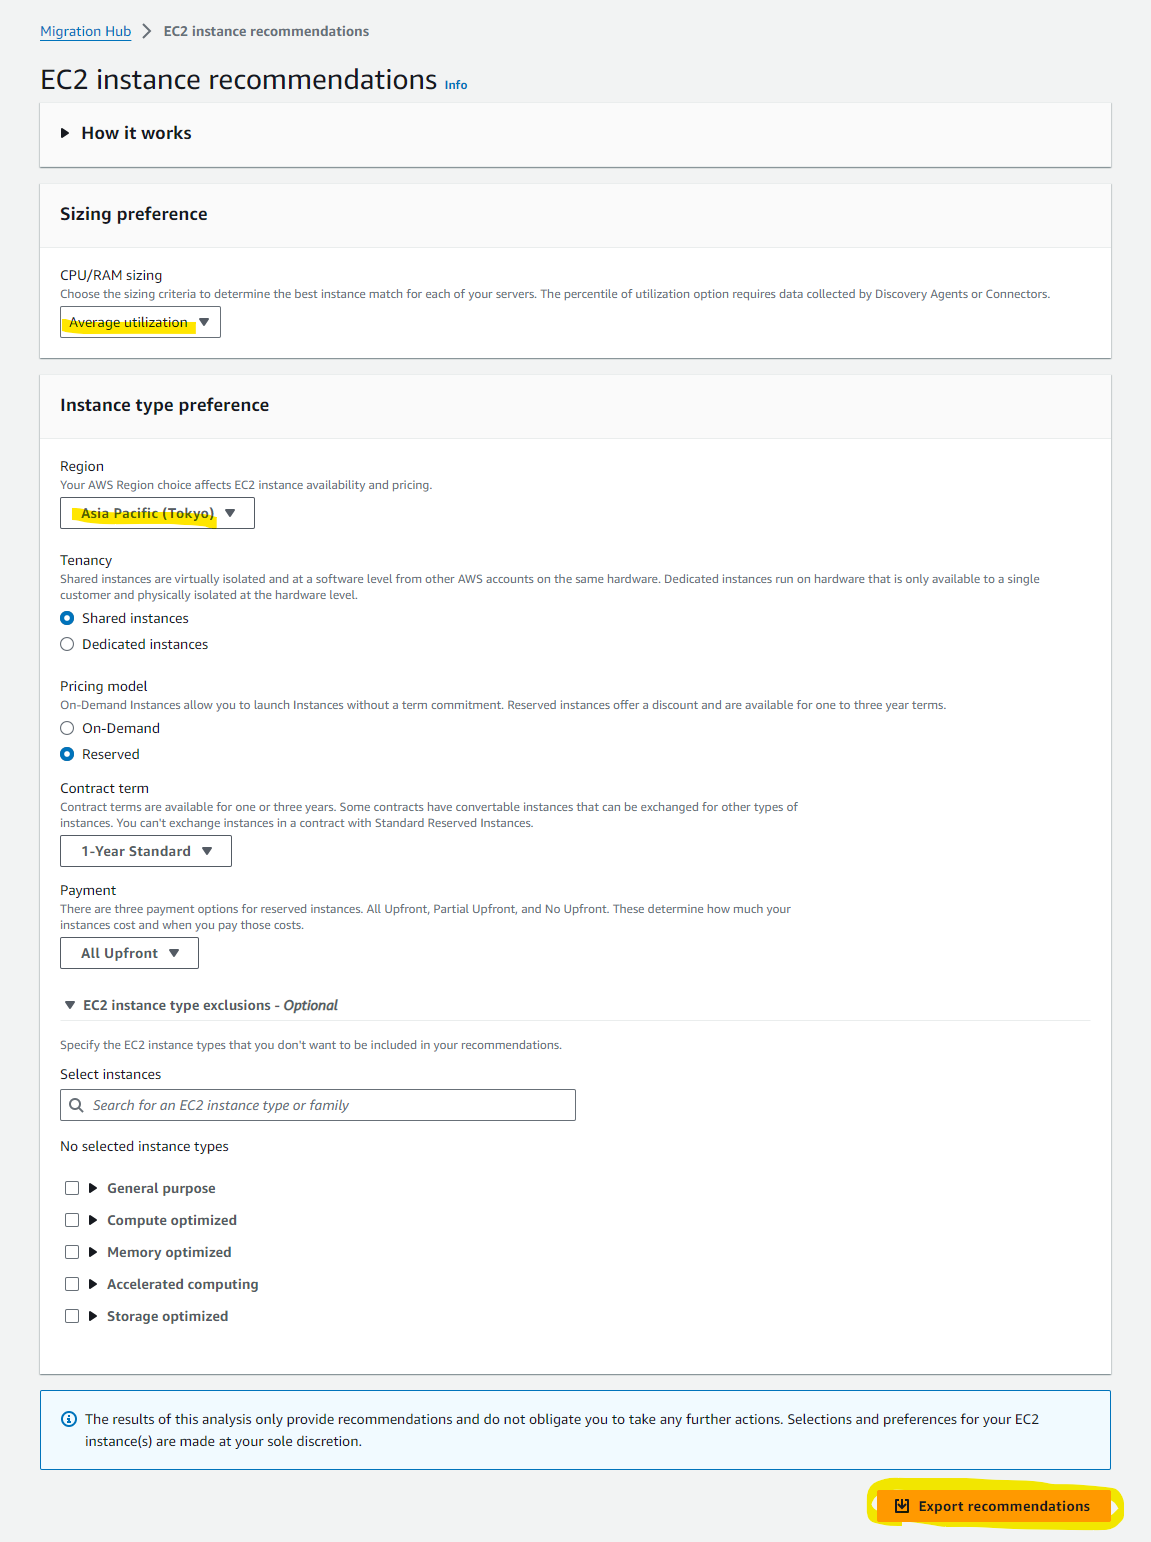
EC2 インスタンスのレコメンド
収集した情報を基に、EC2 に移行した場合のおすすめインスタンスタイプを出力ができます。agent をインストールして収集した CPU の数、メモリの量、OS、リソース利用率などを加味した出力です。留意点として、瞬間的に急な負荷が上がる使い方の場合は、agent による情報収集にデータが含まれない場合があるので、参考情報として活用いただくのが良いでしょう。
Migration Hub のメニューから、EC2 instance recommendations を選択します。

csv ファイルがダウンロードされます。重要なところを赤線で占めします。
- 情報収集元のホスト名
- 情報収集元のOS

- 現在の vCPU 数
- CPU の利用率
- Memory の割り当て量
- Memory の利用率
- おすすめ EC2 インスタンスタイプ

Athena でクエリー
上記のレコメンドで取得できる csv は、CPU やメモリなどの情報は含まれていますが、Disk の容量は csv に含めることができません。Disk の容量も含めた形で csv で一覧化したいときに利用できるのが、Athena サービスとの連携です。収集した情報が自動的に S3 に格納され、Athena で好きな形でクエリーできるようになります。
以下の画面で、Athena export のチェックを ON にします。

Enable を押します。

その後、Servers のメニューから、View in Amazon Athena のボタンを押します。

Athena の画面上で、Database に「applicaiton_discovery_service_database」という選択肢が自動的に用意されています。

以下のクエリーを実行すると、直近の 72 に時間のデータを対象に、サーバー一覧、CPU、メモリ、DIsk の利用率を表示できます。
SELECT
    "OS"."os_name" AS "OS Name",
    "OS"."os_version" AS "OS Version",
    "OS"."host_name" AS "Host Name",
    "SP"."agent_id",
    "SP"."total_num_logical_processors" AS "Number of vCPU",
    "SP"."total_num_cores" AS "Number of Cores",
    "SP"."total_num_cpus" AS "Number of CPU",
    "SP"."total_cpu_usage_pct" AS "CPU Percentage",
    "SP"."total_ram_in_mb" AS "Total RAM (MB)",
    ("SP"."total_ram_in_mb" - "SP"."free_ram_in_mb") AS "Used RAM (MB)",
    "SP"."free_ram_in_mb" AS "Free RAM (MB)",
    "SP"."total_disk_size_in_gb" AS "Total Storage (GB)",
    ("SP"."total_disk_size_in_gb" - "SP"."total_disk_free_size_in_gb") AS "Used Storage (GB)",
    "SP"."total_disk_free_size_in_gb" AS "Free Storage (GB)",
    "SP"."total_disk_read_ops_per_sec" AS "Disk Read IOPS",
    "SP"."total_disk_bytes_written_per_sec_in_kbps" AS "Disk Write IOPS",
    "SP"."total_network_bytes_read_per_sec_in_kbps" AS "Network Reads (kbps)",
    "SP"."total_network_bytes_written_per_sec_in_kbps" AS "Network Write (kbps)",
    "SP"."timestamp" AT TIME ZONE 'Japan' AS "timestamp"
FROM
    "sys_performance_agent" "SP"
JOIN
    "OS_INFO_agent" "OS" ON "SP"."agent_id" = "OS"."agent_id"
WHERE
    "SP"."timestamp" >= CURRENT_TIMESTAMP - INTERVAL '72' HOUR
ORDER BY "timestamp" ASC
LIMIT 1000;
以下のように Results で結果を確認できます。Download results ボタンを押すことで、csv ファイルをダウンロードできます。

検証を通じてわかったこと
- agent タイプは、15 秒ごとにポーリングされて、15 分おきにサーバーの情報を AWS に送付する
- agent をインストールするサーバーの要件は以下の Document に記載されている。
- agent をインストールするサーバーからインターネットに対して、TCP 443 で通信する必要がある。
- 同時に agent を稼働できるのは、1000 個まで
参考 URL
BlackBelt 資料
https://pages.awscloud.com/rs/112-TZM-766/images/AWS-Black-Belt_2023_AWS_ADS.pdf
サーバーの負荷について
https://frontse.hatenablog.jp/entry/aws_ads