はじめに
前回の記事では、CDK v2 を使って単一の AWS アカウントにデプロイする方法を確認しました。今回の記事では、CDK Pipeline を使って複数の AWS アカウントに対して CI/CD パイプラインを構成する方法を整理していきます。
前回は、手動で cdk コマンドを実行することでデプロイを行いました。この方法は開発するエンジニアが少ないうちは問題ないと思いますが、人数が多くなってくると運用が難しくなります。cdk を使ったデプロイを同時に行うことはできないので、特定の人が特定の環境でコマンド実行することになります。この問題点は、特定の人がボトルネックになりデプロイのスピードが落ちること、また、環境が壊れたときの復旧が面倒なことが挙げられます。
そこで、Git をつかった CI/CD を使って解決しようというのが、今回の記事の内容です。CDK Pipeline を使うことで、CDK の CI/CD パイプラインを比較的簡単に構築が出来ます。これによって、Git の特定のブランチが更新されたことをトリガーに CI/CD パイプラインを実行できるので、デプロイのスピード向上と属人化の解消が出来ます。
構成図

- GitHub と連携して、CDK Pipeline を構成。GitHub の Branch と、CodePipeline を 1対1 で紐づける
- 開発環境用、本番環境用の2つの環境を想定
- 3 つのAWS アカウントを利用
- Pipeline Account : CDK Pipeline を使って、CI/CD Pipeline を構成するアカウント。Dev と Prod の 2 つの CodePipeline が動く
- Dev Account : 開発環境想定
- Prod Account : 本番環境想定
CodePipeline で Connection の作成
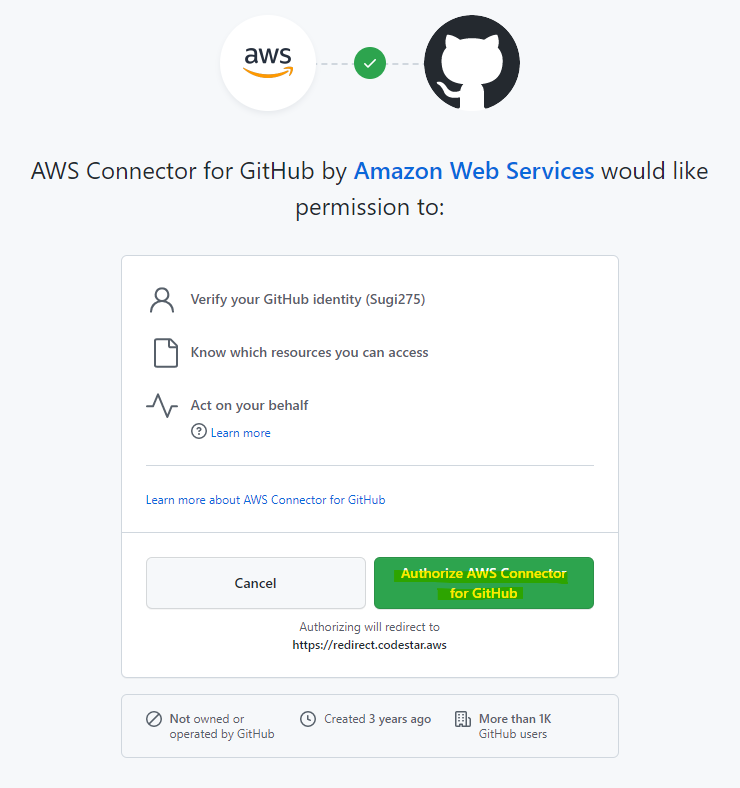
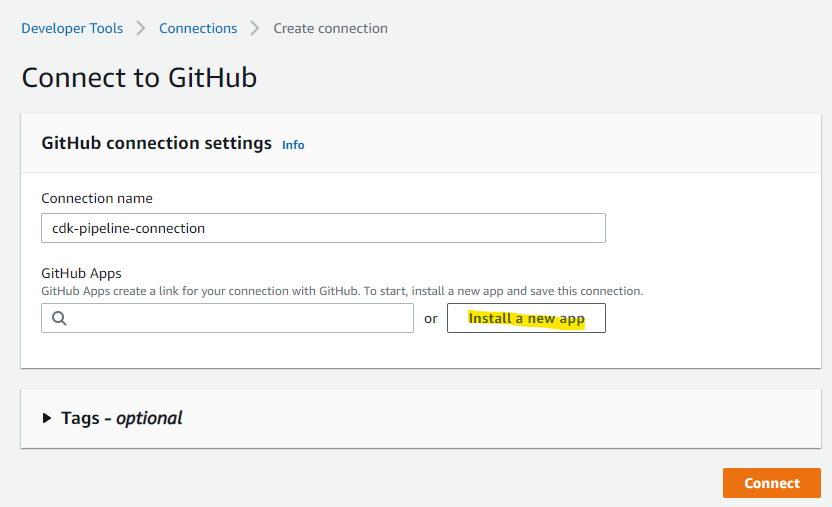
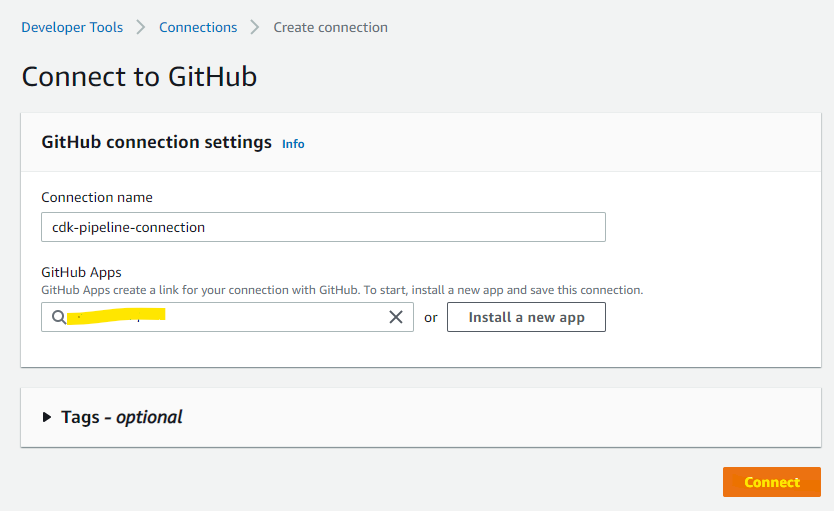
今回の記事では、GitHub と連携して CDK Pipeline を構成します。GitHub と連携するために、CodePipeline 上で Connection を作成します。

GitHub を選択して、Connect to GitHub を押します。

緑のボタンを押します
Install a new app を押します
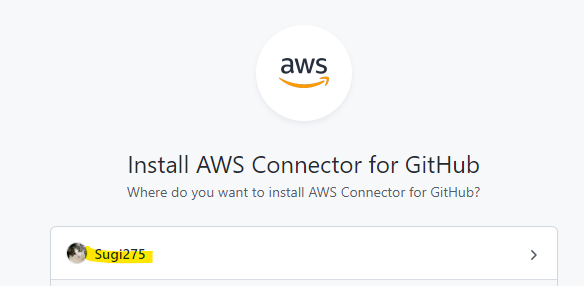
連携したいアカウントを選択します
install を押します
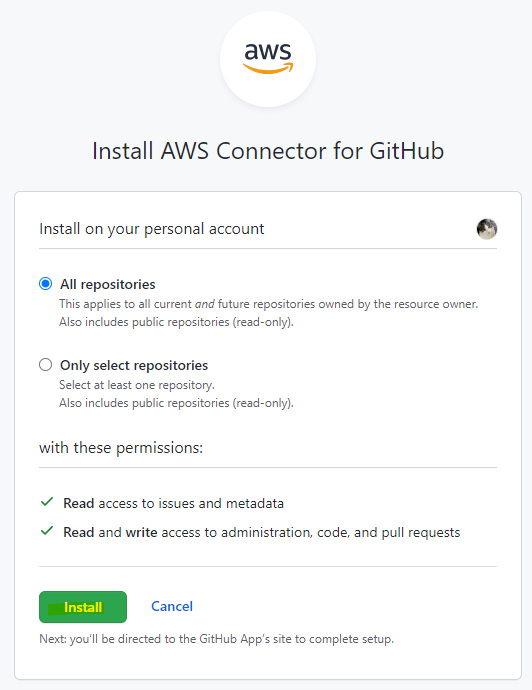
画像ではモザイクを入れていますが、GitHub Apps に数字が入力されます。Connect を押します。
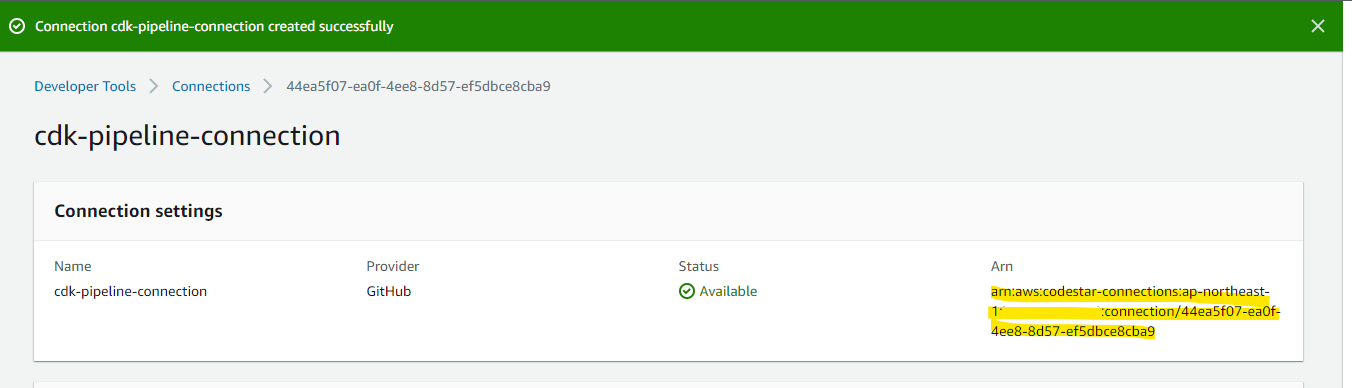
Connection が作成されました
CDK Bootstrap
マルチアカウントにまたがった CDK Pipeline を構成するときに、npx cdk bootstrap コマンドを各アカウントごとに実行する必要があります。各アカウント間の連携に必要となる作業です。このコマンドにより、IAM Role の作成や、信頼関係の構築など、自動的に行ってくれます。
詳細が気になるかたはこちらの URL をご覧ください。
Pipeline アカウントを対象にして実行
npx cdk bootstrap \
    --cloudformation-execution-policies arn:aws:iam::aws:policy/AdministratorAccess \
    aws://11111111/ap-northeast-1
Dev アカウントを対象にして実行
npx cdk bootstrap \
    --profile sub1 \
    --cloudformation-execution-policies arn:aws:iam::aws:policy/AdministratorAccess \
    --trust 11111111 \
    aws://222222222/ap-northeast-1
Prod アカウントを対象にして実行
npx cdk bootstrap \
    --profile sub3 \
    --cloudformation-execution-policies arn:aws:iam::aws:policy/AdministratorAccess \
    --trust 11111111 \
    aws://3333333333/ap-northeast-1
CDK Pipelines の構成
CDK のコードを編集して、CDK Pipelines を構成していきます。
lib/pipeline-stacks.ts
CDK Pipeline で、どのようなビルドを行うか定義するファイルを新規作成
lib/pipeline-stacks.ts
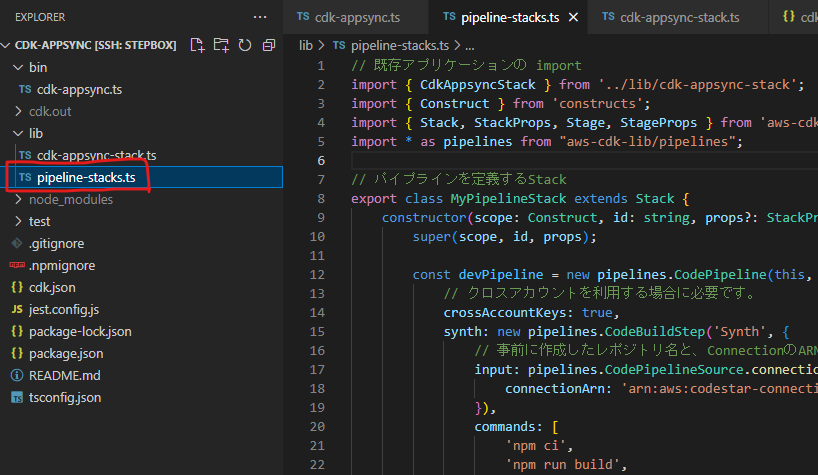
実際のソースコードを全部記載します。
// 実際に各環境にデプロイする Stack を import
import { CdkAppsyncStack } from '../lib/cdk-appsync-stack';
import { Construct } from 'constructs';
import { Stack, StackProps, Stage, StageProps } from 'aws-cdk-lib';
import * as pipelines from "aws-cdk-lib/pipelines";

// パイプラインを定義するStack
export class MyPipelineStack extends Stack {
    constructor(scope: Construct, id: string, props?: StackProps) {
        super(scope, id, props);

        const devPipeline = new pipelines.CodePipeline(this, 'DevPipeline', {
            // クロスアカウントを利用する場合に必要です。
            crossAccountKeys: true,
            synth: new pipelines.CodeBuildStep('Synth', {
                // 事前に作成したレポジトリ名と、ConnectionのARNに置き換えてください。
                input: pipelines.CodePipelineSource.connection('Sugi275/cdk-pipelines-multiaccount-test', 'dev', {
                    connectionArn: 'arn:aws:codestar-connections:ap-northeast-1:11111111:connection/44ea5f07-ea0f-4ee8-8d57-ef5dbce8cba9',
                }),
                commands: [
                    'npm ci',
                    'npm run build',
                    'npx cdk synth -c stage=dev',
                ],
            }),
        });

        // 任意のアカウントとリージョンで、必要な回数だけ`addStage`を呼び出します。
        devPipeline.addStage(new MyApplication(this, 'Dev', {
            env: {
                account: '222222222',
                region: 'ap-northeast-1',
            }
        }));

        const prodPipeline = new pipelines.CodePipeline(this, 'ProdPipeline', {
            // クロスアカウントを利用する場合に必要です。
            crossAccountKeys: true,
            synth: new pipelines.CodeBuildStep('Synth', {
                // 事前に作成したレポジトリ名と、ConnectionのARNに置き換えてください。
                input: pipelines.CodePipelineSource.connection('Sugi275/cdk-pipelines-multiaccount-test', 'master', {
                    connectionArn: 'arn:aws:codestar-connections:ap-northeast-1:11111111:connection/44ea5f07-ea0f-4ee8-8d57-ef5dbce8cba9',
                }),
                commands: [
                    'npm ci',
                    'npm run build',
                    'npx cdk synth -c stage=prod',
                ],
            }),
        });

        // 任意のアカウントとリージョンで、必要な回数だけ`addStage`を呼び出します。
        prodPipeline.addStage(new MyApplication(this, 'Prod', {
            env: {
                account: '3333333333',
                region: 'ap-northeast-1',
            }
        }));
    }
}

/**
 * `Stage`をextendsして`MyApplication`を定義します。
 * `MyApplication`は1つ以上のStackで構成されます。
 */
export class MyApplication extends Stage {
    constructor(scope: Construct, id: string, props?: StageProps) {
        super(scope, id, props);

        new CdkAppsyncStack(this, "CdkAppsyncStack");
    }
}
大事なポイントをいくつか記載します。
これは、開発環境用のパイプライン定義です。CDK Pipeline に紐づける、GitHub の Repository 名と、Branch 名を指定します。ここで指定した dev Branch が更新されると、 devPipeline で定義したパイプラインが起動します。
起動したときに、commands で指定したコマンドが実行されます。CDK としてビルドしたあとに、npx cdk synth -c stage=dev でデプロイを行っています。
stage=dev を指定することで、cdk.json で定義した dev に紐づく環境変数を利用できます。開発環境と本番環境で環境変数を使ってパラメータを調整したいときに活用しましょう。
        const devPipeline = new pipelines.CodePipeline(this, 'DevPipeline', {
            // クロスアカウントを利用する場合に必要です。
            crossAccountKeys: true,
            synth: new pipelines.CodeBuildStep('Synth', {
                // 事前に作成したレポジトリ名と、ConnectionのARNに置き換えてください。
                input: pipelines.CodePipelineSource.connection('Sugi275/cdk-pipelines-multiaccount-test', 'dev', {
                    connectionArn: 'arn:aws:codestar-connections:ap-northeast-1:11111111:connection/44ea5f07-ea0f-4ee8-8d57-ef5dbce8cba9',
                }),
                commands: [
                    'npm ci',
                    'npm run build',
                    'npx cdk synth -c stage=dev',
                ],
            }),
        });
開発環境用の AWS アカウント ID や、リージョンを指定しています。
        // 任意のアカウントとリージョンで、必要な回数だけ`addStage`を呼び出します。
        devPipeline.addStage(new MyApplication(this, 'Dev', {
            env: {
                account: '222222222',
                region: 'ap-northeast-1',
            }
        }));
上記のものは開発環境のものを抜粋しましたが、本番環境のものも同じように指定しています。開発環境と同じですが、main ブランチを指定している点、stage=prod を指定している箇所は大事なポイントなので、注意しましょう。
        const prodPipeline = new pipelines.CodePipeline(this, 'ProdPipeline', {
            // クロスアカウントを利用する場合に必要です。
            crossAccountKeys: true,
            synth: new pipelines.CodeBuildStep('Synth', {
                // 事前に作成したレポジトリ名と、ConnectionのARNに置き換えてください。
                input: pipelines.CodePipelineSource.connection('Sugi275/cdk-pipelines-multiaccount-test', 'main', {
                    connectionArn: 'arn:aws:codestar-connections:ap-northeast-1:11111111:connection/44ea5f07-ea0f-4ee8-8d57-ef5dbce8cba9',
                }),
                commands: [
                    'npm ci',
                    'npm run build',
                    'npx cdk synth -c stage=prod',
                ],
            }),
        });

        // 任意のアカウントとリージョンで、必要な回数だけ`addStage`を呼び出します。
        prodPipeline.addStage(new MyApplication(this, 'Prod', {
            env: {
                account: '3333333333',
                region: 'ap-northeast-1',
            }
        }));
    }
lib/cdk-appsync-stack.ts
CDK Pipeline の中で、デプロイ対象とする Stack の定義
lib/cdk-appsync-stack.ts
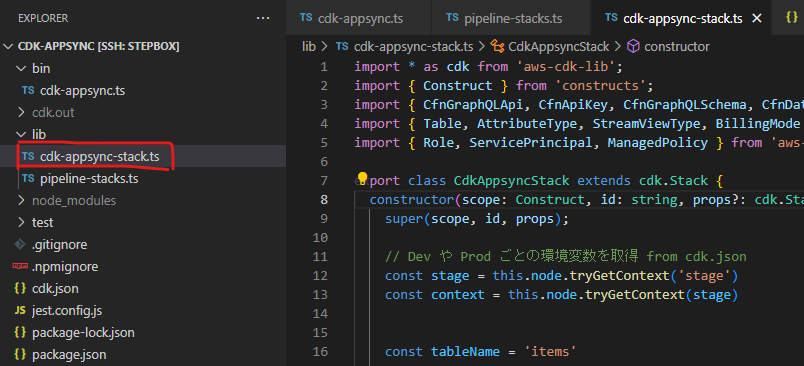
import * as cdk from 'aws-cdk-lib';
import { Construct } from 'constructs';
import { CfnGraphQLApi, CfnApiKey, CfnGraphQLSchema, CfnDataSource, CfnResolver } from 'aws-cdk-lib/aws-appsync';
import { Table, AttributeType, StreamViewType, BillingMode } from 'aws-cdk-lib/aws-dynamodb';
import { Role, ServicePrincipal, ManagedPolicy } from 'aws-cdk-lib/aws-iam';

export class CdkAppsyncStack extends cdk.Stack {
  constructor(scope: Construct, id: string, props?: cdk.StackProps) {
    super(scope, id, props);

    // Dev や Prod ごとの環境変数を取得 from cdk.json
    const stage = this.node.tryGetContext('stage')
    const context = this.node.tryGetContext(stage)


    const tableName = 'items'

    const itemsGraphQLApi = new CfnGraphQLApi(this, 'ItemsApi', {
      name: context.testkey01 + '-items-api',
      authenticationType: 'API_KEY'
    });

    new CfnApiKey(this, 'ItemsApiKey', {
      apiId: itemsGraphQLApi.attrApiId
    });

    const apiSchema = new CfnGraphQLSchema(this, 'ItemsSchema', {
      apiId: itemsGraphQLApi.attrApiId,
      definition: `type ${tableName} {
        ${tableName}Id: ID!
        name: String
      }
      type Paginated${tableName} {
        items: [${tableName}!]!
        nextToken: String
      }
      type Query {
        all(limit: Int, nextToken: String): Paginated${tableName}!
        getOne(${tableName}Id: ID!): ${tableName}
      }
      type Mutation {
        save(name: String!): ${tableName}
        delete(${tableName}Id: ID!): ${tableName}
      }
      type Schema {
        query: Query
        mutation: Mutation
      }`
    });

    const itemsTable = new Table(this, 'ItemsTable', {
      tableName: tableName,
      partitionKey: {
        name: `${tableName}Id`,
        type: AttributeType.STRING
      },
      billingMode: BillingMode.PAY_PER_REQUEST,
      stream: StreamViewType.NEW_IMAGE,

      // The default removal policy is RETAIN, which means that cdk destroy will not attempt to delete
      // the new table, and it will remain in your account until manually deleted. By setting the policy to
      // DESTROY, cdk destroy will delete the table (even if it has data in it)
      removalPolicy: cdk.RemovalPolicy.DESTROY, // NOT recommended for production code
    });

    const itemsTableRole = new Role(this, 'ItemsDynamoDBRole', {
      assumedBy: new ServicePrincipal('appsync.amazonaws.com')
    });

    itemsTableRole.addManagedPolicy(ManagedPolicy.fromAwsManagedPolicyName('AmazonDynamoDBFullAccess'));

    const dataSource = new CfnDataSource(this, 'ItemsDataSource', {
      apiId: itemsGraphQLApi.attrApiId,
      name: 'ItemsDynamoDataSource',
      type: 'AMAZON_DYNAMODB',
      dynamoDbConfig: {
        tableName: itemsTable.tableName,
        awsRegion: this.region
      },
      serviceRoleArn: itemsTableRole.roleArn
    });

    const getOneResolver = new CfnResolver(this, 'GetOneQueryResolver', {
      apiId: itemsGraphQLApi.attrApiId,
      typeName: 'Query',
      fieldName: 'getOne',
      dataSourceName: dataSource.name,
      requestMappingTemplate: `{
        "version": "2017-02-28",
        "operation": "GetItem",
        "key": {
          "${tableName}Id": $util.dynamodb.toDynamoDBJson($ctx.args.${tableName}Id)
        }
      }`,
      responseMappingTemplate: `$util.toJson($ctx.result)`
    });
    getOneResolver.addDependsOn(apiSchema);
    getOneResolver.addDependsOn(dataSource);

    const getAllResolver = new CfnResolver(this, 'GetAllQueryResolver', {
      apiId: itemsGraphQLApi.attrApiId,
      typeName: 'Query',
      fieldName: 'all',
      dataSourceName: dataSource.name,
      requestMappingTemplate: `{
        "version": "2017-02-28",
        "operation": "Scan",
        "limit": $util.defaultIfNull($ctx.args.limit, 20),
        "nextToken": $util.toJson($util.defaultIfNullOrEmpty($ctx.args.nextToken, null))
      }`,
      responseMappingTemplate: `$util.toJson($ctx.result)`
    });
    getAllResolver.addDependsOn(apiSchema);
    getAllResolver.addDependsOn(dataSource);

    const saveResolver = new CfnResolver(this, 'SaveMutationResolver', {
      apiId: itemsGraphQLApi.attrApiId,
      typeName: 'Mutation',
      fieldName: 'save',
      dataSourceName: dataSource.name,
      requestMappingTemplate: `{
        "version": "2017-02-28",
        "operation": "PutItem",
        "key": {
          "${tableName}Id": { "S": "$util.autoId()" }
        },
        "attributeValues": {
          "name": $util.dynamodb.toDynamoDBJson($ctx.args.name)
        }
      }`,
      responseMappingTemplate: `$util.toJson($ctx.result)`
    });
    saveResolver.addDependsOn(apiSchema);
    saveResolver.addDependsOn(dataSource);

    const deleteResolver = new CfnResolver(this, 'DeleteMutationResolver', {
      apiId: itemsGraphQLApi.attrApiId,
      typeName: 'Mutation',
      fieldName: 'delete',
      dataSourceName: dataSource.name,
      requestMappingTemplate: `{
        "version": "2017-02-28",
        "operation": "DeleteItem",
        "key": {
          "${tableName}Id": $util.dynamodb.toDynamoDBJson($ctx.args.${tableName}Id)
        }
      }`,
      responseMappingTemplate: `$util.toJson($ctx.result)`
    });
    deleteResolver.addDependsOn(apiSchema);
    deleteResolver.addDependsOn(dataSource);

  }
}
一番大事な点は、こちらです。npx cdk synth -c stage=dev で指定した stage を取得しています。開発環境はdevで、本番環境は prod を指定しています。ここで指定した名前に紐づく形で、cdk.json から環境変数を読みこんでいます。
    // Dev や Prod ごとの環境変数を取得 from cdk.json
    const stage = this.node.tryGetContext('stage')
    const context = this.node.tryGetContext(stage)
上記の環境変数を、以下のように利用できます。AppSync の名前に name: context.testkey01 + '-items-api' と指定しており、環境変数を名前に含めています。この記事の例は名前だけですが、実際のユースケースに合わせて便利に活用できることがわかります。
    const tableName = 'items'

    const itemsGraphQLApi = new CfnGraphQLApi(this, 'ItemsApi', {
      name: context.testkey01 + '-items-api',
      authenticationType: 'API_KEY'
    });
bin/cdk-appsync.ts
大元のコードを編集して、新たに追加した CodePipeline のコードを呼びだす
bin/cdk-appsync.ts

ここで指定する AWS のアカウントに、CDK Pipeline に含まれる CodePipeline や CodeBuild などが構成されます。
#!/usr/bin/env node
import 'source-map-support/register';
import * as cdk from 'aws-cdk-lib';
import { MyPipelineStack } from '../lib/pipeline-stacks';

const app = new cdk.App();

new MyPipelineStack(app, 'MyPipelineStack', {
  env: { account: "11111111", region: "ap-northeast-1" },
});
cdk.json
環境変数を追加します。
cdk.json
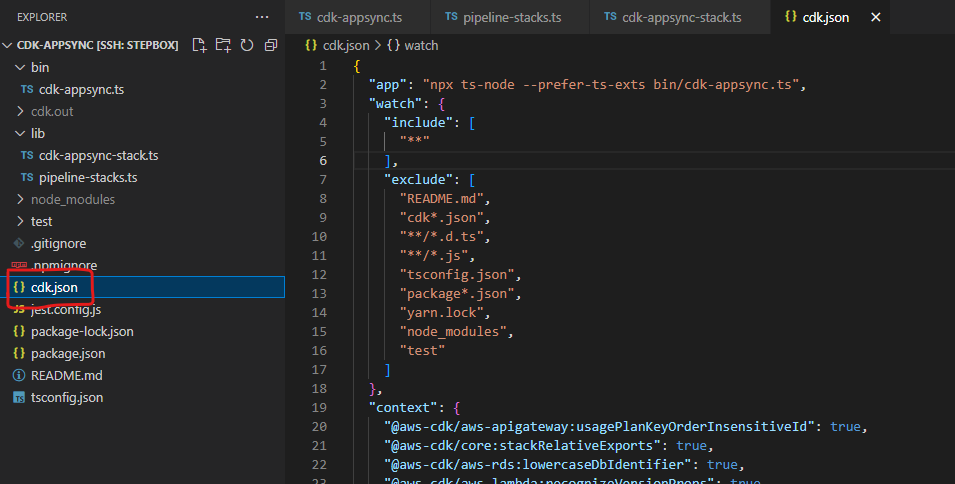
{
  "app": "npx ts-node --prefer-ts-exts bin/cdk-appsync.ts",
  "watch": {
    "include": [
      "**"
    ],
    "exclude": [
      "README.md",
      "cdk*.json",
      "**/*.d.ts",
      "**/*.js",
      "tsconfig.json",
      "package*.json",
      "yarn.lock",
      "node_modules",
      "test"
    ]
  },
  "context": {
    "@aws-cdk/aws-apigateway:usagePlanKeyOrderInsensitiveId": true,
    "@aws-cdk/core:stackRelativeExports": true,
    "@aws-cdk/aws-rds:lowercaseDbIdentifier": true,
    "@aws-cdk/aws-lambda:recognizeVersionProps": true,
    "@aws-cdk/aws-lambda:recognizeLayerVersion": true,
    "@aws-cdk/aws-cloudfront:defaultSecurityPolicyTLSv1.2_2021": true,
    "@aws-cdk-containers/ecs-service-extensions:enableDefaultLogDriver": true,
    "@aws-cdk/aws-ec2:uniqueImdsv2TemplateName": true,
    "@aws-cdk/core:checkSecretUsage": true,
    "@aws-cdk/aws-iam:minimizePolicies": true,
    "@aws-cdk/aws-ecs:arnFormatIncludesClusterName": true,
    "@aws-cdk/core:validateSnapshotRemovalPolicy": true,
    "@aws-cdk/aws-codepipeline:crossAccountKeyAliasStackSafeResourceName": true,
    "@aws-cdk/aws-s3:createDefaultLoggingPolicy": true,
    "@aws-cdk/aws-sns-subscriptions:restrictSqsDescryption": true,
    "@aws-cdk/aws-apigateway:disableCloudWatchRole": true,
    "@aws-cdk/core:enablePartitionLiterals": true,
    "@aws-cdk/core:target-partitions": [
      "aws",
      "aws-cn"
    ],
    "dev": {
      "testkey01": "devenv01"
    },
    "prod": {
      "testkey01": "prodenv01"
    }
  }
}
特に大事な部分がこちらです。dev や prod 環境に合わせて、利用したい環境変数を指定しています。
    "dev": {
      "testkey01": "devenv01"
    },
    "prod": {
      "testkey01": "prodenv01"
    }
CDK Deploy
ここまでで準備が出来たので、実際に Deploy を行います
cdk deploy
Pipeline Account で、CodePipeline が構成される様子が見えます

CodePipeline が自動生成されています。かつ、Pipeline も実際に稼働して、デプロイが走っています。
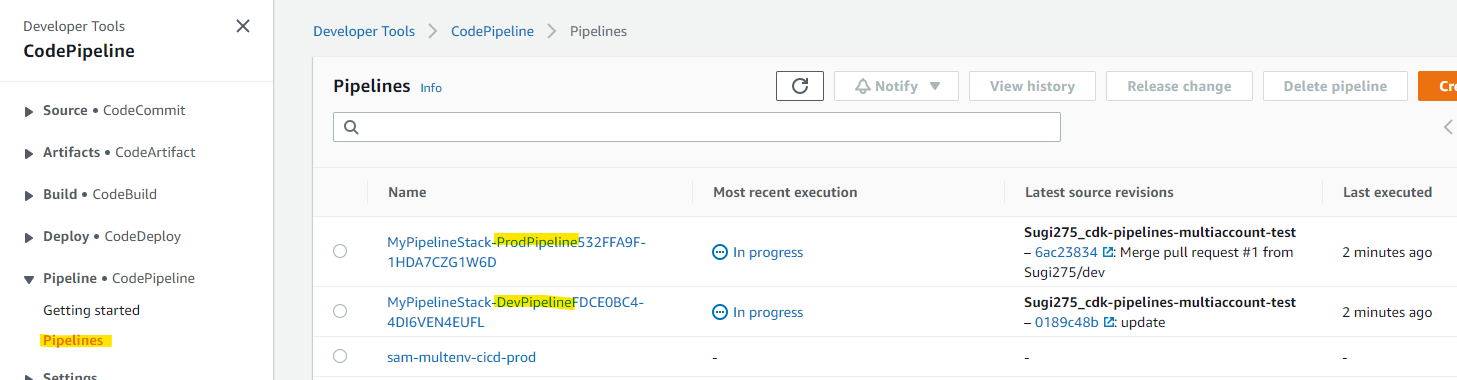
これで、GitHub の2つのブランチに紐づく形で、CDK Pipeline が構成されました。あとは、各ブランチを更新することで、自動的に CodePipeline が稼働して CDK 経由でデプロイされます。
デプロイされたものを確認
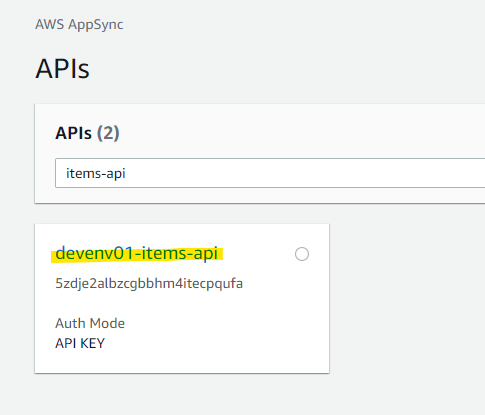
Dev Account
AppSync API : 環境変数 devenv01 が利用されていることがわかります。
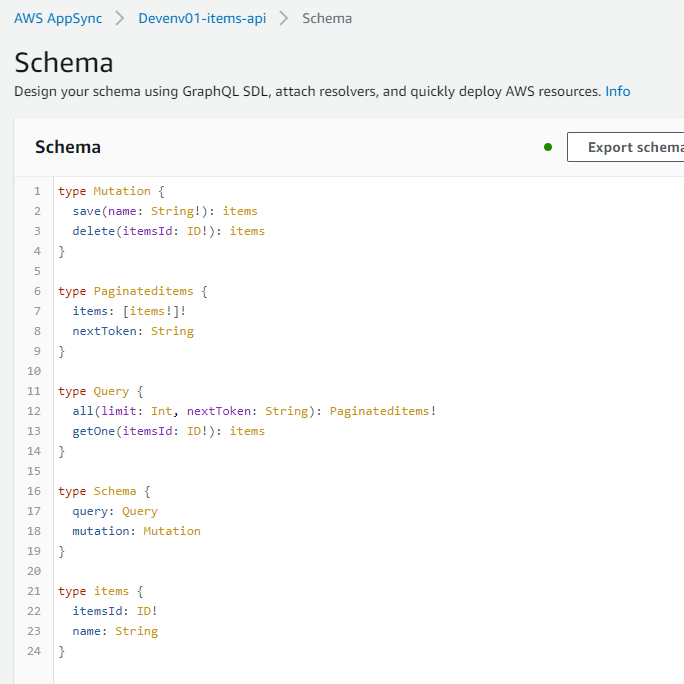
Schema
DynamoDB

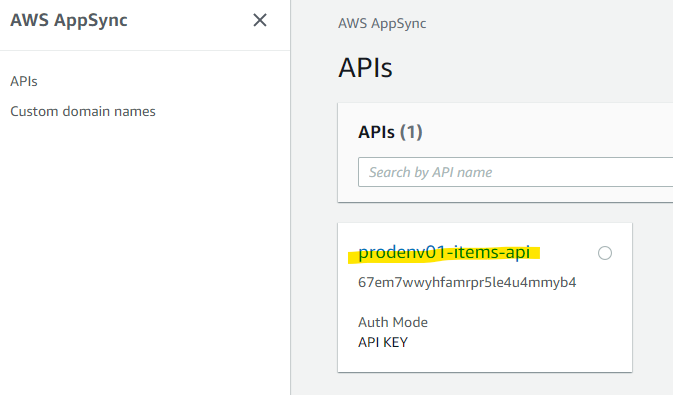
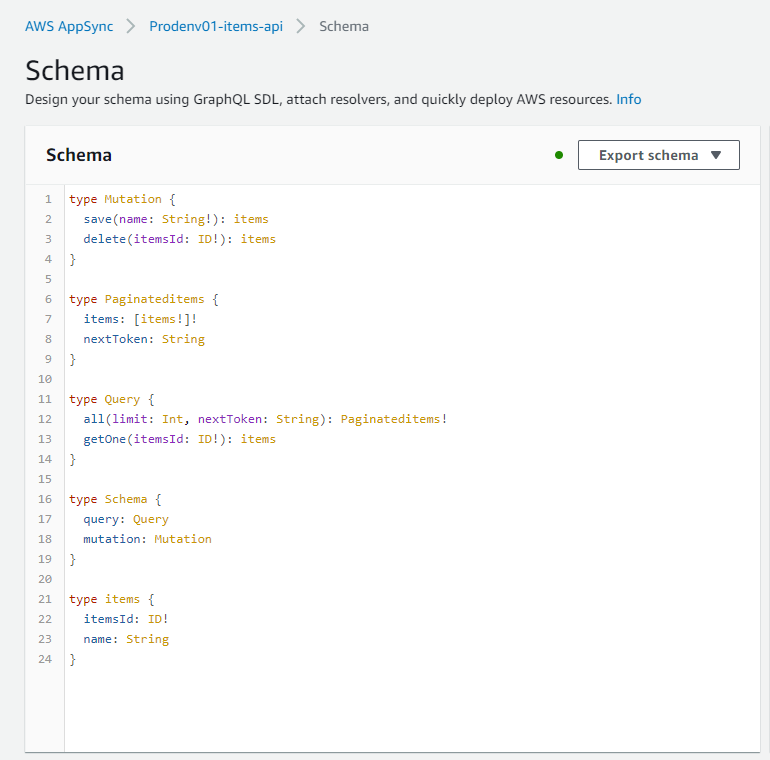
Prod Account
AppSync API : 環境変数 prodenv01 が利用されていることがわかります。
Schema
DynamoDB Table

検証を通じてわかったこと
- GitHub と連携する Branch は、CDK のソースコードで指定する。
- おそらくアスタリスクは指定できないので、1 Branch に 1 Pipeline を紐づけるのが基本的となる
- Dev 環境・Prod 環境で、それぞれ環境変数を指定可能
- 以下の AWS Blog の記載内容が古い。CDK v1 の時のコードがあり、これを参考にして、若干ハマった。
参考 URL
変数の渡し方
https://abillyz.com/mamezou/studies/464
変数の渡し方
https://chariosan.com/2022/01/10/4-methods-to-configure-multiple-environments-in-the-aws-cdk/