はじめに
SES をつかってメールを送る方法は、大きく分けて2つ方法があります。
- AWS SDK 経由
- SMTP
SMTP を使って SES 経由でメールを送る場合、25番ポートを使いたくなりますが、デフォルトでは Port 25 のアウトバウント通信は制限されています。
https://docs.aws.amazon.com/ja_jp/AWSEC2/latest/UserGuide/ec2-resource-limits.html#port-25-throttle
AWS サポートに問い合わせて制限解除を申請することもできますが、より簡単な方法として STARTTLS(587 or 2587) や TLS(465 or 2465)を利用する方法があります。(ほかにも、AWS SDK を使って回避することも可能です)
25番以外のポートを使うため、申請不要でメールを送付できます。その代わり、SMTP 認証情報を取得して Postfix に 適切なSMTPリレーの設定を入れる必要があります。
今回の記事では、EC2 インスタンスで稼働している Postfix から、STARTTLS(587番ポート)を使って SES を経由したメールを送付する方法を紹介します。
環境情報
- EC2 Instance
- Amazon Linux
- Postfix 2.10.1
- SES を使ってドメインの認証済み
Postfix Install
Amazon Linux 2 の環境では、既に Postfix がインストールされています。
$ yum list installed | grep postfix
postfix.x86_64                        2:2.10.1-6.amzn2.0.3             installed
Postfix のバージョンを確認
$ postconf | grep mail_version
mail_version = 2.10.1
Postfix の基本的な設定
Postfix の設定ファイルを、念のためバックアップします。
sudo cp -p /etc/postfix/main.cf /etc/postfix/main.cf.old
postconf コマンドで編集をします。
sudo postconf -e "myhostname = sugiaws.tokyo"
sudo postconf -e "mydomain = sugiaws.tokyo"
Postfix の再起動と自動起動
sudo systemctl restart postfix
sudo systemctl enable postfix
Postfix のステータス確認
sudo systemctl status postfix
Postfix そのものの動作確認をします。メール送付は出来ませんが、ログを確認して動作確認とします。
sendmail -f sender@example.com recipient@example.com
From: Sender Name <sender@example.com>
Subject: Amazon SES Test
This message was sent using Amazon SES.
.
想定通りエラーログが出ています。Postfix 自体が動作していることがわかります。
$ sudo tail -n 4 /var/log/maillog
Jan 22 14:56:09 ip-10-0-1-116 postfix/smtp[3989]: warning: valid_hostname: empty hostname
Jan 22 14:56:09 ip-10-0-1-116 postfix/smtp[3989]: warning: malformed domain name in resource data of MX record for example.com:
Jan 22 14:56:09 ip-10-0-1-116 postfix/smtp[3989]: 69F036E944: to=<sender@example.com>, relay=none, delay=0, delays=0/0/0/0, dsn=5.4.4, status=bounced (Name service error for name=example.com type=MX: Malformed or unexpected name server reply)
Jan 22 14:56:09 ip-10-0-1-116 postfix/qmgr[3872]: 69F036E944: removed
SES の SMTP クレデンシャルの取得
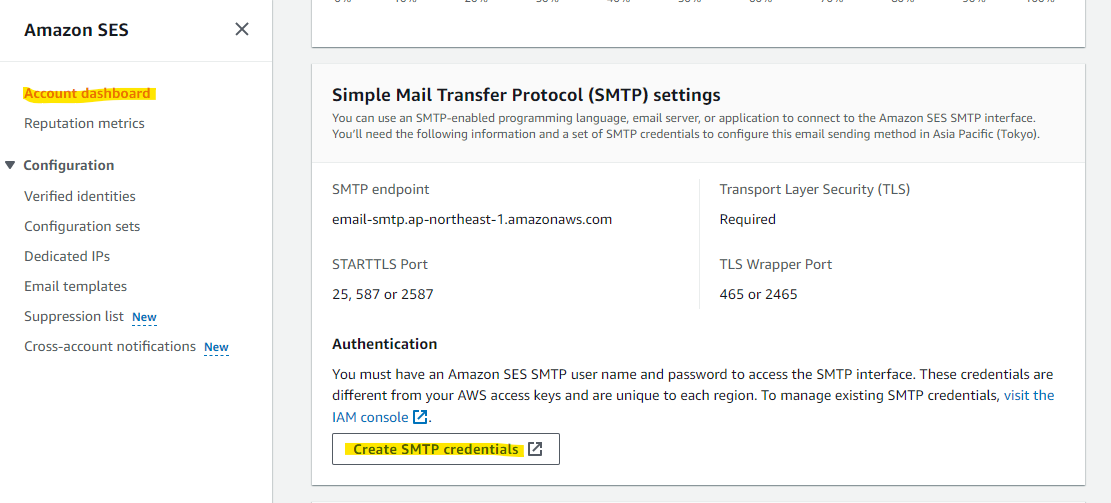
Postfix から SMTP リレーを行う際に認証情報が必要です。SES の画面から SMTP クレデンシャルを取得します。
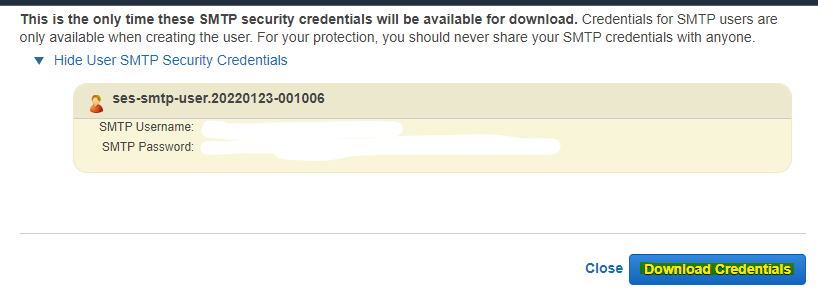
自動作成される IAM User の名前を確認し、Create を押します。
download して、csv ファイルを大切に保管しておきます。
SES に転送するための Postfix 設定
設定変更をします。対象のリージョンは適宜環境に合わせて変更してください。
sudo postconf -e "relayhost = [email-smtp.ap-northeast-1.amazonaws.com]:587" \
"smtp_sasl_auth_enable = yes" \
"smtp_sasl_security_options = noanonymous" \
"smtp_sasl_password_maps = hash:/etc/postfix/sasl_passwd" \
"smtp_use_tls = yes" \
"smtp_tls_security_level = encrypt" \
"smtp_tls_note_starttls_offer = yes"
SMTP クレデンシャルを書き込んでいきます。
sudo vim /etc/postfix/sasl_passwd
以下の値を入れます。SMTPUSERNAME:SMTPPASSWORD の部分は環境に合わせて変更してください。
[email-smtp.ap-northeast-1.amazonaws.com]:587 SMTPUSERNAME:SMTPPASSWORD
hashmap データべースファイルを作成します。
sudo postmap hash:/etc/postfix/sasl_passwd
所有権の変更をして、root ユーザーのみ触れるようにします。
sudo chown root:root /etc/postfix/sasl_passwd /etc/postfix/sasl_passwd.db
sudo chmod 0600 /etc/postfix/sasl_passwd /etc/postfix/sasl_passwd.db
CA 証明書の位置を指定します。
sudo postconf -e 'smtp_tls_CAfile = /etc/ssl/certs/ca-bundle.crt'
Postfix の再起動
sudo systemctl restart postfix
Postfix のステータス確認
sudo systemctl status postfix
動作確認
sendmail コマンドで、メールを送付していきます。宛先メールアドレスはマスクをしています。
sendmail -f sender@sugiaws.tokyo xxxxxxxx@xxxxxx.xxx
From: I AM POSTFIX <sender@sugiaws.tokyo>
Subject: Amazon SES Test
This message was sent using Amazon SES.
.
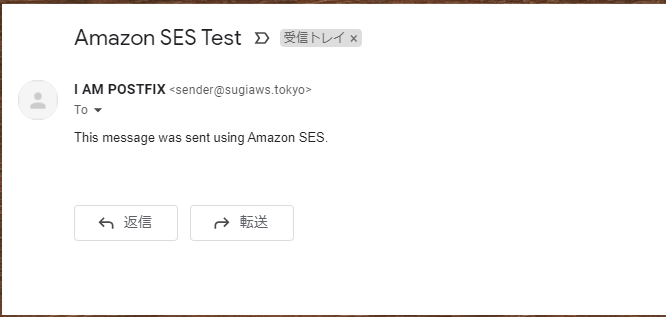
メールの送付先を確認すると、正常にメールが到着しています!
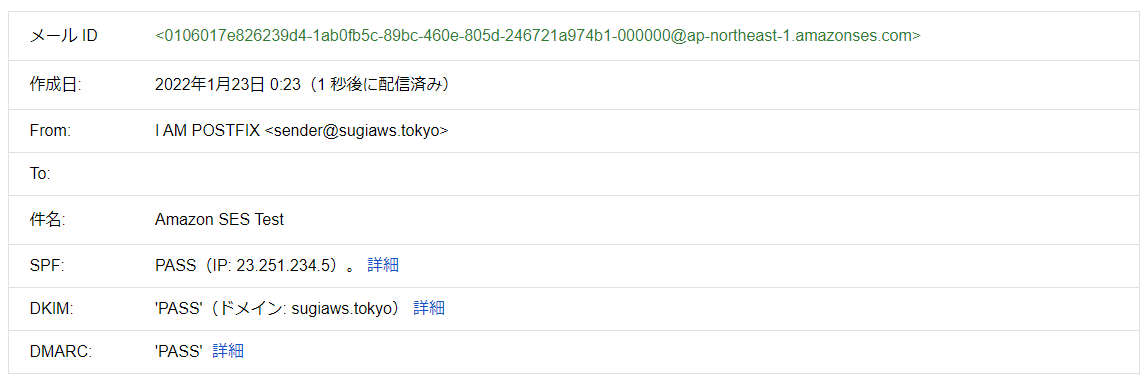
メールのソースを確認します。From も正常に指定されてありますね。
検証を通じてわかったこと
- Postfix から SMTP を使って SES へメール送付が可能
参考URL
Amazon SES とPostfixの統合
https://docs.aws.amazon.com/ja_jp/ses/latest/dg/postfix.html
CentOSとPostfixを使って送信専用のメールサーバーを構築する方法
https://www.rem-system.com/mail-postfix01/
ローカル環境のPostfix構築
https://qiita.com/y-araki-qiita/items/864dab044786f008e3c9


