はじめに
Blockchain 技術が世の中で話題になりつつあります。「改ざんが難しい」「複数の組織の間でトランザクションを共有できる」といったメリットがあり、物理的な壁を越えたスムーズな相互の手続きが注目されている状況となっています。
Blockchain には、ざっくりわけて2種類のタイプで分けることができます (もっと詳細な分類はありますが、、、)
- 中央集権型
- 非中央集権型 (分散型)
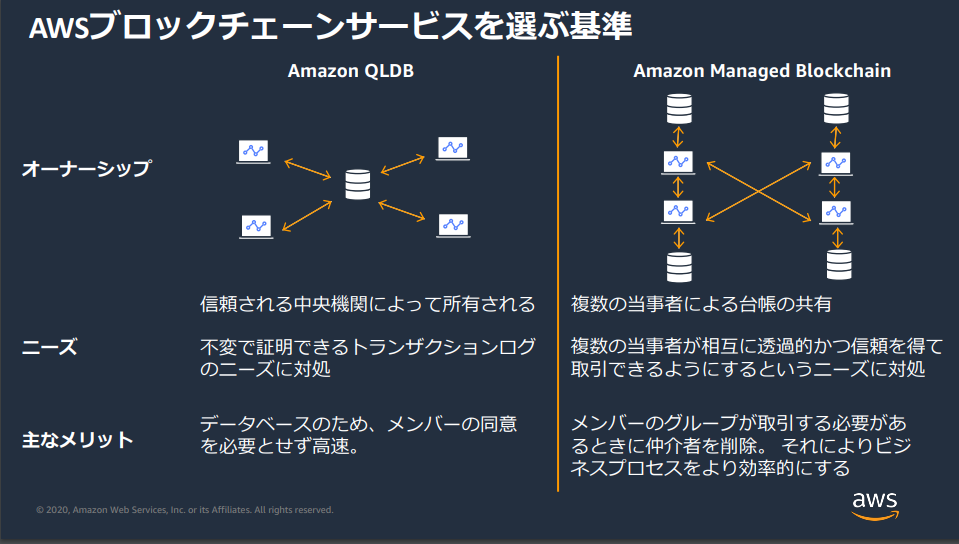
中央集権型は、とある信頼された1個の中央組織が Blockchain ためのリソースを利用し、トランザクションを管理する方式です。中央組織が提供するトランザクション機能を、他の組織が利用することで、互いに手続きを共有することができます。中央管理されたデータストアに Blockchain の技術を活用することで、データ改ざんを防ぎ、信頼されたデータを管理することが可能になります。AWS のサービスだと、Amazon QLDB がこれに該当します。
非中央集権型は、複数の組織にまたがったトランザクションを共有する形です。Blockchain のネットワークに参加する複数の組織が、自分たちの Blockchain サーバーをそれぞれ持ち寄り、ネットワークに分散された形でトランザクションを管理する方式です。これにより、透過性のあるトランザクションを全体で分散管理することができ、効率的なやりとりを行うことが出来ます。AWS のサービスでは、Amazon Managed Blockchain が該当します。
BlackBelt の資料がわかりやすいので、一部抜粋しました。
https://d1.awsstatic.com/webinars/jp/pdf/services/20200519_AWS_BlackBelt_AMB.pdf
今回の記事では、非中央集権型の Amazon Managed Blockchain を使って Hyperledger Fabric 2.2 を構築していく記事になります。手を動かすことで初めてわかる部分もでてくるので、やっていきましょう。
AWS Document Getting Started を参考にしております。公式 Document も活用することが可能です。
https://docs.aws.amazon.com/managed-blockchain/latest/hyperledger-fabric-dev/managed-blockchain-get-started-tutorial.html
検証の構成について
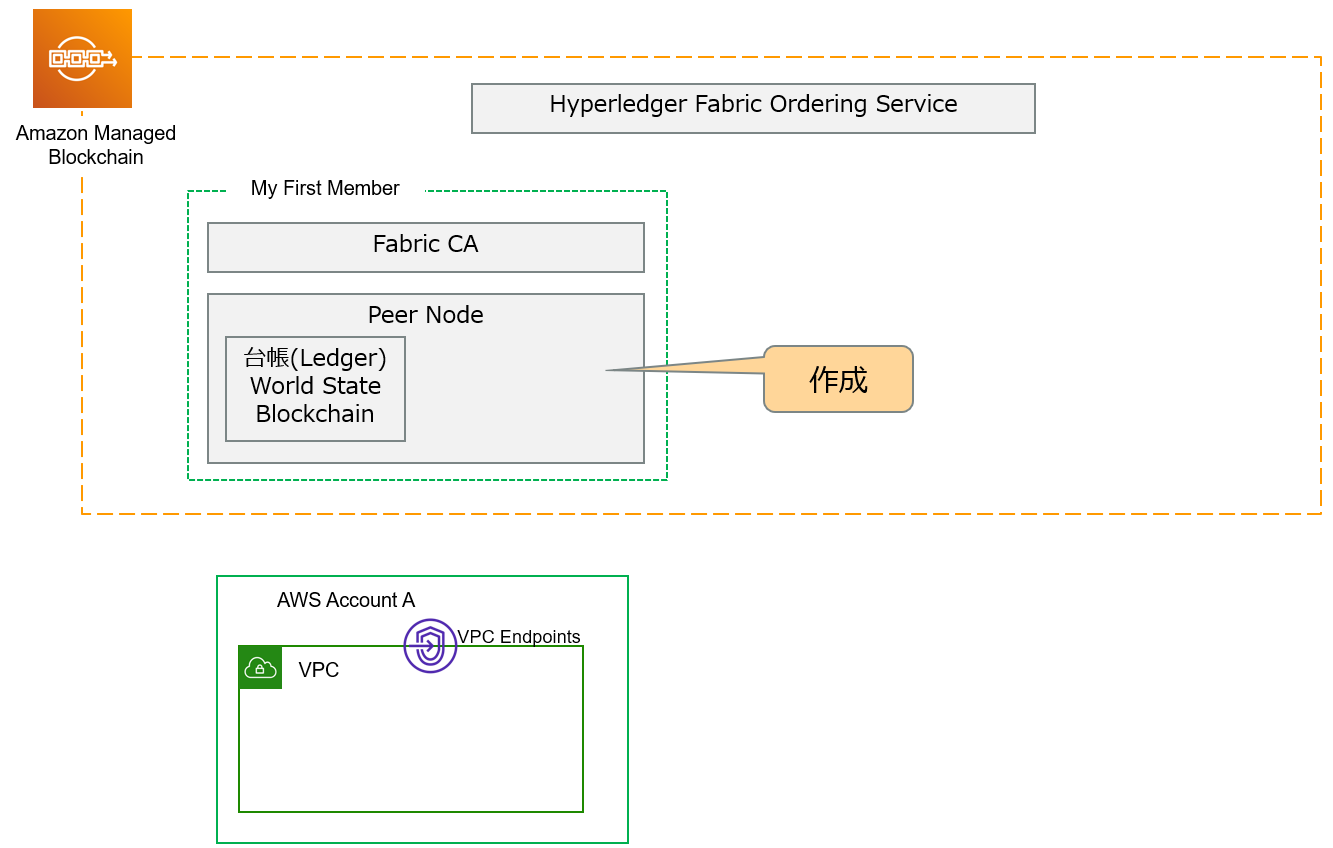
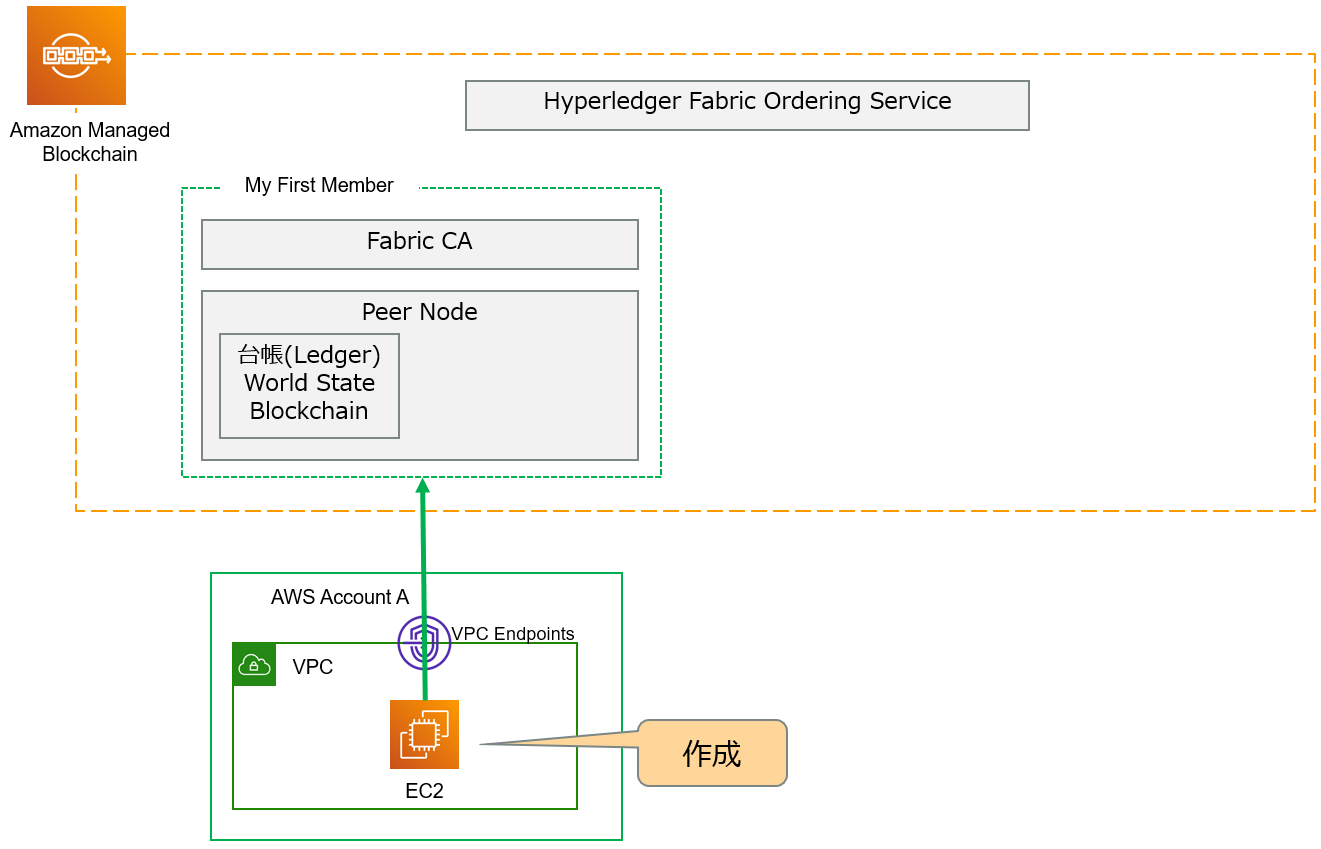
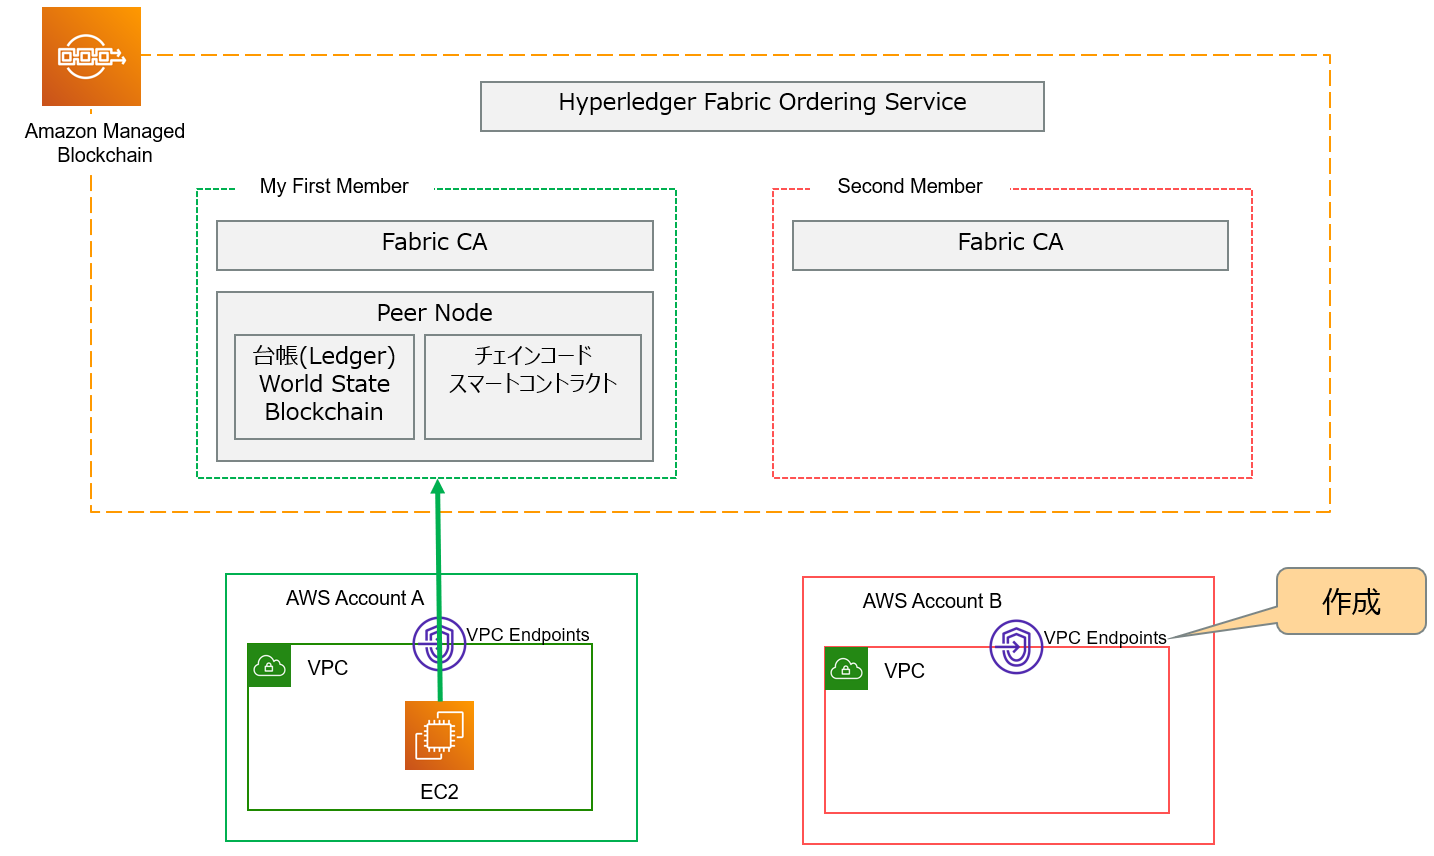
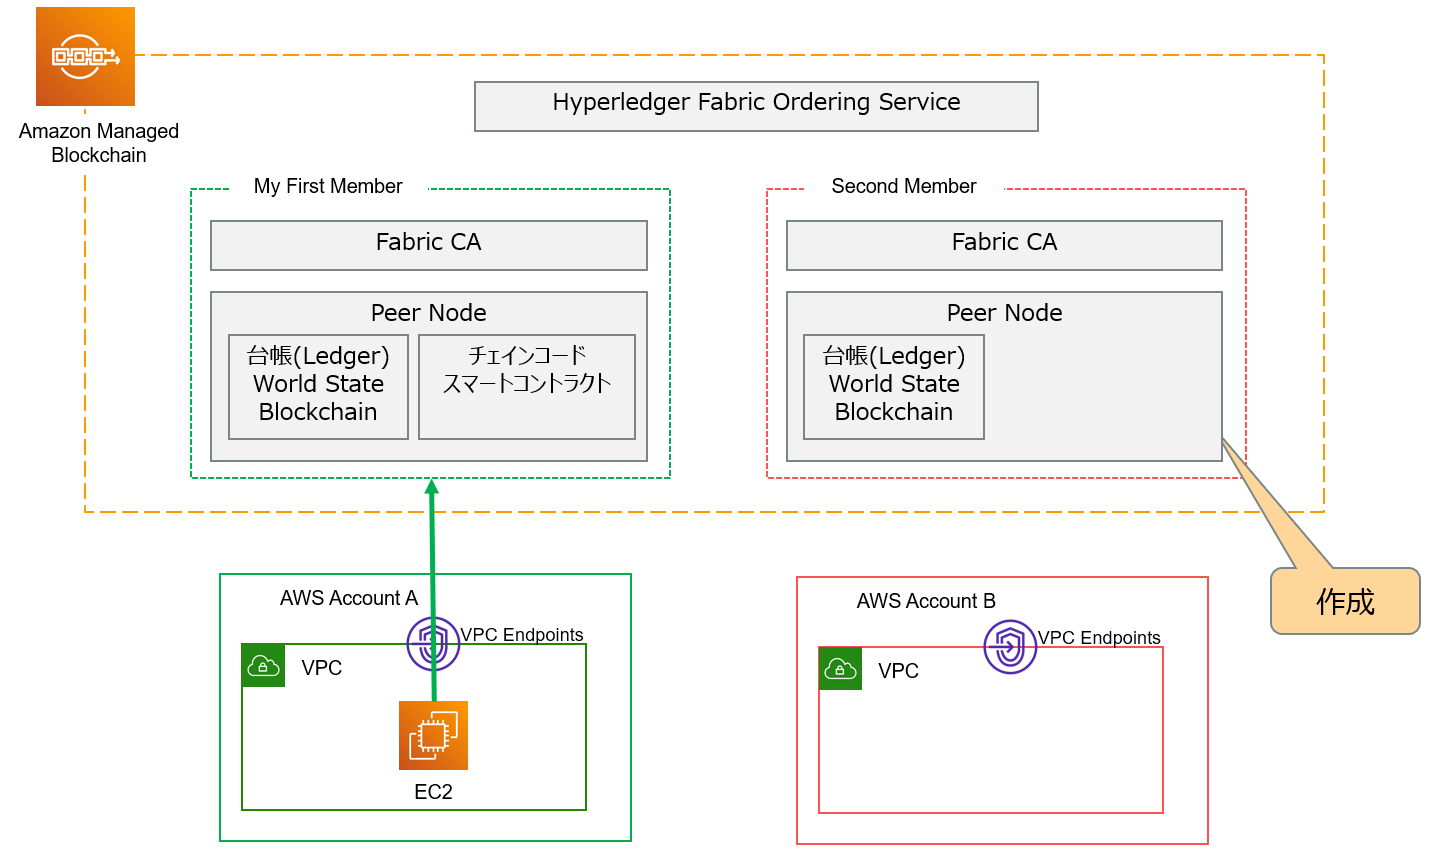
まず、今回の検証で出来上がる構成図を出します。
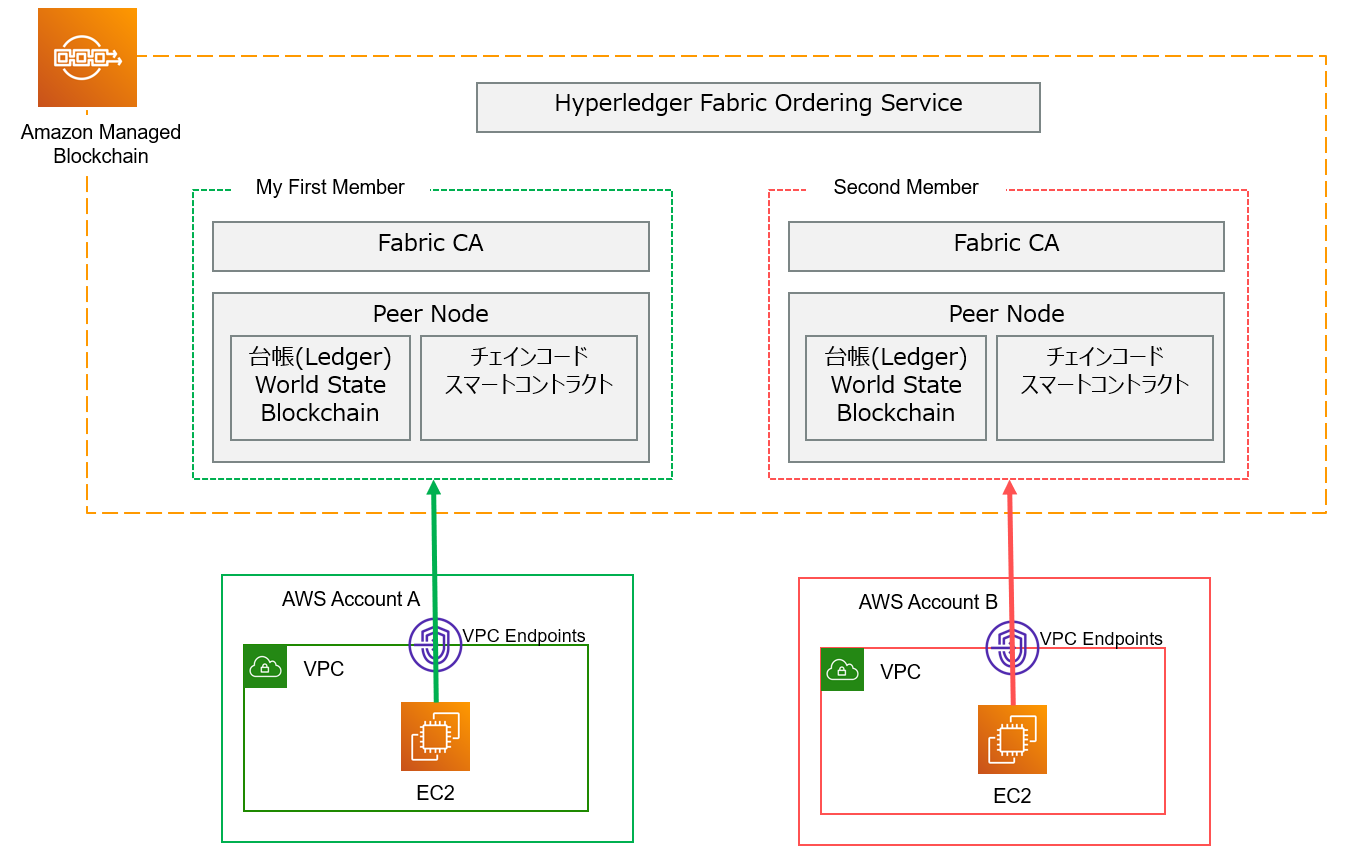
今回の検証では、2つの組織が登場します。図の下にある AWS Account A と、AWS Account B は、それぞれ異なる組織を想定しています。例えば、異なる会社間でプライベートな取引データのやり取りを行うようなシチュエーションですね。
2 つの組織が、それぞれ AWS アカウントを利用しながら、自分たちの Peer Node や Fabric CA を構成することで、Hyperledger Fabric のネットワークを構成していく形です。
それでは構築を始めていきましょう。これより、この記事の各段落ごとに「A」や「B」と頭文字を付けていきます。これは、AWS アカウントの A や B を表しているので、区別しながら読み進めて頂くとわかりやすいです。
A : Hyperledger Fabric 用の Network を作成
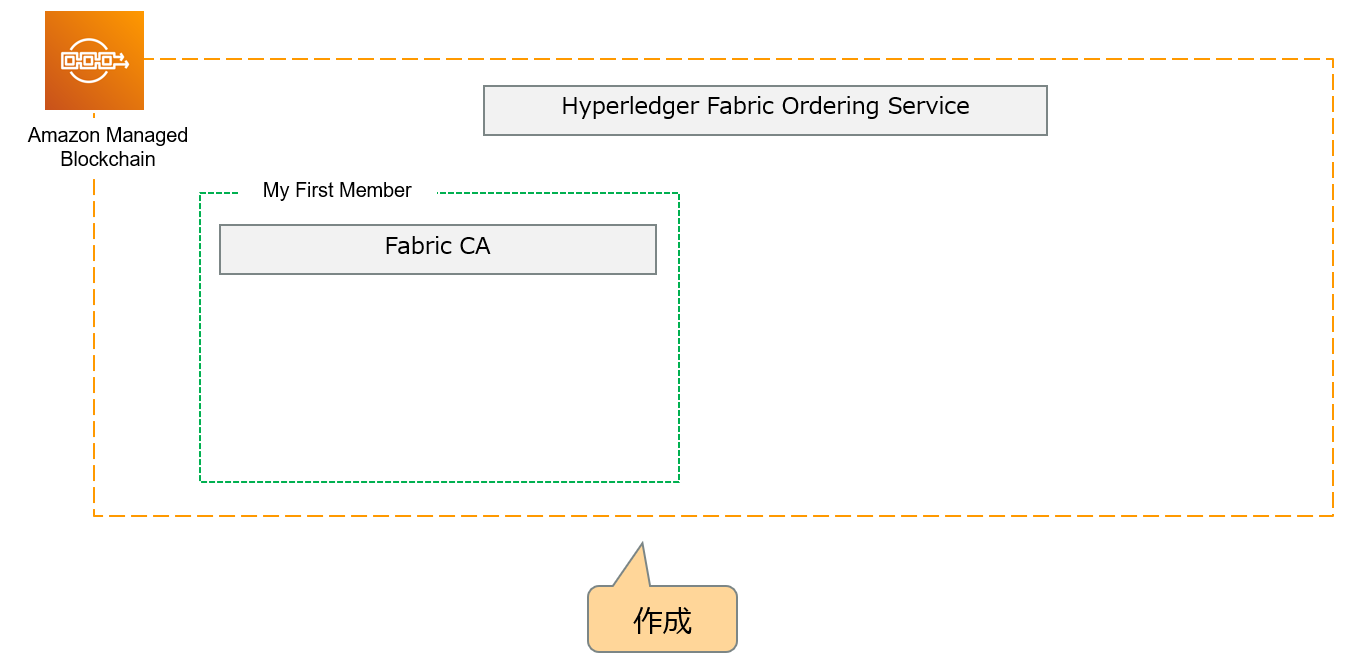
Amazon Managed Blockchain で Hyperledger Fabric 用の Network を作成していきます。Network と一緒に、初めに参加する Member という枠組みを作っていきます。Member は、通常の Hyperledger Fabricでいうところの、Organization(組織) と似たような概念となっていて、ネットワークに所属する 1個の組織になっています。
構成図で言うとこんな感じです。Hyperledger Fabric の Network を作り、そのなかに「My First Member」を作っていきます。
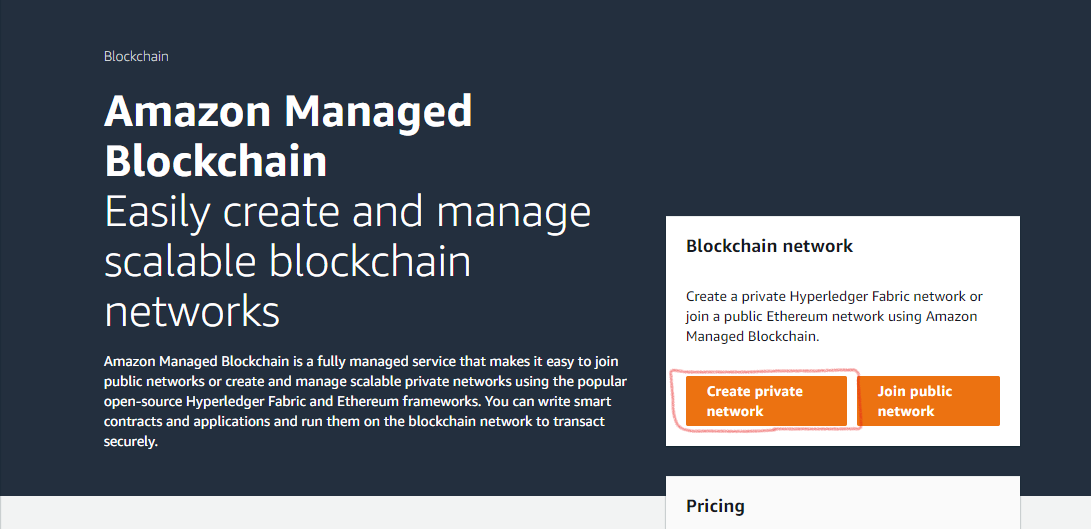
Amazon Managed Blockchain のページを開き、Create Private Network を押します。
Hyperledger Fabric のバージョンを Edition を指定します。今回は検証環境向けの Starter Edition を選択しますが、本番環境では Standard Edition が向いています。Standard と Starter は、可用性・選択可能なインスタンスの種類、いくつかのリソース上限、パフォーマンスなどの違いがあります。
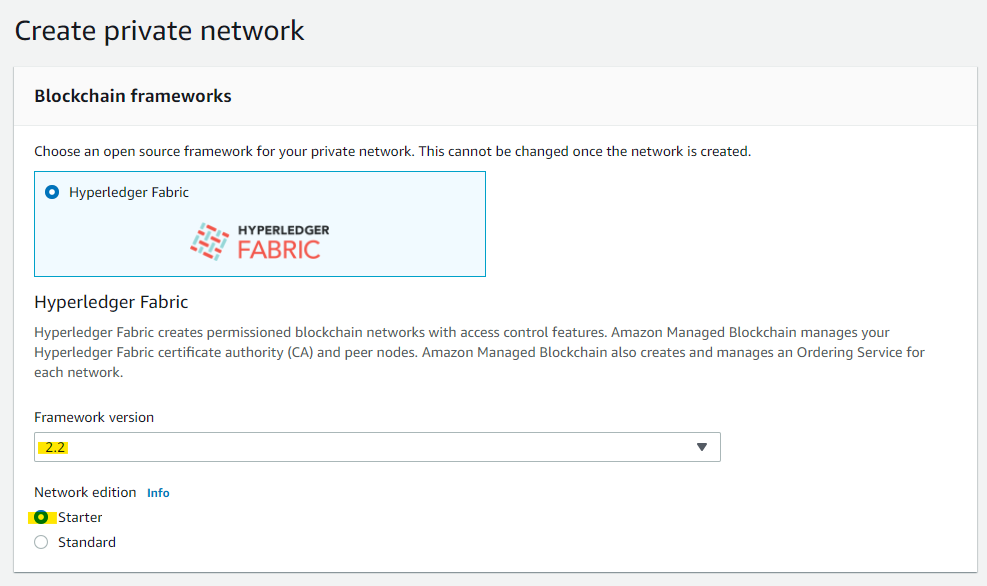
Hyperledger Fabric Network の名前や、投票の閾値を指定します。この投票は、たとえば Network に新たな Member を追加する際に、既存の Member の投票で賛成や反対を投票するのですが、どれだけの割合を超えると参加できるか、といった閾値を設定できます。

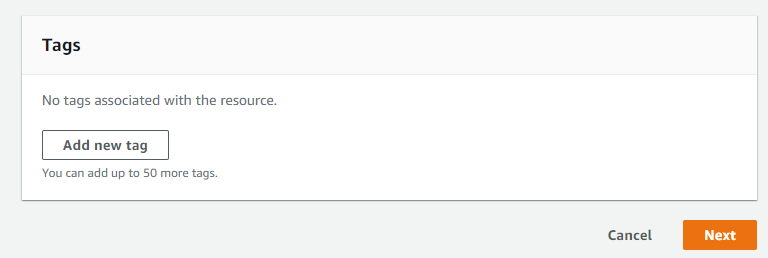
このまま Next を押します。
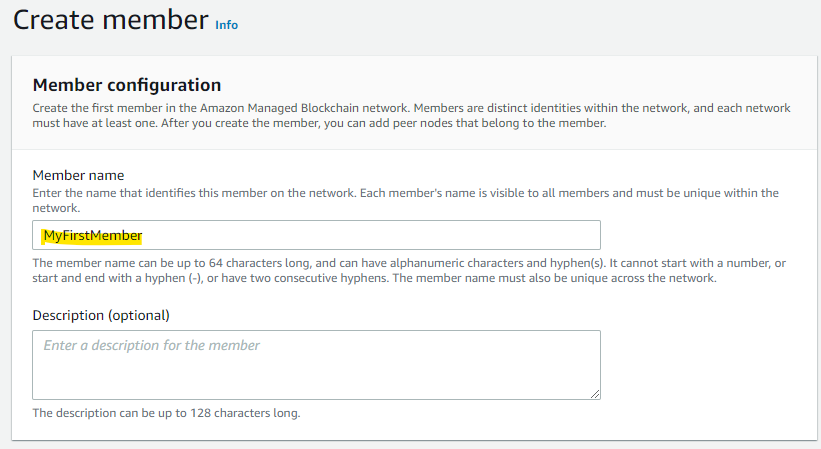
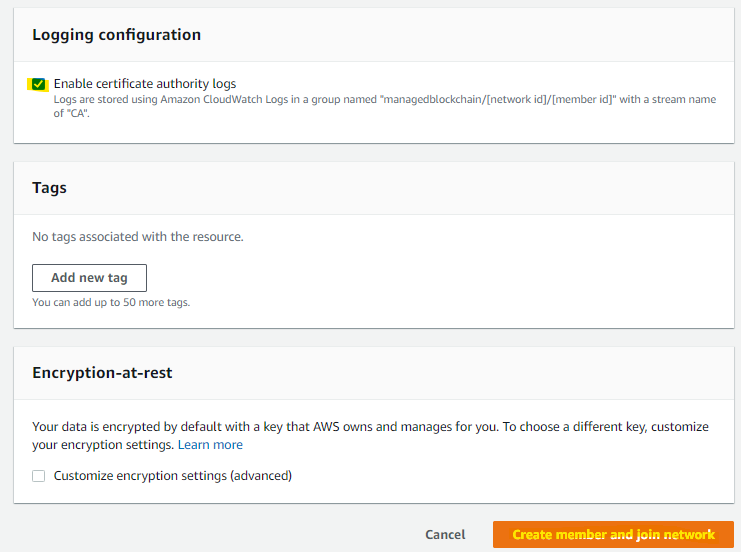
Member の名前を指定します。
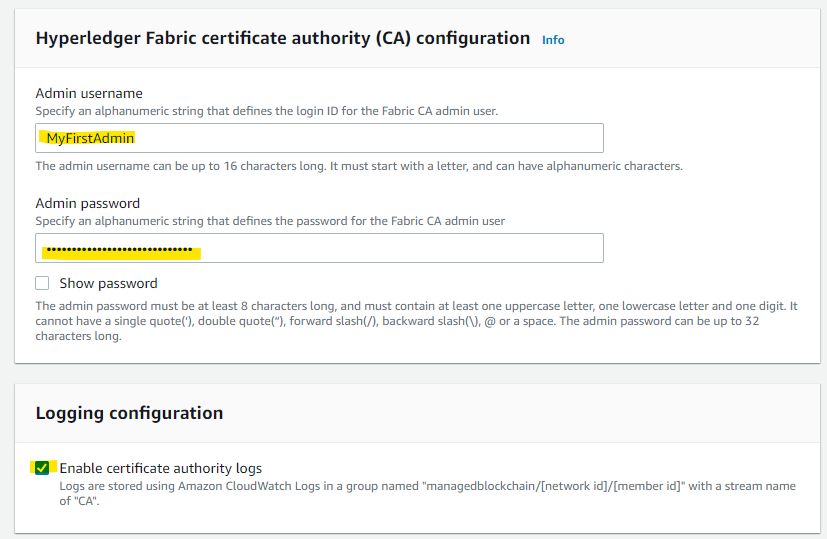
CA としての、Admin 名やパスワードを入れます。ログも ON にしてみましょう。
MyFirstAdmin
next
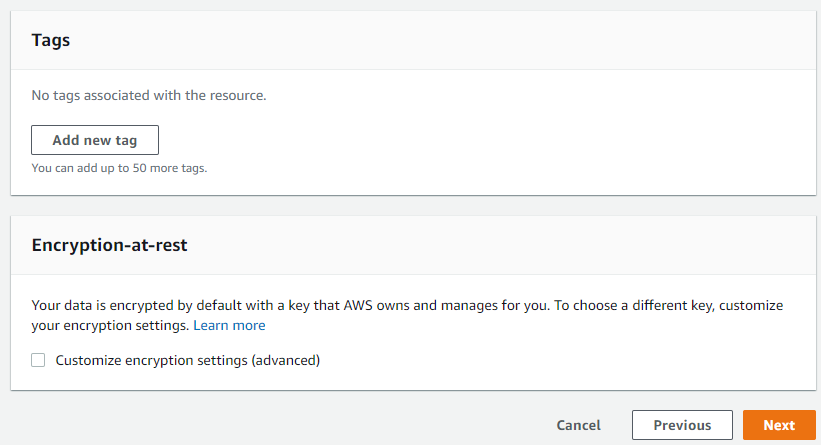
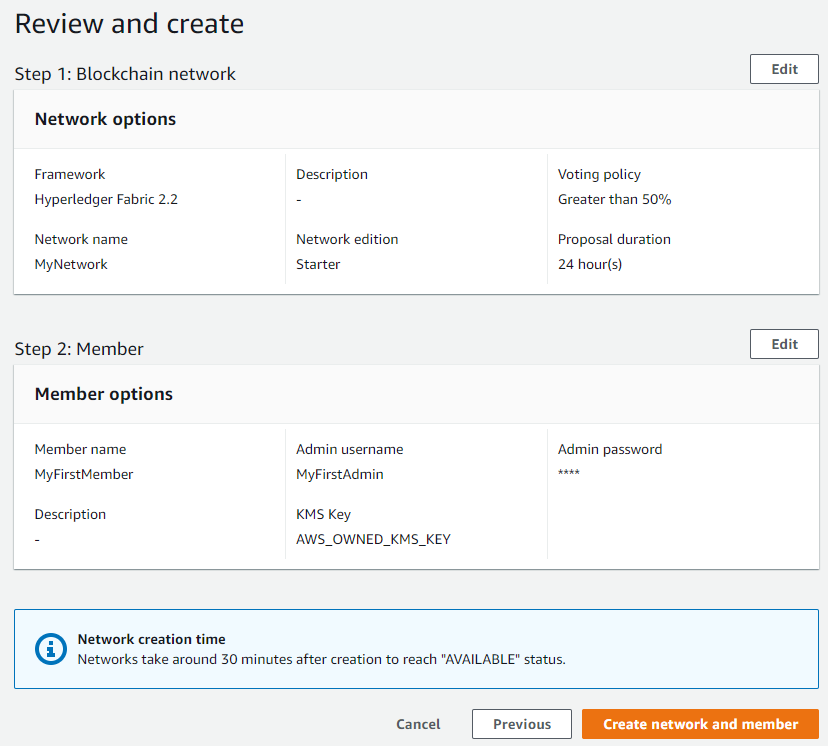
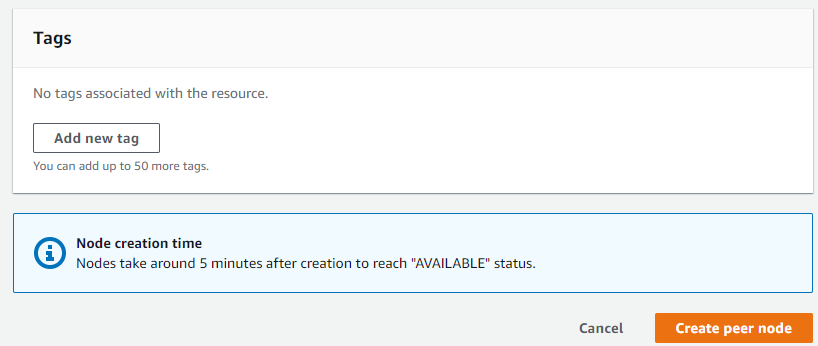
Create を押します。画面に出ているとおり、30分ほど掛かりますので、お茶でも飲んで待ちましょう。
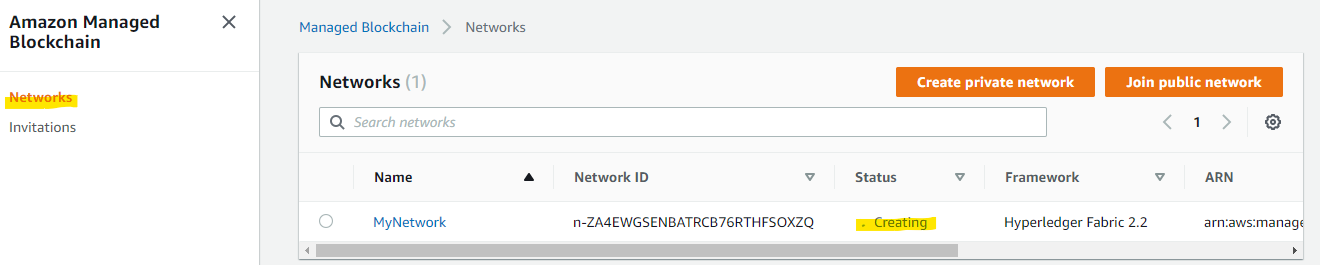
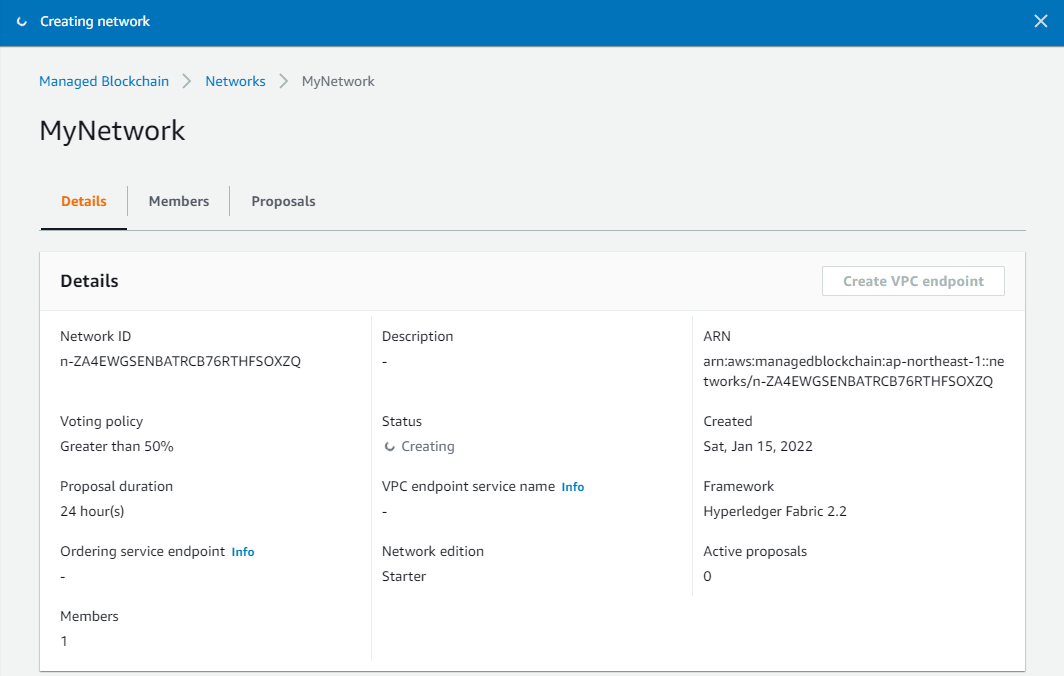
Network が Creating になっています。
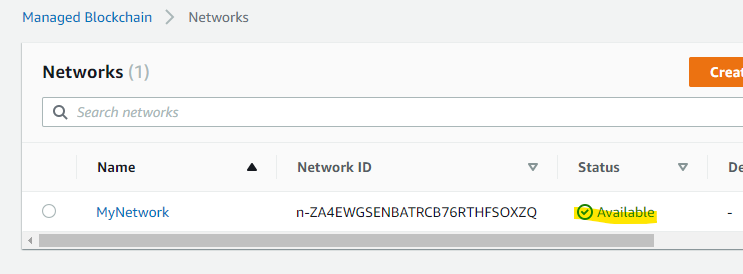
一定時間後 Available になります。
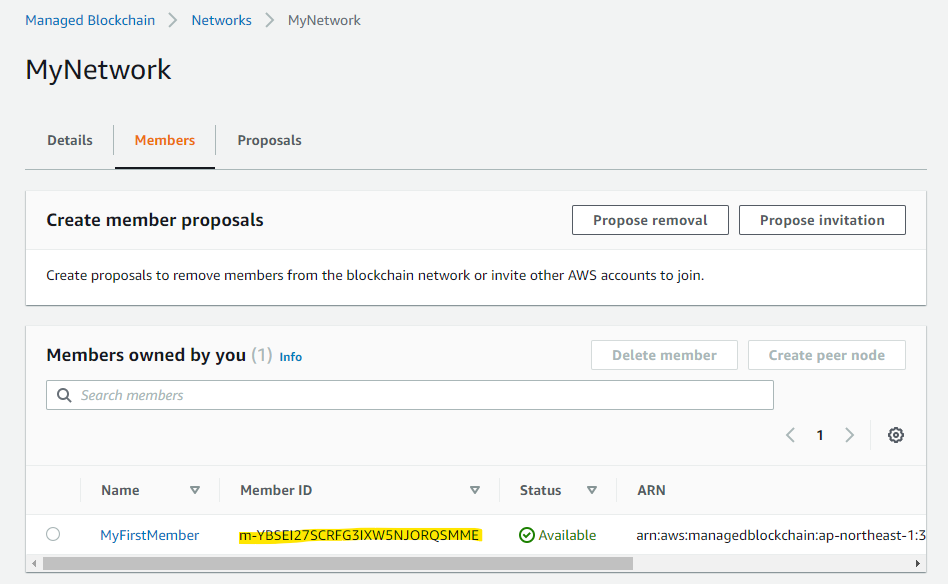
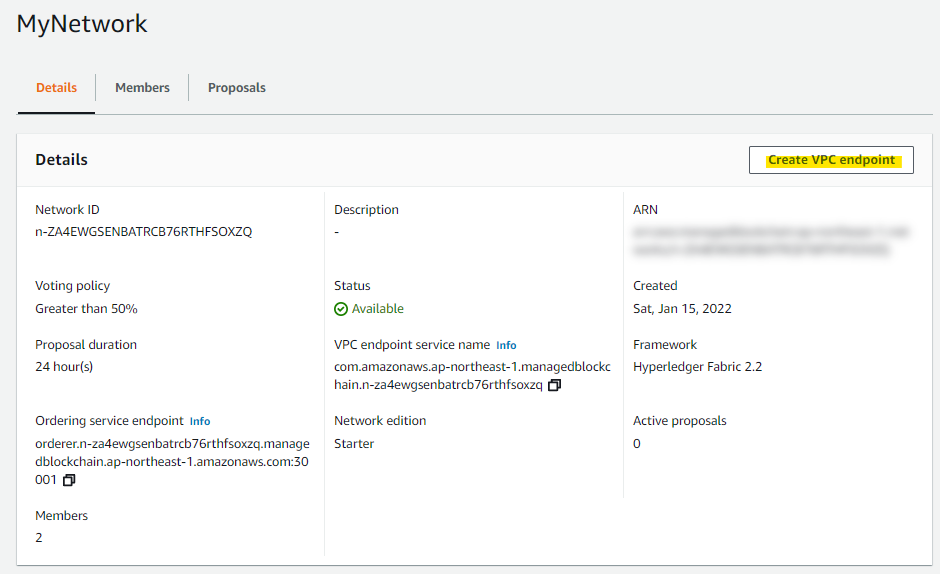
いくつか画面を見てみましょう。Network の詳細画面も確認可能です。
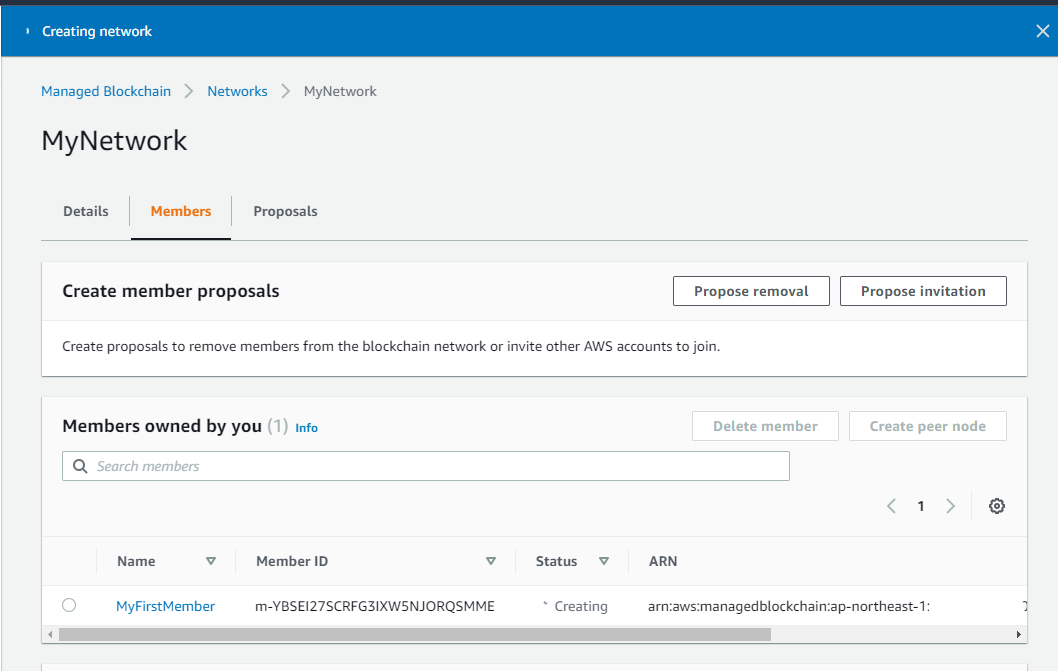
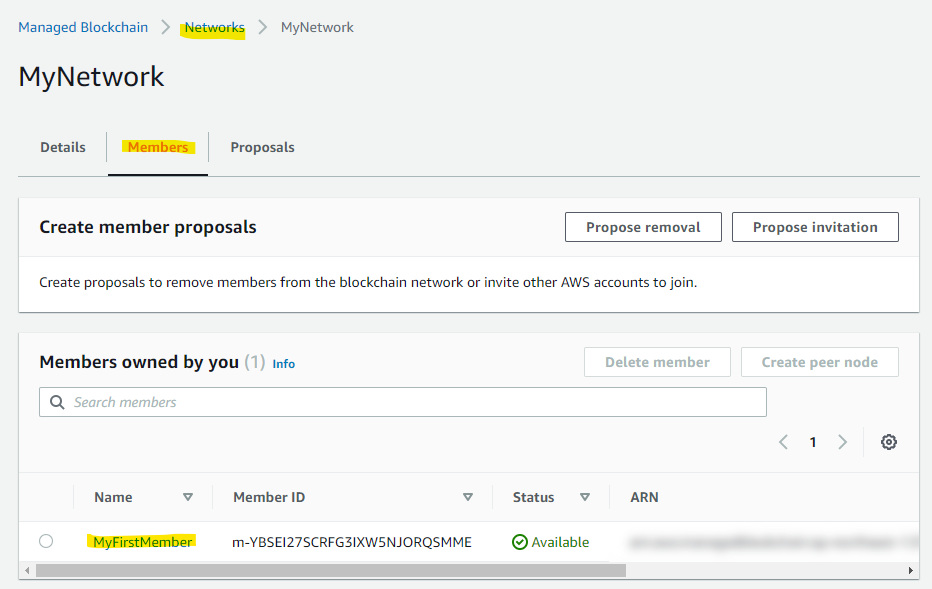
Member Tab に、1人目の Member が登録されています。
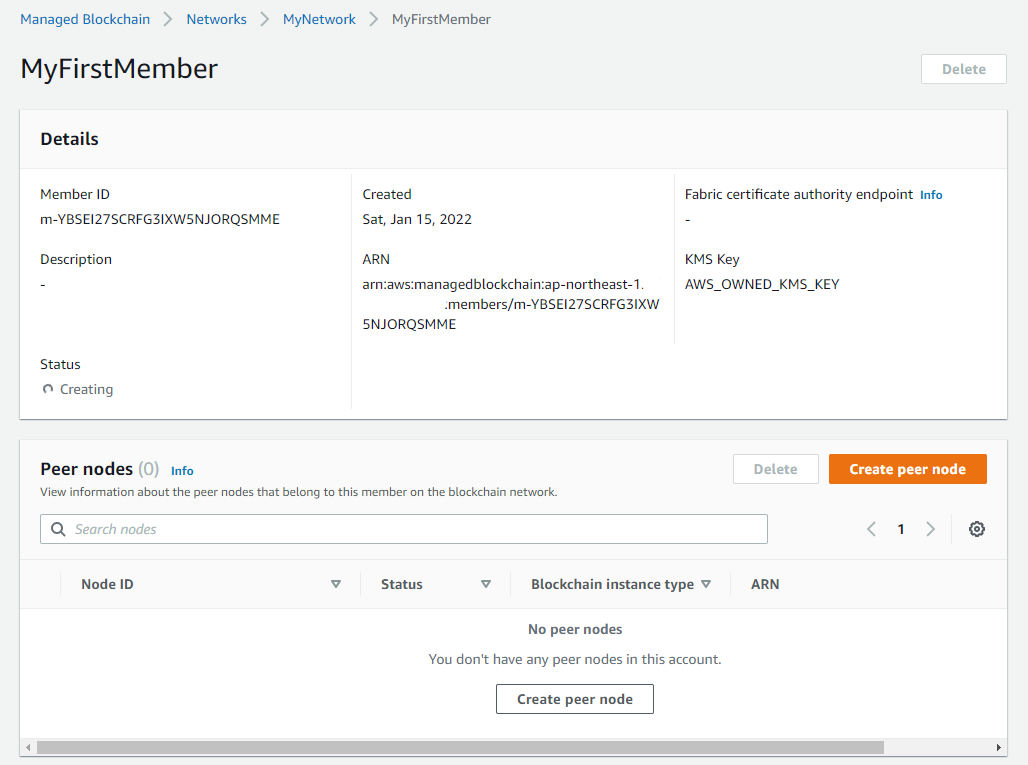
Member 配下に、Peer Node が作成できる画面となっています。
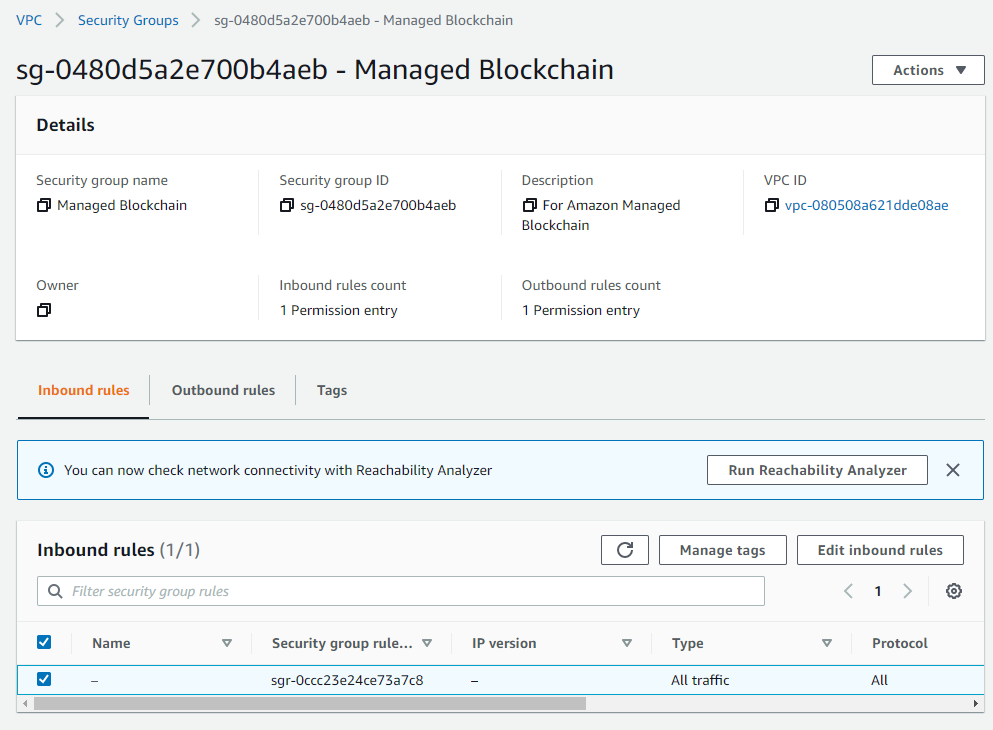
A : VPC Endpoint 用 Security Group の作成
Hyperledger Fabric 用の Network が作成できたので、これにアクセスするために VPC Endpoint を作成する必要があります。VPC Endpoint 用の Security Group をまず作成します。
A : VPC Endpoint の作成
Hyperledger Fabric 用の Network にアクセスするために VPC Endpoint を作成します。構成図でいうと、左下の VPC Endpoint を作成していきます。
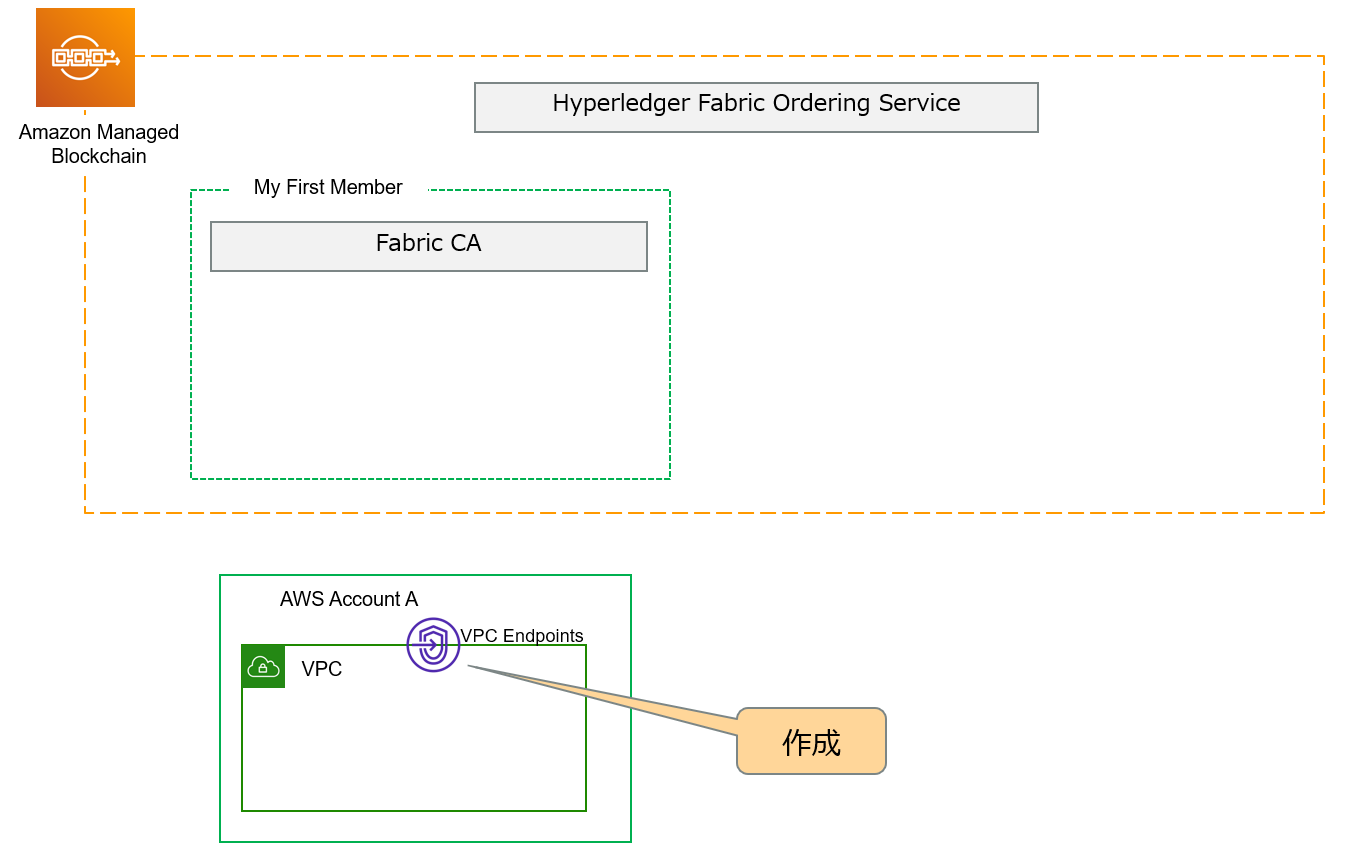
作成した Network を選択

Create VPC Endpoint を選択

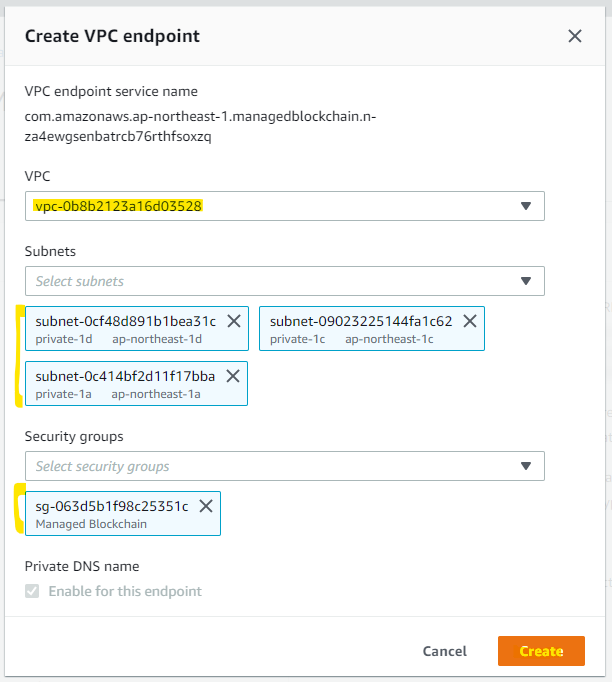
作成する VPC や Subnet, Security Group を選択して Create を押します。
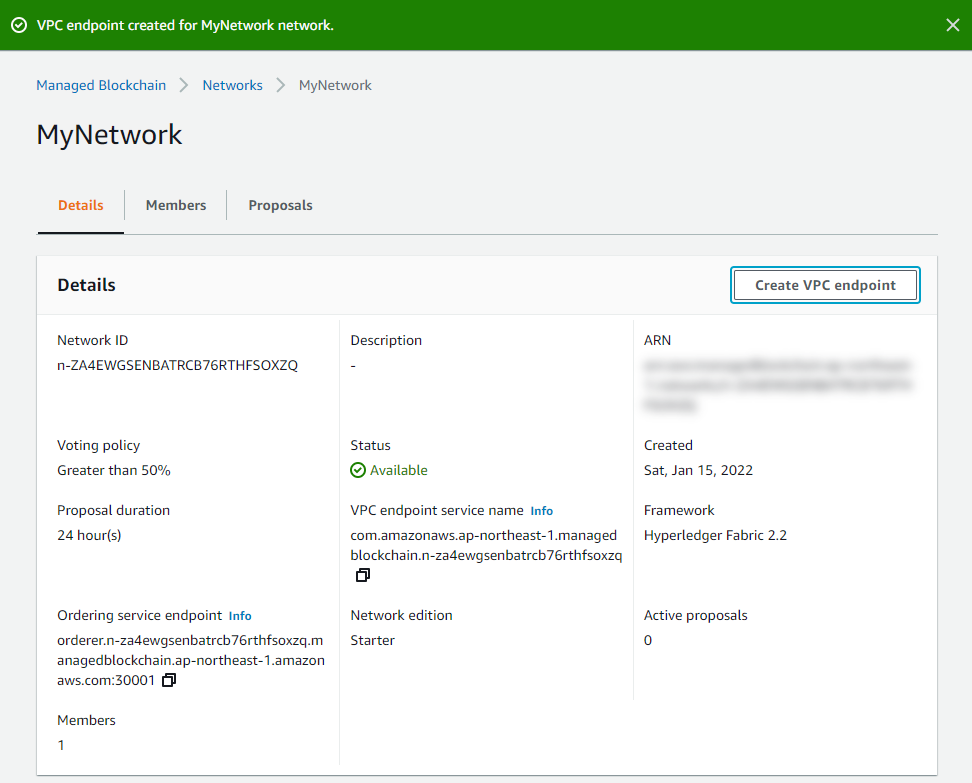
作成されました。
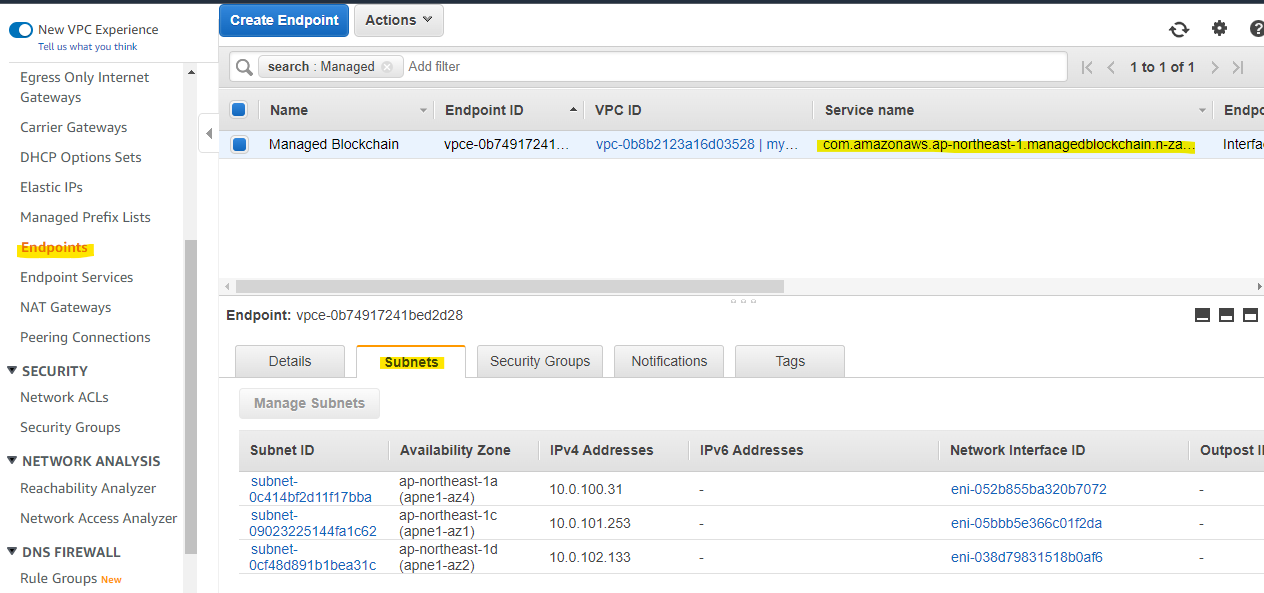
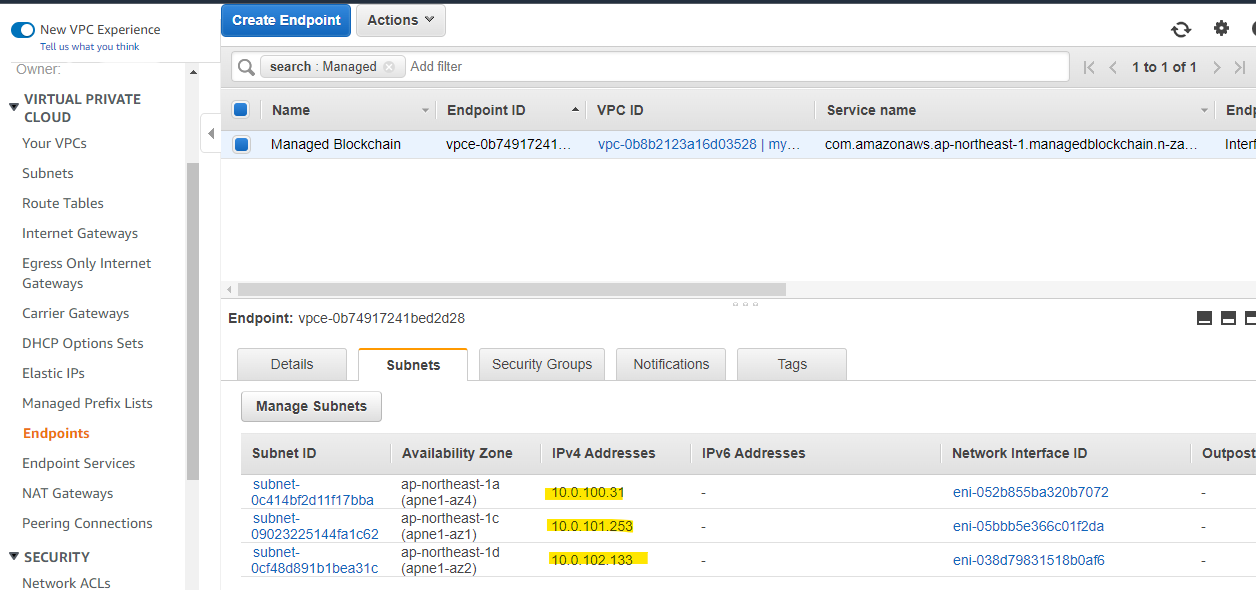
VPC のページで、VPC Endpoint のページを見ると、こちらにも作成された Endpoint を確認可能です
A : Peer Node の作成
メンバー配下に Peer Node を作成していきます。構成図でいうところの、Peer Node を構成します。Peer Node は、ネットワークの中で他のメンバーの Peer Node と連携し、台帳の更新や保持・管理を行う役割を担います。
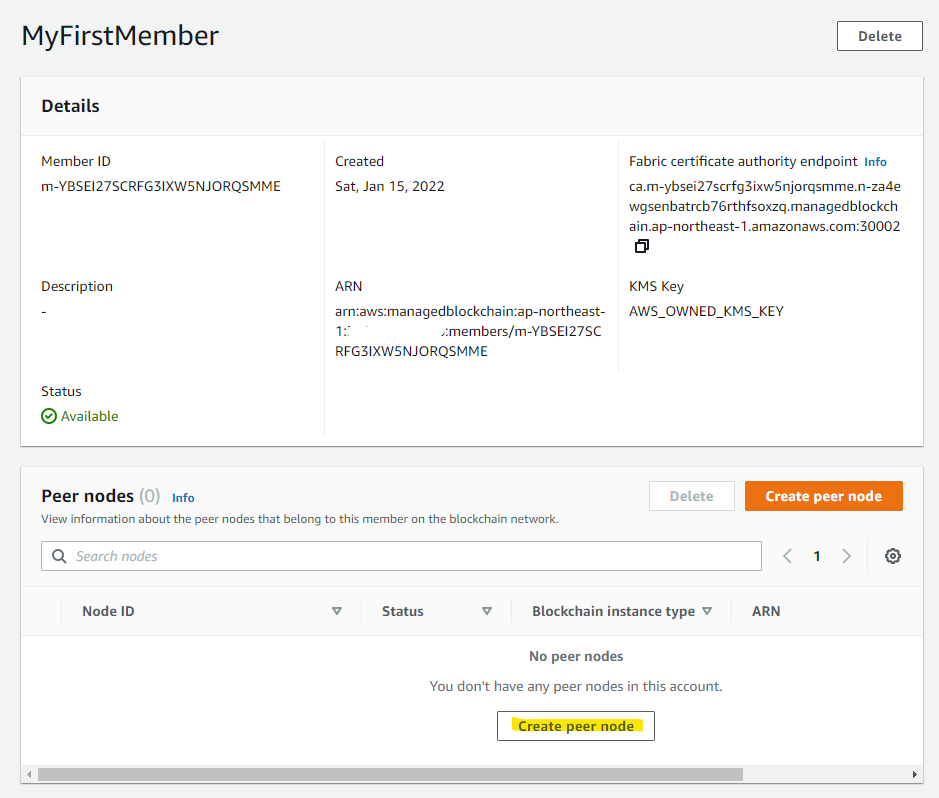
Network の中に、作成した Member の詳細画面を開きます。
Create peer node を選択します。
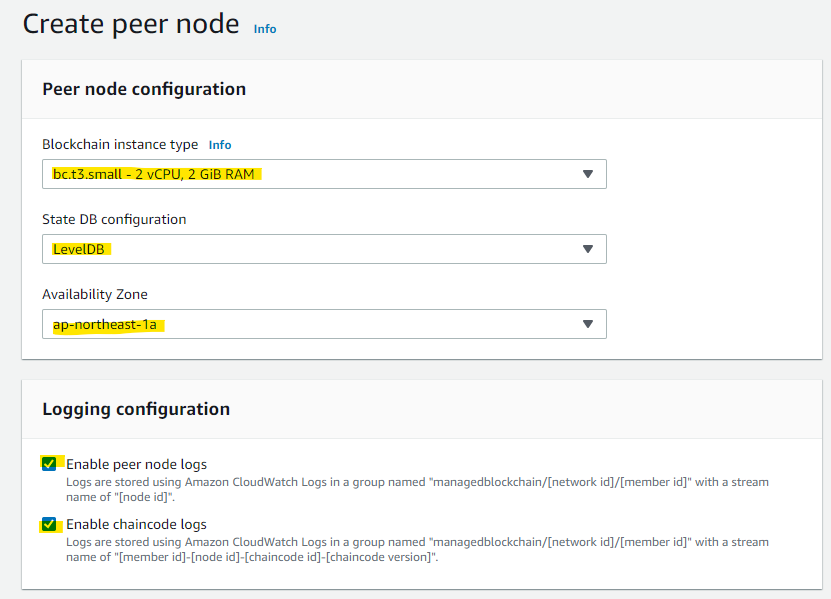
Peer Node のインスタンスタイプや、AZ、State DB を選択します。State DB は、LevelDB と CouchDB の2種類から選択可能となっています。Level DB の方はシンプルな Key-Value を扱い、CouchDB は JSON を使い比較的リッチなクエリーを使えます。Level DB の方がパフォーマンスが良いとされています。詳細は次の Document をご覧ください。
- Instance Type
- State DB は LevelDB を指定
- AZ を指定
- ログを有効化
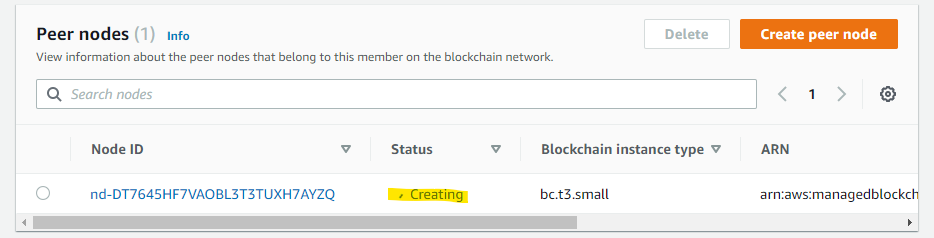
Create をします。5分ほどかかります。
Creating となります。
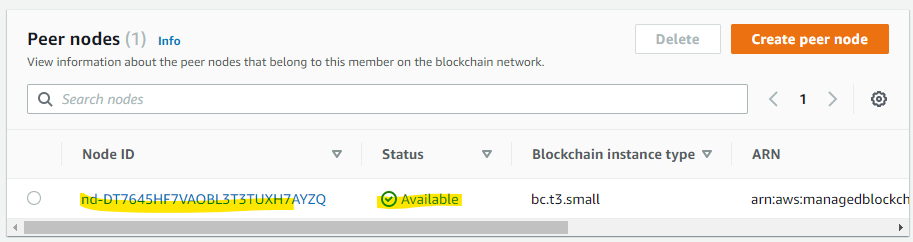
一定時間後、Available となります。
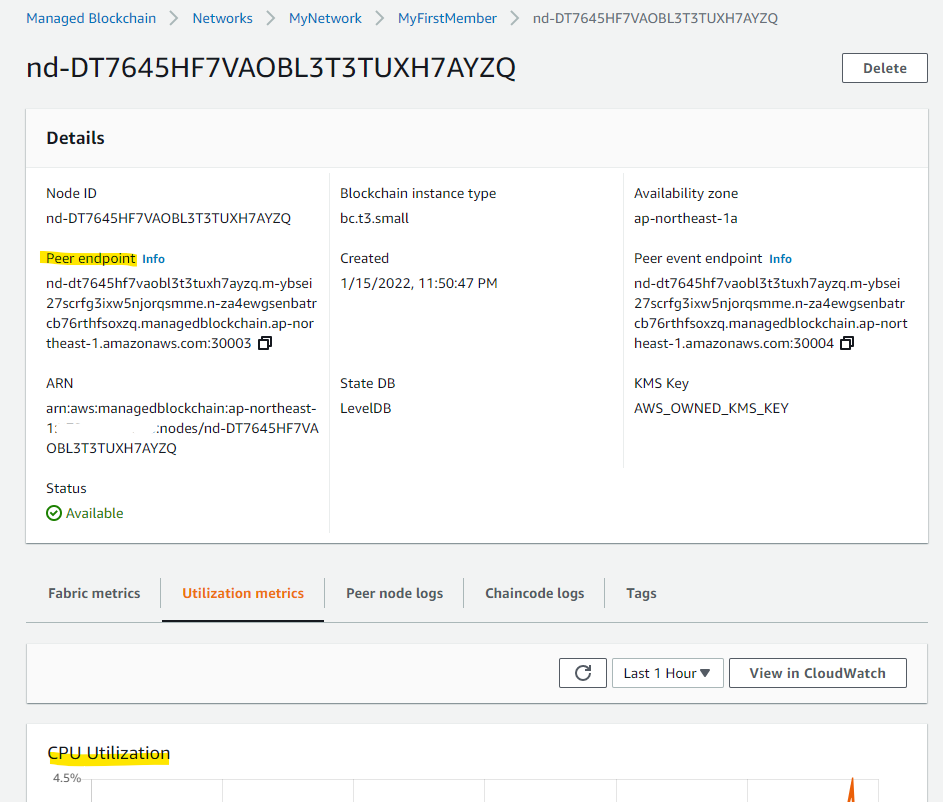
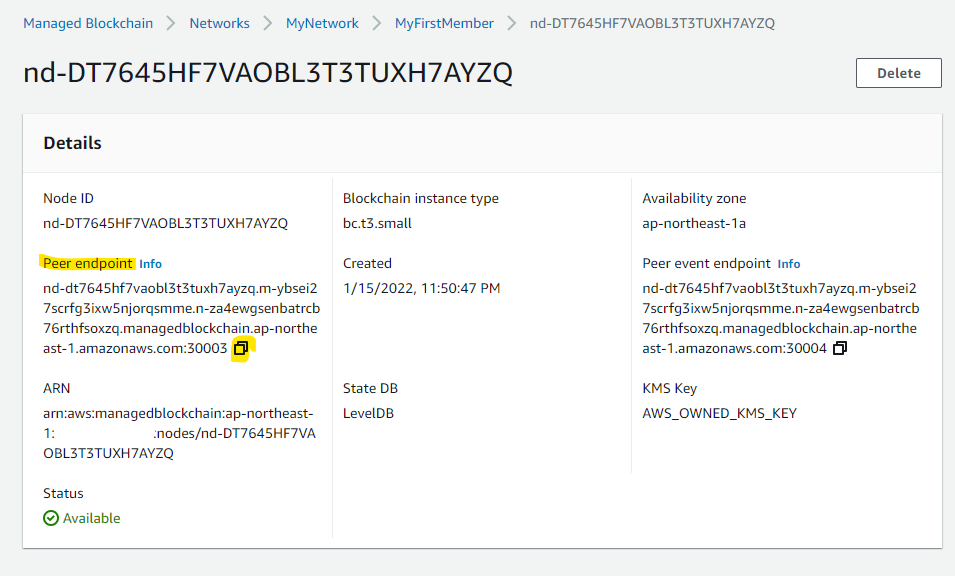
Peer Node の詳細画面です。
- Peer Node に接続するための Endpoint が表示されている
- CPU 使用率やメモリ使用率も表示されている
なお、Peer Endpoint で名前解決すると、3 つの IP アドレスが返ってきます。
> dig +dnssec nd-dt7645hf7vaobl3t3tuxh7ayzq.m-ybsei27scrfg3ixw5njorqsmme.n-za4ewgsenbatrcb76rthfsoxzq.managedblockchain.ap-northeast-1.amazonaws.com A
;; ANSWER SECTION:
nd-dt7645hf7vaobl3t3tuxh7ayzq.m-ybsei27scrfg3ixw5njorqsmme.n-za4ewgsenbatrcb76rthfsoxzq.managedblockchain.ap-northeast-1.amazonaws.com. 60 IN A 10.0.100.31
nd-dt7645hf7vaobl3t3tuxh7ayzq.m-ybsei27scrfg3ixw5njorqsmme.n-za4ewgsenbatrcb76rthfsoxzq.managedblockchain.ap-northeast-1.amazonaws.com. 60 IN A 10.0.102.133
nd-dt7645hf7vaobl3t3tuxh7ayzq.m-ybsei27scrfg3ixw5njorqsmme.n-za4ewgsenbatrcb76rthfsoxzq.managedblockchain.ap-northeast-1.amazonaws.com. 60 IN A 10.0.101.253
この 3 つの IP アドレスは、VPC Endpoint の IP アドレスを指し示していることがわかります。構成図通りに、VPC Endpoint 経由で Peer Node にアクセスできることがわかります。
A : Client の準備
次に、Hyperledger Fabric にアクセスするための Linux マシンを EC2 インスタンスとして作成をしてきます。この Linux マシンから、Hyperledger Fabric に関するトランザクションを発行していく形ですね。
A : パッケージインストール
VPC 内に Linux マシンを用意します。今回は Amazon Linux 2 を使っています。
今回の手順で使うソフトウェア群をインストール
sudo yum install jq telnet emacs docker libtool libtool-ltdl-devel git -y
Docker の起動
sudo systemctl start docker
ec2-user を docker グループに追加
sudo usermod -a -G docker ec2-user
docker-compose のインストール。バージョンは最新のものを指定。
sudo curl -L https://github.com/docker/compose/releases/download/v2.2.3/docker-compose-`uname -s`-`uname -m` -o /usr/local/bin/docker-compose
実行権限を付与。
sudo chmod a+x /usr/local/bin/docker-compose
Go 言語のインストール。root にスイッチ
sudo su -
Golan 1.17.6 の Install を行う。 最新のものはここで確認
cd /home/ec2-user/temp
wget https://go.dev/dl/go1.17.6.linux-amd64.tar.gz
rm -rf /usr/local/go && tar -C /usr/local -xzf go1.17.6.linux-amd64.tar.gz
環境変数の指定のために、root ユーザーから、ec2-user に戻る
exit
編集
vim ~/.bash_profile
末尾に追加。Shell 再読み込み。
PATH=$PATH:/usr/local/go/bin
バージョンの確認
Docker
> sudo docker version
Client:
 Version:           20.10.7
 API version:       1.41
 Go version:        go1.15.14
 Git commit:        f0df350
 Built:             Wed Nov 17 03:05:36 2021
 OS/Arch:           linux/amd64
 Context:           default
 Experimental:      true

Server:
 Engine:
  Version:          20.10.7
  API version:      1.41 (minimum version 1.12)
  Go version:       go1.15.14
  Git commit:       b0f5bc3
  Built:            Wed Nov 17 03:06:14 2021
  OS/Arch:          linux/amd64
  Experimental:     false
 containerd:
  Version:          1.4.6
  GitCommit:        d71fcd7d8303cbf684402823e425e9dd2e99285d
 runc:
  Version:          1.0.0
  GitCommit:        84113eef6fc27af1b01b3181f31bbaf708715301
 docker-init:
  Version:          0.19.0
  GitCommit:        de40ad0
Docker Compose
> docker-compose version
Docker Compose version v2.2.3
Go
> go version
go version go1.17.6 linux/amd64
A : Fabric CA Client の設定
VPC Endpoint を使って、Hyperledger Fabric CAに接続できることを確認します。Hyperledger Fabric CAクライアントをインストールします。
まず、Fabric CA Endpoint を確認
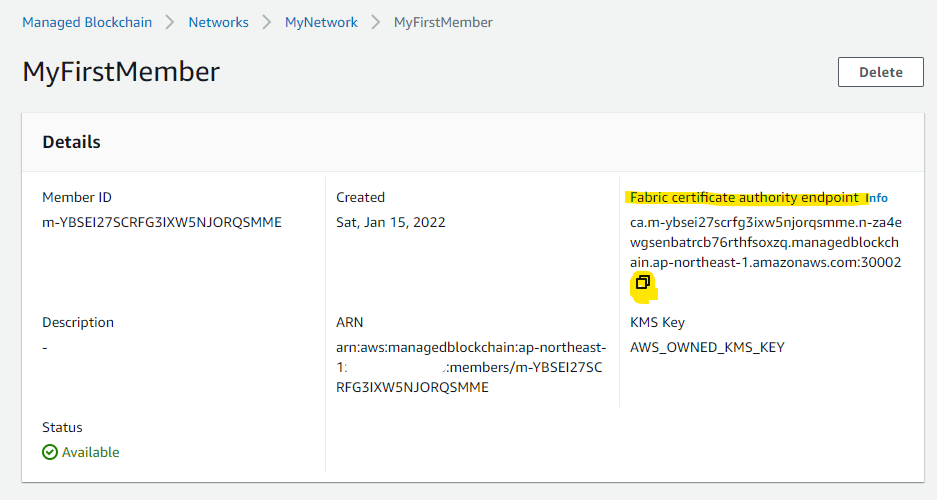
curl でアクセスして、ネットワーク的に疎通できるか確認
curl https://ca.m-ybsei27scrfg3ixw5njorqsmme.n-za4ewgsenbatrcb76rthfsoxzq.managedblockchain.ap-northeast-1.amazonaws.com:30002/cainfo -k
実行例 : このように Response が返ってきたら、正常に疎通が出来ています。
> curl https://ca.m-ybsei27scrfg3ixw5njorqsmme.n-za4ewgsenbatrcb76rthfsoxzq.managedblockchain.ap-northeast-1.amazonaws.com:30002/cainfo -k |
jq .
  % Total    % Received % Xferd  Average Speed   Time    Time     Time  Current
                                 Dload  Upload   Total   Spent    Left  Speed
100  2925    0  2925    0     0   131k      0 --:--:-- --:--:-- --:--:--  136k
{
  "result": {
    "CAName": "m-YBSEI27SCRFG3IXW5NJORQSMME",
    "CAChain": "LS0tLS1CRUdJTiBDRVJUSUZJQ0FURS0tLS0tCk1JSUN0VENDQWx1Z0F3SUJBZ0lVSXJyRjBUNkFXZlBVY1ZOL001VHRPbG95Z09Vd0NnWUlLb1pJemowRUF3SXcKZ2JZeEN6QUpCZ05WQkFZVEFsVlRNUk13RVFZRFZRUUlFd3BYWVhOb2FXNW5kRzl1TVJBd0RnWURWUVFIRXdkVApaV0YwZEd4bE1TSXdJQVlEVlFRS0V4bEJiV0Y2YjI0Z1YyVmlJRk5sY25acFkyVnpMQ0JKYm1NdU1TSXdJQVlEClZRUUxFeGxCYldGNmIyNGdUV0Z1WVdkbFpDQkNiRzlqYTJOb1lXbHVNVGd3TmdZRFZRUURFeTlOZVVacGNuTjAKVFdWdFltVnlJRUZ0WVhwdmJpQk5ZVzVoWjJWa0lFSnNiMk5yWTJoaGFXNGdVbTl2ZENCRFFUQWVGdzB5TWpBeApNVFV4TVRFMU1EQmFGdzB6TnpBeE1URXhNVEUxTURCYU1JRzJNUXN3Q1FZRFZRUUdFd0pWVXpFVE1CRUdBMVVFCkNCTUtWMkZ6YUdsdVozUnZiakVRTUE0R0ExVUVCeE1IVTJWaGRIUnNaVEVpTUNBR0ExVUVDaE1aUVcxaGVtOXUKSUZkbFlpQlRaWEoyYVdObGN5d2dTVzVqTGpFaU1DQUdBMVVFQ3hNWlFXMWhlbTl1SUUxaGJtRm5aV1FnUW14dgpZMnRqYUdGcGJqRTRNRFlHQTFVRUF4TXZUWGxHYVhKemRFMWxiV0psY2lCQmJXRjZiMjRnVFdGdVlXZGxaQ0JDCmJHOWphMk5vWVdsdUlGSnZiM1FnUTBFd1dUQVRCZ2NxaGtqT1BRSUJCZ2dxaGtqT1BRTUJCd05DQUFSTFpOaXkKRWJabmhQaGV2UVFUN0tITTBaTUMyZExCUVJPWFcxNFZvUm8zL1MwaElXbzJUdGxQUE0rTjV4NHErenNOOFhHcAp5NEdrNHVrL1VYSjlDbG1FbzBVd1F6QU9CZ05WSFE4QkFmOEVCQU1DQVFZd0VnWURWUjBUQVFIL0JBZ3dCZ0VCCi93SUJBVEFkQmdOVkhRNEVGZ1FVenFMWXBPeFY2ampja2Q1VTFSUk9SZUoyNURNd0NnWUlLb1pJemowRUF3SUQKU0FBd1JRSWhBUE45UUtPNHlRTFpFcFpEbms1bmVTSDJvaVZZU2l0azRoeUkxVWNpaWE1MEFpQXRuOS9uR2V6Ngp6ckRadDhoSFIvUGo1b09rSG9YKzNMaDRxall4ck0rblN3PT0KLS0tLS1FTkQgQ0VSVElGSUNBVEUtLS0tLQo=",
    "IssuerPublicKey": "CgJPVQoEUm9sZQoMRW5yb2xsbWVudElEChBSZXZvY2F0aW9uSGFuZGxlEkQKILnoAWBekT2G+rxmhAyre8GnLabeb1gw6tXA415GlZIEEiCzxMcYcRlbgg6AbYBO5zsT1wCZg12epr4FKV+95zYuBxpECiDq4Xs51iZ1LVymtNmajoAQCrW0fj4El32h/Ym2ZTbpuRIgMdO8AmdyRCWxY5MHIxaqFUZV9vyBYr+znmXnItold0ciRAogLjHHwSZpvnm8OEfYRbevOYNmMgTk1+f+Jv2teE0Q6/ESIGxYsILhvmc0jh2ku++e8ld/RmF9Nf85MkGGd2li5/IdIkQKIHvPHPpyLD2LxG4Of7Jyi1ZzjvKvL7Y8KKH6LzMMYzPCEiAFFCpdLYBdTyMMNd30te6Sjt8IfxfzoRromylXH2CofiJECiAd70u3qqXCzulhhe772IRxNjbE4zt0zN2VQ7D4ADWKUhIgdiTHXRU5fiKh/JAqUdMOsFpypKSD1s6mrPzpxKAO67IiRAogJj9bguaPvyFX/wPhqA4D1O1Rg47aHoeQKX5RWfZUOn8SIDWPoUMVAGdAAnWt8NWFecIRD+LjTXqYqOg/ulwe+dmvKogBCiCXwEGlr8leYuQFXCzDLqKiQrWoj8mvLLZ0a5aLvjyHOhIgR0wJeQ9QHf9c5D4dN6w/PWVH+90OkSP0o3iUcPycp1EaIMtv+o2vuF4HbLx9ixpkvRdf9gqstTeJru0gQriUJh6EIiA7oxrILHKjSOwndb8jteN32GODhYRci3aenatzc2ee9jJECiAaQGiTzrK+SBwui1klu/hGc9heKy7guxUnB9yn1pl77BIgdsBIii1WXNyjV8mCN/0Mw6Q9m2a/KFLfppETqeQbZno6RAoggm5lYWZuYI9aG7E5OTQl+zAkiLk4qKFDz4dWa4ZdrPMSIGO1gDkgugOC1G1SEgJ/0cx7QSngyh4IH61c8DJOLPkLQiD7U+4GDCeqfNrEf2CVfM1doqrV43YYE45MDt/INl24VkogTDQE5LEYxITfbXWyHOxsehEPSf7q4+sf8aSN/dEVdhdSIFoJvumZgMkGrkqFIkcK44/nGle33qleFHg06expBSWq",
    "IssuerRevocationPublicKey": "LS0tLS1CRUdJTiBQVUJMSUMgS0VZLS0tLS0KTUhZd0VBWUhLb1pJemowQ0FRWUZLNEVFQUNJRFlnQUV2NjhQSnhFUUJrV2xvZEM1Smd2b2g5a0NVMG50ekh5dgpWd0hydzgrcFJRdzkrZ1VOYUFUNGxWMnNneGE4SXR1Q2Yya2FtcVNWMGtzOVB4OHlpcFFqeUhSZFVDMkN1OE1zCnNhcmZValVkMlFNaldVMnlUYXNrakRMRTB2MU1TNEF2Ci0tLS0tRU5EIFBVQkxJQyBLRVktLS0tLQo=",
    "Version": "1.4.7"
  },
  "errors": [],
  "messages": [],
  "success": true
}
Hyperledger Fabric v2.2 networks を使っているので、Fabric CA Client の 1.4 をインストール
mkdir /home/ec2-user/temp/managed-blockchain/
cd /home/ec2-user/temp/managed-blockchain/
wget https://github.com/hyperledger/fabric-ca/releases/download/v1.4.7/hyperledger-fabric-ca-linux-amd64-1.4.7.tar.gz
tar -xzf hyperledger-fabric-ca-linux-amd64-1.4.7.tar.gz
2つのバイナリファイルが解凍されている
> ls -la bin/
total 51988
drwxr-xr-x 2 ec2-user docker       54 May 15  2020 .
drwxr-xr-x 3 ec2-user docker       71 Jan 16 01:40 ..
-rwxr-xr-x 1 ec2-user docker 22950608 May 15  2020 fabric-ca-client
-rwxr-xr-x 1 ec2-user docker 30278008 May 15  2020 fabric-ca-server
PATH 配下に移動
sudo cp -p bin/fabric-ca-client /usr/local/bin
sudo cp -p bin/fabric-ca-server /usr/local/bin
A : サンプルリポジトリのクローン
Hyperledger Fabric のサンプルリポジトルをクローン
mkdir -p /home/ec2-user/temp/managed-blockchain/
cd /home/ec2-user/temp/managed-blockchain/
git clone --branch v2.2.3 https://github.com/hyperledger/fabric-samples.git
A : Hyperledger Fabric CLI を Docker-Compose で起動
Hyperledger Fabric CLI を使い Peer Node にアクセスできる環境を設定します。後述の手順で、 Hyperledger Fabric CLI を使ってトランザクションを流していくための前準備です。
まず、いくつかの文字列をメモっていきます。
Member ID
Peer Node の Endpoint
Hyperledger Fabric CLI を起動するための Docker-Compose 設定ファイルを準備します。
vim /home/ec2-user/temp/managed-blockchain/docker-compose-cli.yaml
次の値を環境に合わせて指定します。
- CORE_PEER_LOCALMSPID : Member ID を指定
- CORE_PEER_ADDRESS : Peer Node Endpoint を指定
- volumes : Client の作業用ディレクトリを指定
hyperledger/fabric-tools:2.2 のコンテナイメージを使っていることがわかります。
version: '2'
services:
  cli:
    container_name: cli
    image: hyperledger/fabric-tools:2.2
    tty: true
    environment:
      - GOPATH=/opt/gopath
      - CORE_VM_ENDPOINT=unix:///host/var/run/docker.sock
      - FABRIC_LOGGING_SPEC=info # Set logging level to debug for more verbose logging
      - CORE_PEER_ID=cli
      - CORE_チェインコード_KEEPALIVE=10
      - CORE_PEER_TLS_ENABLED=true
      - CORE_PEER_TLS_ROOTCERT_FILE=/opt/home/managedblockchain-tls-chain.pem
      - CORE_PEER_LOCALMSPID=m-YBSEI27SCRFG3IXW5NJORQSMME
      - CORE_PEER_MSPCONFIGPATH=/opt/home/admin-msp
      - CORE_PEER_ADDRESS=nd-dt7645hf7vaobl3t3tuxh7ayzq.m-ybsei27scrfg3ixw5njorqsmme.n-za4ewgsenbatrcb76rthfsoxzq.managedblockchain.ap-northeast-1.amazonaws.com:30003
    working_dir: /opt/gopath/src/github.com/hyperledger/fabric/peer
    command: /bin/bash
    volumes:
      - /var/run/:/host/var/run/
      - /home/ec2-user/temp/managed-blockchain/fabric-samples/チェインコード:/opt/gopath/src/github.com/
      - /home/ec2-user/temp/managed-blockchain:/opt/home
Hyperledger Fabric CLI コンテナを起動します
docker-compose -f docker-compose-cli.yaml up -d
実行例
> docker-compose -f docker-compose-cli.yaml up -d
[+] Running 9/9
 ⠿ cli Pulled                                                                                                                           8.6s
   ⠿ a0d0a0d46f8b Pull complete                                                                                                         0.8s
   ⠿ 31adcdaf11c8 Pull complete                                                                                                         0.9s
   ⠿ b8b176561691 Pull complete                                                                                                         1.0s
   ⠿ ffa5077b735b Pull complete                                                                                                         4.8s
   ⠿ 2e51fde7a4ad Pull complete                                                                                                         4.9s
   ⠿ ca55bf76b621 Pull complete                                                                                                         5.2s
   ⠿ fcc465d926d3 Pull complete                                                                                                         6.0s
   ⠿ 025eefba8376 Pull complete                                                                                                         6.1s
[+] Running 2/2
 ⠿ Network managed-blockchain_default  Created                                                                                          0.0s
 ⠿ Container cli                       Started                                                                                          3.5s
A : 管理ユーザーを登録する
Network 作成時に指定した管理用ユーザーを、登録します。
A : Certificate File を作成
AWS により S3 上に公開されている pem ファイルをダウンロードします。利用するリージョンを間違えないようにしましょう。
aws s3 cp s3://ap-northeast-1.managedblockchain/etc/managedblockchain-tls-chain.pem /home/ec2-user/temp/managed-blockchain/managedblockchain-tls-chain.pem
確認
> openssl x509 -noout -text -in managedblockchain-tls-chain.pem
Certificate:
    Data:
        Version: 3 (0x2)
        Serial Number:
            8d:83:ec:5e:0e:50:f6:97:ae:23:a8:ac:39:fe:1a:81
    Signature Algorithm: sha256WithRSAEncryption
        Issuer: C=US, ST=WA, L=Seattle, O=Amazon Web Services, Inc., OU=Amazon Managed Blockchain, CN=Amazon Managed Blockchain ap-northeast-1 Root CA
        Validity
            Not Before: Feb 11 00:48:55 2020 GMT
            Not After : Feb  6 00:48:55 2035 GMT
        Subject: C=US, ST=WA, L=Seattle, O=Amazon Web Services, Inc., OU=Amazon Managed Blockchain, CN=Amazon Managed Blockchain ap-northeast-1 Intermediate CA
        Subject Public Key Info:
            Public Key Algorithm: rsaEncryption
                Public-Key: (4096 bit)
                Modulus:
                    00:bd:21:1b:3a:c8:8d:e5:78:93:a4:3d:78:7d:67:
                    af:c6:24:16:7e:f2:9d:3e:ed:d5:ce:d3:e2:83:4d:
A : 管理ユーザーを登録する
管理ユーザーを登録していきます。
fabric-ca-client enroll \
-u 'https://MyFirstAdmin:secret@ca.m-ybsei27scrfg3ixw5njorqsmme.n-za4ewgsenbatrcb76rthfsoxzq.managedblockchain.ap-northeast-1.amazonaws.com:30002' \
--tls.certfiles /home/ec2-user/temp/managed-blockchain/managedblockchain-tls-chain.pem -M /home/ec2-user/temp/managed-blockchain/admin-msp
実行例
> fabric-ca-client enroll \
      -u 'https://MyFirstAdmin:secret@ca.m-ybsei27scrfg3ixw5njorqsmme.n-za4ewgsenbatrcb76rthfsoxzq.managedblockchain.ap-northeast-1.amazonaws.com:30002' \
      --tls.certfiles /home/ec2-user/temp/managed-blockchain/managedblockchain-tls-chain.pem -M /home/ec2-user/temp/managed-blockchain/admin-msp
2022/01/16 02:25:06 [INFO] TLS Enabled
2022/01/16 02:25:06 [INFO] generating key: &{A:ecdsa S:256}
2022/01/16 02:25:06 [INFO] encoded CSR
2022/01/16 02:25:06 [INFO] Stored client certificate at /home/ec2-user/temp/managed-blockchain/admin-msp/signcerts/cert.pem
2022/01/16 02:25:06 [INFO] Stored root CA certificate at /home/ec2-user/temp/managed-blockchain/admin-msp/cacerts/ca-m-ybsei27scrfg3ixw5njorqsmme-n-za4ewgsenbatrcb76rthfsoxzq-managedblockchain-ap-northeast-1-amazonaws-com-30002.pem
2022/01/16 02:25:06 [INFO] Stored Issuer public key at /home/ec2-user/temp/managed-blockchain/admin-msp/IssuerPublicKey
2022/01/16 02:25:06 [INFO] Stored Issuer revocation public key at /home/ec2-user/temp/managed-blockchain/admin-msp/IssuerRevocationPublicKey
このコマンドにより、自動生成されているファイル群です。
> ls -la /home/ec2-user/temp/managed-blockchain/admin-msp/
total 8
drwx------ 6 ec2-user docker 122 Jan 16 02:25 .
drwxr-xr-x 6 ec2-user docker 199 Jan 16 02:24 ..
-rw-r--r-- 1 ec2-user docker 843 Jan 16 02:25 IssuerPublicKey
-rw-r--r-- 1 ec2-user docker 215 Jan 16 02:25 IssuerRevocationPublicKey
drwxr-xr-x 2 ec2-user docker 131 Jan 16 02:25 cacerts
drwx------ 2 ec2-user docker 156 Jan 16 02:25 keystore
drwxr-xr-x 2 ec2-user docker  22 Jan 16 02:25 signcerts
drwxr-xr-x 2 ec2-user docker   6 Jan 16 02:24 user
A : 証明書のコピー
今後の手順のため、証明書ファイルのコピーを行います。
cd /home/ec2-user/temp/managed-blockchain/
cp -r /home/ec2-user/temp/managed-blockchain/admin-msp/signcerts admin-msp/admincerts
admincerts がコピーされている状態です。
> ls -la admin-msp/
total 8
drwx------ 7 ec2-user docker 140 Jan 16 02:28 .
drwxr-xr-x 6 ec2-user docker 199 Jan 16 02:24 ..
-rw-r--r-- 1 ec2-user docker 843 Jan 16 02:25 IssuerPublicKey
-rw-r--r-- 1 ec2-user docker 215 Jan 16 02:25 IssuerRevocationPublicKey
drwxr-xr-x 2 ec2-user docker  22 Jan 16 02:28 admincerts
drwxr-xr-x 2 ec2-user docker 131 Jan 16 02:25 cacerts
drwx------ 2 ec2-user docker 156 Jan 16 02:25 keystore
drwxr-xr-x 2 ec2-user docker  22 Jan 16 02:25 signcerts
drwxr-xr-x 2 ec2-user docker   6 Jan 16 02:24 user
A : Hyperledger Fabric Channel を作成
Hyperledger Fabric のネットワークに、最初の Channel を作成します。Channel は、ネットワークを仮想的に分割する単位となっており、台帳を共有する範囲を限定することが出来ます。例を挙げると、Network には5個の組織が参加している状況で、2個の組織に限定した共有を行うことが可能です。
A : configtx.yaml の作成
Channel を作成するためのパラメータを指定するファイルを作成していきます。詳細は次の Document に記載されてあります。
vim configtx.yaml
次の値を Member ID に書き換える必要があります。
- Name
- ID
################################################################################
#
#   ORGANIZATIONS
#
#   This section defines the organizational identities that can be referenced
#   in the configuration profiles.
#
################################################################################
Organizations:
  # Org1 defines an MSP using the sampleconfig. It should never be used
  # in production but may be used as a template for other definitions.
  - &Org1
    # Name is the key by which this org will be referenced in channel
    # configuration transactions.
    # Name can include alphanumeric characters as well as dots and dashes.
    Name: m-YBSEI27SCRFG3IXW5NJORQSMME
    # ID is the key by which this org's MSP definition will be referenced.
    # ID can include alphanumeric characters as well as dots and dashes.
    ID: m-YBSEI27SCRFG3IXW5NJORQSMME
    # SkipAsForeign can be set to true for org definitions which are to be
    # inherited from the orderer system channel during channel creation.  This
    # is especially useful when an admin of a single org without access to the
    # MSP directories of the other orgs wishes to create a channel.  Note
    # this property must always be set to false for orgs included in block
    # creation.
    SkipAsForeign: false
    Policies: &Org1Policies
      Readers:
        Type: Signature
        Rule: "OR('Org1.member')"
        # If your MSP is configured with the new NodeOUs, you might
        # want to use a more specific rule like the following:
        # Rule: "OR('Org1.admin', 'Org1.peer', 'Org1.client')"
      Writers:
        Type: Signature
        Rule: "OR('Org1.member')"
        # If your MSP is configured with the new NodeOUs, you might
        # want to use a more specific rule like the following:
        # Rule: "OR('Org1.admin', 'Org1.client')"
      Admins:
        Type: Signature
        Rule: "OR('Org1.admin')"
    # MSPDir is the filesystem path which contains the MSP configuration.
    MSPDir: /opt/home/admin-msp
    # AnchorPeers defines the location of peers which can be used for
    # cross-org gossip communication. Note, this value is only encoded in
    # the genesis block in the Application section context.
    AnchorPeers:
      - Host: 127.0.0.1
        Port: 7051
################################################################################
#
#   CAPABILITIES
#
#   This section defines the capabilities of fabric network. This is a new
#   concept as of v1.1.0 and should not be utilized in mixed networks with
#   v1.0.x peers and orderers.  Capabilities define features which must be
#   present in a fabric binary for that binary to safely participate in the
#   fabric network.  For instance, if a new MSP type is added, newer binaries
#   might recognize and validate the signatures from this type, while older
#   binaries without this support would be unable to validate those
#   transactions.  This could lead to different versions of the fabric binaries
#   having different world states.  Instead, defining a capability for a channel
#   informs those binaries without this capability that they must cease
#   processing transactions until they have been upgraded.  For v1.0.x if any
#   capabilities are defined (including a map with all capabilities turned off)
#   then the v1.0.x peer will deliberately crash.
#
################################################################################
Capabilities:
  # Channel capabilities apply to both the orderers and the peers and must be
  # supported by both.
  # Set the value of the capability to true to require it.
  # Note that setting a later Channel version capability to true will also
  # implicitly set prior Channel version capabilities to true. There is no need
  # to set each version capability to true (prior version capabilities remain
  # in this sample only to provide the list of valid values).
  Channel: &ChannelCapabilities
    # V2.0 for Channel is a catchall flag for behavior which has been
    # determined to be desired for all orderers and peers running at the v2.0.0
    # level, but which would be incompatible with orderers and peers from
    # prior releases.
    # Prior to enabling V2.0 channel capabilities, ensure that all
    # orderers and peers on a channel are at v2.0.0 or later.
    V2_0: true
  # Orderer capabilities apply only to the orderers, and may be safely
  # used with prior release peers.
  # Set the value of the capability to true to require it.
  Orderer: &OrdererCapabilities
    # V1.1 for Orderer is a catchall flag for behavior which has been
    # determined to be desired for all orderers running at the v1.1.x
    # level, but which would be incompatible with orderers from prior releases.
    # Prior to enabling V2.0 orderer capabilities, ensure that all
    # orderers on a channel are at v2.0.0 or later.
    V2_0: true
  # Application capabilities apply only to the peer network, and may be safely
  # used with prior release orderers.
  # Set the value of the capability to true to require it.
  # Note that setting a later Application version capability to true will also
  # implicitly set prior Application version capabilities to true. There is no need
  # to set each version capability to true (prior version capabilities remain
  # in this sample only to provide the list of valid values).
  Application: &ApplicationCapabilities
    # V2.0 for Application enables the new non-backwards compatible
    # features and fixes of fabric v2.0.
    # Prior to enabling V2.0 orderer capabilities, ensure that all
    # orderers on a channel are at v2.0.0 or later.
    V2_0: true
################################################################################
#
#   CHANNEL
#
#   This section defines the values to encode into a config transaction or
#   genesis block for channel related parameters.
#
################################################################################
Channel: &ChannelDefaults
  # Policies defines the set of policies at this level of the config tree
  # For Channel policies, their canonical path is
  #   /Channel/<PolicyName>
  Policies:
    # Who may invoke the 'Deliver' API
    Readers:
      Type: ImplicitMeta
      Rule: "ANY Readers"
    # Who may invoke the 'Broadcast' API
    Writers:
      Type: ImplicitMeta
      Rule: "ANY Writers"
    # By default, who may modify elements at this config level
    Admins:
      Type: ImplicitMeta
      Rule: "MAJORITY Admins"
  # Capabilities describes the channel level capabilities, see the
  # dedicated Capabilities section elsewhere in this file for a full
  # description
  Capabilities:
    <<: *ChannelCapabilities
################################################################################
#
#   APPLICATION
#
#   This section defines the values to encode into a config transaction or
#   genesis block for application-related parameters.
#
################################################################################
Application: &ApplicationDefaults
  # Organizations is the list of orgs which are defined as participants on
  # the application side of the network
  Organizations:
  # Policies defines the set of policies at this level of the config tree
  # For Application policies, their canonical path is
  #   /Channel/Application/<PolicyName>
  Policies: &ApplicationDefaultPolicies
    LifecycleEndorsement:
      Type: ImplicitMeta
      Rule: "ANY Readers"
    Endorsement:
      Type: ImplicitMeta
      Rule: "ANY Readers"
    Readers:
      Type: ImplicitMeta
      Rule: "ANY Readers"
    Writers:
      Type: ImplicitMeta
      Rule: "ANY Writers"
    Admins:
      Type: ImplicitMeta
      Rule: "MAJORITY Admins"

  Capabilities:
    <<: *ApplicationCapabilities
################################################################################
#
#   PROFILES
#
#   Different configuration profiles may be encoded here to be specified as
#   parameters to the configtxgen tool. The profiles which specify consortiums
#   are to be used for generating the orderer genesis block. With the correct
#   consortium members defined in the orderer genesis block, channel creation
#   requests may be generated with only the org member names and a consortium
#   name.
#
################################################################################
Profiles:
  OneOrgChannel:
    <<: *ChannelDefaults
    Consortium: AWSSystemConsortium
    Application:
      <<: *ApplicationDefaults
      Organizations:
        - <<: *Org1
Hyperledger Fabric CL を使って、configtxgen を行います。
docker exec cli configtxgen \
-outputCreateChannelTx /opt/home/mychannel.pb \
-profile OneOrgChannel -channelID mychannel \
--configPath /opt/home/
実行例
> docker exec cli configtxgen \
      -outputCreateChannelTx /opt/home/mychannel.pb \
      -profile OneOrgChannel -channelID mychannel \
      --configPath /opt/home/
2022-01-15 17:48:16.531 UTC [common.tools.configtxgen] main -> INFO 001 Loading configuration
2022-01-15 17:48:16.536 UTC [common.tools.configtxgen.localconfig] Load -> INFO 002 Loaded configuration: /opt/home/configtx.yaml
2022-01-15 17:48:16.536 UTC [common.tools.configtxgen] doOutputChannelCreateTx -> INFO 003 Generating new channel configtx
2022-01-15 17:48:16.536 UTC [common.tools.configtxgen] doOutputChannelCreateTx -> INFO 004 Writing new channel tx
A : 環境変数の設定
環境変数を設定するために、いくつかの値を確認します。
Ordering service endpoint
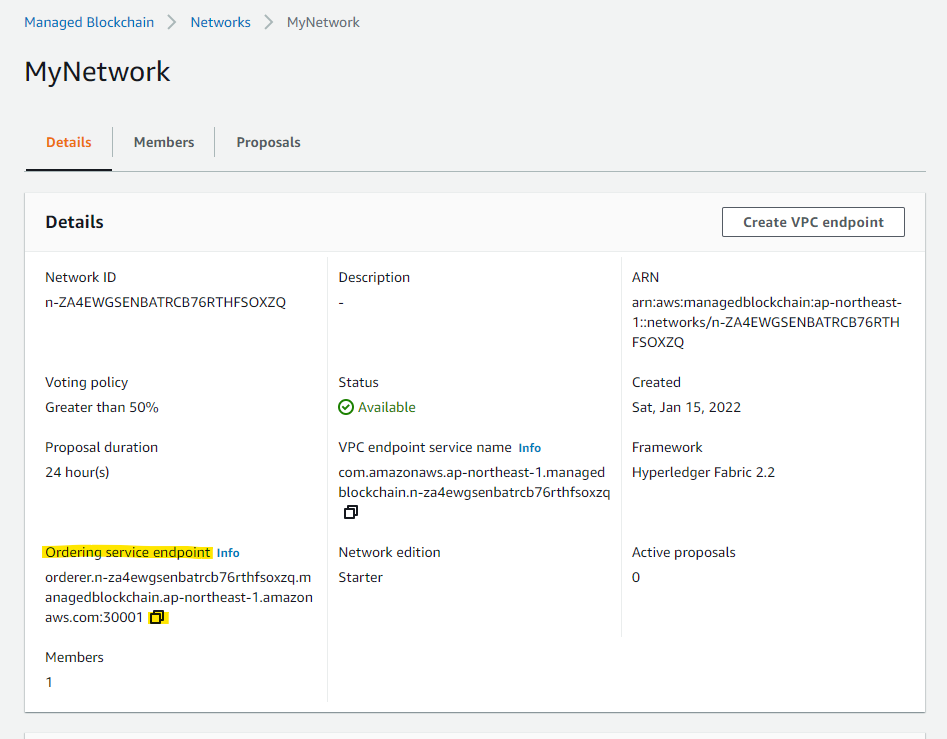
Shell の環境変数にExport します。
export ORDERER=orderer.n-za4ewgsenbatrcb76rthfsoxzq.managedblockchain.ap-northeast-1.amazonaws.com:30001
A : Channel の作成
Hyperledger Fabric のネットワークに、mychannel を作成します。
docker exec cli peer channel create -c mychannel \
-f /opt/home/mychannel.pb -o $ORDERER \
--cafile /opt/home/managedblockchain-tls-chain.pem --tls
実行例
> docker exec cli peer channel create -c mychannel \
      -f /opt/home/mychannel.pb -o $ORDERER \
      --cafile /opt/home/managedblockchain-tls-chain.pem --tls
2022-01-15 17:54:53.122 UTC [channelCmd] InitCmdFactory -> INFO 001 Endorser and orderer connections initialized
2022-01-15 17:54:55.477 UTC [cli.common] readBlock -> INFO 002 Received block: 0
A : Channel に参加
作成が出来たので、Channel に参加します。
docker exec cli peer channel join -b mychannel.block \
-o $ORDERER --cafile /opt/home/managedblockchain-tls-chain.pem --tls
実行例
> docker exec cli peer channel join -b mychannel.block \
      -o $ORDERER --cafile /opt/home/managedblockchain-tls-chain.pem --tls
2022-01-15 17:55:26.895 UTC [channelCmd] InitCmdFactory -> INFO 001 Endorser and orderer connections initialized
2022-01-15 17:55:27.060 UTC [channelCmd] executeJoin -> INFO 002 Successfully submitted proposal to join channel
参加している Channel 一覧を確認します。
-
mychannelに参加できている
> docker exec cli peer channel list
2022-01-15 17:56:45.330 UTC [channelCmd] InitCmdFactory -> INFO 001 Endorser and orderer connections initialized
Channels peers has joined:
mychannel
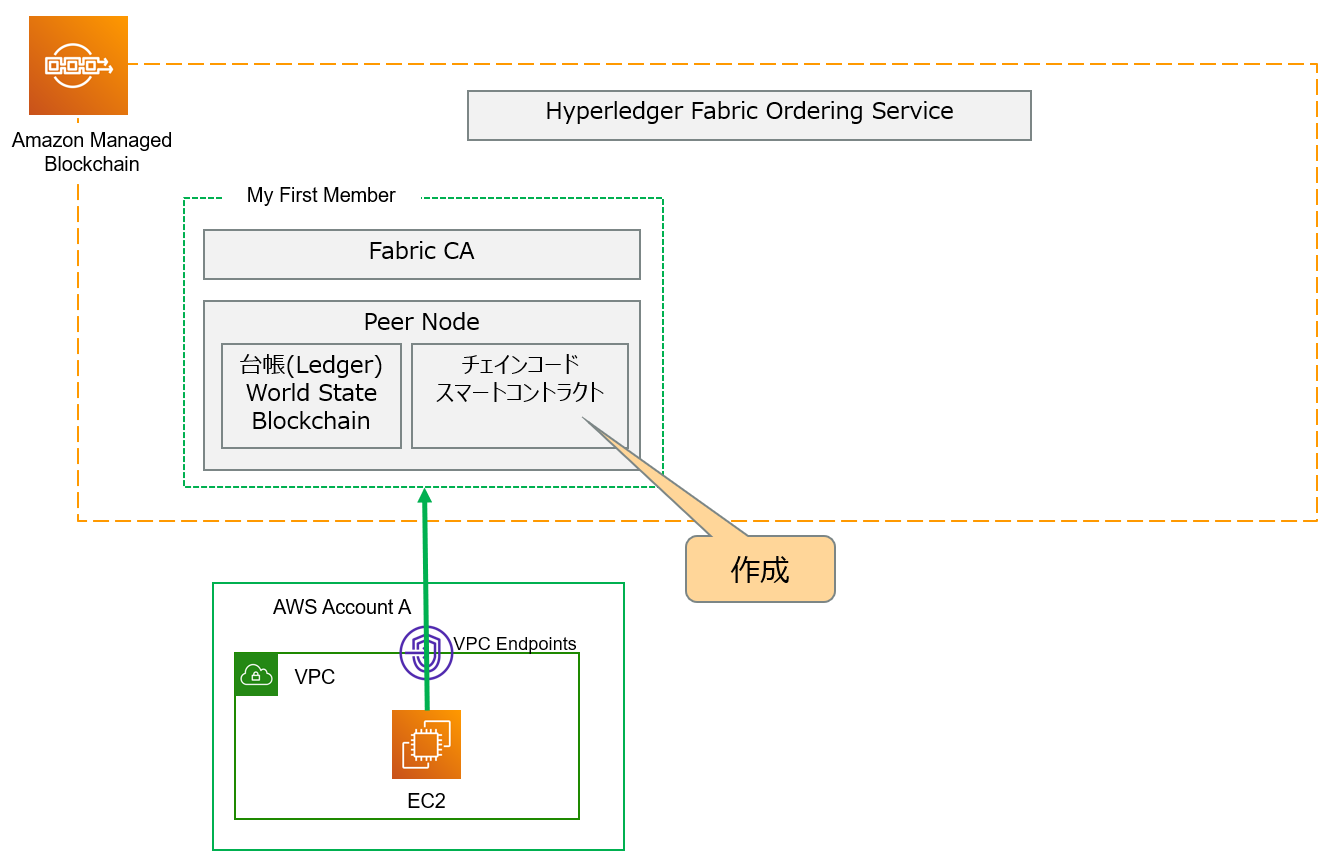
A : チェインコードのインストールと動作確認
チェインコードを PeerNode にインストールしていきます。チェインコードとは、企業間の取引のためのロジックを定義するものです。スマートコントラクトとも表現されることがあります。詳細な定義とは異なる部分もあるため、気になる方はつぎの URL をご覧ください。
構成図でいうと、こんな感じです。Peer Node にチェインコードをインストールしていきます。
Hyperledger Fabric から Clone してきた中に、Go言語で出来たチェインコードのサンプルプログラムがあり、今回はこれを利用していきます。依存関係が問題ないか確認します。
cd /home/ec2-user/temp/managed-blockchain/
cd fabric-samples/chaincode/abstore/go/
GO111MODULE=on go mod vendor
実行例
> GO111MODULE=on go mod vendor
go: downloading github.com/hyperledger/fabric-contract-api-go v1.1.0
go: downloading github.com/hyperledger/fabric-chaincode-go v0.0.0-20200424173110-d7076418f212
go: downloading github.com/hyperledger/fabric-protos-go v0.0.0-20200424173316-dd554ba3746e
go: downloading github.com/xeipuuv/gojsonschema v1.2.0
go: downloading github.com/go-openapi/spec v0.19.4
go: downloading github.com/gobuffalo/packr v1.30.1
go: downloading github.com/xeipuuv/gojsonreference v0.0.0-20180127040603-bd5ef7bd5415
go: downloading github.com/golang/protobuf v1.3.2
go: downloading google.golang.org/grpc v1.23.0
go: downloading github.com/xeipuuv/gojsonpointer v0.0.0-20180127040702-4e3ac2762d5f
go: downloading github.com/go-openapi/jsonpointer v0.19.3
go: downloading github.com/go-openapi/jsonreference v0.19.2
go: downloading github.com/go-openapi/swag v0.19.5
go: downloading github.com/gobuffalo/envy v1.7.0
go: downloading github.com/gobuffalo/packd v0.3.0
go: downloading google.golang.org/genproto v0.0.0-20180831171423-11092d34479b
go: downloading golang.org/x/net v0.0.0-20190827160401-ba9fcec4b297
go: downloading github.com/mailru/easyjson v0.0.0-20190626092158-b2ccc519800e
go: downloading gopkg.in/yaml.v2 v2.2.8
go: downloading github.com/PuerkitoBio/purell v1.1.1
go: downloading github.com/joho/godotenv v1.3.0
go: downloading github.com/rogpeppe/go-internal v1.3.0
go: downloading golang.org/x/sys v0.0.0-20190710143415-6ec70d6a5542
go: downloading github.com/PuerkitoBio/urlesc v
このパッケージのソースコードはこんな感じです。興味の無い方は読み飛ばして大丈夫です
- Init, Invoke, Delete, Query などが定義されている
- Init は、値の初期化。新たな商品を扱うときの、初期在庫数を設定するような処理イメージ
- invoke は、値の移動。倉庫から商品を取り出して、別の組織に郵送するような処理イメージ
/*
Copyright IBM Corp. 2016 All Rights Reserved.

Licensed under the Apache License, Version 2.0 (the "License");
you may not use this file except in compliance with the License.
You may obtain a copy of the License at

		 http://www.apache.org/licenses/LICENSE-2.0

Unless required by applicable law or agreed to in writing, software
distributed under the License is distributed on an "AS IS" BASIS,
WITHOUT WARRANTIES OR CONDITIONS OF ANY KIND, either express or implied.
See the License for the specific language governing permissions and
limitations under the License.
*/

package main

import (
	"errors"
	"fmt"
	"strconv"

	"github.com/hyperledger/fabric-contract-api-go/contractapi"
)

// ABstore chaincode implementation
type ABstore struct {
	contractapi.Contract
}

func (t *ABstore) Init(ctx contractapi.TransactionContextInterface, A string, Aval int, B string, Bval int) error {
	fmt.Println("ABstore Init")
	var err error
	// Initialize the chaincode
	fmt.Printf("Aval = %d, Bval = %d\n", Aval, Bval)
	// Write the state to the ledger
	err = ctx.GetStub().PutState(A, []byte(strconv.Itoa(Aval)))
	if err != nil {
		return err
	}

	err = ctx.GetStub().PutState(B, []byte(strconv.Itoa(Bval)))
	if err != nil {
		return err
	}

	return nil
}

// Transaction makes payment of X units from A to B
func (t *ABstore) Invoke(ctx contractapi.TransactionContextInterface, A, B string, X int) error {
	var err error
	var Aval int
	var Bval int
	// Get the state from the ledger
	// TODO: will be nice to have a GetAllState call to ledger
	Avalbytes, err := ctx.GetStub().GetState(A)
	if err != nil {
		return fmt.Errorf("Failed to get state")
	}
	if Avalbytes == nil {
		return fmt.Errorf("Entity not found")
	}
	Aval, _ = strconv.Atoi(string(Avalbytes))

	Bvalbytes, err := ctx.GetStub().GetState(B)
	if err != nil {
		return fmt.Errorf("Failed to get state")
	}
	if Bvalbytes == nil {
		return fmt.Errorf("Entity not found")
	}
	Bval, _ = strconv.Atoi(string(Bvalbytes))

	// Perform the execution
	Aval = Aval - X
	Bval = Bval + X
	fmt.Printf("Aval = %d, Bval = %d\n", Aval, Bval)

	// Write the state back to the ledger
	err = ctx.GetStub().PutState(A, []byte(strconv.Itoa(Aval)))
	if err != nil {
		return err
	}

	err = ctx.GetStub().PutState(B, []byte(strconv.Itoa(Bval)))
	if err != nil {
		return err
	}

	return nil
}

// Delete  an entity from state
func (t *ABstore) Delete(ctx contractapi.TransactionContextInterface, A string) error {

	// Delete the key from the state in ledger
	err := ctx.GetStub().DelState(A)
	if err != nil {
		return fmt.Errorf("Failed to delete state")
	}

	return nil
}

// Query callback representing the query of a chaincode
func (t *ABstore) Query(ctx contractapi.TransactionContextInterface, A string) (string, error) {
	var err error
	// Get the state from the ledger
	Avalbytes, err := ctx.GetStub().GetState(A)
	if err != nil {
		jsonResp := "{\"Error\":\"Failed to get state for " + A + "\"}"
		return "", errors.New(jsonResp)
	}

	if Avalbytes == nil {
		jsonResp := "{\"Error\":\"Nil amount for " + A + "\"}"
		return "", errors.New(jsonResp)
	}

	jsonResp := "{\"Name\":\"" + A + "\",\"Amount\":\"" + string(Avalbytes) + "\"}"
	fmt.Printf("Query Response:%s\n", jsonResp)
	return string(Avalbytes), nil
}

func main() {
	cc, err := contractapi.Newchaincode(new(ABstore))
	if err != nil {
		panic(err.Error())
	}
	if err := cc.Start(); err != nil {
		fmt.Printf("Error starting ABstore チェインコード: %s", err)
	}
}
作業用ディレクトリに戻ります。
cd /home/ec2-user/temp/managed-blockchain/
チェインコードをパッケージする
docker exec cli peer lifecycle chaincode package ./abstore.tar.gz \
--path /opt/home/fabric-samples/chaincode/abstore/go/ \
--label abstore_1
実行例 : 何も文字列が表示されませんが正常
> docker exec cli peer lifecycle chaincode package ./abstore.tar.gz \
      --path /opt/home/fabric-samples/chaincode/abstore/go/ \
      --label abstore_1
コンテナイメージの work ディレクトリに tar.gz が作成されている
> docker exec cli ls -la
total 2436
drwxr-xr-x    2 root     root            28 Jan 16 07:59 .
drwxr-xr-x    3 root     root            18 Jan 16 07:28 ..
-rw-------    1 root     root       2494274 Jan 16 07:59 abstore.tar.gz
チェインコードをインストールします
docker exec cli peer lifecycle chaincode install abstore.tar.gz
実行例
> docker exec cli peer lifecycle chaincode install abstore.tar.gz
2022-01-16 07:59:25.686 UTC [cli.lifecycle.chaincode] submitInstallProposal -> INFO 001 Installed remotely: response:<status:200 payload:"\nJabstore_1:3918d0438fd2ebe48ed1bde01533513a14f788846fd2d72ef054482760e73409\022\tabstore_1" >
2022-01-16 07:59:25.687 UTC [cli.lifecycle.chaincode] submitInstallProposal -> INFO 002 chaincode code package identifier: abstore_1:3918d0438fd2ebe48ed1bde01533513a14f788846fd2d72ef054482760e73409
Peer Node に、チェインコード がインストールされているか確認します。
- Package ID をメモ
> docker exec cli peer lifecycle chaincode queryinstalled
Installed chaincodes on peer:
Package ID: abstore_1:3918d0438fd2ebe48ed1bde01533513a14f788846fd2d72ef054482760e73409, Label: abstore_1
インストールされた チェインコード を利用するために承認を行います。この承認は、Network に参加している Member のうち、事前に設定した閾値を超える賛成票が得られれば利用可能になります。
- チェインコード に mycc という名前を付けている
- 作成した mychannel を指定
- Package ID を指定
docker exec cli peer lifecycle chaincode approveformyorg \
--orderer $ORDERER --tls --cafile /opt/home/managedblockchain-tls-chain.pem \
--channelID mychannel --name mycc --version v0 --sequence 1 --package-id abstore_1:3918d0438fd2ebe48ed1bde01533513a14f788846fd2d72ef054482760e73409
実行例
> docker exec cli peer lifecycle chaincode approveformyorg \
      --orderer $ORDERER --tls --cafile /opt/home/managedblockchain-tls-chain.pem \
      --channelID mychannel --name mycc --version v0 --sequence 1 --package-id abstore_1:3918d0438fd2ebe48ed1bde01533513a14f788846fd2d72ef054482760e73409
2022-01-16 08:02:52.504 UTC [chaincodeCmd] ClientWait -> INFO 001 txid [fb38e6bf655da6a061c54c0810b726bfa03af34e215ca10ba8ec67c8ea78d404] committed with status (VALID) at nd-dt7645hf7vaobl3t3tuxh7ayzq.m-ybsei27scrfg3ixw5njorqsmme.n-za4ewgsenbatrcb76rthfsoxzq.managedblockchain.ap-northeast-1.amazonaws.com:30003
投票の状況を確認します。
docker exec cli peer lifecycle chaincode checkcommitreadiness \
--orderer $ORDERER --tls --cafile /opt/home/managedblockchain-tls-chain.pem \
--channelID mychannel --name mycc --version v0 --sequence 1
true となっています。今回は、Member が1人しかいないので、利用可能になります。
> docker exec cli peer lifecycle chaincode checkcommitreadiness \
      --orderer $ORDERER --tls --cafile /opt/home/managedblockchain-tls-chain.pem \
      --channelID mychannel --name mycc --version v0 --sequence 1
chaincode definition for chaincode 'mycc', version 'v0', sequence '1' on channel 'mychannel' approval status by org:
m-YBSEI27SCRFG3IXW5NJORQSMME: true
投票が過半数を超えたので、チェインコード定義をコミットします
docker exec cli peer lifecycle chaincode commit \
--orderer $ORDERER --tls --cafile /opt/home/managedblockchain-tls-chain.pem \
--channelID mychannel --name mycc --version v0 --sequence 1
実行例
> docker exec cli peer lifecycle chaincode commit \
      --orderer $ORDERER --tls --cafile /opt/home/managedblockchain-tls-chain.pem \
      --channelID mychannel --name mycc --version v0 --sequence 1
2022-01-16 08:08:13.503 UTC [chaincodeCmd] ClientWait -> INFO 001 txid [7447f969f40fc689aa2daaec70ebd55f19f61b7ac5906620525d170be21619cb] committed with status (VALID) at nd-dt7645hf7vaobl3t3tuxh7ayzq.m-ybsei27scrfg3ixw5njorqsmme.n-za4ewgsenbatrcb76rthfsoxzq.managedblockchain.ap-northeast-1.amazonaws.com:30003
反映されているか確認します。
チェーンコードの設定がピアノードに反映されるまで、1~2分掛かる場合がある。
docker exec cli peer lifecycle chaincode querycommitted \
--channelID mychannel
実行例 : committed になっていればOK
> docker exec cli peer lifecycle chaincode querycommitted \
      --channelID mychannel
Committed chaincode definitions on channel 'mychannel':
Name: mycc, Version: v0, Sequence: 1, Endorsement Plugin: escc, Validation Plugin: vscc
それではチェインコードを動かしてみましょう。"init" を指定しており、値の初期化を行います。商品の初期在庫みたいなイメージです。a という場所に200個の商品、bという場所に200個の商品を抱えるイメージです。
docker exec cli peer chaincode invoke \
--tls --cafile /opt/home/managedblockchain-tls-chain.pem \
--channelID mychannel \
--name mycc -c '{"Args":["init", "a", "100", "b", "200"]}'
実行例
> docker exec cli peer chaincode invoke \
      --tls --cafile /opt/home/managedblockchain-tls-chain.pem \
      --channelID mychannel \
      --name mycc -c '{"Args":["init", "a", "100", "b", "200"]}'
2022-01-16 08:10:50.377 UTC [chaincodeCmd] InitCmdFactory -> INFO 001 Retrieved channel (mychannel) orderer endpoint: nd-vco6ukvfgzcqbfev7hjbfmnquq.m-cvvx3eyk5jfppi2rvwbnsmx3bi.n-za4ewgsenbatrcb76rthfsoxzq.managedblockchain.ap-northeast-1.amazonaws.com:30001
2022-01-16 08:10:50.405 UTC [chaincodeCmd] chaincodeInvokeOrQuery -> INFO 002 chaincode invoke successful. result: status:200
値の取得をしてみましょう。query で a を指定します。
docker exec cli peer chaincode query \
--tls --cafile /opt/home/managedblockchain-tls-chain.pem \
--channelID mychannel \
--name mycc -c '{"Args":["query", "a"]}'
実行例です。a は 100 の数値が返ってきて、
> docker exec cli peer chaincode query \
      --tls --cafile /opt/home/managedblockchain-tls-chain.pem \
      --channelID mychannel \
      --name mycc -c '{"Args":["query", "a"]}'
100
b は 200 の数値が返ってきています。
> docker exec cli peer chaincode query \
      --tls --cafile /opt/home/managedblockchain-tls-chain.pem \
      --channelID mychannel \
      --name mycc -c '{"Args":["query", "b"]}'
200
存在しない c を指定してみると、エラーになります。
> docker exec cli peer chaincode query \
      --tls --cafile /opt/home/managedblockchain-tls-chain.pem \
      --channelID mychannel \
      --name mycc -c '{"Args":["query", "c"]}'
Error: endorsement failure during query. response: status:500 message:"{\"Error\":\"Nil amount for c\"}"
それでは次に、invoke を呼びだします。a から b に 10 の在庫を移動するイメージです。
docker exec cli peer chaincode invoke \
--tls --cafile /opt/home/managedblockchain-tls-chain.pem \
--channelID mychannel \
--name mycc -c '{"Args":["invoke", "a", "b", "10"]}'
実行例
> docker exec cli peer chaincode invoke \
      --tls --cafile /opt/home/managedblockchain-tls-chain.pem \
      --channelID mychannel \
      --name mycc -c '{"Args":["invoke", "a", "b", "10"]}'
2022-01-16 08:14:42.925 UTC [chaincodeCmd] InitCmdFactory -> INFO 001 Retrieved channel (mychannel) orderer endpoint: nd-vco6ukvfgzcqbfev7hjbfmnquq.m-cvvx3eyk5jfppi2rvwbnsmx3bi.n-za4ewgsenbatrcb76rthfsoxzq.managedblockchain.ap-northeast-1.amazonaws.com:30001
2022-01-16 08:14:42.959 UTC [chaincodeCmd] chaincodeInvokeOrQuery -> INFO 002 chaincode invoke successful. result: status:200
a が 90 に減っているか確認します。
docker exec cli peer chaincode query \
--tls --cafile /opt/home/managedblockchain-tls-chain.pem \
--channelID mychannel \
--name mycc -c '{"Args":["query", "a"]}'
a が 90 に減っており、
> docker exec cli peer chaincode query \
      --tls --cafile /opt/home/managedblockchain-tls-chain.pem \
      --channelID mychannel \
      --name mycc -c '{"Args":["query", "a"]}'
90
bが210に増えています。正常に動作できていますね。
> docker exec cli peer chaincode query \
      --tls --cafile /opt/home/managedblockchain-tls-chain.pem \
      --channelID mychannel \
      --name mycc -c '{"Args":["query", "b"]}'
210
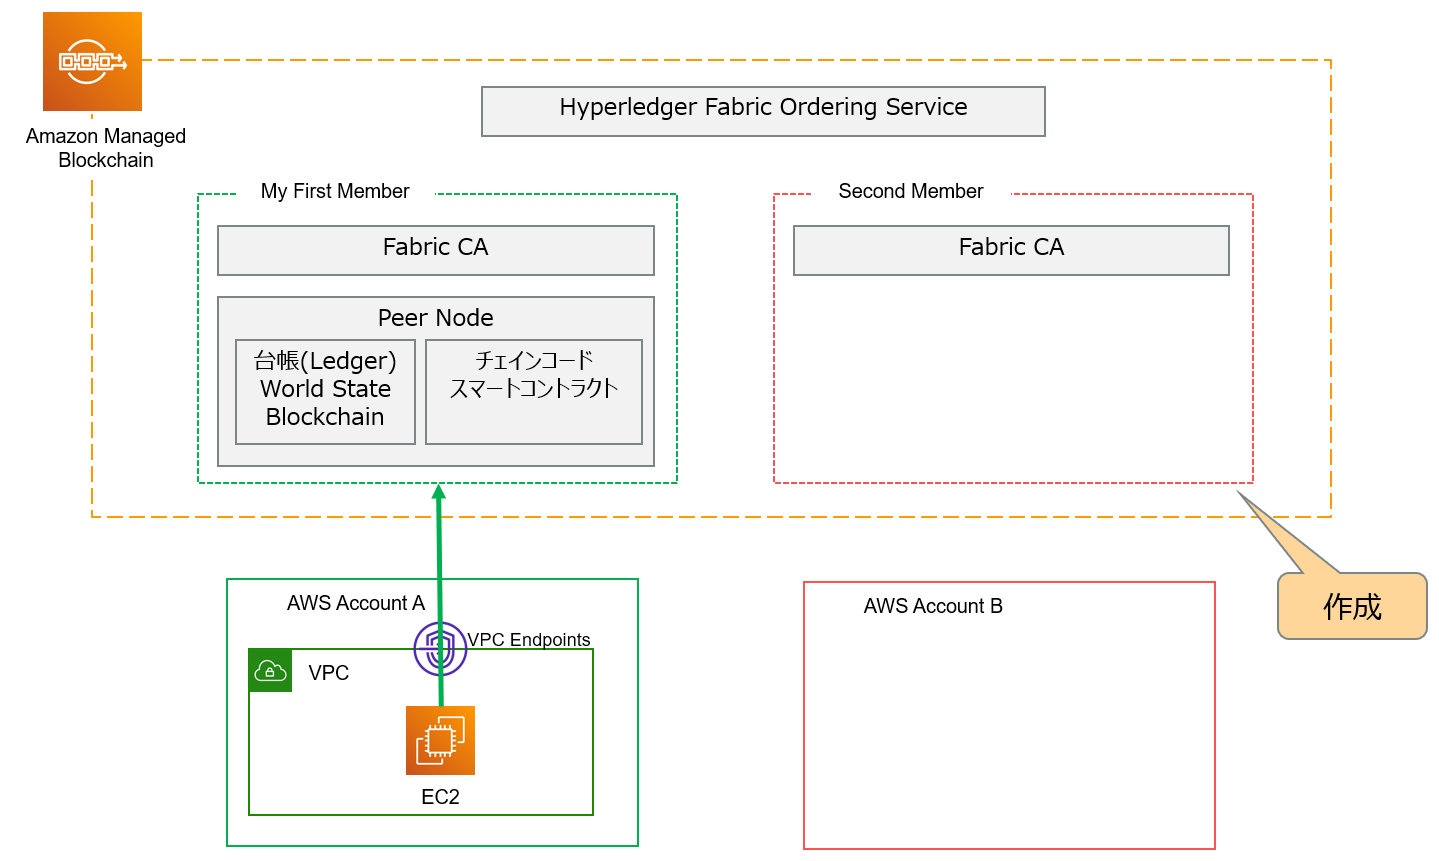
A : 他の AWS アカウントを招待する
ここまでの手順で、Amazon Managed Blockchain を使って Hyperledger Fabric のネットワークを作成し、初期のメンバーを追加したあと、チェインコード を扱えるようにしました。これから、2個目のメンバーを招待していきましょう。
初期メンバーと別の AWS アカウントを招待してもいいし、同じ AWS アカウントを利用してもOKです。
構成図はこんな感じです。
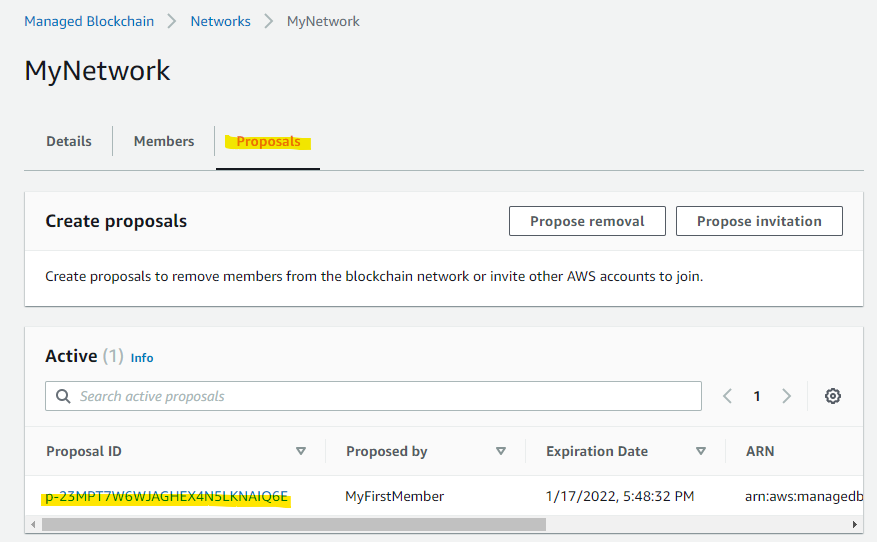
A : Invitation Proposal を作成
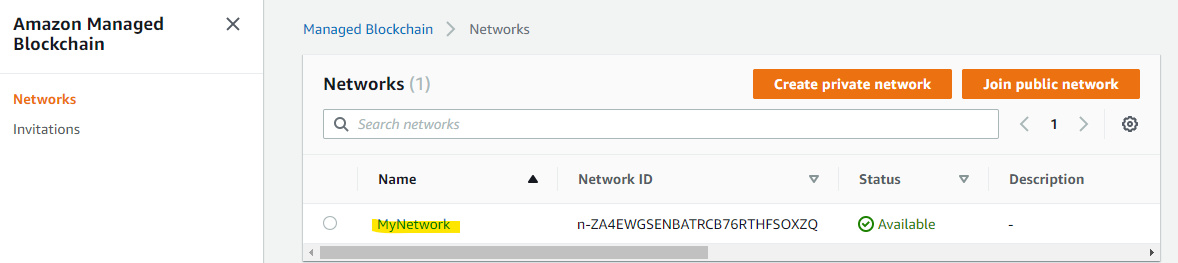
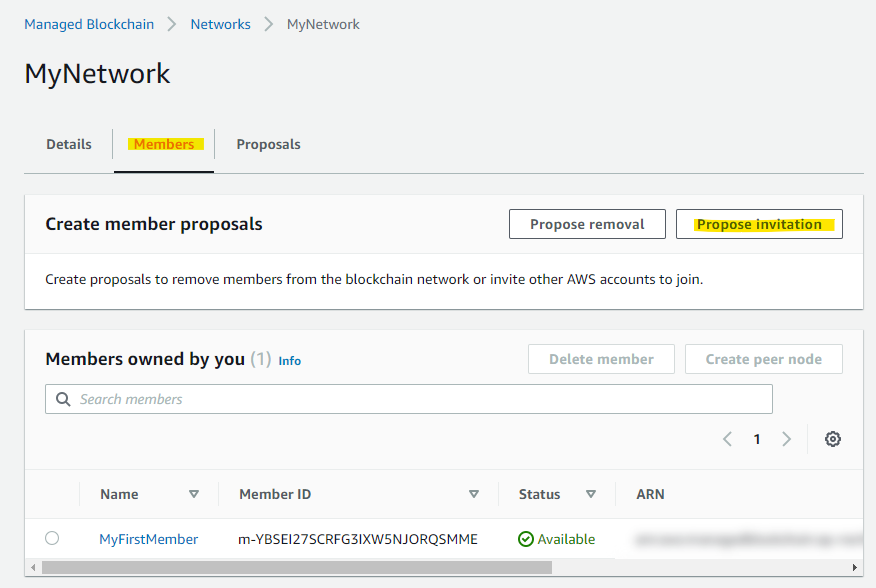
招待するために、Network の詳細画面を開きます。
Member のタブで、Propose invitation を選択
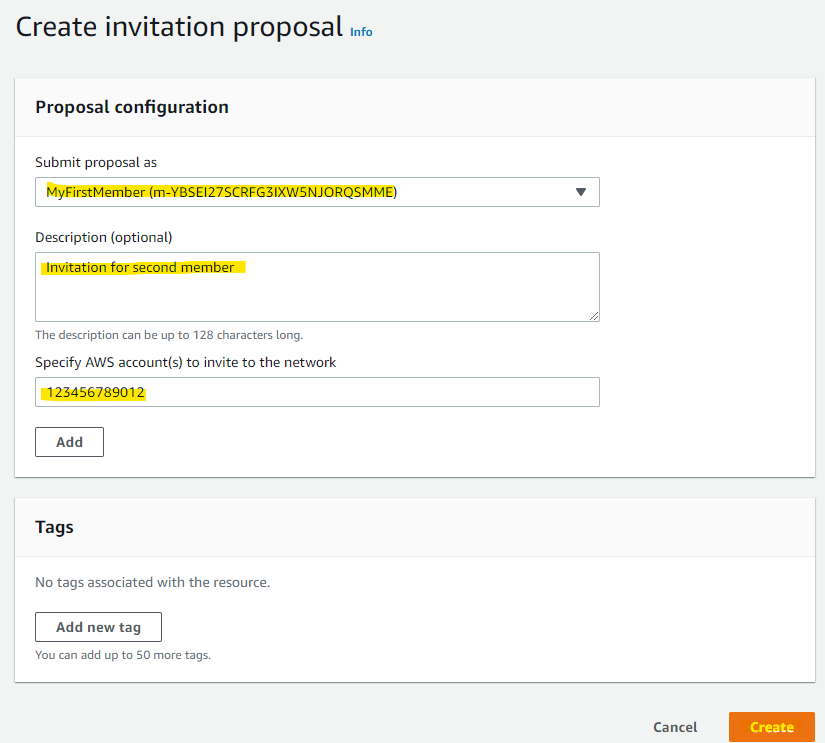
招待のためのパラメータを指定します。
- 招待先の AWS アカウント ID を指定
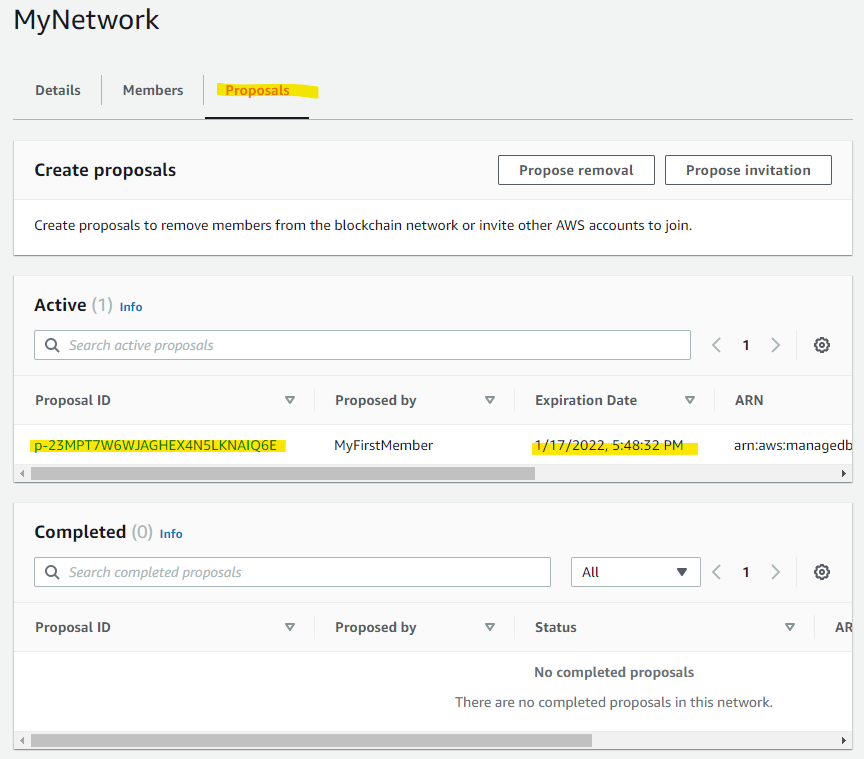
招待が作成されました。
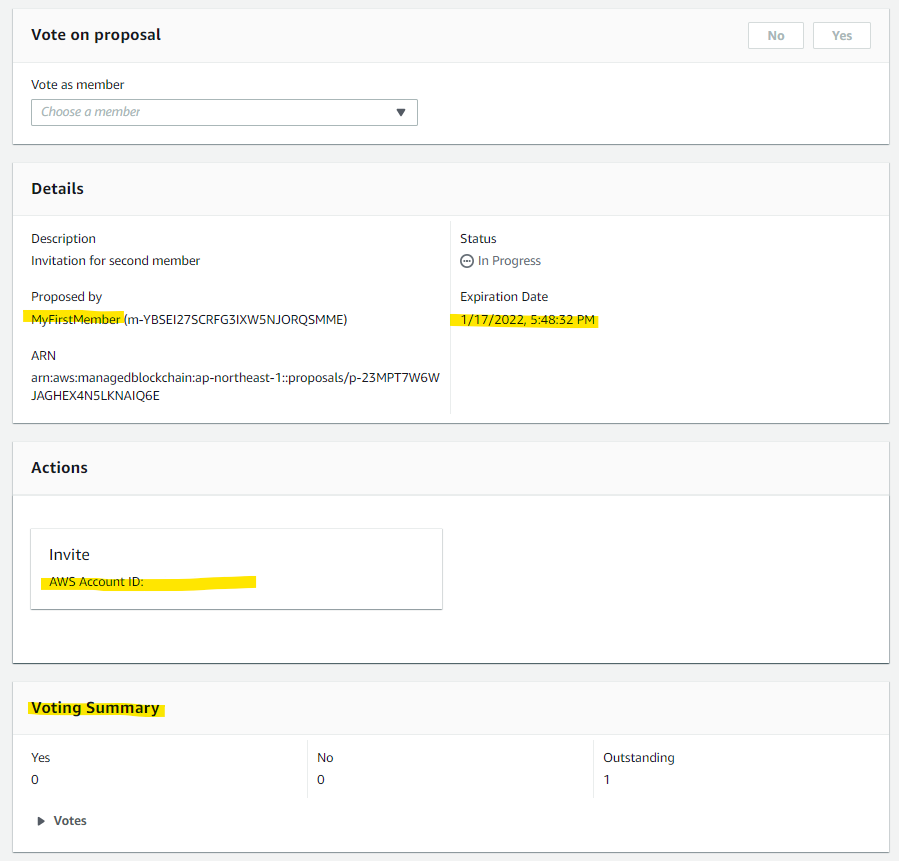
A : 承認をおこなう
招待そのものはまだ有効になっておらず、事前に設定した閾値以上の賛成票が必要です。Propose を出した Member も、手動で承認が必要です。自動でされるわけではありません。
招待の詳細ページを開きます。
こんな詳細画面となっています。
- だれによって提案されたのか
- 有効期限はいつまでか : Network作成時のポリシーに依存
- 現在の投票状況
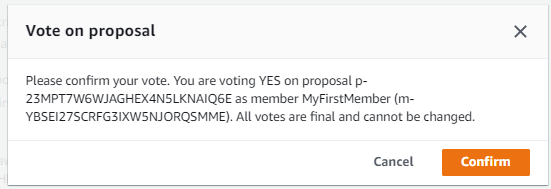
Yes を選択して、賛成に投票します。

Confirm
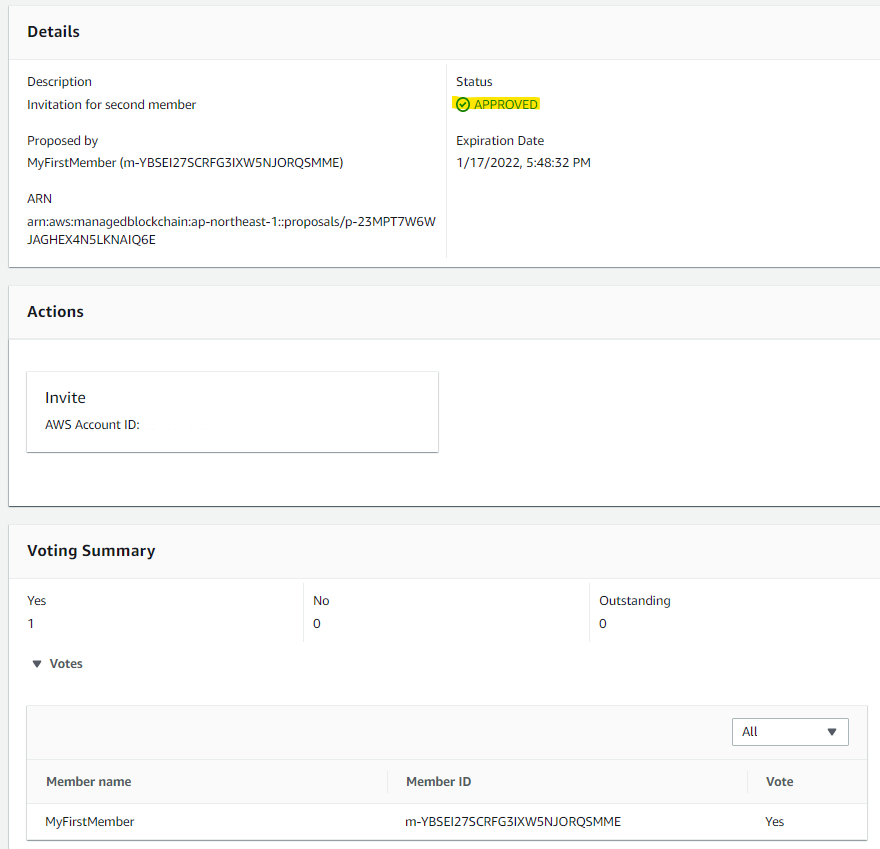
賛成票が閾値をこえたため、Status が Approved に切り替わります。
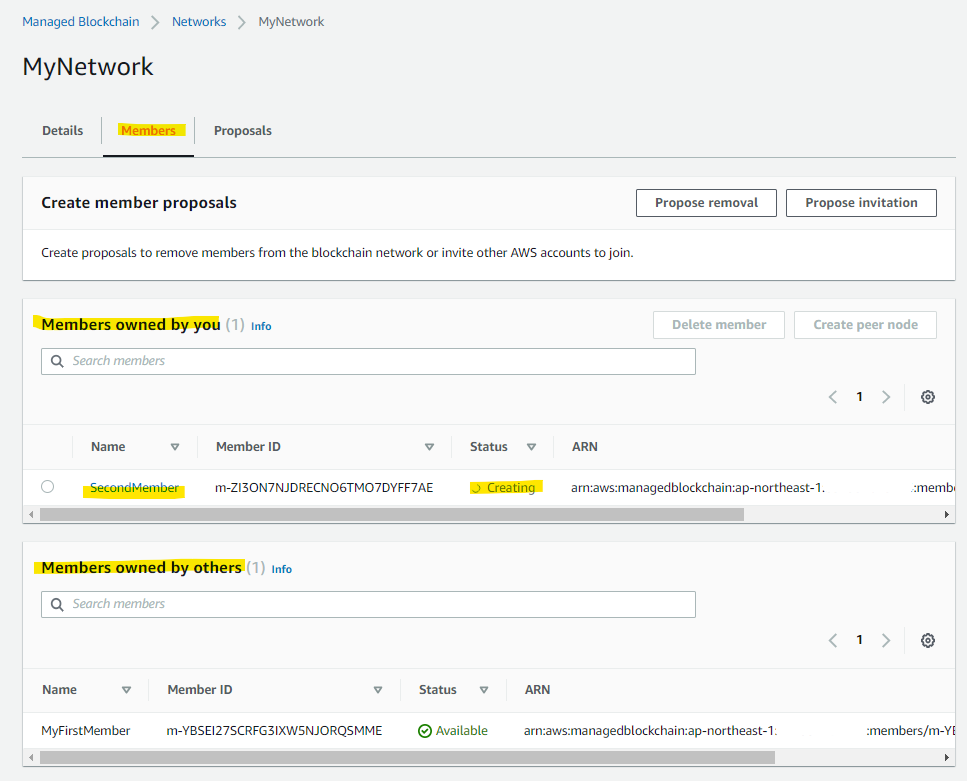
B : 招待を受け入れて、メンバーを作成する
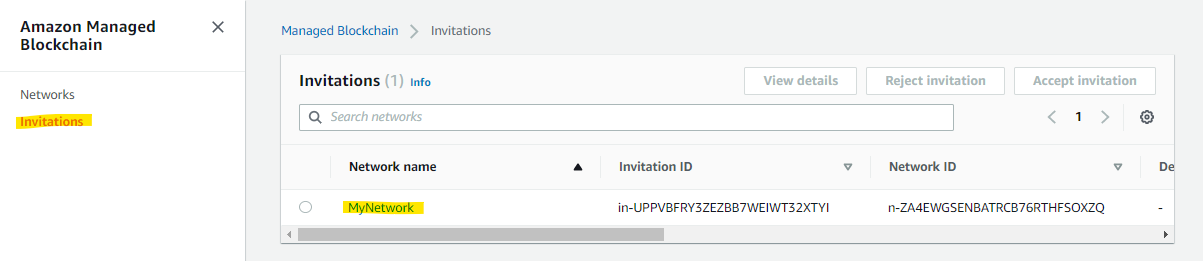
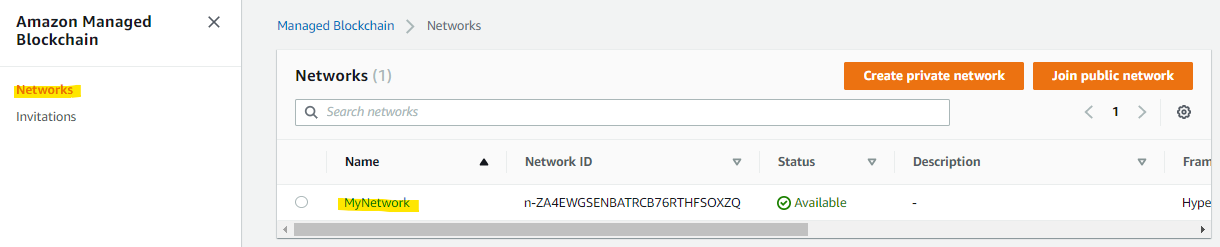
別の AWS にアカウントに切り替えます。Invitation を受けた 別のAWS アカウントでは招待を受けた状態が見えます。Invitation のメニューで、Network が見えます。
- Network を作成したリージョンと同じRegionのみ確認可能です
招待を Accept するために、詳細画面のメンバータブに移動します。
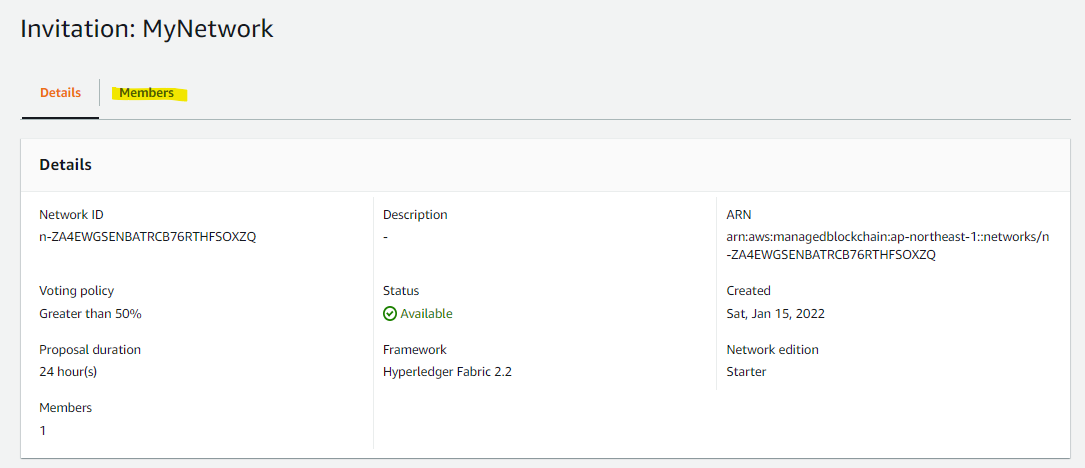
Accept します。
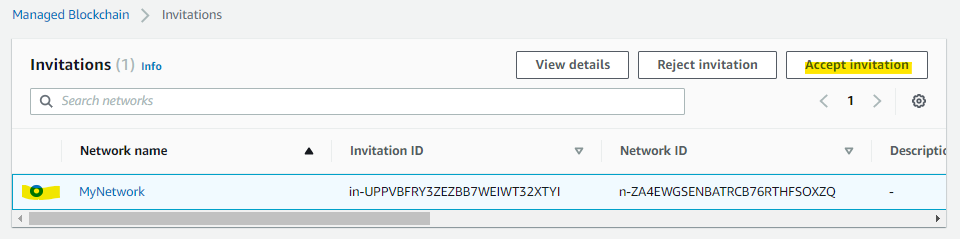
Accept するときに、自分が参加するためのメンバーを作成します。1招待 = 1 メンバーという形となっています。
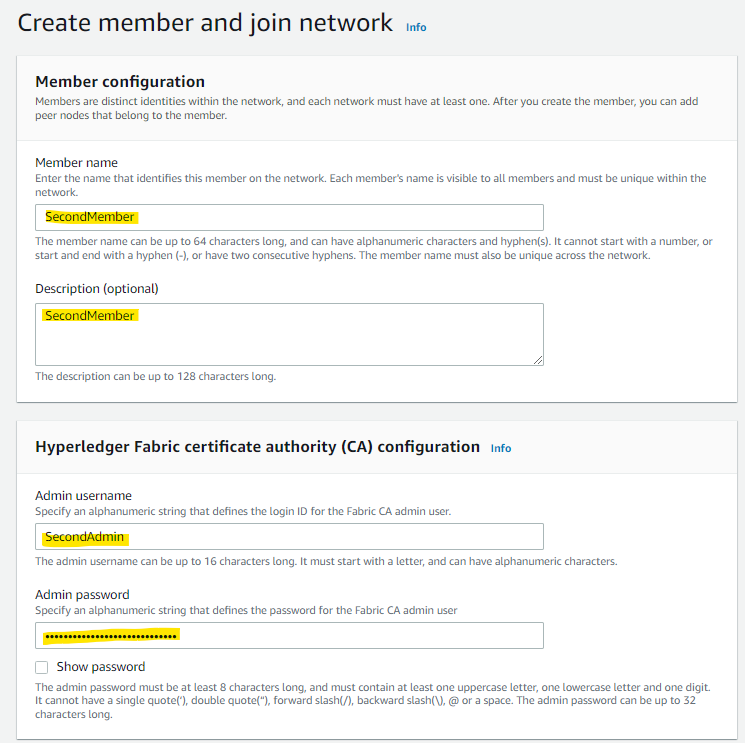
Create を押して、ネットワークに参加すると同時にメンバーを作成します。
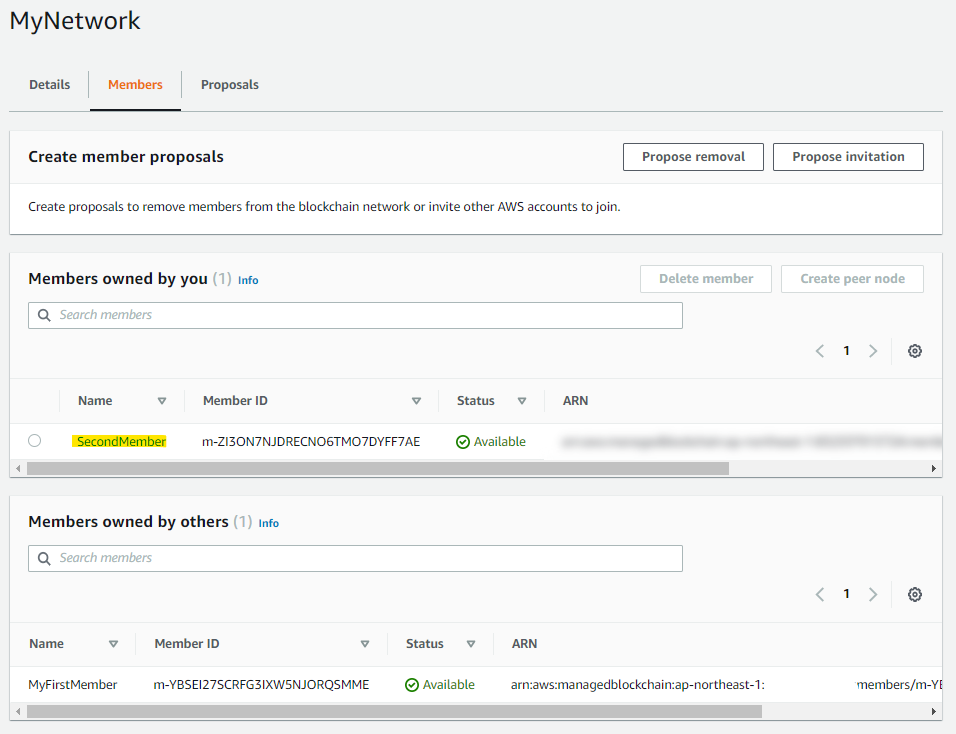
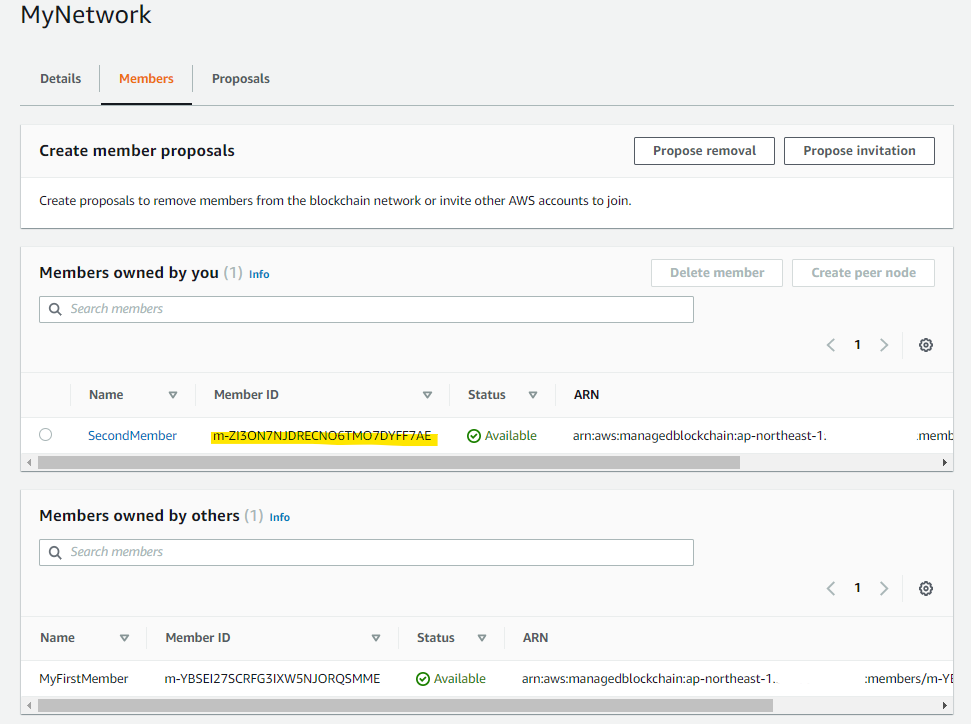
Member のページで、SecondMember が Creating となっている。一定時間後、Available に変わる。ネットワークに参加している 他のメンバー MyFirstMember も見える。
B : VPC Endpoint の作成
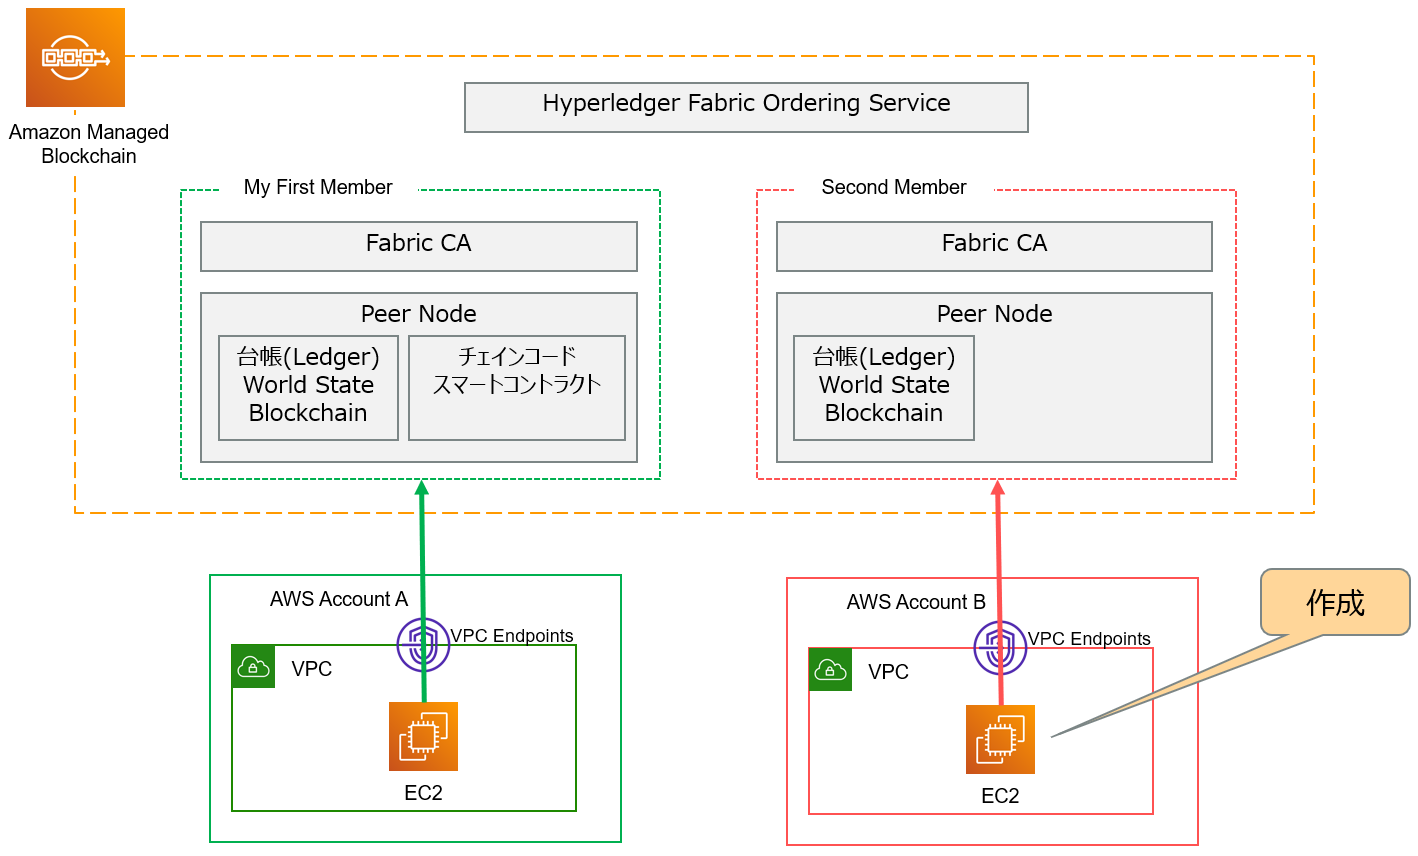
「A」の手順を参考にしながら、VPC Endpoint を作成します。構成図はこんな感じです。
手順は同じなので、詳細は省略しますが、ポイントをいくつか載せておきます。
Invitations を Accept したので、Network の画面に MyNetwork が見えている。
Network の画面に、VPC Endpoint を作成出来るようになっている。
B : ピアノードの作成
「A」の手順を参考にしながら進めます。構成図はこんな感じです。
Network の画面で、作成した Member を選択できるようになっている
Create Peer Node

B : Client の準備
「A」の手順を参考にしながら進めます。構成図はこんな感じです。
B : 管理ユーザーを登録する
「A」の手順を参考にしながら進めます。
A : 共有チャンネルを作成するための事前準備
初めに作成した MyFirstMember の Client 端末を使って、新たな SecondMember と共有するチャンネルを新規作成します。そのための前準備を行っていきます。
SecondMember の各種証明書群を、MyFirstMember の Client 端末に格納が必要です。
SecondMember Client の作業。tar gz で圧縮。
cd /home/ec2-user/temp/managed-blockchain
tar cfvz org2-admin-msp.tar.gz admin-msp
SCP で MyFirstMember の Client に渡す
scp ec2-user@XX.XX.XX.XX:/home/ec2-user/temp/managed-blockchain/org2-admin-msp.tar.gz .
scp org2-admin-msp.tar.gz ec2-user@XX.XX.XX.XX:/home/ec2-user/temp/managed-blockchain/
MyFirstMember Clientで所定の位置に格納します
mkdir /home/ec2-user/temp/managed-blockchain/org2-msp
mkdir /home/ec2-user/temp/managed-blockchain/org2-msp/admincerts
mkdir /home/ec2-user/temp/managed-blockchain/org2-msp/cacerts

mv org2-admin-msp.tar.gz org2-msp/
cd org2-msp/

tar xfvz org2-admin-msp.tar.gz

mv admin-msp moved-admin-msp

cp moved-admin-msp/admincerts/* /home/ec2-user/temp/managed-blockchain/org2-msp/admincerts
cp moved-admin-msp/cacerts/* /home/ec2-user/temp/managed-blockchain/org2-msp/cacerts
A : configtx.yaml ファイルの修正
configtx.yaml を修正して、メンバー2人分の情報を入力します。
SecondMember の ID を確認
configtx.yaml の変更前のファイルを保管しておきます。
cd /home/ec2-user/temp/managed-blockchain/
cp -p configtx.yaml configtx-old.yaml
編集
vim configtx.yaml
中身
- Org1 と Org2 が定義されている
################################################################################
#
#   ORGANIZATIONS
#
#   This section defines the organizational identities that can be referenced
#   in the configuration profiles.
#
################################################################################
Organizations:
  # Org1 defines an MSP using the sampleconfig. It should never be used
  # in production but may be used as a template for other definitions.
  - &Org1
    # Name is the key by which this org will be referenced in channel
    # configuration transactions.
    # Name can include alphanumeric characters as well as dots and dashes.
    Name: m-YBSEI27SCRFG3IXW5NJORQSMME
    # ID is the key by which this org's MSP definition will be referenced.
    # ID can include alphanumeric characters as well as dots and dashes.
    ID: m-YBSEI27SCRFG3IXW5NJORQSMME
    # SkipAsForeign can be set to true for org definitions which are to be
    # inherited from the orderer system channel during channel creation.  This
    # is especially useful when an admin of a single org without access to the
    # MSP directories of the other orgs wishes to create a channel.  Note
    # this property must always be set to false for orgs included in block
    # creation.
    SkipAsForeign: false
    Policies: &Org1Policies
      Readers:
        Type: Signature
        Rule: "OR('Org1.member', 'Org2.member')"
        # If your MSP is configured with the new NodeOUs, you might
        # want to use a more specific rule like the following:
        # Rule: "OR('Org1.admin', 'Org1.peer', 'Org1.client')"
      Writers:
        Type: Signature
        Rule: "OR('Org1.member', 'Org2.member')"
        # If your MSP is configured with the new NodeOUs, you might
        # want to use a more specific rule like the following:
        # Rule: "OR('Org1.admin', 'Org1.client')"
      Admins:
        Type: Signature
        Rule: "OR('Org1.admin')"
    # MSPDir is the filesystem path which contains the MSP configuration.
    MSPDir: /opt/home/admin-msp
    # AnchorPeers defines the location of peers which can be used for
    # cross-org gossip communication. Note, this value is only encoded in
    # the genesis block in the Application section context.
    AnchorPeers:
      - Host: 127.0.0.1
        Port: 7051
  - &Org2
    Name: m-ZI3ON7NJDRECNO6TMO7DYFF7AE
    ID: m-ZI3ON7NJDRECNO6TMO7DYFF7AE
    SkipAsForeign: false
    Policies: &Org2Policies
      Readers:
        Type: Signature
        Rule: "OR('Org2.member', 'Org1.member')"
        # If your MSP is configured with the new NodeOUs, you might
        # want to use a more specific rule like the following:
        # Rule: "OR('Org1.admin', 'Org1.peer', 'Org1.client')"
      Writers:
        Type: Signature
        Rule: "OR('Org2.member', 'Org1.member')"
        # If your MSP is configured with the new NodeOUs, you might
        # want to use a more specific rule like the following:
        # Rule: "OR('Org1.admin', 'Org1.client')"
      Admins:
        Type: Signature
        Rule: "OR('Org2.admin')"
    # MSPDir is the filesystem path which contains the MSP configuration.
    MSPDir: /opt/home/org2-msp
    # AnchorPeers defines the location of peers which can be used for
    # cross-org gossip communication. Note, this value is only encoded in
    # the genesis block in the Application section context.
    AnchorPeers:
      - Host: 127.0.0.1
        Port: 7052
################################################################################
#
#   CAPABILITIES
#
#   This section defines the capabilities of fabric network. This is a new
#   concept as of v1.1.0 and should not be utilized in mixed networks with
#   v1.0.x peers and orderers.  Capabilities define features which must be
#   present in a fabric binary for that binary to safely participate in the
#   fabric network.  For instance, if a new MSP type is added, newer binaries
#   might recognize and validate the signatures from this type, while older
#   binaries without this support would be unable to validate those
#   transactions.  This could lead to different versions of the fabric binaries
#   having different world states.  Instead, defining a capability for a channel
#   informs those binaries without this capability that they must cease
#   processing transactions until they have been upgraded.  For v1.0.x if any
#   capabilities are defined (including a map with all capabilities turned off)
#   then the v1.0.x peer will deliberately crash.
#
################################################################################
Capabilities:
  # Channel capabilities apply to both the orderers and the peers and must be
  # supported by both.
  # Set the value of the capability to true to require it.
  # Note that setting a later Channel version capability to true will also
  # implicitly set prior Channel version capabilities to true. There is no need
  # to set each version capability to true (prior version capabilities remain
  # in this sample only to provide the list of valid values).
  Channel: &ChannelCapabilities
    # V2.0 for Channel is a catchall flag for behavior which has been
    # determined to be desired for all orderers and peers running at the v2.0.0
    # level, but which would be incompatible with orderers and peers from
    # prior releases.
    # Prior to enabling V2.0 channel capabilities, ensure that all
    # orderers and peers on a channel are at v2.0.0 or later.
    V2_0: true
  # Orderer capabilities apply only to the orderers, and may be safely
  # used with prior release peers.
  # Set the value of the capability to true to require it.
  Orderer: &OrdererCapabilities
    # V1.1 for Orderer is a catchall flag for behavior which has been
    # determined to be desired for all orderers running at the v1.1.x
    # level, but which would be incompatible with orderers from prior releases.
    # Prior to enabling V2.0 orderer capabilities, ensure that all
    # orderers on a channel are at v2.0.0 or later.
    V2_0: true
  # Application capabilities apply only to the peer network, and may be safely
  # used with prior release orderers.
  # Set the value of the capability to true to require it.
  # Note that setting a later Application version capability to true will also
  # implicitly set prior Application version capabilities to true. There is no need
  # to set each version capability to true (prior version capabilities remain
  # in this sample only to provide the list of valid values).
  Application: &ApplicationCapabilities
    # V2.0 for Application enables the new non-backwards compatible
    # features and fixes of fabric v2.0.
    # Prior to enabling V2.0 orderer capabilities, ensure that all
    # orderers on a channel are at v2.0.0 or later.
    V2_0: true
################################################################################
#
#   CHANNEL
#
#   This section defines the values to encode into a config transaction or
#   genesis block for channel related parameters.
#
################################################################################
Channel: &ChannelDefaults
  # Policies defines the set of policies at this level of the config tree
  # For Channel policies, their canonical path is
  #   /Channel/<PolicyName>
  Policies:
    # Who may invoke the 'Deliver' API
    Readers:
      Type: ImplicitMeta
      Rule: "ANY Readers"
    # Who may invoke the 'Broadcast' API
    Writers:
      Type: ImplicitMeta
      Rule: "ANY Writers"
    # By default, who may modify elements at this config level
    Admins:
      Type: ImplicitMeta
      Rule: "MAJORITY Admins"
  # Capabilities describes the channel level capabilities, see the
  # dedicated Capabilities section elsewhere in this file for a full
  # description
  Capabilities:
    <<: *ChannelCapabilities
################################################################################
#
#   APPLICATION
#
#   This section defines the values to encode into a config transaction or
#   genesis block for application-related parameters.
#
################################################################################
Application: &ApplicationDefaults
  # Organizations is the list of orgs which are defined as participants on
  # the application side of the network
  Organizations:
  # Policies defines the set of policies at this level of the config tree
  # For Application policies, their canonical path is
  #   /Channel/Application/<PolicyName>
  Policies: &ApplicationDefaultPolicies
    LifecycleEndorsement:
      Type: ImplicitMeta
      Rule: "ANY Readers"
    Endorsement:
      Type: ImplicitMeta
      Rule: "ANY Readers"
    Readers:
      Type: ImplicitMeta
      Rule: "ANY Readers"
    Writers:
      Type: ImplicitMeta
      Rule: "ANY Writers"
    Admins:
      Type: ImplicitMeta
      Rule: "MAJORITY Admins"

  Capabilities:
    <<: *ApplicationCapabilities
################################################################################
#
#   PROFILES
#
#   Different configuration profiles may be encoded here to be specified as
#   parameters to the configtxgen tool. The profiles which specify consortiums
#   are to be used for generating the orderer genesis block. With the correct
#   consortium members defined in the orderer genesis block, channel creation
#   requests may be generated with only the org member names and a consortium
#   name.
#
################################################################################
Profiles:
  TwoOrgChannel:
    <<: *ChannelDefaults
    Consortium: AWSSystemConsortium
    Application:
      <<: *ApplicationDefaults
      Organizations:
        - *Org1
        - *Org2
Diff で差分を確認します。
> diff -u configtx-old.yaml configtx.yaml
--- configtx-old.yaml   2022-01-16 21:49:05.892000000 +0900
+++ configtx.yaml       2022-01-16 21:50:05.626625682 +0900
@@ -27,13 +27,13 @@
     Policies: &Org1Policies
       Readers:
         Type: Signature
-        Rule: "OR('Org1.member')"
+        Rule: "OR('Org1.member', 'Org2.member')"
         # If your MSP is configured with the new NodeOUs, you might
         # want to use a more specific rule like the following:
         # Rule: "OR('Org1.admin', 'Org1.peer', 'Org1.client')"
       Writers:
         Type: Signature
-        Rule: "OR('Org1.member')"
+        Rule: "OR('Org1.member', 'Org2.member')"
         # If your MSP is configured with the new NodeOUs, you might
         # want to use a more specific rule like the following:
         # Rule: "OR('Org1.admin', 'Org1.client')"
@@ -48,6 +48,34 @@
     AnchorPeers:
       - Host: 127.0.0.1
         Port: 7051
+  - &Org2
+    Name: m-ZI3ON7NJDRECNO6TMO7DYFF7AE
+    ID: m-ZI3ON7NJDRECNO6TMO7DYFF7AE
+    SkipAsForeign: false
+    Policies: &Org2Policies
+      Readers:
+        Type: Signature
+        Rule: "OR('Org2.member', 'Org1.member')"
+        # If your MSP is configured with the new NodeOUs, you might
+        # want to use a more specific rule like the following:
+        # Rule: "OR('Org1.admin', 'Org1.peer', 'Org1.client')"
+      Writers:
+        Type: Signature
+        Rule: "OR('Org2.member', 'Org1.member')"
+        # If your MSP is configured with the new NodeOUs, you might
+        # want to use a more specific rule like the following:
+        # Rule: "OR('Org1.admin', 'Org1.client')"
+      Admins:
+        Type: Signature
+        Rule: "OR('Org2.admin')"
+    # MSPDir is the filesystem path which contains the MSP configuration.
+    MSPDir: /opt/home/org2-msp
+    # AnchorPeers defines the location of peers which can be used for
+    # cross-org gossip communication. Note, this value is only encoded in
+    # the genesis block in the Application section context.
+    AnchorPeers:
+      - Host: 127.0.0.1
+        Port: 7052
 ################################################################################
 #
 #   CAPABILITIES
@@ -183,10 +211,11 @@
 #
 ################################################################################
 Profiles:
-  OneOrgChannel:
+  TwoOrgChannel:
     <<: *ChannelDefaults
     Consortium: AWSSystemConsortium
     Application:
       <<: *ApplicationDefaults
       Organizations:
-        - <<: *Org1
+        - *Org1
+        - *Org2
configtxピアブロックを生成
docker exec cli configtxgen \
-outputCreateChannelTx /opt/home/ourchannel.pb \
-profile TwoOrgChannel -channelID ourchannel \
--configPath /opt/home/
実行例
> docker exec cli configtxgen \
      -outputCreateChannelTx /opt/home/ourchannel.pb \
      -profile TwoOrgChannel -channelID ourchannel \
      --configPath /opt/home/
2022-01-16 12:54:35.639 UTC [common.tools.configtxgen] main -> INFO 001 Loading configuration
2022-01-16 12:54:35.644 UTC [common.tools.configtxgen.localconfig] Load -> INFO 002 Loaded configuration: /opt/home/configtx.yaml
2022-01-16 12:54:35.644 UTC [common.tools.configtxgen] doOutputChannelCreateTx -> INFO 003 Generating new channel configtx
2022-01-16 12:54:35.645 UTC [common.tools.configtxgen] doOutputChannelCreateTx -> INFO 004 Writing new channel tx
A : 共有チャンネルを作成
2つの Member が参加する共有チャンネルを作成します。
docker exec cli peer channel create -c ourchannel \
-f /opt/home/ourchannel.pb -o $ORDERER \
--cafile /opt/home/managedblockchain-tls-chain.pem --tls
AB : チャンネルジェネシスブロックを取得
MyFirstMember Client で作業を行います。
export ORDERER=orderer.n-za4ewgsenbatrcb76rthfsoxzq.managedblockchain.ap-northeast-1.amazonaws.com:30001

docker exec cli peer channel fetch oldest /opt/home/ourchannel.block \
-c ourchannel -o $ORDERER \
--cafile /opt/home/managedblockchain-tls-chain.pem --tls
実行例
> docker exec cli peer channel fetch oldest /opt/home/ourchannel.block \
      -c ourchannel -o $ORDERER \
      --cafile /opt/home/managedblockchain-tls-chain.pem --tls
2022-01-16 12:58:08.614 UTC [channelCmd] InitCmdFactory -> INFO 001 Endorser and orderer connections initialized
2022-01-16 12:58:08.622 UTC [cli.common] readBlock -> INFO 002 Received block: 0
SecondMember Client で作業を行います。
export ORDERER=orderer.n-za4ewgsenbatrcb76rthfsoxzq.managedblockchain.ap-northeast-1.amazonaws.com:30001

docker exec cli peer channel fetch oldest /opt/home/ourchannel.block \
-c ourchannel -o $ORDERER \
--cafile /opt/home/managedblockchain-tls-chain.pem --tls
実行例
$ docker exec cli peer channel fetch oldest /opt/home/ourchannel.block \
-c ourchannel -o $ORDERER \
--cafile /opt/home/managedblockchain-tls-chain.pem --tls
2022-01-16 12:59:52.493 UTC [channelCmd] InitCmdFactory -> INFO 001 Endorser and orderer connections initialized
2022-01-16 12:59:52.502 UTC [cli.common] readBlock -> INFO 002 Received block: 0
AB : Channel の参加
それぞれの Member で Channel に参加していきます。
MyFirstMember が、現在参加しているチャンネルの一覧
> docker exec cli peer channel list
2022-01-16 13:01:27.632 UTC [channelCmd] InitCmdFactory -> INFO 001 Endorser and orderer connections initialized
Channels peers has joined:
mychannel
SecondMember が、現在参加しているチャンネルの一覧
$ docker exec cli peer channel list
2022-01-16 13:01:40.053 UTC [channelCmd] InitCmdFactory -> INFO 001 Endorser and orderer connections initialized
Channels peers has joined:
MyFirstMember が新しい共有チャンネルに参加
docker exec cli peer channel join -b /opt/home/ourchannel.block \
-o $ORDERER --cafile /opt/home/managedblockchain-tls-chain.pem --tls
正常に参加できています。
> docker exec cli peer channel list
2022-01-16 13:02:16.467 UTC [channelCmd] InitCmdFactory -> INFO 001 Endorser and orderer connections initialized
Channels peers has joined:
ourchannel
mychannel
SecondMember が新しい共有チャンネルに参加
docker exec cli peer channel join -b /opt/home/ourchannel.block \
-o $ORDERER --cafile /opt/home/managedblockchain-tls-chain.pem --tls
正常に参加できています。
$ docker exec cli peer channel list
2022-01-16 13:02:42.252 UTC [channelCmd] InitCmdFactory -> INFO 001 Endorser and orderer connections initialized
Channels peers has joined:
ourchannel
B : チェインコード の Package
新環境では、チェインコードを Package していないので、まず Package をします
依存関係を解決する
cd /home/ec2-user/temp/managed-blockchain/
cd fabric-samples/chaincode/abstore/go/
GO111MODULE=on go mod vendor
元に戻る
cd /home/ec2-user/temp/managed-blockchain/
チェインコードをパッケージする
docker exec cli peer lifecycle chaincode package ./abstore.tar.gz \
--path /opt/home/fabric-samples/chaincode/abstore/go/ \
--label abstore_1
作業ディレクトリに tar.gz が作成されてる
> docker exec cli ls -la
total 2436
drwxr-xr-x    2 root     root            28 Jan 16 07:59 .
drwxr-xr-x    3 root     root            18 Jan 16 07:28 ..
-rw-------    1 root     root       2494274 Jan 16 07:59 abstore.tar.gz
Peer Node に チェインコード をインストールする
docker exec cli peer lifecycle chaincode install abstore.tar.gz
AB : チェインコード の承認
チェインコードがインストールされているか確認します
MyFirstMember
docker exec cli peer lifecycle chaincode queryinstalled
実行例
> docker exec cli peer lifecycle chaincode queryinstalled
Installed chaincodes on peer:
Package ID: abstore_1:3918d0438fd2ebe48ed1bde01533513a14f788846fd2d72ef054482760e73409, Label: abstore_1
SecondMember
docker exec cli peer lifecycle chaincode queryinstalled
実行例
> docker exec cli peer lifecycle chaincode queryinstalled
Installed chaincodes on peer:
Package ID: abstore_1:3918d0438fd2ebe48ed1bde01533513a14f788846fd2d72ef054482760e73409, Label: abstore_1
両方のメンバーで、チェインコードを利用するために賛成を投票します
- ourchannel を指定
MyFirstMember
docker exec cli peer lifecycle chaincode approveformyorg \
--orderer $ORDERER --tls --cafile /opt/home/managedblockchain-tls-chain.pem \
--channelID ourchannel --name myjointcc --version v0 --sequence 1 --package-id abstore_1:3918d0438fd2ebe48ed1bde01533513a14f788846fd2d72ef054482760e73409
SecondMember
docker exec cli peer lifecycle chaincode approveformyorg \
--orderer $ORDERER --tls --cafile /opt/home/managedblockchain-tls-chain.pem \
--channelID ourchannel --name myjointcc --version v0 --sequence 1 --package-id abstore_1:3918d0438fd2ebe48ed1bde01533513a14f788846fd2d72ef054482760e73409
投票状況の確認です。
docker exec cli peer lifecycle chaincode checkcommitreadiness \
--orderer $ORDERER --tls --cafile /opt/home/managedblockchain-tls-chain.pem \
--channelID ourchannel --name myjointcc --version v0 --sequence 1
2つのメンバー分 True が集まっており、閾値を超える賛成票となりました。
> docker exec cli peer lifecycle chaincode checkcommitreadiness \
      --orderer $ORDERER --tls --cafile /opt/home/managedblockchain-tls-chain.pem \
      --channelID ourchannel --name myjointcc --version v0 --sequence 1
chaincode definition for chaincode 'myjointcc', version 'v0', sequence '1' on channel 'ourchannel' approval status by org:
m-YBSEI27SCRFG3IXW5NJORQSMME: true
m-ZI3ON7NJDRECNO6TMO7DYFF7AE: true
chaincode のコミットをおこないます。MyFirstMember の Client で行うと、Channel 全体に反映されます。
docker exec cli peer lifecycle chaincode commit \
--orderer $ORDERER --tls --cafile /opt/home/managedblockchain-tls-chain.pem \
--channelID ourchannel --name myjointcc --version v0 --sequence 1
実行例
> docker exec cli peer lifecycle chaincode commit \
      --orderer $ORDERER --tls --cafile /opt/home/managedblockchain-tls-chain.pem \
      --channelID ourchannel --name myjointcc --version v0 --sequence 1
2022-01-16 13:15:00.143 UTC [chaincodeCmd] ClientWait -> INFO 001 txid [7ee8dab79abef1f5339c6830f7f09e41461e1347d071581ae79faa025693c4e7] committed with status (VALID) at nd-dt7645hf7vaobl3t3tuxh7ayzq.m-ybsei27scrfg3ixw5njorqsmme.n-za4ewgsenbatrcb76rthfsoxzq.managedblockchain.ap-northeast-1.amazonaws.com:30003
チェインコードが利用できる状況が確認します。
docker exec cli peer lifecycle chaincode querycommitted \
--channelID ourchannel
実行例
> docker exec cli peer lifecycle chaincode querycommitted \
      --channelID ourchannel
Committed chaincode definitions on channel 'ourchannel':
Name: myjointcc, Version: v0, Sequence: 1, Endorsement Plugin: escc, Validation Plugin: vscc
AB : チェインコードの動作確認
これまでの手順で、2つのメンバー間で、Hyperledger Fabric のトランザクションを共有できる環境が整いました!
チェインコードを動かしてみましょう!
MyFirstMember の Client で作業を行います。init を指定して、初期の値を設定します。「a」という物流センターに、100個の在庫を確保して、「b」という物流センターに200個の在庫を確保するようなイメージです。
docker exec cli peer chaincode invoke \
--tls --cafile /opt/home/managedblockchain-tls-chain.pem \
--channelID ourchannel \
--name myjointcc -c '{"Args":["init", "a", "100", "b", "200"]}'
実行例
> docker exec cli peer chaincode invoke \
      --tls --cafile /opt/home/managedblockchain-tls-chain.pem \
      --channelID ourchannel \
      --name myjointcc -c '{"Args":["init", "a", "100", "b", "200"]}'
2022-01-16 14:54:51.879 UTC [chaincodeCmd] InitCmdFactory -> INFO 001 Retrieved channel (ourchannel) orderer endpoint: nd-vco6ukvfgzcqbfev7hjbfmnquq.m-cvvx3eyk5jfppi2rvwbnsmx3bi.n-za4ewgsenbatrcb76rthfsoxzq.managedblockchain.ap-northeast-1.amazonaws.com:30001
2022-01-16 14:54:51.908 UTC [chaincodeCmd] chaincodeInvokeOrQuery -> INFO 002 chaincode invoke successful. result: status:200
値の取得を行います。「a」の数値を取得してみます。
docker exec cli peer chaincode query \
--tls --cafile /opt/home/managedblockchain-tls-chain.pem \
--channelID ourchannel \
--name myjointcc -c '{"Args":["query", "a"]}'
MyFirstMember の Client での実行例です。100の数字が取得できます。
> docker exec cli peer chaincode query \
      --tls --cafile /opt/home/managedblockchain-tls-chain.pem \
      --channelID ourchannel \
      --name myjointcc -c '{"Args":["query", "a"]}'
100
SecondMember の Client での実行例です。これも同じく、100の数字が取得できます。トランザクションが共有されており、それぞれの Member の Peer Node を使って、値を確認できます。
$ docker exec cli peer chaincode query \
> --tls --cafile /opt/home/managedblockchain-tls-chain.pem \
> --channelID ourchannel \
> --name myjointcc -c '{"Args":["query", "a"]}'
100
b の値も確認してみましょう。それぞれ200となっております。
MyFirstMember の Client での実行例です。
> docker exec cli peer chaincode query \
      --tls --cafile /opt/home/managedblockchain-tls-chain.pem \
      --channelID ourchannel \
      --name myjointcc -c '{"Args":["query", "b"]}'
200
SecondMember の Client での実行例です。
> docker exec cli peer chaincode query \
      --tls --cafile /opt/home/managedblockchain-tls-chain.pem \
      --channelID ourchannel \
      --name myjointcc -c '{"Args":["query", "b"]}'
200
次に、invoke を指定します。「a」物流センターから、「b」物流センターに 10 の在庫を移動するイメージです。
MyFirstMember の Client で実行します。
docker exec cli peer chaincode invoke \
--tls --cafile /opt/home/managedblockchain-tls-chain.pem \
--channelID ourchannel \
--name myjointcc -c '{"Args":["invoke", "a", "b", "10"]}'
実行例
> docker exec cli peer chaincode invoke \
      --tls --cafile /opt/home/managedblockchain-tls-chain.pem \
      --channelID ourchannel \
      --name myjointcc -c '{"Args":["invoke", "a", "b", "10"]}'
2022-01-16 14:59:39.124 UTC [chaincodeCmd] InitCmdFactory -> INFO 001 Retrieved channel (ourchannel) orderer endpoint: nd-vco6ukvfgzcqbfev7hjbfmnquq.m-cvvx3eyk5jfppi2rvwbnsmx3bi.n-za4ewgsenbatrcb76rthfsoxzq.managedblockchain.ap-northeast-1.amazonaws.com:30001
2022-01-16 14:59:39.153 UTC [chaincodeCmd] chaincodeInvokeOrQuery -> INFO 002 chaincode invoke successful. result: status:200
a が 90 に減っているか確認してみます。
docker exec cli peer chaincode query \
--tls --cafile /opt/home/managedblockchain-tls-chain.pem \
--channelID ourchannel \
--name myjointcc -c '{"Args":["query", "a"]}'
実行例
MyFirstMember、SecondMember 、両方とも同じ結果となっています。
> docker exec cli peer chaincode query \
      --tls --cafile /opt/home/managedblockchain-tls-chain.pem \
      --channelID ourchannel \
      --name myjointcc -c '{"Args":["query", "a"]}'
90
b に 10 が移動している
MyFirstMember、SecondMember 、両方とも同じ結果となっています。
> docker exec cli peer chaincode query \
      --tls --cafile /opt/home/managedblockchain-tls-chain.pem \
      --channelID ourchannel \
      --name myjointcc -c '{"Args":["query", "b"]}'
210
この検証を通じてわかったこと
- 複数の AWS アカウントで Network に参加可能
- Region は同一である必要あり
- Edition の違いがあり、Starter Edition は検証用途で Standard Edition は本番用途での利用が向いている。詳細な違いは、FAQ に違いがある。
- https://aws.amazon.com/jp/managed-blockchain/faqs/
- インスタンスタイプの違い、1ネットワークあたりのメンバーの最大数、1メンバーあたりのピアノードの最大数などが異なる。
- Hyperledger Fabric を基本的にはそのまま利用できるため、Hyperledger Fabric の知見を活かしてスムーズに扱うことが出来る
参考URL
AWS Document Getting Started
https://docs.aws.amazon.com/managed-blockchain/latest/hyperledger-fabric-dev/managed-blockchain-get-started-tutorial.html