はじめに
Amplify には、フロントエンドエンジニア向けに、バックエンドサーバー群を自動生成する機能があります。GraphQL のスキーマファイルを定義するだけで、AWS 側の AppSync、DynamoDB などから構成されるバックエンドサーバー群を自動生成できます。また、このバックエンドサーバーにクエリーをするための、フロントエンドの API 群も自動生成されます。例えば、React や Vue.js 上で、自動生成された API を使って、簡単に GraphQL にクエリーが出来る用になるため、バックエンドサーバーエンジニアが居ない環境で便利に利用できると言えます。
具体例を上げてみましょう。次のように、GraphQL スキーマで、Todo モデルを定義したとします。
type Todo @model {
  id: ID!
  name: String!
  description: String
}
この 5 行の GraphQL スキーマファイルを定義したあとに、amplify push コマンドを実行するだけで、AWS 側で AppSync や DynamoDB が自動構成され、Todo を管理できるバックエンドサーバーが出来上がります。
amplify push
また、AWS 側のバックエンドサーバーにアクセスするためのフロントエンドの API も自動生成されています。一つ具体例を挙げると、Todo の一覧を取得したいとき、import した listTodos を呼びだすだけで、バックエンドサーバー経由で Todo の一覧を取得できます。
import { API } from 'aws-amplify'
import { listTodos } from './graphql/queries'

const result = await API.graphql(graphqlOperation(listTodos))
console.log(result)
このようにバックエンドサーバー側を手動で構築せず、GraphQL を使ったバックエンドサーバーを自動生成できるのが Amplify の大きな特徴の一つです。
データの関連性
GraphQL のスキーマについてです。扱うシステムによっては、モデル間の関連性を表現したいときがあります。Amplify では、@hasOne, @hasMany, @belongsTo, @manyToMany といった指定で、モデル間の関係を表現できます。
| Relationship | Description |
|---|---|
@hasOne |
2つのモデル間に一方向の1対1の関係を作成する。例えば、プロジェクトはチームを「1つ」持っている。これにより、プロジェクトのレコードからチームに問い合わせることができる。 |
@hasMany |
2つのモデル間に一方向の一対多のリレーションを作成します。例えば、Post が多くの Comment を持っているとします。これにより、Postのレコードからすべての Comment を照会することができます。 |
@belongsTo |
@belongsTo リレーションシップを使用すると、「has one」または「has many」リレーションシップを双方向にすることができる。例えば、プロジェクトは1つのチームを持ち、チームはプロジェクトに所属している。これにより、プロジェクトのレコードからチームに問い合わせたり、逆にプロジェクトのレコードからチームに問い合わせたりすることができる。 |
@manyToMany |
多対多の関係を促進するために、2つのモデル間で「結合テーブル」を構成します。例えば、ブログは多くのタグを持ち、タグは多くのブログを持つとします。 |
一つ例を上げます。次のように、@hasMany でデータの関連性を表現することが出来ます。
- 1 個の Blog は、複数の Post を持つ
- 1 個の Post は、複数の Blog を持つ
type Blog @model {
  id: ID!
  name: String!
  posts: [Post] @hasMany
}

type Post @model {
  id: ID!
  title: String!
  comments: [Comment] @hasMany
}

type Comment @model {
  id: ID!
  content: String!
}
上の GraphQL データスキーマを使って、Amplify で自動生成すると、DynamoDB には、次の3個のテーブルが作成されます。
Blog と Post と Comment の3種類のテーブルが作成され、それぞれのテーブル間の関連性を表現する blogPostId や postCommentsId の列が生成されます。次の概要図をご覧いただければ、イメージが付きやすいと思います。

詳細が気になる方は、次の Document をご参照ください。
この @hasMany を使ったときに、どのようなテーブル構成となるのか不明だったので、検証をしながら確認をしていきます。また、N+1 問題と呼ばれるパフォーマンス上の考慮点もあり、これも確認をしていきます。
React と Amplify でプロジェクト作成
まず、React と Amplify でプロジェクトを適当に作成します。
作業用ディレクトリを作成
mkdir ~/amplifydir/
cd ~/amplifydir/
React の Project 作成
npx create-react-app transformverv2
動作確認で、Localhost で React の起動
cd ~/amplifydir/transformverv2
npm start
amplify init で、React のプロジェクトに Amplify を追加していきます。
cd ~/amplifydir/transformverv2
amplify init
色々 amplify で聞かれますが、デフォルトのまま。
? Enter a name for the project transformverv2
The following configuration will be applied:

Project information
| Name: transformverv2
| Environment: dev
| Default editor: Visual Studio Code
| App type: javascript
| Javascript framework: react
| Source Directory Path: src
| Distribution Directory Path: build
| Build Command: npm run-script build
| Start Command: npm run-script start

? Initialize the project with the above configuration? Yes
Using default provider  awscloudformation
自動的に CloudFormation を使った Provisioning がが走ります。
処理終了後の amplify status はこちら。Env が dev 以外何も作成されていない。
> amplify status
⚠️ Amplify command hooks are disabled in the current execution environment.
⚠️ See https://docs.amplify.aws/cli/usage/command-hooks/ for more information.

    Current Environment: dev

┌──────────┬───────────────┬───────────┬─────────────────┐
│ Category │ Resource name │ Operation │ Provider plugin │
└──────────┴───────────────┴───────────┴─────────────────┘
AppSync の API を追加
ここからが、GraphQL の API を追加する部分です。
add api で追加する
amplify add api
GraphQL を選択
? Select from one of the below mentioned services:
❯ GraphQL
  REST
デフォルトのまま認証方式は、API Key にしておく。(実際には、Cognito や IAM の選択肢になることも多いと思う)
? Here is the GraphQL API that we will create. Select a setting to edit or continue (Use arrow keys)
  Name: transformverv2
  Authorization modes: API key (default, expiration time: 365 days from now)
  Conflict detection (required for DataStore): Disabled
❯ Continue
One-to-many relationship を選択してみる
? Choose a schema template:
  Single object with fields (e.g., “Todo” with ID, name, description)
❯ One-to-many relationship (e.g., “Blogs” with “Posts” and “Comments”)
  Blank Schema
Schema は変更しない
Edit your schema at /home/ec2-user/amplifydir/transformverv2/amplify/backend/api/transformverv2/schema.graphql or place .graphql files in a directory at /home/ec2-user/amplifydir/transformverv2/amplify/backend/api/transformverv2/schema
✔ Do you want to edit the schema now? (Y/n) · no
✅ Successfully added resource transformverv2 locally

✅ Some next steps:
"amplify push" will build all your local backend resources and provision it in the cloud
"amplify publish" will build all your local backend and frontend resources (if you have hosting category added) and provision it in the cloud
次の GraphQL の Schema ファイルが生成されます。
/home/ec2-user/amplifydir/transformverv2/amplify/backend/api/transformverv2/schema.graphql
# This "input" configures a global authorization rule to enable public access to
# all models in this schema. Learn more about authorization rules here: https://docs.amplify.aws/cli/graphql/authorization-rules
input AMPLIFY { globalAuthRule: AuthRule = { allow: public } } # FOR TESTING ONLY!

type Blog @model {
  id: ID!
  name: String!
  posts: [Post] @hasMany
}

type Post @model {
  id: ID!
  title: String!
  blog: Blog @belongsTo
  comments: [Comment] @hasMany
}

type Comment @model {
  id: ID!
  post: Post @belongsTo
  content: String!
}
@hasMany と @belongsTo の両方が定義されていますが、@hasMany 単体の挙動を確認したいので、次のように変更します。
# This "input" configures a global authorization rule to enable public access to
# all models in this schema. Learn more about authorization rules here: https://docs.amplify.aws/cli/graphql/authorization-rules
input AMPLIFY { globalAuthRule: AuthRule = { allow: public } } # FOR TESTING ONLY!

type Blog @model {
  id: ID!
  name: String!
  posts: [Post] @hasMany
}

type Post @model {
  id: ID!
  title: String!
  comments: [Comment] @hasMany
}

type Comment @model {
  id: ID!
  content: String!
}
この段階で、Amplify push で AWS 側に反映していく。
まずは status を確認する
> amplify status
⚠️ Amplify command hooks are disabled in the current execution environment.
⚠️ See https://docs.amplify.aws/cli/usage/command-hooks/ for more information.

    Current Environment: dev

┌──────────┬────────────────┬───────────┬───────────────────┐
│ Category │ Resource name  │ Operation │ Provider plugin   │
├──────────┼────────────────┼───────────┼───────────────────┤
│ Api      │ transformverv2 │ Create    │ awscloudformation │
└──────────┴────────────────┴───────────┴───────────────────┘

GraphQL transformer version: 2
つぎに push をして、AWS 側の AppSync や、DynamoDB、フロントエンドの API コードを自動生成していきます。
amplify push
DynamoDB のデータ構造の確認
ここまでの手順で、Amplify を使ってバックエンドサーバー側として、AppSync と DynamoDB の自動生成を行いました。@hasManyのデータ構造を確認するために、いくつかテストデータを入れていきましょう。
データを入れる
AppSync では、マネージメントコンソールでクエリーを実行できる画面が用意されています。この記事では、これを使っていきます。

まずは、一番親のモデルである Blog を作成するため、mutation を実行します。
- id や name を指定
mutation CreateBlog {
  createBlog(input: {id: "blog001", name: "MyBlog01"}) {
    id
  }
}
この Blog に紐づく形で、Post を2つ作成
-
blogPostsIdに、親の Blog ID を付与
mutation CreatePost1 {
  createPost(input: {id: "post001", title: "MyPost01", blogPostsId: "blog001"}) {
    id
  }
}

mutation CreatePost2 {
  createPost(input: {id: "post002", title: "MyPost02", blogPostsId: "blog001"}) {
    id
  }
}
上記 Post に紐づく形で、Comment を 4 つ作成
-
postCommentsIdに postid を付与
mutation CreateComment1 {
  createComment(input: {id: "comment001", content: "MyCommec01", postCommentsId: "post001"}) {
    id
  }
}

mutation CreateComment2 {
  createComment(input: {id: "comment002", content: "MyCommec02", postCommentsId: "post001"}) {
    id
  }
}

mutation CreateComment3 {
  createComment(input: {id: "comment003", content: "MyCommec03", postCommentsId: "post002"}) {
    id
  }
}

mutation CreateComment4 {
  createComment(input: {id: "comment004", content: "MyCommec04", postCommentsId: "post002"}) {
    id
  }
}
データを取得
データを登録できたので、以下のクエリーを投げてみます
- blog001 に紐づく、すべての Post と すべての Comment を取得
query MyQuery {
  getBlog(id: "blog001") {
    id
    name
    posts {
      items {
        id
        title
        comments {
          items {
            id
            content
          }
        }
      }
    }
  }
}
実行例
- Blog01 に紐づく2つの Post と、それに紐づく 4 つの Comment を、1回のクエリーで取得できる
{
  "data": {
    "getBlog": {
      "id": "blog001",
      "name": "MyBlog01",
      "posts": {
        "items": [
          {
            "id": "post001",
            "title": "MyPost01",
            "comments": {
              "items": [
                {
                  "id": "comment002",
                  "content": "MyCommec02"
                },
                {
                  "id": "comment001",
                  "content": "MyCommec01"
                }
              ]
            }
          },
          {
            "id": "post002",
            "title": "MyPost02",
            "comments": {
              "items": [
                {
                  "id": "comment004",
                  "content": "MyCommec04"
                },
                {
                  "id": "comment003",
                  "content": "MyCommec03"
                }
              ]
            }
          }
        ]
      }
    }
  }
}
データ構造
このときのデータ構造を、図として表現するとこんな感じになります。

DynamoDB に投げられるクエリーの確認
ここまでの手順で、Amplify の裏側で生成される DynamoDB のデータ構造が理解できました。ここからは、Amplify 経由で投げるクエリーが、DynamoDB としてどのようなリクエストがやってくるのか確認をしていきます。
結論から記載すると、AppSync としては 1 回のクエリーが実行されている裏側で、DynamoDB は複数のクエリーを処理しています。表現を変えると、データ容量が多い状況では N+1 問題が起こりえることもあるので、データ容量などの要件を基に適切に設計する必要があります。
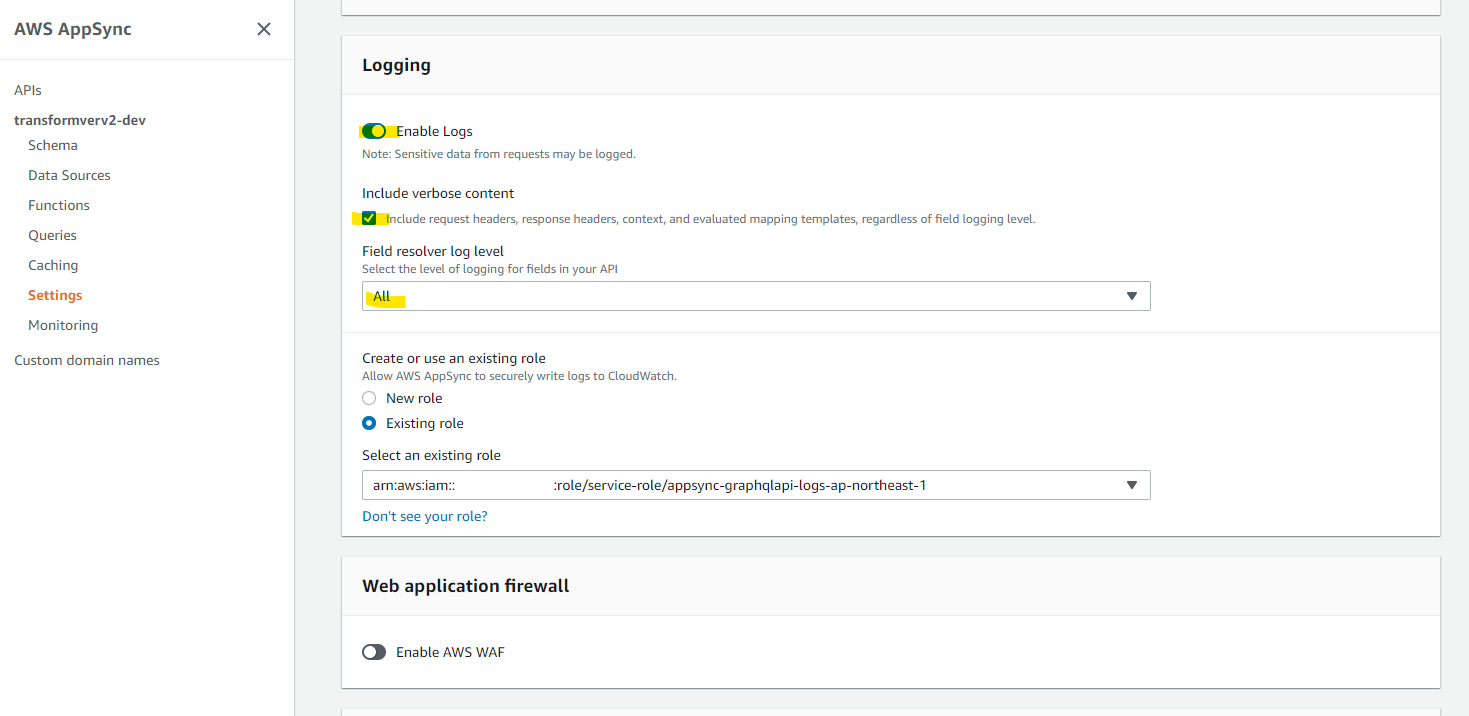
それでは確認をしていきます。まず、AppSync のログを有効化をします。
- include verbose content を ON
- Field resolver log level を ON
有効化が終わったあとに、AppSync としてクエリーを実行します。
-
blog001に紐づくすべての Post と、Comment を取得
query MyQuery {
  getBlog(id: "blog001") {
    id
    name
    posts {
      items {
        id
        title
        comments {
          items {
            id
            content
          }
        }
      }
    }
  }
}

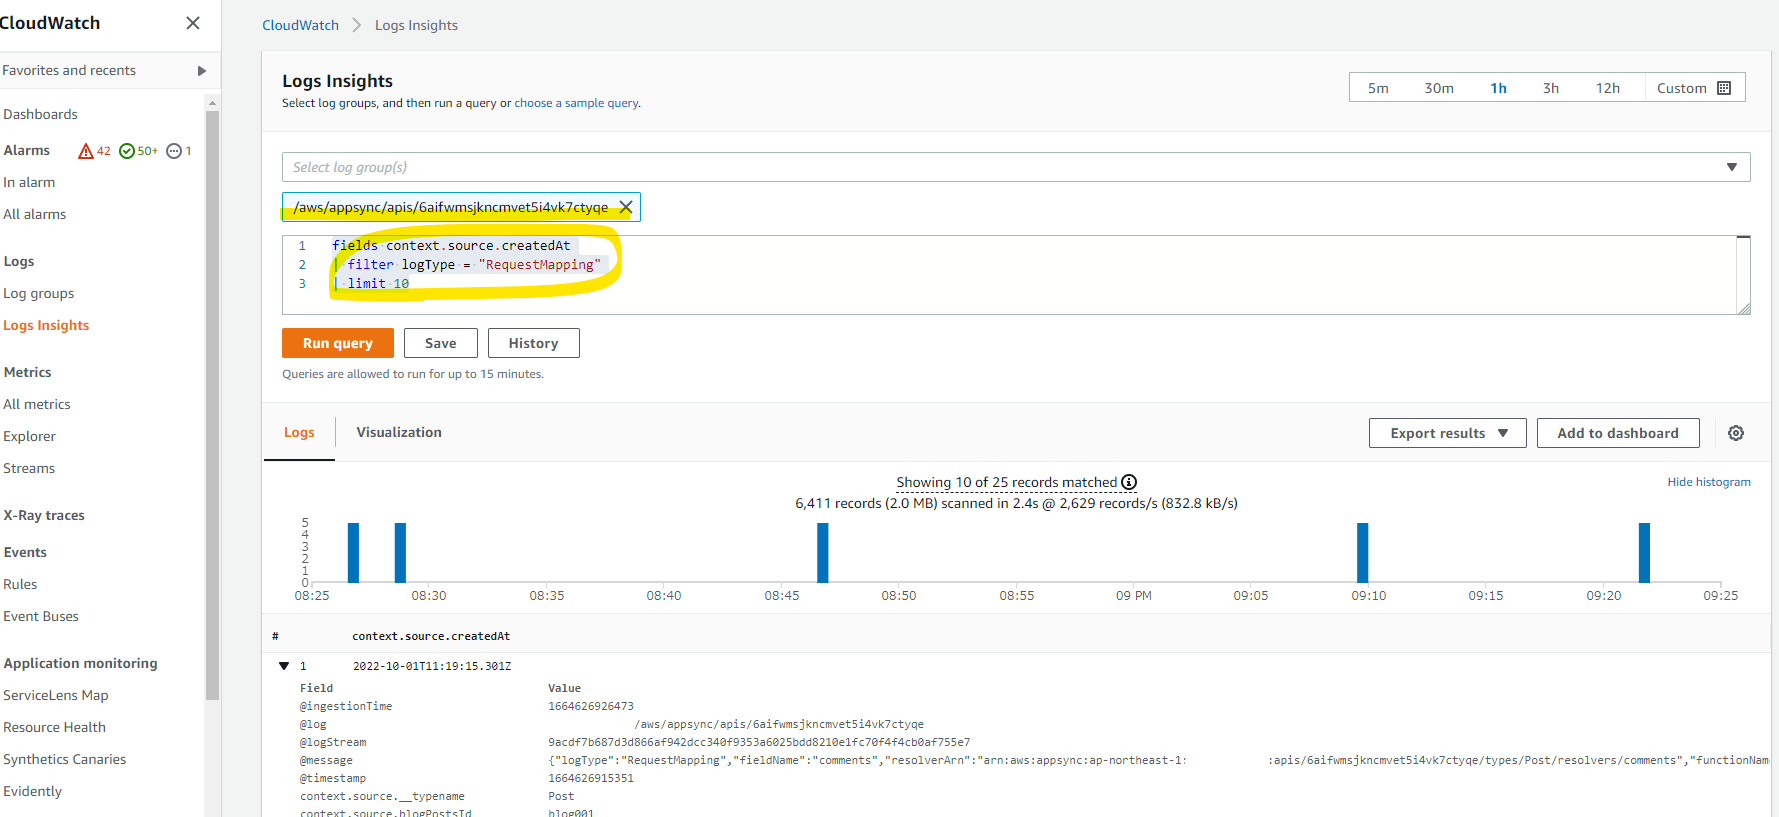
AppSync で生成されたログは、CloudWatch Logs に流れます。簡単に検索するために、CloudWatch Logs Insights を使っていきます。CloudWatch Logs 上で、logType RequestMapping を見ると、DynamoDB へリクエストするクエリーを確認できます。
fields @timestamp
| filter logType = "RequestMapping"
| limit 100
- 時刻を右上の 5m を選択して、直近5分を検索範囲にする
- logType
RequestMappingを指定して検索
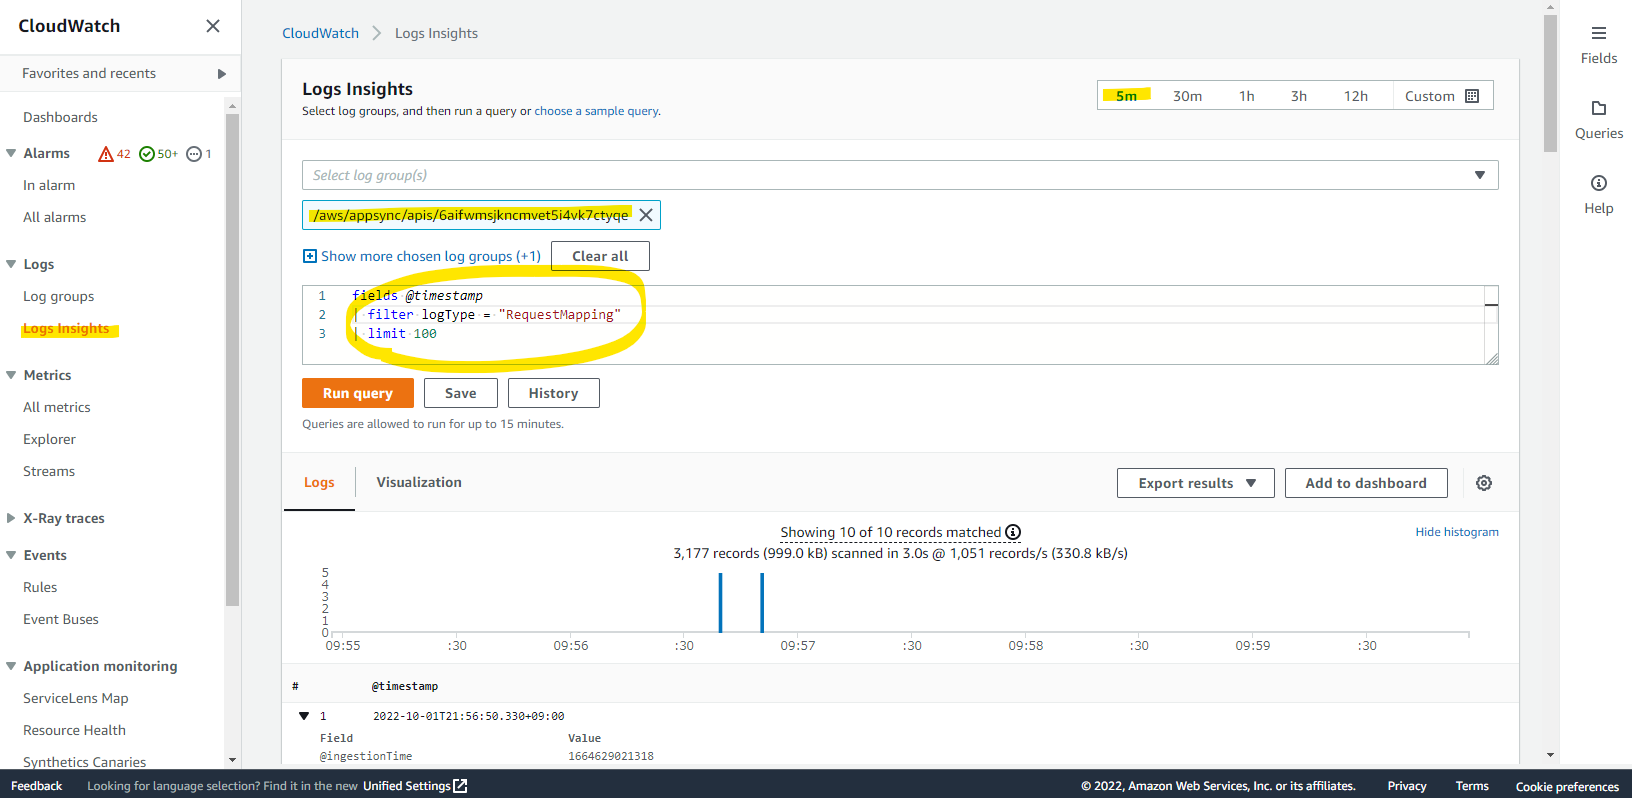
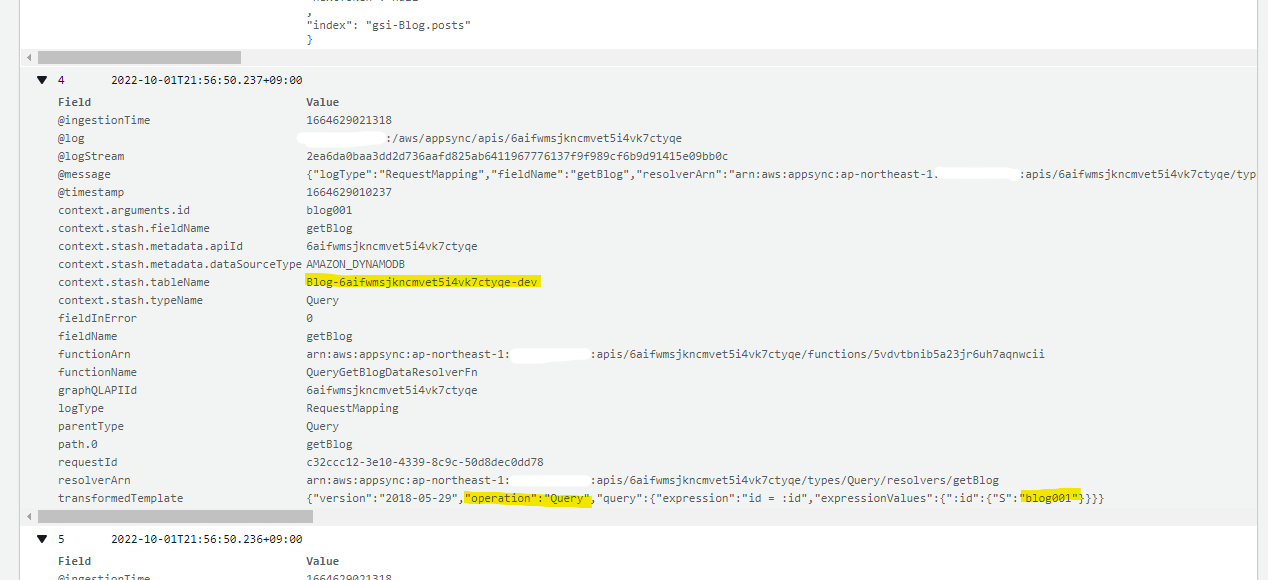
この検索で引っかかったログです。
-
context.stash.tableName: 検索対象の DynamoDB テーブル名 -
transformedTemplate: DynamoDB 側に流れるリクエストが表示されている。operation : Queryと表示されており、全データ取得する scan は利用されていない点などがわかる
ログの見方を基に、どのように AppSync の裏側で DynamoDB にクエリーが実行されるか調査しました。結論から書くと、この記事の状況では 1 回の AppSync へのリクエストの裏側で、4回の DynamoDB のリクエストが処理されています。下の概要図をご覧ください。blog001 に紐づく Post や Comment のデータを全て取得するので、それぞれのテーブルで複数回のリクエストが発生する形になっています。

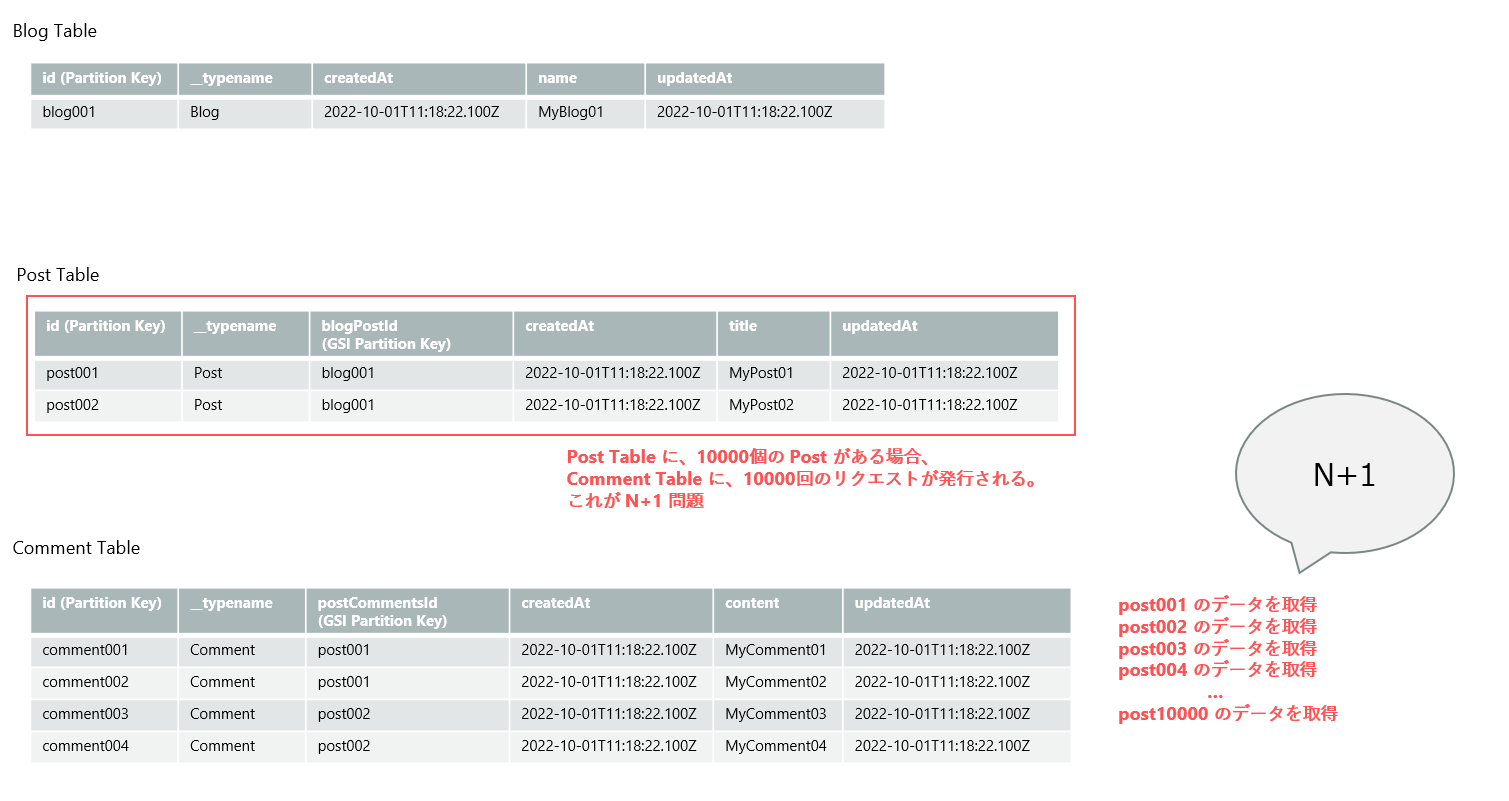
N+1 問題について
ここで、データの数がどんどん増えてくると、N+1 問題が出てきます。簡単に図で表現しました。例えば、Post Table に 10,000 個の Post が有るとします。これに紐づく Comment を全て取得しようとすると、Comment テーブルに対して、10,000 回のデータ取得リクエストが発行されます。
親の数が増えるたびに、子からデータを取得する処理が増える問題は N+1 と言われています。通常の RDBMS でも発生しますが、Amplify の裏側でももちろん発生します。特にデータ容量が多い場合だったり、高速なパフォーマンスが求められる使い方のときには注意が必要となっています。
こういった N+1 問題が発生しそうな状況となったら、BatchGetItem API を使って複数のデータを取得する方法が紹介されています。
- https://www.youtube.com/watch?v=-jd8aQpIiNU : 23:12 付近
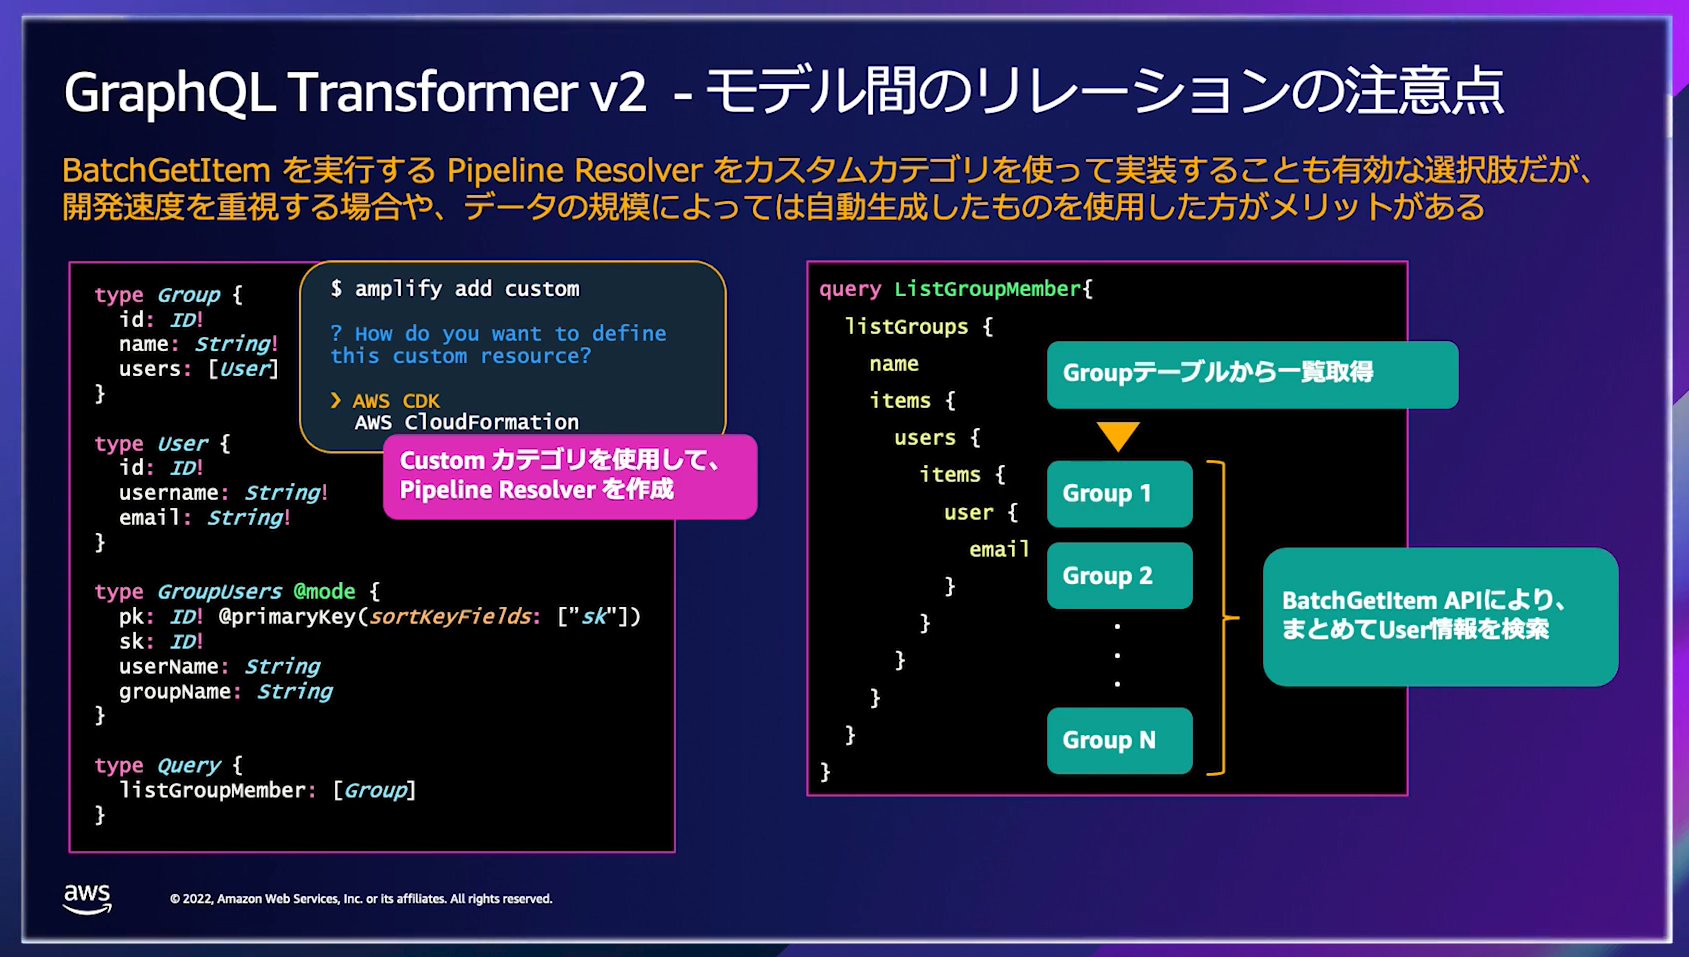
ただ、Amplify の自動生成の範囲から外れた手法になるので、開発のフェーズやデータ容量などを基に検討するのが良いと思います。開発するプロダクトが初期フェーズで、それほどデータ容量が多くない場合は、まずは Amplify の自動生成の範囲でやっていくこともアリだと思います。
また、他の DynamoDB のベストプラクティスが記載されている Document もあるので、このあたりもご活用いただけます。
- https://docs.aws.amazon.com/ja_jp/amazondynamodb/latest/developerguide/bp-adjacency-graphs.html
- https://docs.aws.amazon.com/ja_jp/amazondynamodb/latest/developerguide/bp-gsi-overloading.html
付録1 : AppSync の裏側で DynamoDB に投げられるリクエストログ
1個目
- Blog テーブルで、Partition Key を対象に、
blog001で Query
{"version":"2018-05-29","operation":"Query","query":{"expression":"id = :id","expressionValues":{":id":{"S":"blog001"}}}}
2個目
- Post テーブルで、GSI を対象に、
blog001で Query
{
"version": "2018-05-29",
"operation": "Query",
"query": {"expression":"#partitionKey = :partitionKey","expressionNames":{"#partitionKey":"blogPostsId"},"expressionValues":{":partitionKey":{"S":"blog001"}}},
"scanIndexForward": true
,
"filter": null
,
"limit": 100,
"nextToken": null
,
"index": "gsi-Blog.posts"
}
3個目
- Comment テーブルで、GSI を対象に
post001で Query
{
"version": "2018-05-29",
"operation": "Query",
"query": {"expression":"#partitionKey = :partitionKey","expressionNames":{"#partitionKey":"postCommentsId"},"expressionValues":{":partitionKey":{"S":"post001"}}},
"scanIndexForward": true
,
"filter": null
,
"limit": 100,
"nextToken": null
,
"index": "gsi-Post.comments"
}
4個目
- Commentテーブルで、GSI を対象に
post002で Query
{
"version": "2018-05-29",
"operation": "Query",
"query": {"expression":"#partitionKey = :partitionKey","expressionNames":{"#partitionKey":"postCommentsId"},"expressionValues":{":partitionKey":{"S":"post002"}}},
"scanIndexForward": true
,
"filter": null
,
"limit": 100,
"nextToken": null
,
"index": "gsi-Post.comments"
}
付録2 : AppSync のクエリー取得件数が制限されているマッピングテンプレートの場所
Amplify 経由で利用する AppSync や、DynamoDB には、一度のクエリーで取得できるデータに制限があります。制限を超えて取得したいときは、NextToken が生成されるので、それで再度クエリーを実行すると、制限を超えたデータを再帰的に取得できます。詳細は、次の記事にかかれています。
制限について
-
容量の制限 : DynamoDB には、一回のクエリーで 1MB までしか取得できない制限がある
-
取得するデータ数の制限 : デフォルトだと 100 件まで
取得するデータ数の制限については、AppSync のマッピングテンプレートに埋め込まれています。例えば、自動生成された AppSync 側の Functions から、QueryListBlogsDataResolverFn を選択します。

Mapping Template に、$limit が 100 と指定されています。

上記の数値を変更してもよいですし、Query 実行時に Limit を指定することも可能。
query MyQuery {
  listEmployees(limit: 1000) {
    items {
      id
      name
      company
    }
  }
}
検証を通じてわかったこと
-
Amplify でモデル間の関連性を示す
@hasManyなどの指定て、簡単にデータの関連性を表現できて、GraphQL をつかってデータを取得できて便利- 一方、N+1 問題が発生する可能性もあるので注意
- データの数が増える時や、パフォーマンスが求められるような使い方をしているときには、裏側のデータの仕組みを考慮する時が出てくる
- 裏側の仕組みをしらずに、使い始められる Amplify の特徴から相反するところでもあるが・・・。
-
DynamoDB には、一回のクエリーで 1MB までしか取得できない制限がある
- https://aws.amazon.com/jp/premiumsupport/knowledge-center/appsync-wrong-query-item-number-dynamodb/
- AppSync では、1MB といった容量や、件数といった制限があるときに、複数クエリーで取得する nextToken の仕組みがある
-
AppSync のリゾルバーが、DynamoDB に
queryとscanを使っているのか、静的な設定で把握が出来る -
AppSync のロギングの設定をすることで、AppSync から DynamoDB に対して、どのようなクエリーを発行したのか確認可能

-
また、CloudWatch Log Insights でシンプルな検索が可能
-
fields @timestamp
| filter logType = "RequestMapping"
| limit 100
-
@belongsToは、実際に DynamoDB のデータ構造に影響を与える設定ではなさそう (に見える)-
@belongsToを指定することで、AppSync を使ったデータ取得を双方向にするメリットがある - ただ、
@belongsToを有効化することで、DynamoDB のデータ構造には影響はしない。 - あくまで、AppSync だったり、フロントエンドで自動生成される API に影響を与える設定と理解して差し支え無さそう
-
参考 URL
Amplify Docs : Data modeling
https://docs.amplify.aws/cli/graphql/data-modeling/
AWS Blog : AWS Amplify は、より機能が豊富で、柔軟性と拡張性に優れた、新しい GraphQL Transformer v2 を発表しました
https://aws.amazon.com/jp/blogs/news/aws-amplify-announces-the-new-graphql-transformer-v2-more-feature-rich-flexible-and-extensible/
Level Up! AWS Amplify〜 爆速かつスケーラブルなフルスタック Web / モバイルアプリケーションの開発 〜(AWS-47)
https://www.youtube.com/watch?v=-jd8aQpIiNU
Amplify GraphQL Transformer v2 @hasManyの実際と@indexを使ったカスタマイズ
https://zenn.dev/enish/articles/efc50aed22af83
AWS Amplify フレームワークの使い方Part18〜GraphQL Transform v2 @hasOne/@hasMany/@belongsTo/@manyToMany (旧@ connection)編〜
https://qiita.com/too/items/982dff46f9e70d5226d4
Amplifyにおける複数モデルのGraphQL APIについて
https://toranoana-lab.hatenablog.com/entry/2022/01/19/164040