本稿の内容を三行で
- PHP しか書いたことない人が Kotlin で Android アプリを作ってみる
- GoogleMap を表示させて、端末の移動を検知・記録するものを設計
- そこそこオリジナルっぽい「ピン刺し」部分だけ記事にして紹介
以下本編です。
旅行したら、どこの道を通ったか保存したい
ですよね? 私はしたいです。
旅をしたら、だいたい写真を撮ります。
地元に帰ってから、折に触れてそれを開きます。
はじめのうちは、フレームに収めきれなかった風景や、そこに至るまでの道程を思い出しながら眺めます。
けれどしばらくすると、記憶は曖昧になり、混ざり合って、やがて旅の真実は、写された画の中にのみ存在するものになってしまいます。
デジタル写真には位置情報を付与することもできますが、「どうやってその場所を訪れ、如何にしてその写真を撮るに至ったのか」という、時間の幅を持つような情報は、一葉の写真に記録できるものでは、まだないように思います。
(Exif情報とは、昔で言うと、現像した写真の裏に日付と場所を書いておくようなものでしょうか)
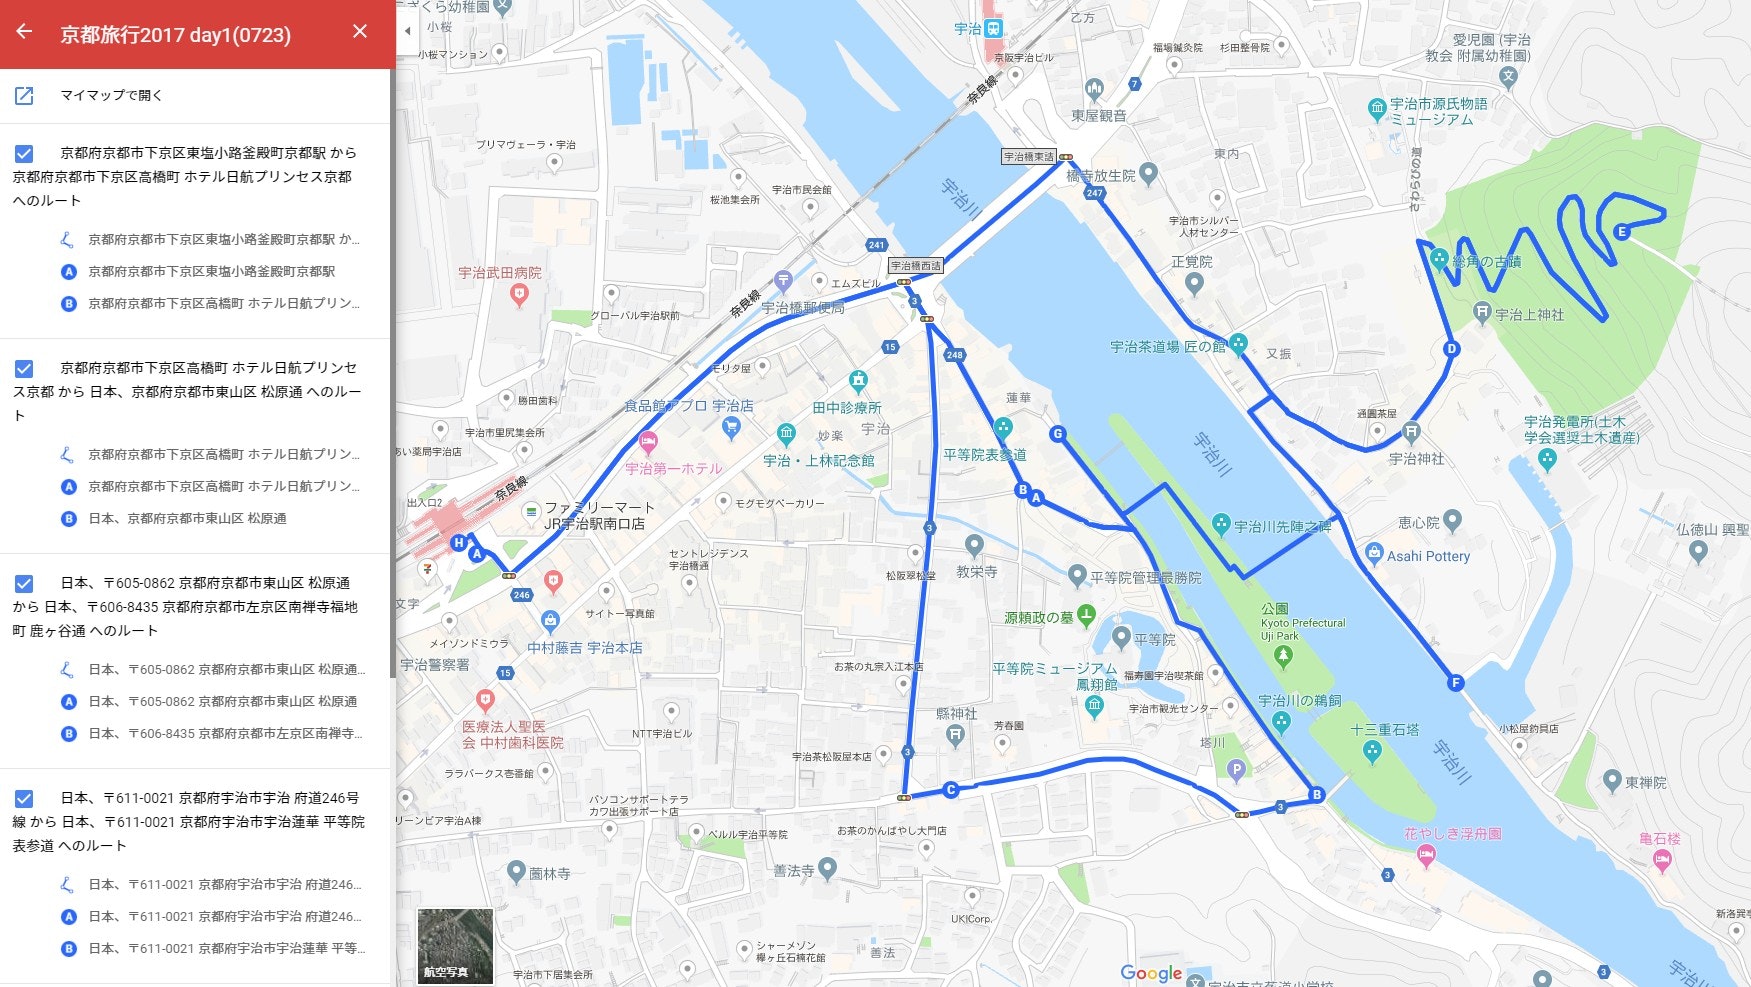
なので私は、遠出をした際は、自身の記憶が確かなうちに、GoogleMap に「マイマップ」を作成し、通った道を経路として保存しています。
例えばこんな感じ。この上に写真付きピンを置くと、時間の幅のある旅行記が保存できる、という想定です。
画像右上の大吉山を下りる時が日没頃で、正面に見える夕陽が大変綺麗でした。
ちなみに同じことをもっと簡単にできる方法は、こちらのページで紹介されています。デジタルカメラのGPSロガーを利用するのですね。
また、こちらはカメラ内蔵のものではないようですが、GPSロガーでプロポーズした方もいらっしゃるように、「経路を記録したい」というのは珍しくはない欲望だと思います。
まぁそんなわけで、有り体に言えば
GPSロガーを自作してみた
というのが本記事の内容になります。
アプリの設計
どうせ自作するので、ログするだけではなく、GPS の精度と電池消費の関係についても調べたいと思いました。
なので設計は
- 【必須】測定中の GPS 情報を記録する(ピンを刺す)
- 【必須】記録を繋いで経路を表示する
- GPS の精度や間隔を設定して測定開始できる
- 測定開始/終了時の時刻と電池残量を記録・表示する
- ピンには記録した時刻と精度(誤差)をラベルする
- GPS 記録をエクスポートできる
という感じです。
いざ実作
……というわけで、前書きの通り PHP しか触れたことのない私がまともに動くアプリを作るまでには、それなりの量の調べものをしたわけですが、その苦労を書いても仕方なく、またそういった資料を挙げると優に100を超えるので、3分クッキングメソッドで省略します。
特に苦労した点は
-
Kotlin は歴史が浅いため、Android アプリの実装サンプルが Java に比べて少ない
→ Java がわかる方なら、Java の実装サンプルを Kotlin に翻訳すれば問題ないと思います。AndroidStudio にも Convert 機能があるらしいので何とかなるのかもしれないのですが、今回は使用しませんでした。 -
位置情報取得には FusedLocationProviderClient を使用するのですが、これまた新しいもので、Webで公開してくださっている実装サンプルには一世代前の FusedLocationProviderAPI を用いたものが少なくない
→ 上と同じく、言語の基本がわかっている方なら、「この辺変えればいいのね」でちょちょいと適応させられるのだと思うのですが、如何せん作法を知らぬゆえ……というわけでこちらも難儀しました。参考:公式
で。
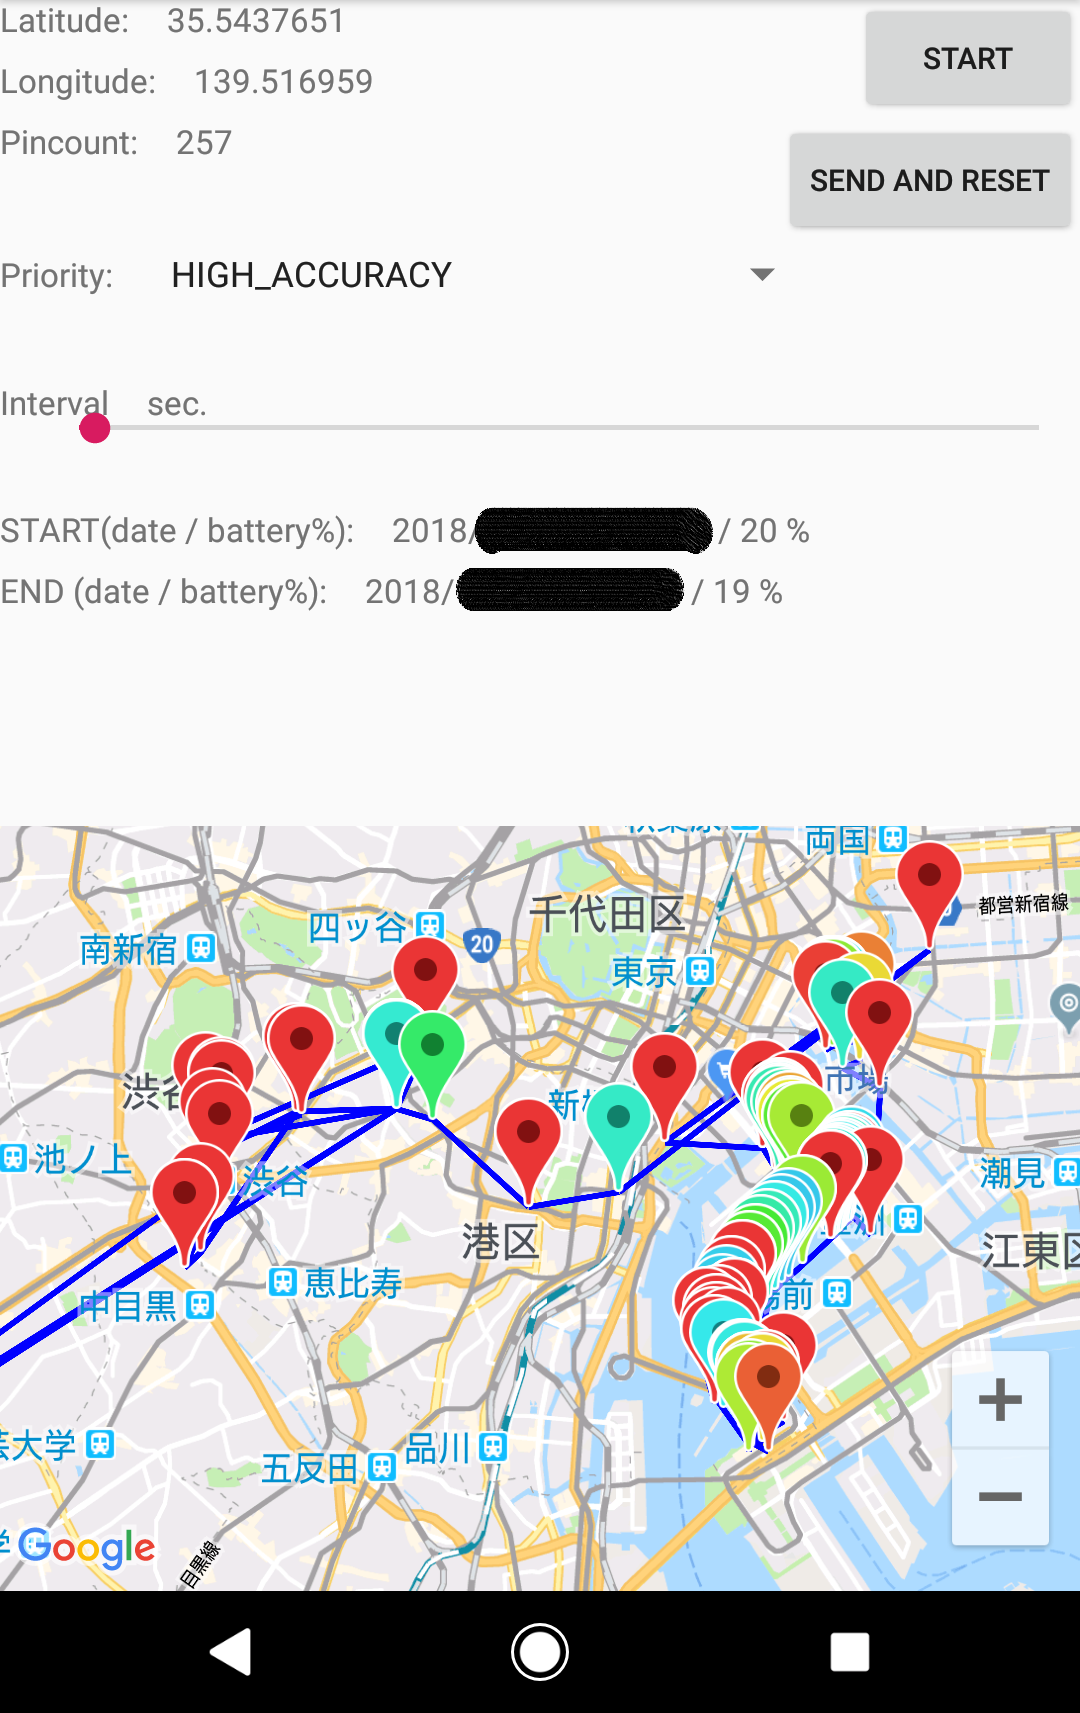
苦難の末に完成したアプリのSSがこちらになります。
こちらは今年の全社懇親会の軌跡です。晴海から出発した屋形船が、隅田川を遡上して東京スカイツリーを望み、そこから東京湾に出てららぽーとなど眺めて港に戻る様子がありありと記録されています……よね? その後地下鉄に乗って帰っている様子は見なかったことにしてください。
今回はその中で、おそらく一番目を引くピンの色の違い……「ピンを刺す」ところの実装をご紹介します。
ピン刺しロジック
コード
import 宣言や関係の薄いメソッドは省略します。
class MainActivity : AppCompatActivity(), GoogleApiClient.ConnectionCallbacks, GoogleApiClient.OnConnectionFailedListener, LocationListener, OnMapReadyCallback, LocationSource {

    // GoogleMapのインスタンスを保持
    private lateinit var mMap: GoogleMap
    private val TAG = "MainActivity"
    private val REQUEST_PERMISSION_CODE: Int = 121
    private var mGetPermission: Boolean = false
    private var onService: Boolean = false

    private lateinit var mGoogleApiClient: GoogleApiClient
    private lateinit var mFusedLocationClient: FusedLocationProviderClient
    private lateinit var mLocationRequest: LocationRequest
    private lateinit var mLocationCallback: LocationCallback
    private var mLocationManager: LocationManager? = null
    private var onLocationChangedListener: LocationSource.OnLocationChangedListener? = null
    private val FASTEST_INTERVAL: Long = 2000 /* 2sec. */
    private var pincount: Int = 0
    private var pLevel: String = ""
    private var dStart: String = ""
    private var dEnd: String = ""
    private var bStart: Int = 0
    private var bEnd: Int = 0
    private val MAX_PINCOUNT: Int = 1000

    private var lastLatLng: LatLng? = null
    private var pinList: Map<Int, Map<String, Any>> = mapOf()

    private val PRIORITY_LIST: Map<String, Int> =
        mapOf("HIGH_ACCURACY" to LocationRequest.PRIORITY_HIGH_ACCURACY,
                "BALANCED_POWER_ACCURACY" to LocationRequest.PRIORITY_BALANCED_POWER_ACCURACY,
                "LOW_POWER" to LocationRequest.PRIORITY_LOW_POWER,
                "NO_POWER" to LocationRequest.PRIORITY_NO_POWER)

    override fun onCreate(savedInstanceState: Bundle?) {
        Log.d(TAG, "onCreate()")

        super.onCreate(savedInstanceState)
        setContentView(R.layout.activity_main)

        mFusedLocationClient = LocationServices.getFusedLocationProviderClient(this)
        doCheckPermission()
        if (mGetPermission == false) {
            showToast("Permission denied...")
        }

        val button: Button = findViewById(R.id.button1)
        val buttonMsg: TextView = findViewById(R.id.button1)
        button.setOnClickListener { v ->
            if ( this.onService ) {
                stopLocationUpdates()
            } else {
                buttonMsg.text = "STOP"
                startLocationUpdates()
            }
        }

        val srbutton: Button = findViewById(R.id.button_reset)
        srbutton.setOnClickListener { v ->
            sendAndResetLog()
            srbutton.setEnabled(false)
            srbutton.setClickable(false)
        }

        val seekBar: SeekBar = findViewById(R.id.seek_interval)
        seekBar.setOnSeekBarChangeListener(
            object: SeekBar.OnSeekBarChangeListener {
                override fun onProgressChanged(
                    seekBar: SeekBar, progress: Int, fromUser: Boolean) {
                    val intervalView: TextView = findViewById(R.id.txt_interval)
                    intervalView.text = progress.toString()
                }

                override fun onStartTrackingTouch(seekBar: SeekBar) {
                }

                override fun onStopTrackingTouch(seekBar: SeekBar) {
                }
            }
        )
    }

// ~~中略~~
// 位置情報許可の確認とか中断時の処理とか

    override fun onStart() {
        Log.d(TAG, "onStart()")

        super.onStart()

        MultiDex.install(this)

        mGoogleApiClient = GoogleApiClient.Builder(this)
            .addConnectionCallbacks(this)
            .addOnConnectionFailedListener(this)
            .addApi(LocationServices.API)
            .build()

        mLocationManager = this.getSystemService(Context.LOCATION_SERVICE) as LocationManager

        mLocationCallback = object:LocationCallback() {
            override fun onLocationResult(locationResult: LocationResult) {
                onLocationChanged(locationResult.lastLocation)
            }
        }

        // Obtain the SupportMapFragment and get notified when the map is ready to be used.
        val mapFragment = supportFragmentManager
            .findFragmentById(R.id.map) as SupportMapFragment
        mapFragment.getMapAsync(this)

        mGoogleApiClient.connect()
    }

    override fun onMapReady(googleMap: GoogleMap) {
        Log.d(TAG, "onMapReady()")

        mMap = googleMap
        setUpMap()
    }

    private fun setUpMap() {
        Log.d(TAG, "setUpMap()")

        mMap.uiSettings.isZoomControlsEnabled = true
        if (ActivityCompat.checkSelfPermission(this, Manifest.permission.ACCESS_FINE_LOCATION) == PackageManager.PERMISSION_GRANTED
            || ActivityCompat.checkSelfPermission(this, Manifest.permission.ACCESS_COARSE_LOCATION) == PackageManager.PERMISSION_GRANTED) {
            mMap.setLocationSource(this)
        }
    }

    private fun startLocationUpdates() {
        this.onService = true

        Log.d(TAG, "startLocationUpdates()")
        showToast("START location tracking.")

        if (ActivityCompat.checkSelfPermission(this, Manifest.permission.ACCESS_FINE_LOCATION) != PackageManager.PERMISSION_GRANTED
            && ActivityCompat.checkSelfPermission(this, Manifest.permission.ACCESS_COARSE_LOCATION) != PackageManager.PERMISSION_GRANTED) {
            return
        }

        // 開始時刻とバッテリー残量を記録
        val dateStr: String = DateFormat.format("yyyy/MM/dd kk:mm:ss", Date()).toString()

        val batteryStatus: Intent = registerReceiver(null, IntentFilter(Intent.ACTION_BATTERY_CHANGED))
        val bLevel = batteryStatus.getIntExtra(BatteryManager.EXTRA_LEVEL, -1)
        val bScale = batteryStatus.getIntExtra(BatteryManager.EXTRA_SCALE, -1)
        val bPercent = (( bLevel / bScale.toFloat() ) * 100).toInt()
        val bPercentStr: String = Integer.toString( bPercent )
        val infoStart = "$dateStr / $bPercentStr %"

        val isView: TextView = findViewById(R.id.txt_info_start)
        if ( isView.text == "" ) {
            isView.text = infoStart
            dStart = dateStr
            bStart = bPercent
        }

        // ユーザーの設定した値を取得し、変更不可属性を付与
        val priorityView: Spinner = findViewById(R.id.spinner_priority)
        pLevel = priorityView.selectedItem.toString()
        priorityView.setEnabled(false)
        priorityView.setClickable(false)

        val seekBar: SeekBar = findViewById(R.id.seek_interval)
        val interval: Long = seekBar.progress * 1000L
        seekBar.setEnabled(false)

        val srbutton: Button = findViewById(R.id.button_reset)
        srbutton.setEnabled(false)
        srbutton.setClickable(false)

        val ieView: TextView = findViewById(R.id.txt_info_end)
        ieView.text = ""

        mLocationRequest = LocationRequest.create()
            .setPriority(PRIORITY_LIST[pLevel]!!)
            .setInterval(interval)
            .setFastestInterval(FASTEST_INTERVAL)

        mFusedLocationClient.requestLocationUpdates(mLocationRequest, mLocationCallback, Looper.myLooper())

        this.onService = true
    }

    override fun onLocationChanged(location: Location) {
        Log.d(TAG, "onLocationChanged()")

        if (ActivityCompat.checkSelfPermission(this, Manifest.permission.ACCESS_FINE_LOCATION) != PackageManager.PERMISSION_GRANTED
            && ActivityCompat.checkSelfPermission(this, Manifest.permission.ACCESS_COARSE_LOCATION) != PackageManager.PERMISSION_GRANTED) {
            return
        }

        val msg = "Updated Location: Latitude..." + location.latitude.toString() + "/Longitude..." + location.longitude.toString()

        val latView: TextView = findViewById(R.id.txt_latitude)
        val lngView: TextView = findViewById(R.id.txt_longitude)

        putPin( location )

        latView.text = location.latitude.toString()
        lngView.text = location.longitude.toString()
        showToast(msg)
    }

    private fun putPin(location: Location) {
        Log.d(TAG, "putPin()")

        val latLng = LatLng(location.latitude, location.longitude)
        val accuracy = location.accuracy.toString()
        val accColor: Float = if (location.accuracy < 100.0F ) 200.0F - location.accuracy * 2 else 0.0F
        val dateStr: String = DateFormat.format("yyyy/MM/dd kk:mm:ss", Date()).toString()

        // put pin
        mMap.addMarker(MarkerOptions().position(latLng).icon(BitmapDescriptorFactory.defaultMarker(accColor)).title("$dateStr / acc: $accuracy m"))

        // draw line between now and last LatLng
        if ( lastLatLng != null ) {
            val straight = PolylineOptions()
            straight.color(Color.BLUE)
            straight.width(6F)
            straight.add(lastLatLng)
            straight.add(latLng)

            mMap.addPolyline(straight)
        }
        lastLatLng = latLng

        // move camera
        val camerapos = CameraPosition.Builder()
        val camerazoom = if (pincount == 0) 18.0F else mMap.cameraPosition.zoom
        camerapos.target(latLng)
        camerapos.zoom(camerazoom)
        mMap.moveCamera(CameraUpdateFactory.newCameraPosition(camerapos.build()))

        // add pin count
        pincount++
        val pincountView: TextView = findViewById(R.id.txt_pincount)
        pincountView.text = Integer.toString(pincount)

        // add pin to list
        pinList += pincount to mapOf(
            "date" to dateStr,
            "latitude" to location.latitude,
            "longitude" to location.longitude,
            "accuracy" to location.accuracy
        )

        if ( pincount == MAX_PINCOUNT ) {
            showToast("pincount has reached maximum.")
            stopLocationUpdates()
        }
    }

    private fun showToast( msg: String, length: Int = Toast.LENGTH_SHORT ) {
        Toast.makeText(this, msg, length).show()
    }

// ~~後略~~

}
説明
GoogleMapをアプリ上にセットするまでの道のりは Web の叡智で舗装されています。
位置情報の更新を検知すると、onLocationChanged() が呼び出され、その引数に最新の位置情報(Location オブジェクト)が入っています。
なので、そこからピンを打つメソッド putPin() を呼び出し、Location オブジェクトをまるっと渡します。
取得した位置の緯度・経度や、その位置の精確性(誤差が何メートル以内か)は Location オブジェクトに入っていますので、そこから抽出して、ピンを打つためのパラメータ(LatLng オブジェクト等)を作成します。
ピンの色は、精確性の値によって変化させています。
icon() に Float 型を渡すことでピンの色を変えることができるのですが、今回は誤差 0.0m で青色、そこから徐々に赤に近づき、100.0m 以上で赤色というルールで実装しました。
ここで渡す Float 型の値は「色相スケール」の値を示しており、0° = 360° の赤を基準として、円を描くように変化・返戻していきます。青から赤へのグラデーションは、角度にして 200.0° ~ 0.0° の間が適当なので、200.0 から誤差距離の2倍を引く計算で、精確性を色に翻訳しました。
ピンを打った後は、一つ前の位置情報が存在したら、その緯度経度と、今回の緯度経度との間に青い線を結びます。これが移動経路を示します。
あんまりピンが増えすぎても困るので、最後は1,000回打ったら止めるようにしてあります。
実際に使ってみた
まぁ二個上の項で実際に使っているわけなのですが。
せっかくなので、電車内からだと『駅メモ!』で目的の駅にチェックインできない地下鉄区間、東急田園都市線二子玉川~渋谷間で起動させてみました。
二子玉川駅出発
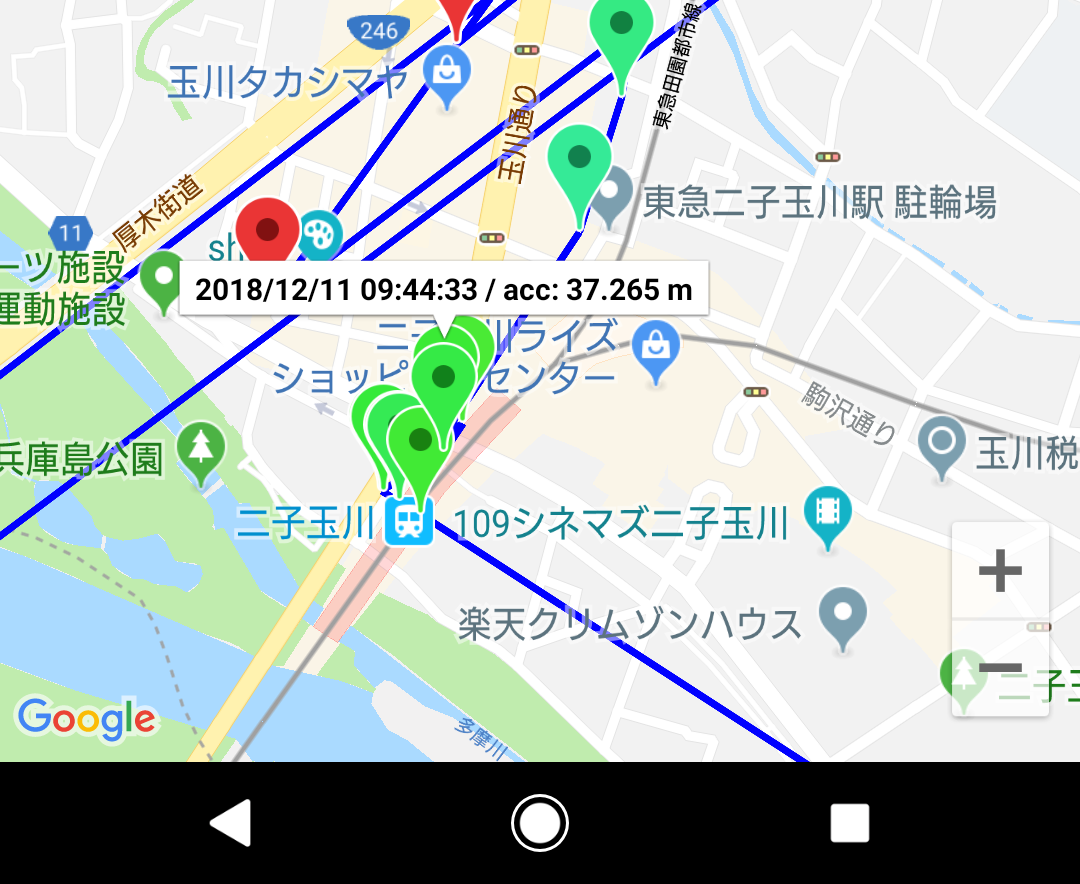
二子玉川駅はまだ地上なのでふつうに計測できます。誤差も 40m 以内で上々ですね。
線がめちゃくちゃに飛んでいるのでこの後の展開はお察しですが。
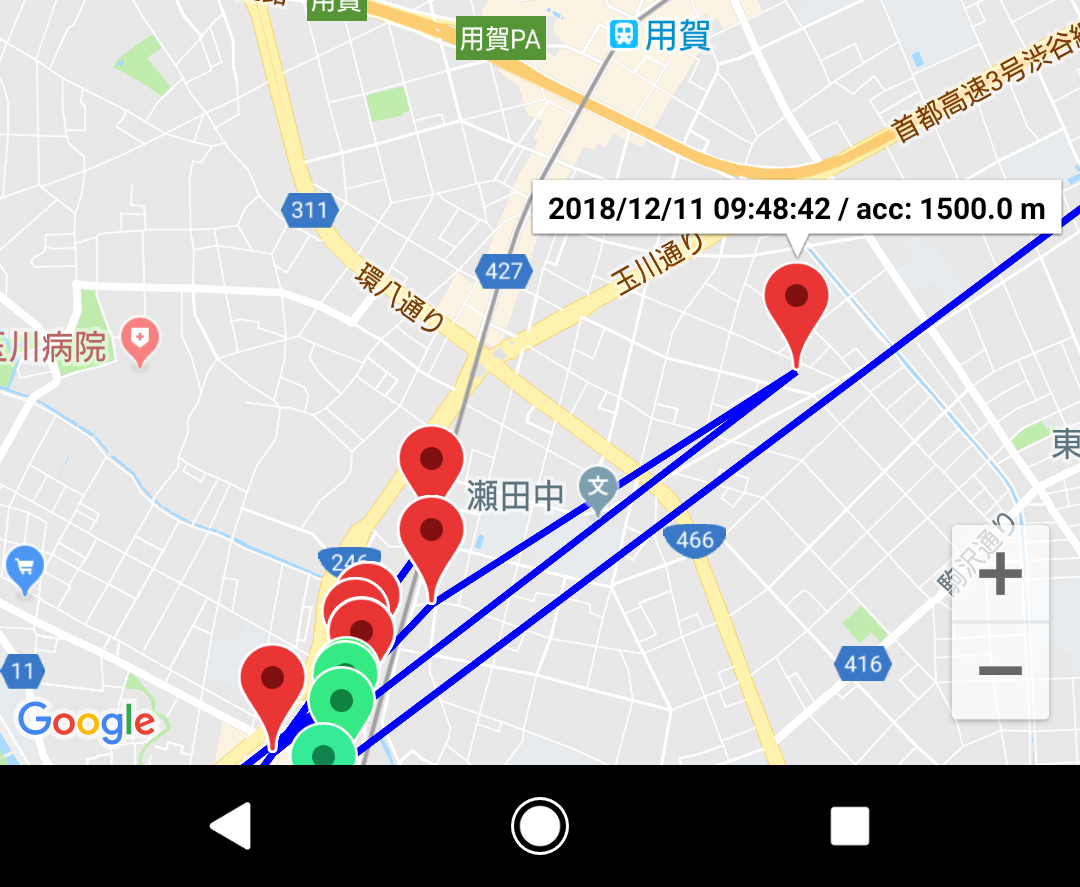
桜新町駅→駒澤大学駅あたり
4分後なので桜新町駅を通過したくらいでしょうか……北上する灰色の線に沿って記録されるのが正しいのですが、用賀駅にさえ辿り着けず、誤差 1.5km というアバウトさで沿線ではないどこかにピンが打たれました。それはチェックインできないわけですわ。
渋谷駅到着
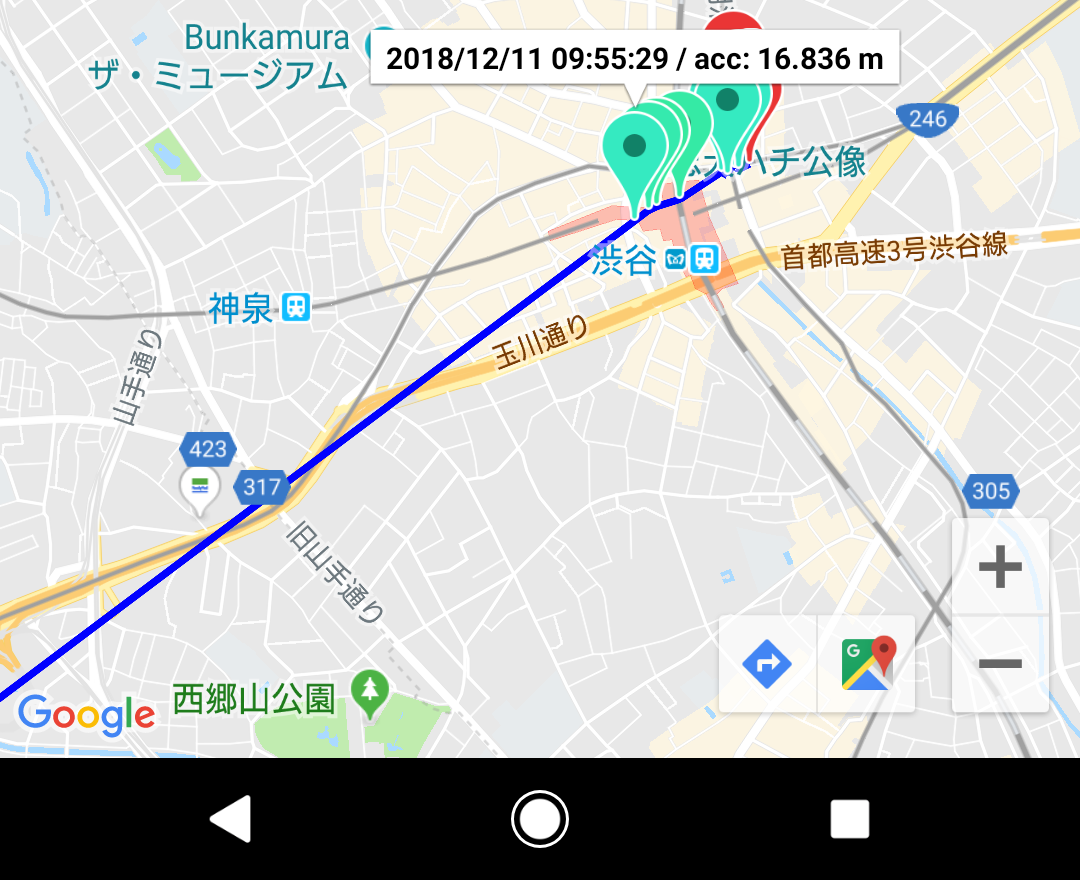
渋谷駅(地下)のホームに着くと、急に高精度で位置情報を取得できるようになりました。ミントグリーンが可愛いです。
というわけで、(少なくとも GPS の)位置情報を使用するゲームは地下鉄では難しい、ということがわかりました。
結びに
今回のアプリは、記事末尾の「参考」欄に挙げさせていただいたページをはじめ、沢山の Web 上の叡智(Qiita とか Stackoverflow とか)を拝借したものです。この場を借りて厚く御礼申し上げます。
そしてこの記事が、私のような「アプリ制作の経験ないけど(地図)アプリ作ってみたい」方のご参考になれば幸いです。
余談
実用に堪えるであろうGPSロガーは既に存在するようです。
地下鉄での移動もカバーできるかはわかりません。
参考
アプリ作成について
[Android] FusedLocationProviderClient を使って位置情報を取得 - nyan のアプリ開発
[Android] Google Map タップして移動、マーカーの追加 - nyan のアプリ開発
Android Tips #25 Google Maps Android API v2 逆引きリファレンス - DevelopersIO
色について
BitmapDescriptorFactory - Google APIs for Android
色相 - Wikipedia
