Wrote: 2019/2/6

概要
create-react-appで作ったプロジェクトにて、WebComponentsを使う手順を説明します。
create-react-app
$ npx create-react-app webcomponents
$ cd webcomponents/
$ npm start
webcomponentsjsとvendor-copyのインストール
npm install --save @webcomponents/webcomponentsjs vendor-copy
vendor-copy
scriptsブロック
package.json のscriptsブロックに以下を挿入
"postinstall": "vendor-copy"
  "scripts": {
    "start": "react-scripts start",
    "build": "react-scripts build",
    "test": "react-scripts test",
    "eject": "react-scripts eject",
    "postinstall": "vendor-copy"
  },
add vendorCopy path
  "vendorCopy": [
    {
      "from": "node_modules/@webcomponents/webcomponentsjs/custom-elements-es5-adapter.js",
      "to": "public/vendor/custom-elements-es5-adapter.js"
    },
    {
      "from": "node_modules/@webcomponents/webcomponentsjs/webcomponents-bundle.js",
      "to": "public/vendor/webcomponents-bundle.js"
    }
  ]
npm installの度に、vendorCopyで指定したファイルがpublicにコピーされます。
public/index.html
public/index.htmlにwebcomponents-bundle参照の追加を行う
<script src="%PUBLIC_URL%/vendor/webcomponents-bundle.js"></script>
<script>if (!window.customElements) { document.write("<!--"); }</script>
<script src="%PUBLIC_URL%/vendor/custom-elements-es5-adapter.js"></script>
<!--! DO NOT REMOVE THIS COMMENT, WE NEED ITS CLOSING MARKER -->
※ <!--! DO NOT REMOVE THIS COMMENT, WE NEED ITS CLOSING MARKER -->は必要なので消さないように注意。
customElementsをサポートしていないブラウザではcustom-elements-es5-adapter.jsをロードしないようにする。
※%PUBLIC_URL%に任意のURLを指定したい場合には、以下のようにhomepageにURLを設定する
{
  // ...
  "scripts": {
    // ...
  },
  "homepage": "https://example.com"
}
テスト
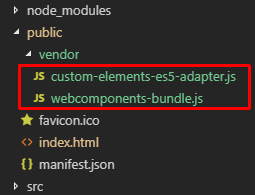
npm install or npm i or yarn installを実行して、public/配下にwebcomponents がコピーされるかテストを行う
↓のようにファイルがコピーされてればOK
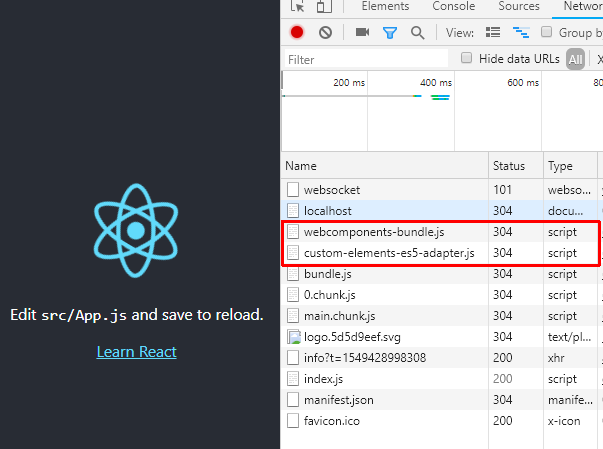
yarn start でブラウザで起動、Networkのデバッグで2つのファイルがロードされてればOK
web componentの追加
今回は、Vaadinの component setを使ってみます。
- vaadin-date-picker
yarn add @vaadin/vaadin-date-picker
src/App.js
importを追加
import "@vaadin/vaadin-date-picker";
renderを以下のように変更
  render() {
    return (
      <div className="App">
        <vaadin-date-picker label="When were you born?"></vaadin-date-picker>
      </div>
    );
  }
実行
以下のようにカレンダーコンポーネントが表示されれば成功です。

イベントハンドリング
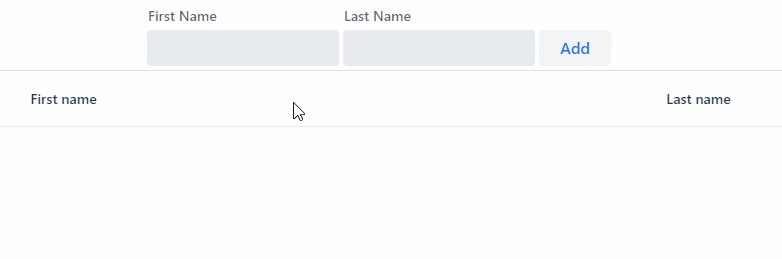
フォームを作成し、テキストBOXを2つ配置
ボタンを押してリストに追加するデモを作成します。
以下のコンポーネント使います。
- vaadin-text-field
- vaadin-button
- vaadin-grid
componentのインストール
yanr add @vaadin/vaadin-text-field @vaadin/vaadin-button @vaadin/vaadin-grid
importを追加
import '@vaadin/vaadin-button';
import '@vaadin/vaadin-grid';
import '@vaadin/vaadin-text-field';
renderを以下のように変更
render() {
  return (
    <div className="App">
        <div className="form">
          <vaadin-text-field label="First Name" ref="firstName" />
          <vaadin-text-field label="Last Name" ref="lastName" />
          <vaadin-button ref="addButton"> Add </vaadin-button>
        </div>
        <vaadin-grid ref="grid">
          <vaadin-grid-column path="firstName" header="First name" />
          <vaadin-grid-column path="lastName" header="Last name" />
        </vaadin-grid>
      </div>
  );
}
componentDidMount()
componentDidMount() {
  let people = [];
  this.refs.addButton.addEventListener('click', e => {
    people = [
      ...people,
      {
        firstName: this.refs.firstName.value,
        lastName: this.refs.lastName.value
      }
    ];
    this.refs.grid.items = people;
    this.refs.firstName.value = '';
    this.refs.lastName.value = '';
  });
}
App.cssを以下のように変更
.App {
  padding: 4px;
}
.App .form * {
  margin-right: 4px;
}
結果
ソース
ソースは以下に置きました
sugasaki/using-web-components-in-react
さらに深く
さらなる続きは以下へダイブ