基本的に以下の資料に沿って進めるメモです。
事前条件
Debugger for Chrome
以下のDebugger for Chromeが入ってること。入ってなければ入れること。
Debugger for Chrome - Visual Studio Marketplace
edgeの場合は以下
Debugger for Edge
vue-cli
Vue-CLIにそってプロジェクトを作成
Vue CLI Guide 内の手順に従い、vue-cli を使ってプロジェクトをインストールして作成します。新しく作成したアプリケーションディレクトリに移動し、VS Code を開いてください。
create project
vue create hello-world
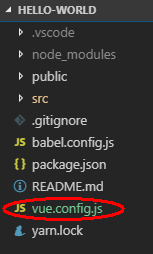
vue.config.js
vue.config.jsを作成する。
内容を以下にする。
// vue.config.js
module.exports = {
  configureWebpack: {
    devtool: 'source-map'
  }
}
設定ファイル
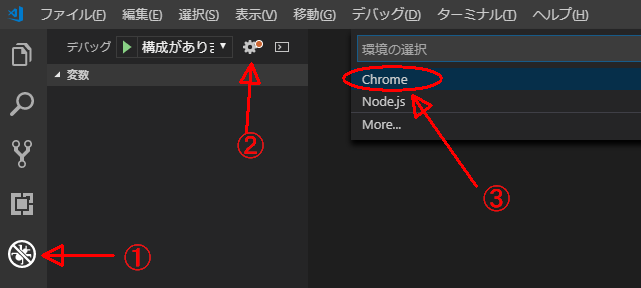
Activity Bar の Debugging アイコン をクリックして Debug ビューを表示
歯車アイコンをクリックして launch.json ファイルを作成する。
図では以下の順番。
launch.jsonが表示されるので、以下のようにwebRoot以下を追記する。
{
  // IntelliSense を使用して利用可能な属性を学べます。
  // 既存の属性の説明をホバーして表示します。
  // 詳細情報は次を確認してください: https://go.microsoft.com/fwlink/?linkid=830387
  "version": "0.2.0",
  "configurations": [
    {
      "type": "chrome",
      "request": "launch",
      "name": "vuejs: chrome",
      "url": "http://localhost:8080",
      "webRoot": "${workspaceFolder}/src",
      "breakOnLoad": true,
      "sourceMapPathOverrides": {
        "webpack:///src/*": "${webRoot}/*"
      }
    }
  ]
}
firefox の設定は以下
    {
      "type": "firefox",
      "request": "launch",
      "name": "vuejs: firefox",
      "url": "http://localhost:8080",
      "webRoot": "${workspaceFolder}/src",
      "pathMappings": [{ "url": "webpack:///src/", "path": "${webRoot}/" }]
    }
edge の設定は以下
        {
            "name": "Launch localhost",
            "type": "edge",
            "request": "launch",
            "url": "http://localhost:8080",
            "webRoot": "${workspaceFolder}/src",
        },
        {
            "name": "Launch index.html (disable sourcemaps)",
            "type": "edge",
            "request": "launch",
            "sourceMaps": false,
            "file": "${workspaceFolder}/index.html"
        },
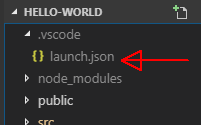
ちなみに、launch.jsonは.vscodeの配下に作成される。
ブレイクポイントを設定する
ブレイクポイントはコード行数の左側をクリックする事でON/OFF切り替える。
赤丸がついていればブレイクポイントが設定されている。
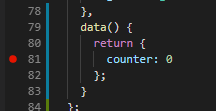
上記画像では、src/components/HelloWorld.vue にdata()を追加してブレイクポイントを設定している。
export default {
  name: "HelloWorld",
  props: {
    msg: String
  },
  data() {
    return {
      counter: 0
    };
  }
};
デバッグの開始
起動
デバッグ前にアプリを起動する。
yarn run serve
デバッグ
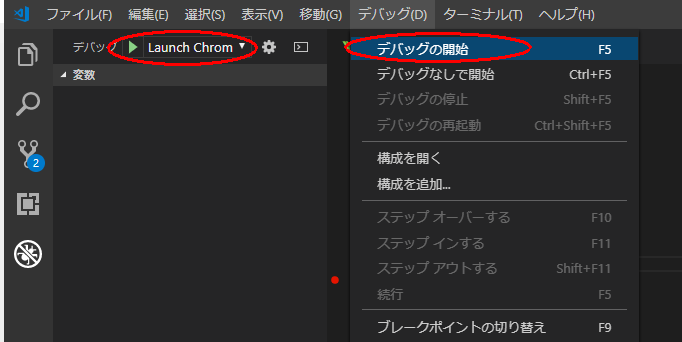
メニューからデバッグ→デバッグの開始を選択するか、
Debug ビューに移動し、緑の再生ボタンをクリックする。
ブラウザが開いて、ブレイクポイントにヒットする
代替え
Vue Devtools
他にもデバッグの方法がありますが、最も人気がありシンプルなのは、Chrome 向け および Firefox 向け の優れた Vue.js devtools を使用することです。
Vuetron
Vuetron は、vue-devtools が行った作業のいくつかを拡張した素晴らしいプロジェクトです。
単純なデバッグステートメント
上記の例は素晴らしいワークフローを持っています。しかしながら、native debugger statement をあなたのコード内に直接使用できる代替オプションがあります。この方法を用いることを選択する場合、完了した時にそのステートメントを削除することを覚えておくことが重要です。
<script>
export default {
  data() {
    return {
      message: ''
    }
  },
  mounted() {
    const hello = 'Hello World!'
    debugger
    this.message = hello
  }
};
</script>
以上


