2018.8.2 追記
ASP.NET Coreが2.1に上がった事でこの記事は古くなっています。
環境:VisualStudio2017
ASP.NET Core2.0
Visual Studio > aspcore2 > React > react-grid-layout
react-grid-layout を使ってドラッグ&ドロップ可能なグリッドシステムを作成します。
Visual Studio Community 2017を使って進めます。

react-grid-layoutとは
React-Grid-Layout はPackery や Gridster に影響を受けて作成されたグリッドレイアウトシステムです。
略してRGL とReact-Grid-Layoutプロジェクト内では呼んでいるようです。
がんばれば以下のようなUIを作成する事ができるっぽいです。

react-grid-layoutのGithub
react-grid-layoutのデモ
プロジェクト作成
Visual Studio(Community可能)プロジェクトの追加
新しいプロジェクトを作成します。
ASP.NET Core Webアプリケーションを作成する。プロジェクト名は適当でOKだがここでは「react-grid-layout」として作成します。

アプリケーションの種類はReact.jsを選択します。

以下のようなプロジェクト構成で作成されます。

ライブラリ参照の追加
npm-shrinkwrap.jsonの削除
バージョンを固定しているnpm-shrinkwrap.jsonを削除します。
以下のようにpackage.jsonの裏に隠れています。

※npm-shrinkwrap.jsonは後ほど再作成します。
package.jsonの編集
package.jsonに以下を追記します。バージョン番号はその時の最新とします。
しばらく待つとnode_modules配下にライブラリが追加されます。
    "@types/react-grid-layout": "0.16.4",
    "react-grid-layout": "0.16.5"
2018/2/28現在、新規作成されたpackage.jsonに追加した結果は以下になります。
{
  "name": "react_grid_layout",
  "private": true,
  "version": "0.0.0",
  "devDependencies": {
    "@types/history": "4.6.0",
    "@types/react": "15.0.35",
    "@types/react-dom": "15.5.1",
    "@types/react-hot-loader": "3.0.3",
    "@types/react-router": "4.0.12",
    "@types/react-router-dom": "4.0.5",
    "@types/webpack-env": "1.13.0",
    "aspnet-webpack": "^2.0.1",
    "aspnet-webpack-react": "^3.0.0",
    "awesome-typescript-loader": "3.2.1",
    "bootstrap": "3.3.7",
    "css-loader": "0.28.4",
    "event-source-polyfill": "0.0.9",
    "extract-text-webpack-plugin": "2.1.2",
    "file-loader": "0.11.2",
    "isomorphic-fetch": "2.2.1",
    "jquery": "3.2.1",
    "json-loader": "0.5.4",
    "react": "15.6.1",
    "react-dom": "15.6.1",
    "react-hot-loader": "3.0.0-beta.7",
    "react-router-dom": "4.1.1",
    "style-loader": "0.18.2",
    "typescript": "2.4.1",
    "url-loader": "0.5.9",
    "webpack": "2.5.1",
    "webpack-hot-middleware": "2.18.2",

    "@types/react-grid-layout": "0.16.4",
    "react-grid-layout": "0.16.5"

  }
}
プログラム変更
boot.tsxの編集
ClientApp/boot.tsx に参照を追加します。
IE11でも表示可能にする(必用に応じて)
boot.tsxの先頭に以下を追加します。
import 'core-js/fn/promise';
Supporting Internet Explorer 11 (or older) · aspnet/JavaScriptServices Wiki
CSS参照の追加
react-grid-layout.cssファイルを作成
ClientApp/cssにreact-grid-layout.cssファイルを作成します。
.react-grid-item:not(.react-grid-placeholder) {
    background: #ccc;
    border: 1px solid black;
}
boot.tsxに追加
function renderApp()の上に以下を追加します。
//react-grid-layout
import '../node_modules/react-grid-layout/css/styles.css';
import '../node_modules/react-resizable/css/styles.css';
import './css/react-grid-layout.css';
試行
この状態で実行してみる。エラーなく表示されればOK

コンポーネント作成
ReactGridLayoutComponentコンポーネントを作成
ClientApp/components/Counter.tsxを複製してReactGridLayoutComponent.tsxに名前を変更します。(名前は別の名前でもOK。)
もしくは、ClientApp/components/ にReactGridLayoutComponent.tsxを作成します。
インターフェース
レイアウトを管理するインターフェースを作成します。
interface ReactGridLayoutItem {
    i: string;
    x: number;
    y: number;
    w: number;
    h: number;
    minW?: number;
    maxW?: number;
    static?: boolean;
}

interface ReactGridLayoutState {
    layout: Array<ReactGridLayoutItem>;
    loading: boolean;
}
クラス名
クラス名をReactGridLayoutComponentに変更します。
Component引数を以下のように変更します。
RouteComponentProps<{}>, Array<ReactGridLayoutItem>
変更後は以下になります。
export class ReactGridLayoutComponent extends React.Component<RouteComponentProps<{}>, ReactGridLayoutState> {
インポート
importは以下になるようにします。
import * as React from 'react';
import { RouteComponentProps } from 'react-router';
import * as ReactGridLayout from 'react-grid-layout';
コンストラクタの追加
コンストラクタを追加し、画面ロード時にReactGridLayoutに3×1のグリッドを作成するためのlayout変数を作成します。
    constructor() {
        super();

        var layout: ReactGridLayoutItem[] = [
            { i: 'a', x: 0, y: 0, w: 1, h: 2, static: true },
            { i: 'b', x: 1, y: 0, w: 3, h: 2, minW: 2, maxW: 4 },
            { i: 'c', x: 4, y: 0, w: 1, h: 2 }
        ];

        this.state = { layout: layout, loading: true };
    }
レンダー
renderにはコンポーネントを表示するコードを記入します。
    public render() {
        return <div>
            <ReactGridLayout className="layout" layout={this.state.layout} cols={12} rowHeight={30} width={1200}>
                <div key="a">a</div>
                <div key="b">b</div>
                <div key="c">c</div>
            </ReactGridLayout>
        </div>;
    }
最終的には以下になります。
import * as React from 'react';
import { RouteComponentProps } from 'react-router';
import * as ReactGridLayout from 'react-grid-layout';


interface ReactGridLayoutItem {
    i: string;
    x: number;
    y: number;
    w: number;
    h: number;
    minW?: number;
    maxW?: number;
    static?: boolean;
}

interface ReactGridLayoutState {
    layout: Array<ReactGridLayoutItem>;
    loading: boolean;
}


export class ReactGridLayoutComponent extends React.Component<RouteComponentProps<{}>, ReactGridLayoutState> {
    constructor() {
        super();

        var layout: ReactGridLayoutItem[] = [
            { i: 'a', x: 0, y: 0, w: 1, h: 2, static: true },
            { i: 'b', x: 1, y: 0, w: 3, h: 2, minW: 2, maxW: 4 },
            { i: 'c', x: 4, y: 0, w: 1, h: 2 }
        ];

        this.state = { layout: layout, loading: true };
    }

    public render() {
        return <div>

            <ReactGridLayout className="layout" layout={this.state.layout}
                cols={12} rowHeight={30} width={1200}>
                <div key="a">a</div>
                <div key="b">b</div>
                <div key="c">c</div>
            </ReactGridLayout>

        </div>;
    }

}
ルート情報の追加
ルート情報の追加
/ClientApp/routes.tsxに以下の2行を追加します。
import { ReactGridLayoutComponent } from './components/ReactGridLayoutComponent';`
<Route path='/reactgridlayout' component={ReactGridLayoutComponent } />
最終的には以下になります。
import * as React from 'react';
import { Route } from 'react-router-dom';
import { Layout } from './components/Layout';
import { Home } from './components/Home';
import { FetchData } from './components/FetchData';
import { Counter } from './components/Counter';
import { ReactGridLayoutComponent } from './components/ReactGridLayoutComponent';

export const routes = <Layout>
    <Route exact path='/' component={ Home } />
    <Route path='/counter' component={ Counter } />
    <Route path='/fetchdata' component={ FetchData } />
    <Route path='/reactgridlayout' component={ReactGridLayoutComponent } />
</Layout>;
画面メニューに参照の追加
ReactGridLayout画面を表示するリンクを追加します。
/ClientApp/components/NavMenu.tsxに以下を追加します。
<li>
    <NavLink to={ '/reactgridlayout' } activeClassName='active'>
        <span className='glyphicon glyphicon-th-list'></span> react-grid-layout
    </NavLink>
</li>
実行
この状態で実行してみる。エラーなく表示されればOKです。

うまく動かない場合
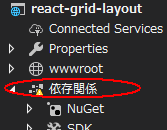
NPM系
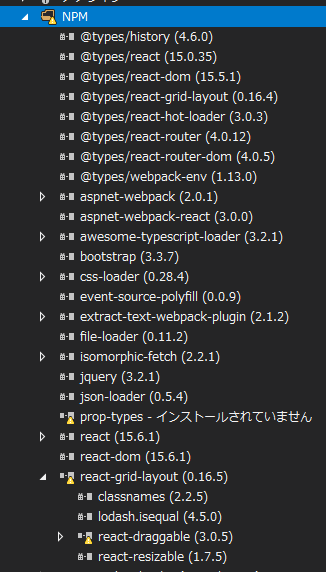
NPMアイコンが以下のような場合はライブラリがインストールされていない場合があるので、
pacage.jsonを見直してみてください。
NPMを開けば何がインストールされていないかを知ることができます。
VS系の原因
ただたんにVSが表示不具合を起こしている場合もあります。
再起動したら治る時があります。
npm-shrinkwrap.jsonの再作成
コマンドプロンプトにて以下を実行する事で、npm-shrinkwrap.jsonを再作成する事ができます。
npm shrinkwrap
ソース
今回のソースは以下に置いてます。