DynamoDBを使ってテーブルを作り, AWS SDK for PHPを使ってデータの挿入、取り出しを行ってみました.
AWS SDK for PHPのインストール
AWS SDKのインストールにはcomposerを用いました. まずはcomposer.jsonを作成します.
{
  "require": {
    "aws/aws-sdk-php": "*"
  }
}
composer.jsonを書いた後, php composer.phar installを実行します.
認証情報ファイルの設定
次にAWSのアクセスキー, シークレットキー, リージョンの情報を書いたファイルを作成します.
include/にcofig.phpファイルを作成します.
<?php
  return array(
      'includes' => array('_aws'),
      'services' => array(
          'default_settings' => array(
              'params' => array(
                  'key' => 'YOURアクセスキー',
                  'secret' => 'YOURシークレットキー',
                  'region' => 'ap-northeast-1'
                )
            )
        )
      );
以上で基本的な設定は終わりです. 次にDynamoDBにテーブルを作成していきます.
DynamoDBデーブルの作成
DynamoDBのAWS Consoleから作成していきます.
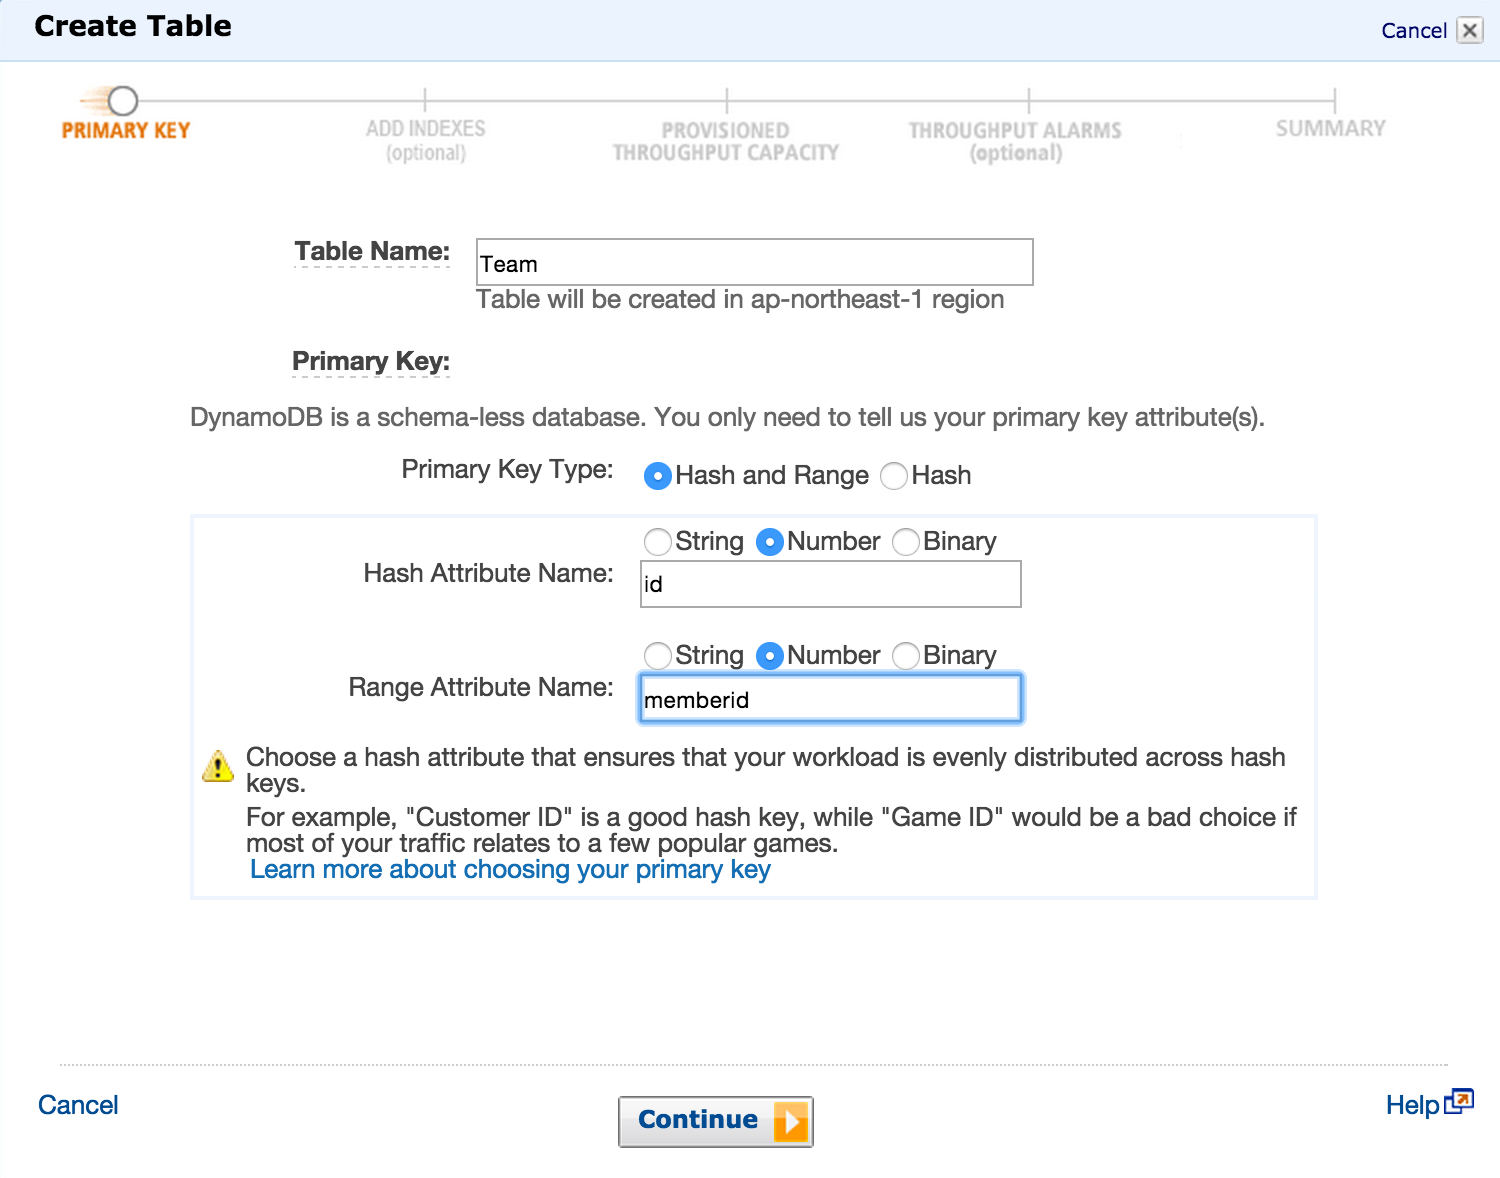
「create table」をクリックすると, 以下のような画面が出てきます.
ここで「Table Name」にTeamと入力します.
次に「Primary Key Type」を指定します. これは「Hash and Range」か「Hash」のどちらかが選べます. 今回は「Hash and Range」を指定し, 上図のように値を入れます. 「Hash and Range」を指定した場合, この2つの値を合わせて一意のキーとなります.
この後の画面ではindexやthroughput capacityの設定が続きますが, 今回はこのまま「Continue」をします.
次にいよいよデータの挿入・取り出しを行っていきます.
Putを用いたデータの挿入
Dynamoでは各テーブルのレコードをItemといいます. Itemにはテーブル作成で指定したhash-key, range-keyの他にattributesという値を挿入することができます.
ファイルは以下のように作成します.
<?php

// Composer Vender
require_once('vendor/autoload.php');

use Aws\Common\Aws;
use Aws\DynamoDbException\DynamoDbException;

// AWSクレデンシャル
$aws = Aws::factory('./include/config.php');

try {
  $client = $aws->get('dynamodb');

  $result = $client->putItem(array(
      'TableName' => 'Team',
      'Item' => $client->formatAttributes(array(
          'id' => 101,
          'memberid' => 1,
          'name' => 'Yuya',
          'language' => 'Japanese',
          'age' => 22,
        )),
    ));
} catch (DynamoDbException $e) {
  echo 'Not Success';
}
そして, 実行します.
php dynamo_put.php
attributeですが, 各アイテムごとに異なっても大丈夫です. 例として, 以下のようなものも大丈夫です.
<?php

// Composer Vender
require_once('vendor/autoload.php');

use Aws\Common\Aws;
use Aws\DynamoDbException\DynamoDbException;

// AWSクレデンシャル
$aws = Aws::factory('./include/config.php');

try {
  $client = $aws->get('dynamodb');

  $result = $client->putItem(array(
      'TableName' => 'Team',
      'Item' => $client->formatAttributes(array(
          'id' => 101,
          'memberid' => 2,
          'name' => 'Sam',
          'language' => 'English',
          'gender' => 'Male',
        )),
    ));
} catch (DynamoDbException $e) {
  echo 'Not Success';
}
次に値を取得していきます. 値の取得にはキーを指定するGetとテーブルの前アイテムを取得するScanとがあります.
データの取得
Get
Getでは, 以下のようにアイテムのhash-keyとrange-keyを指定して値を取得します.
<?php

require_once('vendor/autoload.php');

use Aws\Common\Aws;
use Aws\DynamoDbException\DynamoDbException;

$aws = Aws::factory('./include/config.php');

try {
  $client = $aws->get('dynamodb');

  $result = $client->getItem(array(
      'ConsistentRead' => true,
      'TableName' => 'Team',

      'Key' => array(
          'id' => array('N' => 101),
          'memberid' => array('N' => 1)
        ),
      ));

  var_dump($result);
} catch (DynamoDbException $e) {
  echo 'Not Success';
}
ここで, 'N'が出てきますが, これはidやmemberidの型Numberによるものです. 型の対応は以下のようになります.
| キー名 | データの型 |
|---|---|
| N | Number |
| S | String |
| B | Binary |
| SS | A set of Strings |
| NS | A set of Numbers |
| BS | A set of Binary |
実行します.
php dynamo_get.php
配列の形でデータが取れていることがわかります.
Scan
コードは以下になります.
<?php

require_once('vendor/autoload.php');

use Aws\Common\Aws;
use Aws\DynamoDbException\DynamoDbException;

$aws = Aws::factory('./include/config.php');

try {
  $client = $aws->get('dynamodb');

  $result = $client->scan(array(
    'TableName' => 'Team',
  ));

  var_dump($result);

} catch (DynamoDbException $e) {
  echo 'Not Success';
}
実行します.
php dynamo_scan.php
これもアイテムすべてが配列の形で取得できます.
まとめ
以上のような感じでDynamoDBを使ってデータの挿入・取得をやってみました.
他にも「query」や「batchwriteitem」などの機能があるみたいです.
参考にしたサイト
今回以下のようなサイトを参考にしました.
- DynamoDb 入門編
(http://blog.serverworks.co.jp/tech/2013/09/25/dynamodb-01/) - AWS SDK for PHP2を使ってAmazon DynamoDBのデータを読み書きするサンプル(http://www.lancork.net/2014/08/amazon-dynamodb-aws-sdk-for-php2/)
