はじめに
日付選択用の簡易カレンダーならCalendarViewというものが標準であるらしいので簡単なものならCalendarViewだけで簡単に実装できます。
今回は予定帳アプリみたいに文字をカレンダーに表示させたかったので自分で作ってみました。
(2022/01/11追記)
いい感じのライブラリがあったので自分で作らなくてもこれ使えばいいかもしれないです。
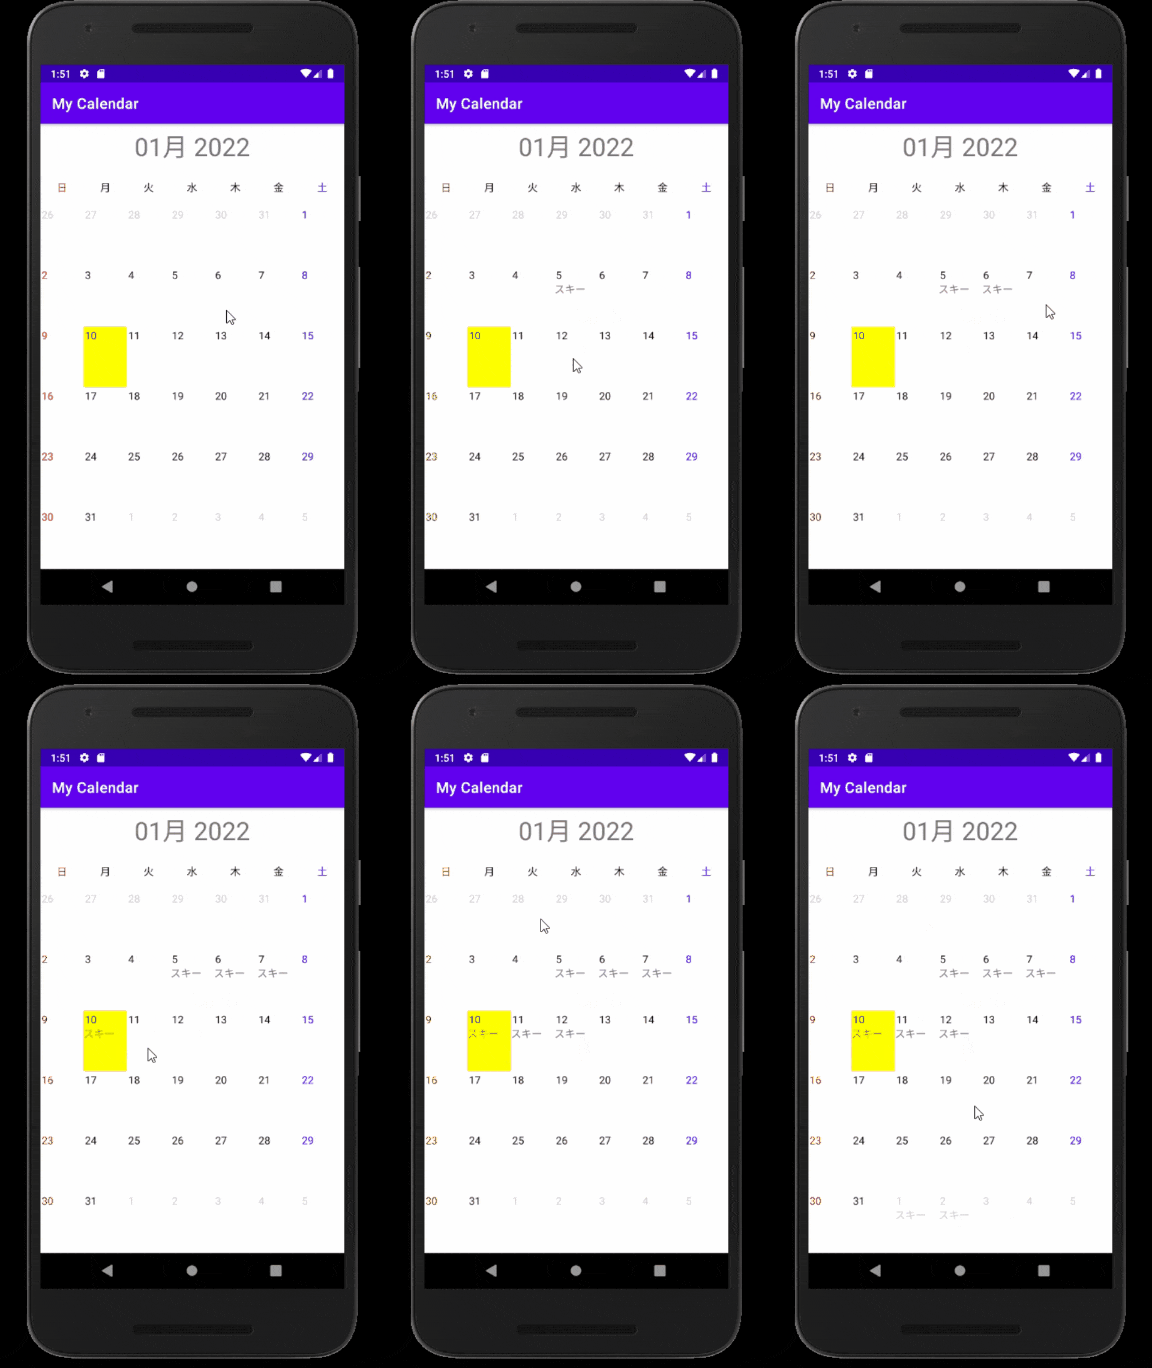
できたもの
予定帳アプリなどを想定して、スライドで月を移動する機能と押した日にちに文字を追加する機能を実装しました。
実装について
FragmentにRecyclerViewをつけて特定の月のカレンダーを表示するようにしています。
そのFragmentをViewPager2で並べてカレンダーをスライドできるようにしています。
FragmentとRecyclerViewとDateManager
月ごとのカレンダーはRecyclerViewのついたFragmentで実装しています。
RecyclerViewの表示にはRecyclerView.Adapterを継承したクラスを定義して使います。
RecyclerView.Adapter.onCreateViewHolderではViewとViewHolderをくっつけます。
アプリを立ち上げたとき、この関数はカレンダーの日付のマスの数だけ呼ばれ、マスの数だけのViewHolderが作成されます。
ただし、カレンダーをスクロールしたりして既存のカレンダーが消えて新しいカレンダーが生まれるときにはViewHolderは
リサイクルされるため、onCreateViewHolderは呼ばれません。
また、この関数ではRecyclerViewのどの位置なのかを意味する変数であるpositionが引数にないため、すべてのViewHolderは同じものが設定されます。
    override fun onCreateViewHolder(parent: ViewGroup, viewType: Int): DateAdapterHolder {
        val view=inflater.inflate(R.layout.calendar_cell,parent,false)

        //viewのサイズを指定
        val params:RecyclerView.LayoutParams=RecyclerView.LayoutParams(parent.width/DateManager.DAYS_OF_WEEK,parent.height/DateManager.WEEKS_OF_CALENDAR)
        view.layoutParams=params
        return DateAdapterHolder(view)
    }
ViewHolderに各日付ごとの情報を入力するのがRecyclerView.Adapter.onBindViewHolderです。
引数positionから自分の日付を取得します。
onBindViewHolder中のdateListはDateManagerが作成しています。
DateManagerは特定の月のDate型を受け取ると、その月のカレンダーに表示される日付を前後の月も含めて返します。
override fun onBindViewHolder(holder: DateAdapterHolder, position: Int) {

        val date:Date=dateList[position]
        //日付のみ表示させる
        val dateFormat: SimpleDateFormat = SimpleDateFormat("d",Locale.JAPAN)
        holder.dateText.text = dateFormat.format(date)

        (中略)

    }
MainActivityとViewPager
上で述べたように、Fragmentは1月分のカレンダーを表示します。
ViewPagerはそれぞれのFragmentに月の情報を与え、大量に並べる役割をしています。(その後Fragmentは月の情報をAdapterを通してDateManagerに渡します)
ViewPagerもRecyclerViewと同じくAdapterを用いて表示の処理を行います。ViewpagerのAdapterはRecyclerViewよりも中身が少ないので、オブジェクト式を使った無名クラスを引数にして簡単に書いています。
今回、カレンダーを無限に表示するやり方がわからなかったので今月から前後200ヶ月までを表示する実装にしています。
calendarViewPager.adapter=object :FragmentStateAdapter(this){
            override fun getItemCount():Int=CalendarManager.MAX_COUNT
            override fun createFragment(position: Int): Fragment{
                return CalendarFragment.newInstance(calendarManager.positionToDateString(position))
            }
        }

        calendarViewPager.registerOnPageChangeCallback(object:ViewPager2.OnPageChangeCallback(){
            //ViewPagerが別のスライドに変わったときに呼ばれる
            override fun onPageSelected(position: Int) {
                super.onPageSelected(position)
                monthText.text=calendarManager.positionToDateString(position)
            }
        })

        calendarViewPager.orientation = ViewPager2.ORIENTATION_HORIZONTAL //横方向にスライド
        calendarViewPager.setCurrentItem(CalendarManager.TODAY_COUNT,false)//最初に表示するページを指定
ハマったところ
RecyclerViewのスクロール
今回ViewPagerでスクロールを行うため、RecyclerViewでのスクロールをOFFにしておく必要がありました。
最初、以下の記事をもとにRecyclerView.OnItemTouchListenerを実装していましたが、おそらくonTouchEventをoverrideする関係でviewのonClickListenerが反応しなくなってしまいました。
そこでいろいろ調べた結果、RecyclerView.suppressLayout(true)でうまくいきました。
calendarRecyclerView.suppressLayout(true)
FragmentのonCreate
Activityと同じ要領でonCreateからviewにアクセスしようとしてずっとエラーが出ていました...
Fragmentのライフサイクルを見るにonViewCreatedでアクセスするのが正しいみたいですね。
RecyclerViewでのセルのサイズ指定
RecyclerView.LayoutParamsを使うそうですが見つけるのに時間がかかりました。
(2022/02/06追記)notifyDataSetChanged()で更新できない
calendarRecyclerView.suppressLayout(true)が原因でした。
(自分と同じところでハマってしまわないようにコード全文中の上記の行はコメントアウトしました。)
calendarRecyclerView.suppressLayout(true)はrecyclerViewの機能を抑制する事ができます。
今回はrecyclerViewが上下にスクロールしようとするのを防ぐために書きましたが、これによって更新の
処理も止まってしまうみたいです。
今回のrecyclerViewにはスクロールするような縦幅はないのでなくても影響はほとんどありませんが、
calendarRecyclerView.suppressLayout(true)を書かないと上下にスクロールしようとするエフェクトがでるようになって少し邪魔です。
そこで自分はnotifyDataSetChanged()の前後でsuppressLayoutを設定して解決しました。
//notifyDataSetChanged()の前後をsuppressLayoutではさむ
calendarRecyclerView.suppressLayout(false)
calendarRecyclerView.adapter.notifyDataSetChanged()
calendarRecyclerView.suppressLayout(true)
コード全文
kotlinのコード補完を使うので、gradleファイルに一行追加してください
plugins {
    (略)
    id 'kotlin-android-extensions'
}
<?xml version="1.0" encoding="utf-8"?>
<androidx.constraintlayout.widget.ConstraintLayout xmlns:android="http://schemas.android.com/apk/res/android"
    xmlns:app="http://schemas.android.com/apk/res-auto"
    xmlns:tools="http://schemas.android.com/tools"
    android:layout_width="match_parent"
    android:layout_height="match_parent"
    tools:context=".MainActivity">

    <TextView
        android:id="@+id/monthText"
        android:layout_width="wrap_content"
        android:layout_height="wrap_content"
        android:layout_marginTop="8dp"
        android:text="TextView"
        android:textSize="34sp"
        app:layout_constraintEnd_toEndOf="parent"
        app:layout_constraintStart_toStartOf="parent"
        app:layout_constraintTop_toTopOf="parent" />

    <androidx.viewpager2.widget.ViewPager2
        android:id="@+id/calendarViewPager"
        android:layout_width="0dp"
        android:layout_height="0dp"
        android:layout_marginTop="8dp"
        android:background="@color/white"
        app:layout_constraintBottom_toBottomOf="parent"
        app:layout_constraintEnd_toEndOf="parent"
        app:layout_constraintStart_toStartOf="parent"
        app:layout_constraintTop_toBottomOf="@+id/monthText" />

</androidx.constraintlayout.widget.ConstraintLayout>
package com.example.mycalendar //ここは自分の方のものを使ってください


import androidx.appcompat.app.AppCompatActivity
import android.os.Bundle
import android.util.Log
import androidx.fragment.app.Fragment
import androidx.viewpager2.adapter.FragmentStateAdapter
import androidx.viewpager2.widget.ViewPager2
import kotlinx.android.synthetic.main.activity_main.*
import java.text.SimpleDateFormat
import java.util.*

class MainActivity : AppCompatActivity() {

    private val SPANCOUNT = 7
    private val calendarManager=CalendarManager()

    override fun onCreate(savedInstanceState: Bundle?) {
        super.onCreate(savedInstanceState)
        setContentView(R.layout.activity_main)


        calendarViewPager.adapter=object :FragmentStateAdapter(this){
            override fun getItemCount():Int=CalendarManager.MAX_COUNT
            override fun createFragment(position: Int): Fragment{
                return CalendarFragment.newInstance(calendarManager.positionToDateString(position))
            }
        }

        calendarViewPager.registerOnPageChangeCallback(object:ViewPager2.OnPageChangeCallback(){
            //ViewPagerが別のスライドに変わったときに呼ばれる
            override fun onPageSelected(position: Int) {
                super.onPageSelected(position)
                monthText.text=calendarManager.positionToDateString(position)
            }
        })

        calendarViewPager.orientation = ViewPager2.ORIENTATION_HORIZONTAL //横方向にスライド
        calendarViewPager.setCurrentItem(CalendarManager.TODAY_COUNT,false)//最初に表示するページを指定
    }


}


//主にFragmentに渡すDateの管理
class CalendarManager(){

    companion object{
        const val MAX_COUNT: Int=400
        const val TODAY_COUNT: Int=200
        const val DATE_PATTERN:String="MM月 yyyy"
    }


    private val calendar:Calendar= Calendar.getInstance()

    fun positionToDateString(position: Int):String{

        val nowDate:Date=calendar.time
        calendar.add(Calendar.MONTH,position- TODAY_COUNT)

        val format:SimpleDateFormat= SimpleDateFormat(DATE_PATTERN, Locale.JAPAN)
        val dateString:String=format.format(calendar.time)

        calendar.time=nowDate

        return dateString
    }


}
<?xml version="1.0" encoding="utf-8"?>
<androidx.constraintlayout.widget.ConstraintLayout xmlns:android="http://schemas.android.com/apk/res/android"
    xmlns:app="http://schemas.android.com/apk/res-auto"
    xmlns:tools="http://schemas.android.com/tools"
    android:layout_width="match_parent"
    android:layout_height="match_parent">

    <TextView
        android:id="@+id/dateText"
        android:layout_width="0dp"
        android:layout_height="wrap_content"
        android:layout_marginStart="2dp"
        android:layout_marginTop="2dp"
        android:gravity="left"
        android:textAppearance="@style/TextAppearance.AppCompat.Small"
        app:layout_constraintEnd_toEndOf="parent"
        app:layout_constraintStart_toStartOf="parent"
        app:layout_constraintTop_toTopOf="parent"
        tools:text="日付" />

    <TextView
        android:id="@+id/sampleText"
        android:layout_width="0dp"
        android:layout_height="wrap_content"
        app:layout_constraintEnd_toEndOf="parent"
        app:layout_constraintHorizontal_bias="0.498"
        app:layout_constraintStart_toStartOf="parent"
        app:layout_constraintTop_toBottomOf="@+id/dateText" />
</androidx.constraintlayout.widget.ConstraintLayout>
package com.example.mycalendar //ここは自分の方のものを使ってください

import android.os.Bundle
import androidx.fragment.app.Fragment
import android.view.LayoutInflater
import android.view.View
import android.view.ViewGroup
import androidx.recyclerview.widget.GridLayoutManager
import androidx.recyclerview.widget.LinearLayoutManager
import kotlinx.android.synthetic.main.fragment_calendar.*
import java.text.SimpleDateFormat
import java.util.*


private const val ARG_DATE = "date"


class CalendarFragment : Fragment() {

    private  var date:Date?=null


    override fun onCreate(savedInstanceState: Bundle?) {
        super.onCreate(savedInstanceState)
        //argumentに入ったstringをDateに直す
        arguments?.let {
            val format=SimpleDateFormat(CalendarManager.DATE_PATTERN,Locale.JAPAN)
            val dateText=it.getString(ARG_DATE)?:""
            date=format.parse(dateText)
        }
    }

    override fun onViewCreated(view: View, savedInstanceState: Bundle?) {
        super.onViewCreated(view, savedInstanceState)

        if(date != null){
            val adapter=DateAdapter(requireContext(), date!!)

            calendarRecyclerView.adapter=adapter

            //並べ方を横7列で並べるように指定
            val layoutManager = GridLayoutManager(requireContext(), DateManager.DAYS_OF_WEEK,LinearLayoutManager.VERTICAL,false)
            calendarRecyclerView.layoutManager = layoutManager

            //recyclerViewのスクロールを止める。(スクロールはviewPager2で行うため)
            //calendarRecyclerView.suppressLayout(true) //これを使うとadapter.notifyDataSetChanged()を実行しても更新されなかったのでコメントアウトしておきます。

            //タップされたときの処理
            adapter.setOnItemClickListener{position: Int,holder:DateAdapter.DateAdapterHolder ->
                holder.sampleText.text="スキー"
            }
        }

    }

    override fun onCreateView(
        inflater: LayoutInflater, container: ViewGroup?,
        savedInstanceState: Bundle?
    ): View? {
        // Inflate the layout for this fragment
        return inflater.inflate(R.layout.fragment_calendar, container, false)
    }

    companion object {

        //Fragamentに引数を渡す
        @JvmStatic
        fun newInstance(dateString: String) =
            CalendarFragment().apply {
                arguments = Bundle().apply {
                    putString(ARG_DATE,dateString)
                }
            }
    }
}
<?xml version="1.0" encoding="utf-8"?>
<androidx.constraintlayout.widget.ConstraintLayout xmlns:android="http://schemas.android.com/apk/res/android"
    xmlns:app="http://schemas.android.com/apk/res-auto"
    xmlns:tools="http://schemas.android.com/tools"
    android:layout_width="match_parent"
    android:layout_height="match_parent"
    tools:context=".CalendarFragment" >

    <LinearLayout
        android:id="@+id/linearLayout"
        android:layout_width="0dp"
        android:layout_height="50dp"
        android:gravity="center"
        android:orientation="horizontal"
        app:layout_constraintEnd_toEndOf="parent"
        app:layout_constraintStart_toStartOf="parent"
        app:layout_constraintTop_toTopOf="parent">

        <TextView
            android:id="@+id/textView"
            android:layout_width="wrap_content"
            android:layout_height="match_parent"
            android:layout_weight="1"
            android:background="@color/white"
            android:gravity="center"
            android:text="日"
            android:textColor="#DD2C00" />

        <TextView
            android:id="@+id/textView2"
            android:layout_width="wrap_content"
            android:layout_height="match_parent"
            android:layout_weight="1"
            android:background="@color/white"
            android:gravity="center"
            android:text="月"
            android:textColor="@color/black" />

        <TextView
            android:id="@+id/textView3"
            android:layout_width="wrap_content"
            android:layout_height="match_parent"
            android:layout_weight="1"
            android:background="@color/white"
            android:gravity="center"
            android:text="火"
            android:textColor="@color/black" />

        <TextView
            android:id="@+id/textView4"
            android:layout_width="wrap_content"
            android:layout_height="match_parent"
            android:layout_weight="1"
            android:background="@color/white"
            android:gravity="center"
            android:text="水"
            android:textColor="@color/black" />

        <TextView
            android:id="@+id/textView5"
            android:layout_width="wrap_content"
            android:layout_height="match_parent"
            android:layout_weight="1"
            android:background="@color/white"
            android:gravity="center"
            android:text="木"
            android:textColor="@color/black" />

        <TextView
            android:id="@+id/textView6"
            android:layout_width="wrap_content"
            android:layout_height="match_parent"
            android:layout_weight="1"
            android:background="@color/white"
            android:gravity="center"
            android:text="金"
            android:textColor="@color/black" />

        <TextView
            android:id="@+id/textView7"
            android:layout_width="wrap_content"
            android:layout_height="match_parent"
            android:layout_weight="1"
            android:background="@color/white"
            android:gravity="center"
            android:text="土"
            android:textColor="#0004FF" />
    </LinearLayout>

    <androidx.recyclerview.widget.RecyclerView
        android:id="@+id/calendarRecyclerView"
        android:layout_width="0dp"
        android:layout_height="0dp"
        app:layout_constraintBottom_toBottomOf="parent"
        app:layout_constraintEnd_toEndOf="parent"
        app:layout_constraintStart_toStartOf="parent"
        app:layout_constraintTop_toBottomOf="@+id/linearLayout" />
</androidx.constraintlayout.widget.ConstraintLayout>
package com.example.mycalendar //ここは自分の方のものを使ってください


import android.content.Context
import android.graphics.Color
import android.view.LayoutInflater
import android.view.View
import android.view.ViewGroup
import android.widget.TextView
import androidx.recyclerview.widget.RecyclerView
import java.text.SimpleDateFormat
import java.util.*


class DateManager(private val date:Date){

    companion object{
        const val DAYS_OF_WEEK:Int=7 //1週間の日数 不変
        const val WEEKS_OF_CALENDAR:Int=6 //カレンダーに記載する週の数 今回は常に6週
    }

    private var calendar:Calendar = Calendar.getInstance()

    init {
        calendar.time=date
    }

    //6週間分の日数
    val dayCount:Int
        get()= DAYS_OF_WEEK* WEEKS_OF_CALENDAR


    fun getDays():List<Date>{

        //calendarの日数を変えていくので後で戻せるように現在の状態を保持
        val startDate:Date=calendar.time

        //当月のカレンダーに表示される前月分の日数を計算
        calendar.set(Calendar.DATE,1)//カレンダーをその月の一日に設定
        val dayOfWeek:Int=calendar.get(Calendar.DAY_OF_WEEK)-1//mCalendar.get(Calendar.DAY_OF_WEEK)で対象の日の曜日が1~7の数字で返される
        calendar.add(Calendar.DATE,-dayOfWeek)//カレンダーを月初めの週の日曜日に設定

        //カレンダーを1日ずつ進めながらdaysに追加
        val days: MutableList<Date> = mutableListOf()
        for(i in 0..dayCount){
            days.add(calendar.time)
            calendar.add(Calendar.DATE,1)
        }
        //状態を復元 (カレンダーを今日に戻す)
        calendar.time=startDate
        return days
    }

    //曜日を取得
    fun getDayOfWeek(date:Date):Int{
        return Calendar.getInstance().apply { time=date }.get(Calendar.DAY_OF_WEEK)
    }

    //今日かどうか
    fun isToday(date: Date): Boolean{
        val format: SimpleDateFormat = SimpleDateFormat("yyyy.MM.dd",Locale.JAPAN)
        val today:String=format.format(Calendar.getInstance().time)
        return today==format.format(date)
    }

    //当月かどうか確認
    fun isCurrentMonth(date: Date): Boolean{
        val format: SimpleDateFormat = SimpleDateFormat("yyyy.MM",Locale.JAPAN)
        val currentMonth:String=format.format(calendar.time)//現在時間を年月を取得(日時の情報は落とす)
        return currentMonth == format.format(date)
    }
}

class DateAdapter(private val context: Context, date:Date):RecyclerView.Adapter<DateAdapter.DateAdapterHolder>(){

    // リスナー格納変数
    private lateinit var listener: ((Int, DateAdapterHolder)->Unit)

    private val inflater = LayoutInflater.from(context)
    private var dateManager:DateManager = DateManager(date)
    private var dateList: List<Date> = dateManager.getDays()

    class DateAdapterHolder(val view: View):RecyclerView.ViewHolder(view){
        val dateText: TextView =view.findViewById<TextView>(R.id.dateText)
        val sampleText:TextView=view.findViewById<TextView>(R.id.sampleText)
    }


    //recyclerViewで並べる数
    override fun getItemCount(): Int {
        return dateManager.dayCount
    }

    override fun onCreateViewHolder(parent: ViewGroup, viewType: Int): DateAdapterHolder {
        val view=inflater.inflate(R.layout.calendar_cell,parent,false)

        //viewのサイズを指定
        val params:RecyclerView.LayoutParams=RecyclerView.LayoutParams(parent.width/DateManager.DAYS_OF_WEEK,parent.height/DateManager.WEEKS_OF_CALENDAR)
        view.layoutParams=params
        return DateAdapterHolder(view)
    }

    override fun onBindViewHolder(holder: DateAdapterHolder, position: Int) {

        val date:Date=dateList[position]
        //日付のみ表示させる
        val dateFormat: SimpleDateFormat = SimpleDateFormat("d",Locale.JAPAN)
        holder.dateText.text = dateFormat.format(date)

        if(dateManager.isToday(date)){
            holder.view.setBackgroundColor(Color.YELLOW) //当日の背景は黄色
        }

        //日曜日を赤、土曜日を青に
        val colorId:Int=
            when (dateManager.getDayOfWeek(date)) {
                1 -> {
                    Color.RED
                }
                7 -> {
                    Color.BLUE
                }
                else -> {
                    Color.BLACK
                }
            }
        holder.dateText.setTextColor(colorId)

        //当月以外は灰色
        if(!dateManager.isCurrentMonth(date)){
            holder.dateText.setTextColor(Color.LTGRAY)
            holder.sampleText.setTextColor(Color.LTGRAY)
        }

        //タップしたときの処理を追加
        holder.view.setOnClickListener{
            listener.invoke(position,holder)
        }

    }


    // リスナー
    fun setOnItemClickListener(listener: (Int,DateAdapterHolder)->Unit){
        this.listener = listener
    }

}
参考にした記事

