SpringBoot の SpringSecurity のログイン情報をDBから取得するようにしたときのメモ
DBは簡易的に使えるH2を利用、なのでH2周りのところも補足でちょっとやってます
なんとなく煩雑な感が否めない...
実行環境
- Windows11
- Pleiades 2022 Full Edition
- SpringFramework Boot v3.2.2
- Java v17
- Gradle(Groovy)
プロジェクト作成
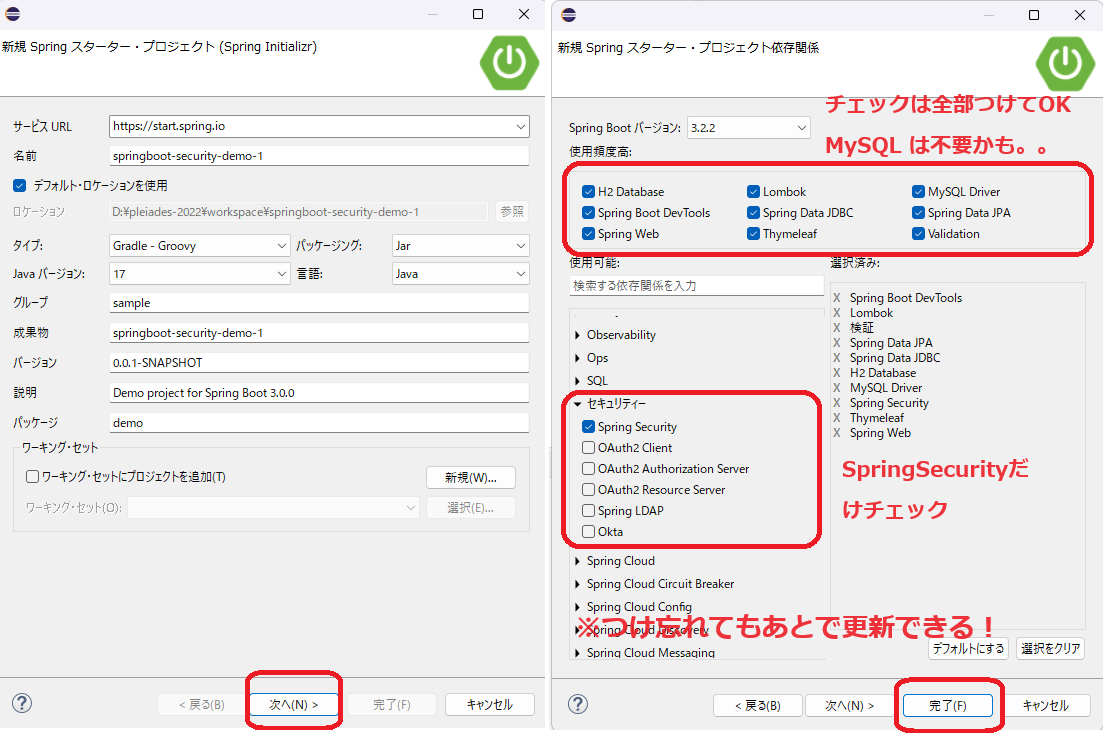
- 新規 - Springスタータ・プロジェクト でプロジェクト作成
- 最初のダイアログはデフォルトで「次へ」(名前は任意で変えてOK)
- タイプ「Gradle-Groovy」, Javaバージョン「17」変えた人は以降の手順は適当に読みかえ必要かも...
- 依存関係のダイアログの設定は以下を参考にして「完了」
- 最初のダイアログはデフォルトで「次へ」(名前は任意で変えてOK)
- 作られたやつの build.gradle の依存関係
dependenciesはこんなかんじ- 依存関係のチェックつけてない人は適宜、追加する
build.gradle
dependencies {
    mplementation 'org.springframework.boot:spring-boot-starter-data-jdbc'
    mplementation 'org.springframework.boot:spring-boot-starter-data-jpa'
    mplementation 'org.springframework.boot:spring-boot-starter-security'
    mplementation 'org.springframework.boot:spring-boot-starter-thymeleaf'
    mplementation 'org.springframework.boot:spring-boot-starter-validation'
    mplementation 'org.springframework.boot:spring-boot-starter-web'
    mplementation 'org.thymeleaf.extras:thymeleaf-extras-springsecurity6'
    ompileOnly 'org.projectlombok:lombok'
    evelopmentOnly 'org.springframework.boot:spring-boot-devtools'
    untimeOnly 'com.h2database:h2'
    untimeOnly 'com.mysql:mysql-connector-j'
    nnotationProcessor 'org.projectlombok:lombok'
    estImplementation 'org.springframework.boot:spring-boot-starter-test'
    estImplementation 'org.springframework.security:spring-security-test'
}
- 依存関係のチェックつけてない人は適宜、追加する
H2 の DB設定追加
- DB接続情報の設定
-
src/main/resources直下のapplication.propertiesを更新して以下を追加 - DB名、DBユーザ、パスワードなどは設定した値でDB作られてSpringのデータソースにも使われる
application.properties
spring.datasource.driver-class-name=org.h2.Driver
spring.datasource.url=jdbc:h2:~/testdb
spring.datasource.username=h2db
spring.datasource.password=h2db

spring.sql.init.mode=always
spring.h2.console.enabled=true
spring.sql.init.schema-locations=classpath:schema.sql
spring.sql.init.data-locations=classpath:data.sql
-
- DBのテーブル作成(ログインユーザのテーブル)
-
src/main/resources直下にschema.sqlを作成して以下を入力schema.sqlCREATE TABLE IF NOT EXISTS loginuser( username VARCHAR(50), password VARCHAR(255), authority VARCHAR(50), PRIMARY KEY(username) );
-
- DBのデータ作成(ログインユーザテーブルの初期データ)
-
src/main/resources直下にdata.sqlを作成して以下を入力 - 最初はハッシュ化しない状態で登録しておく(ハッシュ化は後ほど...)
data.sql
TRUNCATE TABLE loginuser;
INSERT INTO loginuser(username, password, authority) VALUES('admin', 'admin', 'ADMIN');
INSERT INTO loginuser(username, password, authority) VALUES('user', 'user', 'USER');
-
DB取得の実装(ログインユーザテーブルのデータ取得)
- DBデータ(ログインユーザテーブル)のエンティティ作成
-
src/main/java/demoにパッケージentity作成 - 作ったパッケージの直下に
LoginUser.java作成して以下を入力LoginUser.javapackage demo.entity; import jakarta.persistence.Column; import jakarta.persistence.Entity; import jakarta.persistence.Id; import jakarta.persistence.Table; import lombok.Data; @Entity @Table(name = "loginuser") @Data public class LoginUser { @Id @Column private String username; @Column private String password; @Column private String authority; }
-
- DBデータ(ログインユーザテーブル)のリポジトリ作成
-
src/main/java/demoにパッケージrepository作成 - 作ったパッケージの直下に
LoginUserRepository.java作成して以下を入力LoginUserRepository.javapackage demo.repository; import org.springframework.data.jpa.repository.JpaRepository; import demo.entity.LoginUser; public interface LoginUserRepository extends JpaRepository<LoginUser, String> { }
-
- DBデータ(ログインユーザテーブル)のサービス作成
-
src/main/java/demoにパッケージservice作成 - 作ったパッケージの直下に
LoginUserService.java作成して以下を入力LoginUserService.javapackage demo.service; import java.util.List; import org.springframework.beans.factory.annotation.Autowired; import org.springframework.stereotype.Service; import demo.entity.LoginUser; import demo.repository.LoginUserRepository; @Service public class LoginUserService { @Autowired private LoginUserRepository loginUserRepository; public List<LoginUser> findAll() { return loginUserRepository.findAll(); } public LoginUser findById(String username) { return loginUserRepository.findById(username).orElse(null); } }
-
ログイン実行時のプロバイダー実装
- ログイン実行時のプロバイダー作成
-
src/main/java/demoにパッケージprovider作成 - 作ったパッケージの直下に
CustomAuthenticationProvider.java作成して以下を入力CustomAuthenticationProvider.javapackage demo.provider; import org.springframework.beans.factory.annotation.Autowired; import org.springframework.security.authentication.AuthenticationProvider; import org.springframework.security.authentication.BadCredentialsException; import org.springframework.security.authentication.UsernamePasswordAuthenticationToken; import org.springframework.security.core.Authentication; import org.springframework.security.core.AuthenticationException; import org.springframework.security.core.authority.AuthorityUtils; import org.springframework.stereotype.Component; import demo.entity.LoginUser; import demo.service.LoginUserService; @Component public class CustomAuthenticationProvider implements AuthenticationProvider { @Autowired private LoginUserService loginUserService; @Override public Authentication authenticate(Authentication authentication) throws AuthenticationException { // ブラウザから入力したユーザ名・パスワードを取得 String username = authentication.getName(); String password = (String) authentication.getCredentials(); LoginUser loginUser = loginUserService.findById(username); if (loginUser != null && password.equals(loginUser.getPassword())) { // 認証成功時は、認証トークン(ユーザ名、パスワード、権限)を作成 return new UsernamePasswordAuthenticationToken(username, password, AuthorityUtils.createAuthorityList(loginUser.getAuthority())); } else { // 認証失敗は、エラーを返す throw new BadCredentialsException("Authentication failed"); } } @Override public boolean supports(Class<?> authentication) { return authentication.equals(UsernamePasswordAuthenticationToken.class); } }
-
ログイン関連のセキュリティ設定実装
- ログイン関連の設定したコンフィグを作成
-
src/main/java/demoにパッケージconfig作成 - 作ったパッケージの直下に
SecurityConfig.java作成して以下を入力-
h2-console関連の設定は h2db のコンソール確認のために設定 - csrf, headers の sameOrigin の設定も h2dbコンソールの表示で必要になったので設定
-
defaultSuccessUrlのコントローラは適宜、作成(後で補足で作成する)
SecurityConfig.javapackage demo.config; import org.springframework.beans.factory.annotation.Autowired; import org.springframework.boot.autoconfigure.security.servlet.PathRequest; import org.springframework.context.annotation.Bean; import org.springframework.context.annotation.Configuration; import org.springframework.security.authentication.AuthenticationProvider; import org.springframework.security.config.annotation.web.builders.HttpSecurity; import org.springframework.security.config.annotation.web.configuration.EnableWebSecurity; import org.springframework.security.web.SecurityFilterChain; import org.springframework.security.web.util.matcher.AntPathRequestMatcher; @Configuration @EnableWebSecurity public class SecurityConfig { @Autowired private AuthenticationProvider authenticationProvider; @Bean SecurityFilterChain securityFilterChain(HttpSecurity http) throws Exception { http .authenticationProvider(authenticationProvider) .formLogin(formLogin -> formLogin .loginProcessingUrl("/login") .defaultSuccessUrl("/home") .failureUrl("/login?error") .permitAll()) .logout(logout -> logout .logoutSuccessUrl("/login")) .authorizeHttpRequests(authz -> authz .requestMatchers("/").permitAll() .requestMatchers("/login").permitAll() .requestMatchers(PathRequest.toStaticResources().atCommonLocations()).permitAll() .requestMatchers(AntPathRequestMatcher.antMatcher("/h2-console/**")).permitAll() .anyRequest().authenticated()) .csrf(csrf -> csrf .ignoringRequestMatchers(AntPathRequestMatcher.antMatcher("/h2-console/**"))) .headers(headers -> headers .frameOptions(frame -> frame.sameOrigin())); return http.build(); } } -
-
- 補足で home のコントローラ・html 作成
-
src/main/java/demoにパッケージcontller作成 - 作ったパッケージの直下に
HomeController.java作成して以下を入力 - 中身は適当に一旦, loginuser のデータを一覧表示するコントローラ
HomeController.java
package demo.contller; import org.springframework.beans.factory.annotation.Autowired; import org.springframework.stereotype.Controller; import org.springframework.ui.Model; import org.springframework.web.bind.annotation.GetMapping; import demo.service.LoginUserService; @Controller public class HomeController { @Autowired LoginUserService loginUserService; @GetMapping("/home") public String init(Model model) { model.addAttribute("loginusers", loginUserService.findAll()); return "home"; } } -
src/main/resources/templatesの直下にhome.html作成して以下を入力 - 中身は適当に一旦, loginuser のデータを一覧表示するhtml
home.html
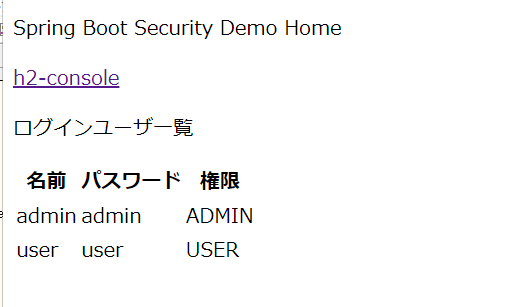
<!DOCTYPE html>
<html>
<head>
    <title>spring-boot-security-demo</title>
    <meta http-equiv="Content-Type" content="text/html; charset=UTF-8" />
</head>
<body>
    <p>Spring Boot Security Demo Home</p>
    <p><a href="/h2-console">h2-console</a></p>
    <p>ログインユーザ一覧</p>
    <div th:if="${loginusers.size() == 0}">
        登録データが1件もありません。
    </div>
    <table th:if="${loginusers.size() >= 1}">
        <thead>
            <tr>
                <th>名前</th>
                <th>パスワード</th>
                <th>権限</th>
            </tr>
        </thead>
        <tbody th:each="loginuser : ${loginusers}" th:object=${loginuser}>
            <td th:text="*{username}"></td>
            <td th:text="*{password}"></td>
            <td th:text="*{authority}"></td>
        </tbody>
    </table>
</body>
</html>
-
起動確認 ※ここまでだとパスワード平文で判定
-
http://localhost:8080/ でアクセス(http://localhost:8080/login にいく)
- デフォルトの login ページが開く
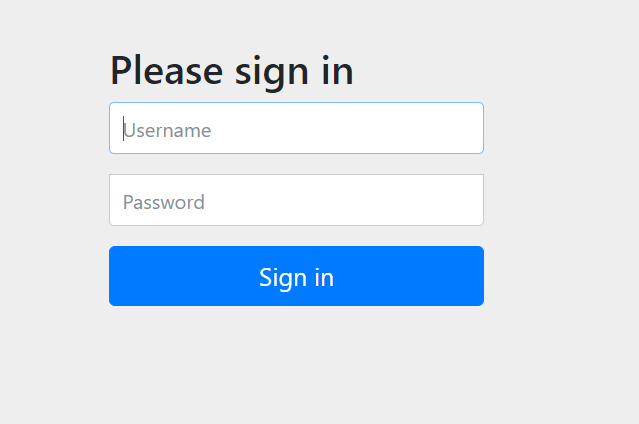
- デフォルトの login ページが開く
- DBに登録したユーザで admin / admin でログインできればOK
- 簡易的につくった home にいけばOK
- 簡易的につくった home にいけばOK
パスワードハッシュ化の設定追加
- パスワードエンコードの設定したコンフィグを作成
-
src/main/java/demo/configの直下にPasswordEncoderConfig.java作成して以下を入力 - BCryptPasswordEncoder を使ってエンコードするための設定
PasswordEncoderConfig.java
package demo.config;

import org.springframework.context.annotation.Bean;
import org.springframework.context.annotation.Configuration;
import org.springframework.security.crypto.bcrypt.BCryptPasswordEncoder;
import org.springframework.security.crypto.password.PasswordEncoder;

@Configuration
public class PasswordEncoderConfig {

    @Bean
    PasswordEncoder passwordEncoder() {
        return new BCryptPasswordEncoder();
    }
}
-
- パスワードのチェック時にPasswordEncoderを使用
- src/main/java/demo/provider
にあるCustomAuthenticationProvider.java` を更新 - PasswordEncoder の依存を追加(Autowiredする)
- PasswordEncoder の matches を使ってパスワードチェック
CustomAuthenticationProvider.java
package demo.provider;

import org.springframework.beans.factory.annotation.Autowired;
import org.springframework.security.authentication.AuthenticationProvider;
import org.springframework.security.authentication.BadCredentialsException;
import org.springframework.security.authentication.UsernamePasswordAuthenticationToken;
import org.springframework.security.core.Authentication;
import org.springframework.security.core.AuthenticationException;
import org.springframework.security.core.authority.AuthorityUtils;
import org.springframework.stereotype.Component;

import demo.entity.LoginUser;
import demo.service.LoginUserService;

@Component
public class CustomAuthenticationProvider implements AuthenticationProvider {

    @Autowired
    private LoginUserService loginUserService;
    // PasswordEncoder 追加
    @Autowired
    private PasswordEncoder passwordEncoder;

    @Override
    public Authentication authenticate(Authentication authentication) throws AuthenticationException {

        String username = authentication.getName();
        String password = (String) authentication.getCredentials();

        LoginUser loginUser = loginUserService.findById(username);
        // PasswordEncoder.matches でパスワードチェックに修正
        if (loginUser != null && passwordEncoder.matches(password, loginUser.getPassword())) {
            return new UsernamePasswordAuthenticationToken(username, password,
                    AuthorityUtils.createAuthorityList(loginUser.getAuthority()));
        } else {
            throw new BadCredentialsException("Authentication failed");
        }
    }

    @Override
    public boolean supports(Class<?> authentication) {
        return authentication.equals(UsernamePasswordAuthenticationToken.class);
    }

}
- src/main/java/demo/provider
DBのデータのパスワードハッシュ値に更新
- パスワードのハッシュ値出力のテストクラス作成
- src/test/java/demo
直下にPasswordEncoderTests.java` を以下のように作成PasswordEncoderTests.javapackage demo; import org.junit.jupiter.api.Test; import org.springframework.beans.factory.annotation.Autowired; import org.springframework.boot.test.context.SpringBootTest; import org.springframework.security.crypto.password.PasswordEncoder; @SpringBootTest class PasswordEncoderTests { @Autowired private PasswordEncoder passwordEncoder; @Test void contextLoads() { System.out.println("↓↓ハッシュ値↓↓"); System.out.println(passwordEncoder.encode("admin")); // ハッシュ化したい文字列を入れる System.out.println(passwordEncoder.encode("user")); } }
- src/test/java/demo
- パスワードのハッシュ値出力のテストクラス実行してハッシュ値を取得
- src/test/java/demo
直下にPasswordEncoderTests.java` を実行-
PasswordEncoderTests.java右クリック - [実行] - [JUnitテスト]
-
- コンソール出力から以下のような出力があるのでハッシュ値を取得
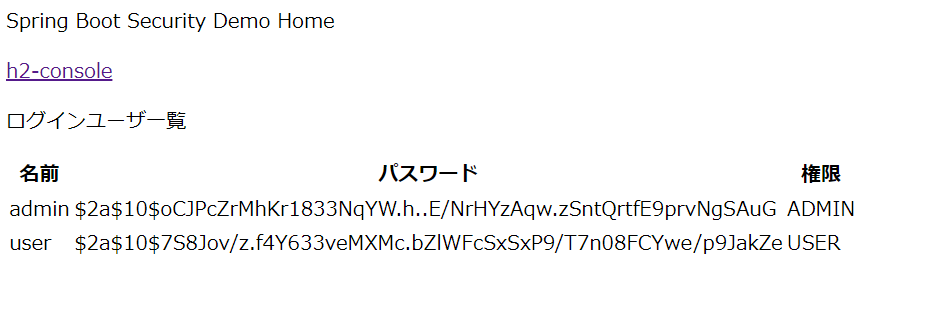
・・・略・・・
↓↓ハッシュ値↓↓
$2a$10$oCJPcZrMhKr1833NqYW.h..E/NrHYzAqw.zSntQrtfE9prvNgSAuG
$2a$10$7S8Jov/z.f4Y633veMXMc.bZlWFcSxSxP9/T7n08FCYwe/p9JakZe
・・・略・・・
- src/test/java/demo
- 出力したハッシュ値でDBのデータファイルを更新
- src/main/resources
直下のdata.sql` のパスワードの値を出力したハッシュ値で更新
- src/main/resources
起動確認 ※これでハッシュ化したパスワードで判定
-
http://localhost:8080/ でアクセス(http://localhost:8080/login にいく)
- デフォルトの login ページが開く
- デフォルトの login ページが開く
- DBに登録したユーザで admin / admin でログインできればOK
- 簡易的につくった home にいけばOK
- パスワードがハッシュ値になってる