はじめに
Chainer を開発したプリファード・ネットワークス が、今後は PyTorch を基盤にするという記事を目にしました。
学術論文も PyTorch による記述が多いらしいです。
PyTorch は、フェイスブックが開発・公開する深層学習ライブラリーです。
今後は PyTorch がスタンダードになってきそうでしょうか。
というわけで、PyTorch を公式チュートリアルから始めてみたいと思います。
Getting Started にある最初のチュートリアル「DEEP LEARNING WITH PYTORCH: A 60 MINUTE BLITZ」の「WHAT IS PYTORCH?」を進めてみます。
目次
1.Google Colaboratory
2.Google Colaboratory をGoogleアカウントで利用する
3.What is PyTorch?
3.1.Tensor の作成
3.2.Tensor の操作
3.3.Tensor ⇔ Numpy
3.4.CUDA Tensor
4.最後に
履歴
1.Google Colaboratory
PyTorch のチュートリアルは Google Colaboratory の環境を利用すると進めやすいと思います。
Google Colaboratory は Google が提供している、ブラウザで Python を実行できる環境です。
Google アカウントが必要ですが、Google ドライブと連携することで、ドライブ上のファイルを Colaboratory 環境で実行したり、ドライブ上のファイルを読み込み、書き出しもできます。
2.Google Colaboratory をGoogleアカウントで利用する
Colaboratory を利用する環境を準備してみます。
Google アカウントでログインし、Colaboratory ( https://colab.research.google.com/ ) にアクセスすると、以下のようなポップアップが表示されます。
ここでは一旦「キャンセル」します。
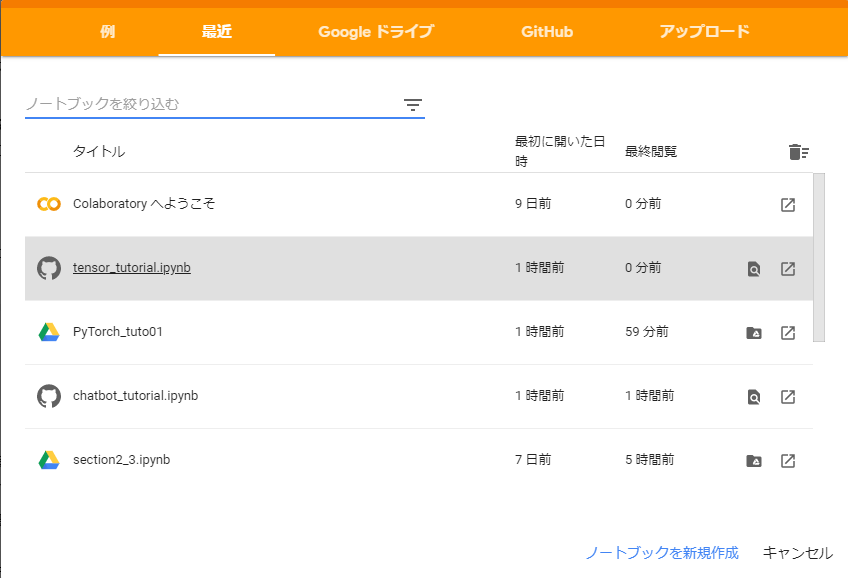
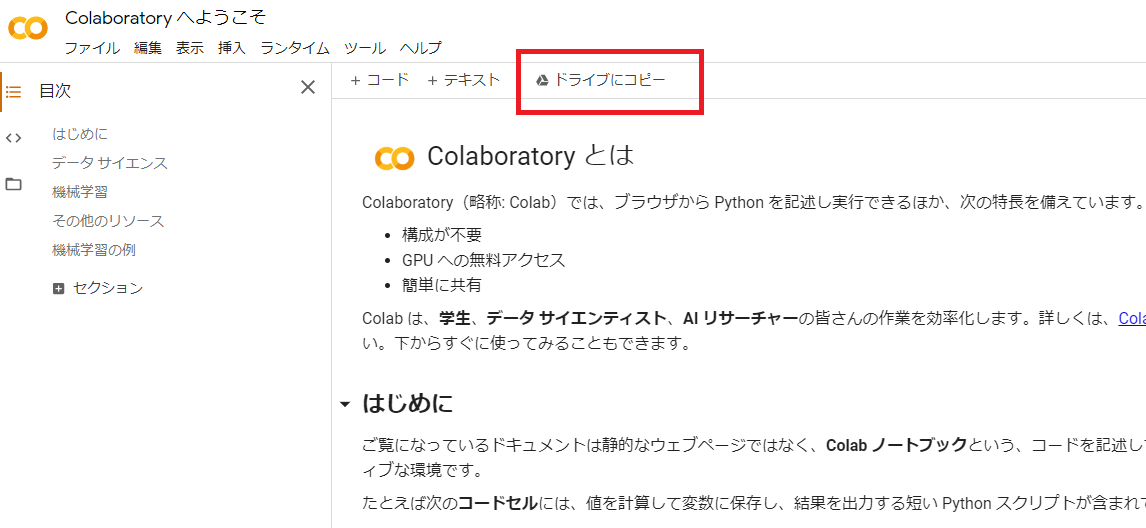
すると以下のような「Colaboratory へようこそ」画面が表示されます。
「ドライブにコピー」をクリックします。
Google ドライブに行くと、以下のように「Colab Notebooks」のフォルダが作成されています。
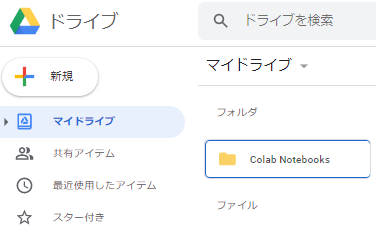
これで、Google Colaboratory を利用する準備が整いました。
PyTorchのチュートリアル ( https://pytorch.org/tutorials/beginner/blitz/tensor_tutorial.html )にアクセスします。
「Run in Google Colab」をクリックします。
このまま進めてもよいのですが、ドライブにコピーをクリックします。
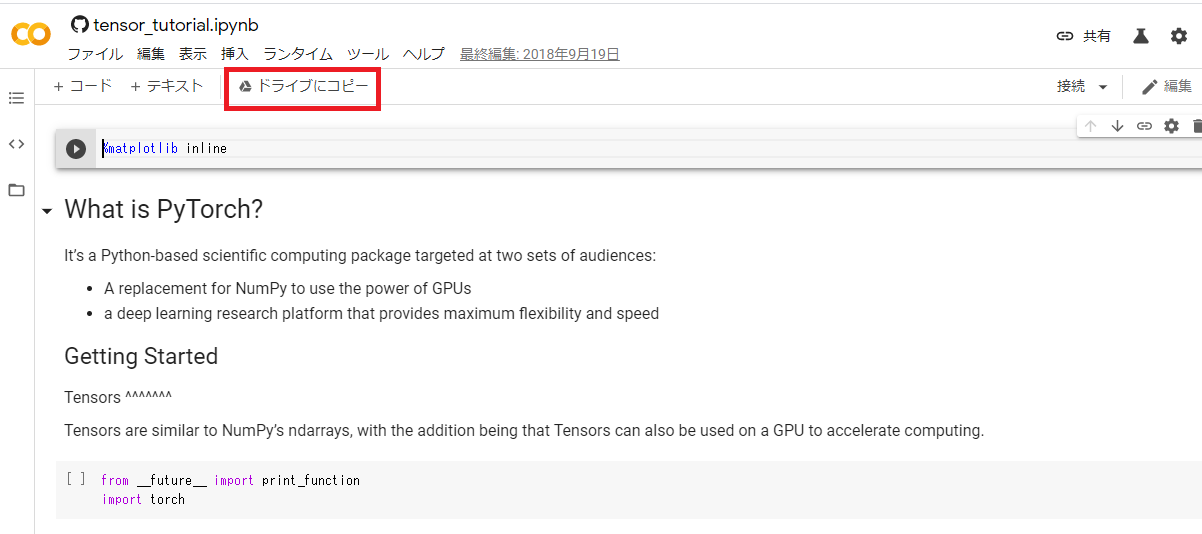
すると、先ほど作成された Google ドライブの「Colab Notebooks」フォルダにファイルがコピーされます。
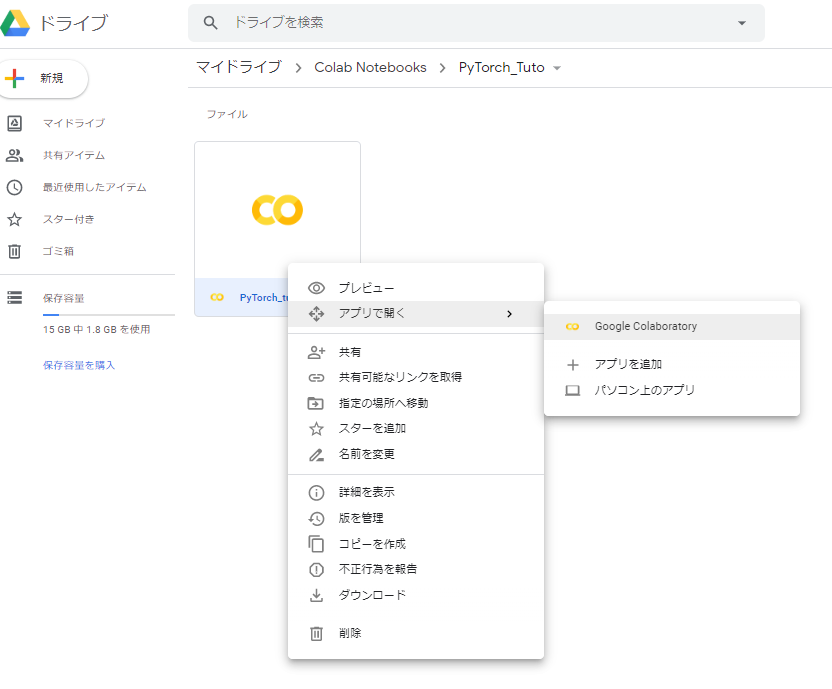
後は、ファイルを右クリック⇒「アプリで開く」⇒「Google Colaboratory」で Colaboratory 環境でファイルを実行できます。
チュートリアルを Google ドライブにコピーして進めることで、自分なりの記述を追加しながら進めることができます。
3.What is PyTorch?
3.1. Tensor の作成
前置きが長くなりましたが、PyTorch のチュートリアルを進めます。
今回は、一番最初の「What is PyTorch?」からです。
PyTorch では入力データを Tensor で扱います。
Tensor とは任意の次元の配列です。
数字1つやスカラーは0次テンソル、1次元配列やベクトルは1次テンソル、2次元配列や行列は2次テンソル、3次元配列は3次テンソルになります。
torch.empty で初期化されていない Tensor を作成します。
from __future__ import print_function
import torch

x = torch.empty(5, 3)
print(x)
tensor([[2.8129e-35, 0.0000e+00, 0.0000e+00],
        [0.0000e+00, 0.0000e+00, 0.0000e+00],
        [0.0000e+00, 0.0000e+00, 2.8026e-45],
        [0.0000e+00, 1.1210e-44, 0.0000e+00],
        [1.4013e-45, 0.0000e+00, 0.0000e+00]])
torch.rand でランダムな値の Tensor を作成します。
x = torch.rand(5, 3)
print(x)
tensor([[0.0129, 0.2380, 0.2860],
        [0.0942, 0.6319, 0.9040],
        [0.3457, 0.0503, 0.9295],
        [0.2715, 0.8802, 0.6511],
        [0.3274, 0.0322, 0.0097]])
torch.zeros で要素が0の Tensor を作成します。
x = torch.zeros(5, 3, dtype=torch.long)
print(x)
tensor([[0, 0, 0],
        [0, 0, 0],
        [0, 0, 0],
        [0, 0, 0],
        [0, 0, 0]])
torch.tensor にリストを渡すことで Tensor を作成することができます。
x = torch.tensor([5.5, 3])
print(x)
tensor([5.5000, 3.0000])
new_ones で元の Tensor を要素1で書き換えます。
また、randn_like で元の Tensor をランダム値で書き換えます。
randn なので、標準化(平均0、標準偏差1)のランダム値になります。
x = x.new_ones(5, 3, dtype=torch.double)      # new_* methods take in sizes
print(x)

x = torch.randn_like(x, dtype=torch.float)    # override dtype!
print(x)
tensor([[1., 1., 1.],
        [1., 1., 1.],
        [1., 1., 1.],
        [1., 1., 1.],
        [1., 1., 1.]], dtype=torch.float64)
tensor([[-1.7169,  0.0026,  0.0341],
        [-0.8156,  0.0672,  0.6364],
        [-0.3116, -0.1866, -1.3844],
        [-0.2527, -0.9790, -1.6029],
        [-0.9892,  0.4730,  0.4554]])
size() で Tensor のサイズを取得します。
print(x.size())
torch.Size([5, 3])
3.2. Tensor の操作
加算は、要素単位で行われます。
- 演算子と torch.add の2通りの記述があります。
y = torch.rand(5, 3)
print(x + y)
tensor([[-1.1761,  0.5185,  0.9026],
        [-0.6358,  0.8661,  0.9583],
        [ 0.4605, -0.0935, -0.7063],
        [ 0.7133, -0.8798, -1.0570],
        [-0.3332,  1.0319,  0.5329]])
print(torch.add(x, y))
tensor([[-1.1761,  0.5185,  0.9026],
        [-0.6358,  0.8661,  0.9583],
        [ 0.4605, -0.0935, -0.7063],
        [ 0.7133, -0.8798, -1.0570],
        [-0.3332,  1.0319,  0.5329]])
out 引数で、出力 Tensor を指定することができます。
result = torch.empty(5, 3)
torch.add(x, y, out=result)
print(result)
tensor([[-1.1761,  0.5185,  0.9026],
        [-0.6358,  0.8661,  0.9583],
        [ 0.4605, -0.0935, -0.7063],
        [ 0.7133, -0.8798, -1.0570],
        [-0.3332,  1.0319,  0.5329]])
add_ で入力 Tensor を計算結果で書き換えます。
# adds x to y
y.add_(x)
print(y)
tensor([[-1.1761,  0.5185,  0.9026],
        [-0.6358,  0.8661,  0.9583],
        [ 0.4605, -0.0935, -0.7063],
        [ 0.7133, -0.8798, -1.0570],
        [-0.3332,  1.0319,  0.5329]])
NumPy のスライスは同様に利用することができます。
print(x[:, 1])
tensor([ 0.0026, 0.0672, -0.1866, -0.9790, 0.4730])
torch.view は Tensor の形状を変換します。
-1を指定すると、他の次元を考慮して補完されます。
x = torch.randn(4, 4)
y = x.view(16)
z = x.view(-1, 8)  # the size -1 is inferred from other dimensions
print(x.size(), y.size(), z.size())
torch.Size([4, 4]) torch.Size([16]) torch.Size([2, 8])
要素数1の Tensor に対して item() を利用すると、通常の値として取得できます。
x = torch.randn(1)
print(x)
print(x.item())
tensor([-1.5867])
-1.5867252349853516
3.3.Tensor ⇔ Numpy
NumPy から Tensor への変換は、torch.numpy() で行います。
Tensor から NumPy への変換は、torch.numpy() で行います。
メモリを共有するため、一方を変更すると、もう一方も変更されます。
a = torch.ones(5)
print(a)
tensor([1., 1., 1., 1., 1.])
b = a.numpy()
print(b)
[1. 1. 1. 1. 1.]
a.add_(1)
print(a)
print(b)
tensor([2., 2., 2., 2., 2.])
[2. 2. 2. 2. 2.]
Tensor から NumPy への変換は、torch.from_numpy() で行います。
NumPy から Tensor への変換は、torch.from_numpy() で行います。
import numpy as np
a = np.ones(5)
b = torch.from_numpy(a)
np.add(a, 1, out=a)
print(a)
print(b)
[2. 2. 2. 2. 2.]
tensor([2., 2., 2., 2., 2.], dtype=torch.float64)
3.4.CUDA Tensor
torch.to() を利用して Tensor を様々なデバイスに移動できます。
以下のコードでは CUDA デバイスに移動しています。
CUDA は NVIDIA が提供している、GPU環境のプラットフォームです。
# let us run this cell only if CUDA is available
# We will use ``torch.device`` objects to move tensors in and out of GPU
if torch.cuda.is_available():
    device = torch.device("cuda")          # a CUDA device object
    y = torch.ones_like(x, device=device)  # directly create a tensor on GPU
    x = x.to(device)                       # or just use strings ``.to("cuda")``
    z = x + y
    print(z)
    print(z.to("cpu", torch.double))       # ``.to`` can also change dtype together!
tensor([0.9866], device='cuda:0')
tensor([0.9866], dtype=torch.float64)
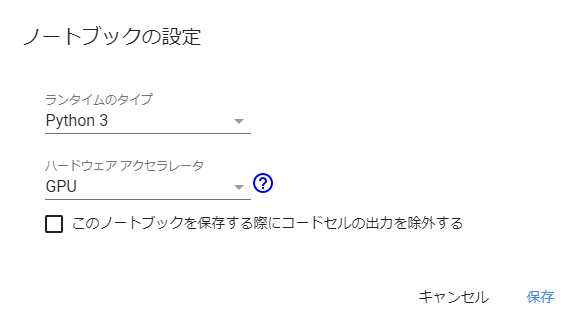
上記のコードを Colaboratory で実行するためには、メニュー「ランタイムのタイプ変更」から「ハードウェアアクセラレータ」を「GPU」にする必要があります。
4.最後に
以上が、PyTorch の最初のチュートリアル「What is PyTorch?」の内容です。
次回は2つ目のチュートリアル「AUTOGRAD: AUTOMATIC DIFFERENTIATION」を進めてみたいと思います。
履歴
2020/02/23 初版公開
2020/02/28 次回のリンク追加
2020/07/11 3.3.Tensor ⇔ Numpy の誤記修正