はじめに
n番煎じな題ですが、何かの参考になれば幸いです。
こういう設定はネット上に落ちてる情報を拾ってきても往々にして上手くいかないものです。
僕の環境ではこれで上手くいきましたが、これで上手くいかない時は自分で頑張って検索しましょう。
基本的に https://centossrv.com/postfix.shtml を参考にしました。
-
#○○は(僕が書いた)コメントなので実際のファイルにはありません。入力しないでください。 -
example.comの部分は自分のドメインにしてください。
目標
- プロトコルはIMAPs、SMTPs
- Maildir形式
- メールユーザはSSHできないようにする。
環境
> cat /etc/redhat-release
CentOS Linux release 7.3.1611 (Core)
1. Let'sEncryptで証明書を発行
1.1 certbotのインストール
> yum -y install certbot
1.2 証明書の発行
\の前の半角スペースを忘れないように
> certbot certonly --standalone \
> -d 発行したいドメイン \
> -m 管理用メールアドレス \
> --agree-tos
例
> certbot certonly --standalone \
> -d mail.example.com \
> -m root@example.com \
> --agree-tos
1.3 証明書が出来ていることを確認
> ls /etc/letsencrypt/live/mail.example.com/
README  cert.pem  chain.pem  fullchain.pem  privkey.pem
1.4 証明書の自動更新の設定
毎朝8時に証明書の期限が切れていないかを確認し、期限が近い場合は更新してサービスを再起動する。
> crontab -e
00 08 * * * /usr/bin/certbot renew --post-hook "systemctl restart postfix && systemctl restart dovecot"
2.Postfixのインストールと設定
2.1 インストールと確認
> yum -y install postfix
> postconf | grep mail_version
mail_version = 2.10.1
2.2 main.cfの設定
書き換えるところだけ書きます。設定項目名でファイル内検索をすると楽かも。
> vi /etc/postfix/main.cf

# メールサーバに割り当てるサブドメイン
myhostname = mail.example.com
# ドメイン名
mydomain = example.com
# メールアドレスの@以降をmydomainにする。この例だとhoge@example.comになる
myorigin = $mydomain
# 外部からメールを受信できるように
inet_interfaces = all
# mydomain宛のメールを受信できるように
mydestination = $myhostname, localhost.$mydomain, localhost, $mydomain
# メールボックス形式をMaildir形式にする
home_mailbox = Maildir/
# 自分がpostfixであることを隠す
smtpd_banner = $myhostname ESMTP unknown
以下はファイルの最後に追記してください。
> vi /etc/postfix/main.cf

# SMTP認証を有効にする。知らない人の踏み台にならないように
smtpd_sasl_auth_enable = yes
smtpd_sasl_local_domain = $myhostname
# 認証にDovecotを使う
smtpd_sasl_type = dovecot
smtpd_sasl_path = private/auth


smtpd_recipient_restrictions =
    permit_mynetworks
    permit_sasl_authenticated
    reject_unauth_destination

# 受信メールサイズを10MBに制限。ここは適当に
message_size_limit = 10485760

# SSLで暗号化する
smtpd_use_tls = yes
# Let'sEncryptで作ったfullchainの方
smtpd_tls_cert_file = /etc/letsencrypt/live/mail.example.com/fullchain.pem
# Let'sEncryptで作ったprivkeyの方
smtpd_tls_key_file = /etc/letsencrypt/live/mail.example.com/privkey.pem
# おまじない?
smtpd_tls_session_cache_database = btree:/var/lib/postfix/smtpd_scache

# 存在しないユーザ宛のメールをunknown_user@localhostに送るようにする(後述)
local_recipient_maps =
luser_relay = unknown_user@localhost
2.3 master.cfの設定
SMTPsを有効にする。
> vi /etc/postfix/master.cf

# 以下の行の頭の#を消す。頑張って探してね
smtps     inet  n       -       n       -       -       smtpd
  -o smtpd_tls_wrappermode=yes
  -o smtpd_sasl_auth_enable=yes
tlsmgr    unix  -       -       n       1000?     1       tlsmgr
-o smtpd_sasl_auth_enable=yesは2つあるけどコメントアウトを外すのはsmtpsの下にある方です。
2.4 SMTP認証の設定
> vi /etc/sasl2/smtpd.conf
# ↓この行を
pwcheck_method: saslauthd
# ↓こうする
pwcheck_method: auxprop
2.5 Maildir形式で受信できるようにする
新規ユーザを作ったときにMaildir/{new,cur,tmp}という名前のフォルダが自動で生成されるようにする。
useradd user1とすると/home/user1/Maildir/直下にフォルダが三つできるようになるはず。
> mkdir -p /etc/skel/Maildir/{new,cur,tmp}
> chmod -R 700 /etc/skel/Maildir
2.6 存在しないユーザ宛のメールを破棄する
main.cfで設定したunknown_user宛のメールを破棄する。
> echo unknown_user: /dev/null >> /etc/aliases
> newaliases
3. Dovecotのインストールと設定
3.1 インストールと確認
> yum -y install dovecot
> dovecot --version
2.2.10
3.2 10-mail.confの設定
Maildir形式にする。
> vi /etc/dovecot/conf.d/10-mail.conf

mail_location = maildir:~/Maildir
3.3 10-ssl.confの設定
SSLを有効にする
> vi /etc/dovecot/conf.d/10-ssl.conf

ssl = yes
# 鍵をLet'sEncryptで取得したやつにする
ssl_cert = </etc/letsencrypt/live/mail.example.com/fullchain.pem
ssl_key = </etc/letsencrypt/live/mail.example.com/privkey.pem
3.4 10-master.confの設定
SSLを使わないIMAPを無効化する。
> vi /etc/dovecot/conf.d/10-master.conf

# ↓の部分を
  inet_listener imap {
    #port = 143
  }
  inet_listener imaps {
    #port = 993
    #ssl = yes
  }
# ↓のようにする
  inet_listener imap {
    port = 0
  }
  inet_listener imaps {
    port = 993
    ssl = yes
  }
PostfixがDovecotの認証を使えるようにする(前述)
# ↓の部分を
  # Postfix smtp-auth
  unix_listener /var/spool/postfix/private/auth {
    mode = 0666
  }

# ↓のようにする
  # Postfix smtp-auth
  unix_listener /var/spool/postfix/private/auth {
    mode = 0660
    user = postfix
    group = postfix
  }
3.5 dovecot.confの設定
POP3を使わずIMAPだけ使う。
> vi /etc/dovecot/dovecot.conf

protocols = imap
4.ファイアウォールの設定
SMTPs、IMAPsの通信を許可する。
SMTPの25番も開けておかないと外部からメールが受信できないっぽい?
> firewall-cmd --add-service=smtp --permanent --zone=public
> firewall-cmd --add-service=smtps --permanent --zone=public
> firewall-cmd --add-service=imaps --pernament --zone=public
> firewall-cmd --reload
servicesのところにsmtpとsmtpsとimapsがあることを確認する。
> firewall-cmd --list-all
public (active)
  target: default
  icmp-block-inversion: no
  interfaces: eth0
  sources:
  services: dhcpv6-client ftp http https smtp imaps smtps ssh
  ports:
  protocols:
  masquerade: no
  forward-ports:
  sourceports:
  icmp-blocks:
  rich rules:
https://www.cman.jp/network/support/port.html とかでポートが開いてるかを確認する。
5. サービスの起動
5.1 Postfix、Dovecotを起動する。
> systemctl start postfix
> systemctl start dovecot
5.2 サーバ起動時に自動で起動するようにする。
> systemctl enable postfix
> systemctl enable dovecot
5.3 起動してるか確認する。
active (running)であることを確認する。
> systemctl status postfix
> systemctl status dovecot
6. メールユーザを設定する
6.1 ユーザを作成する
安全のためSSHログインは出来ないようにする。
パスワードは適当に入力する。
> useradd -s /sbin/nologin test-user
> passwd test-user
ユーザー test のパスワードを変更。
新しいパスワード:
新しいパスワードを再入力してください:
passwd: すべての認証トークンが正しく更新できました。
6.2 SMTP認証に追加する
パスワードは適当に入力する。6.1と一致している必要はない。
> saslpasswd2 -u mail.example.com -c test-user
Password:
Again (for verification):
追加の確認
> sasldblistusers2
test-user@mail.example.com: userPassword
7. Thunderbirdの設定
パスワードは6.2で設定したもの
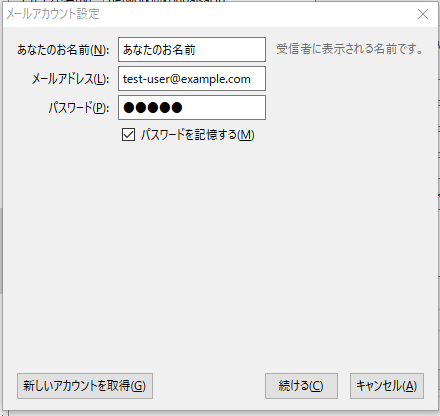
この設定でテストが通れば完成です!

送受信を一応確認しておきましょう。
8. おわりに
うまく動かない時は
tail /var/log/maillogをしてログを見ましょう。postfixのエラーもdovecotのエラーも全部ここにログされます。