背景
ログインしたユーザーだけ実行可能なAPIを作って公開したので、その手順を記載する。
AWS Cognito, API Gateway, Lambdaを使って実現し、S3で公開する。
作るもの
- ユーザー目線
- ユーザーはウェブサイトにアクセスし、サインアップとログインする
- ログインすると、API呼び出しができるようになる
- システム構成
- S3の静的ウェブサイトホスティング機能でウェブサイトを公開する
- Cognitoでユーザー管理、認証、認可を行う
- API GatewayでCORS設定とユーザー認証、認可を行い、Lambdaを呼び出す
- Lambdaがなにか処理をする
- API Gatewayがレスポンスを返す
Cognitoでユーザー管理
ユーザープールの作成
Cognitoにアクセスして、ユーザープールを新規作成。今回はGoogleアカウント連携などはせず、Cognito自身でユーザー管理する。
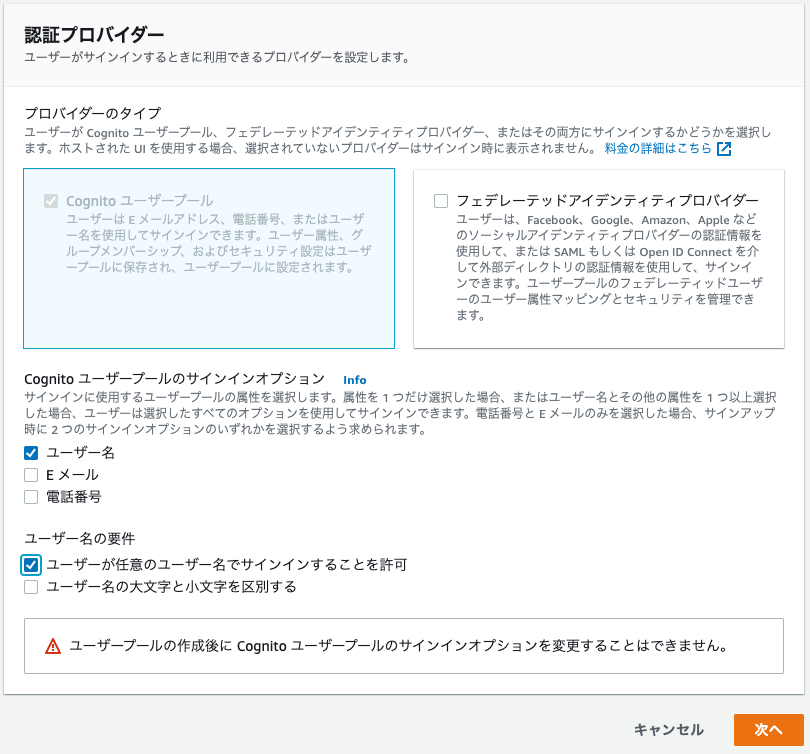
パスワードポリシーは適宜設定変えて、多要素認証はなしにしておく。

自分でサインアップできるように、セルフサービスのサインアップは許可しておく。また、Eメール確認もする。
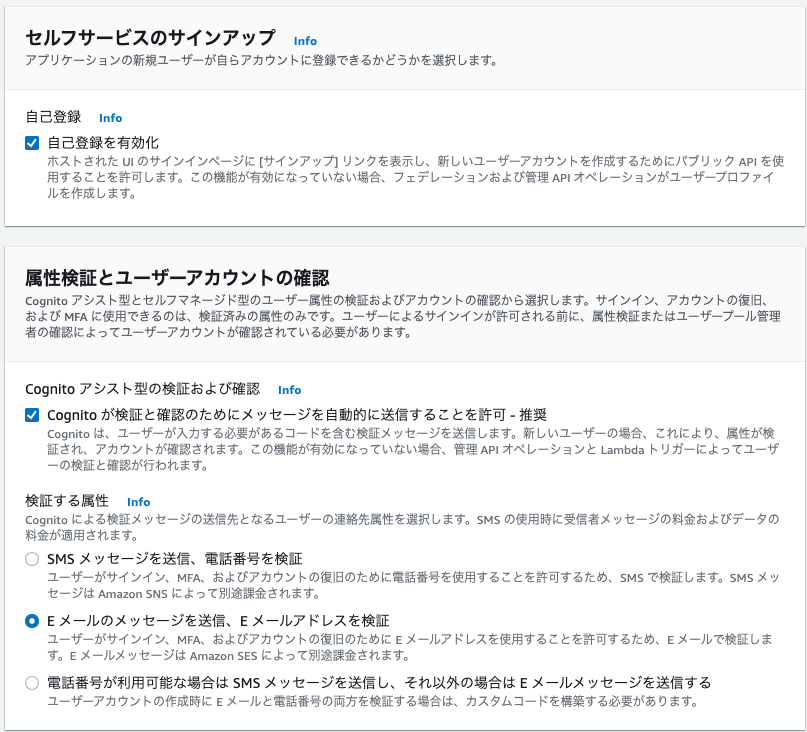
必須の属性は、今回はemailだけにしておく。
メールは、今回はCognitoから送ってもらう。
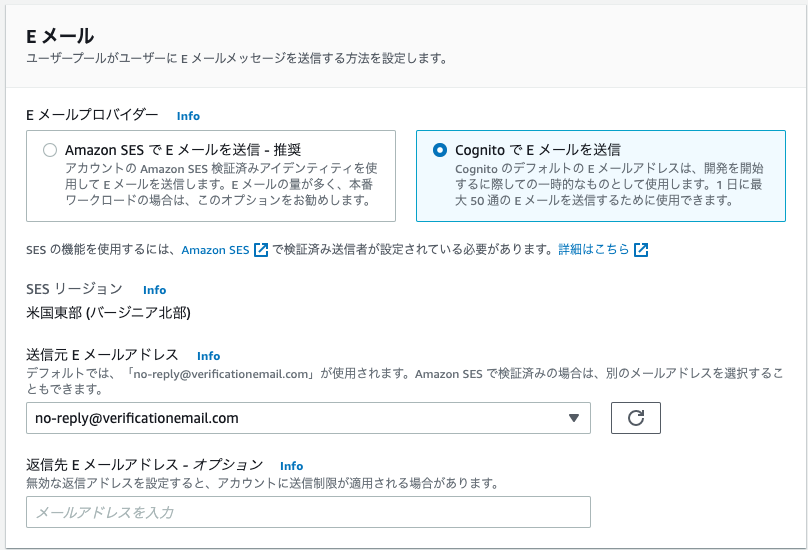
ユーザープール名は適当に qiita-pool としておく。
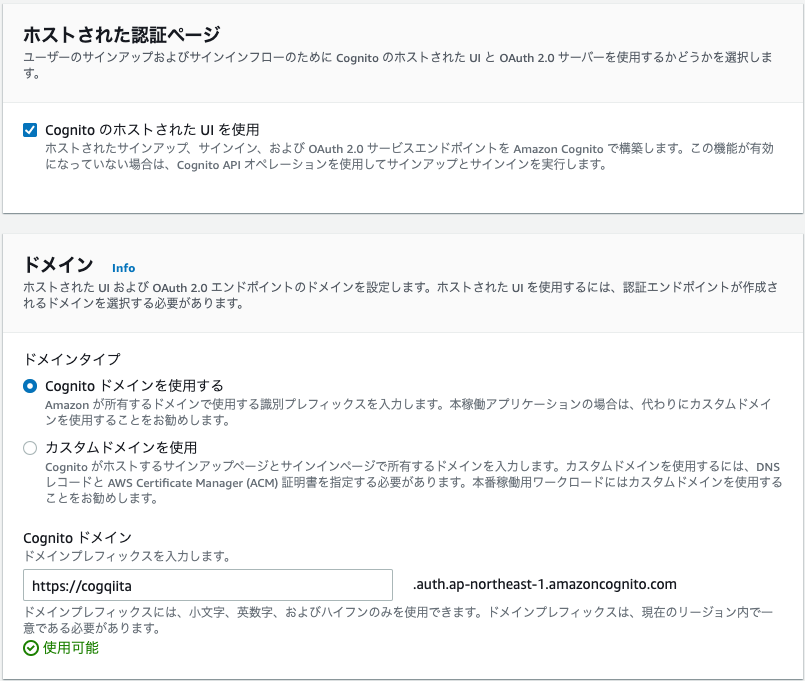
認証ページも今回はCognitoのデフォルトUIにしておき、Cognitoドメインも適当に設定。
ウェブから使う予定なので、パブリッククライアントにする。
Amplifyから使うので、今回はクライアントのシークレットは生成してはいけない。
参考:Configuring Amplify Categories
(App client secret needs to be disabled)
コールバックURLはひとまず https://localhost:8080 としておいたが、あとの手順でS3にファイルを置いたら、URLの置換を行う必要がある。
内容を確認して、ユーザープールを作成する。
IDプールの作成
AWSコンソールのフェデレーティットアイデンティティから新しいIDプールの作成を行う。
Guestアクセスを可能にするために,認証されていないIDに対するアクセスも許可する。
認証フローは、拡張フローを使うとアクセスまでのステップが減るらしいので、チェックボックスを入れないでおく。

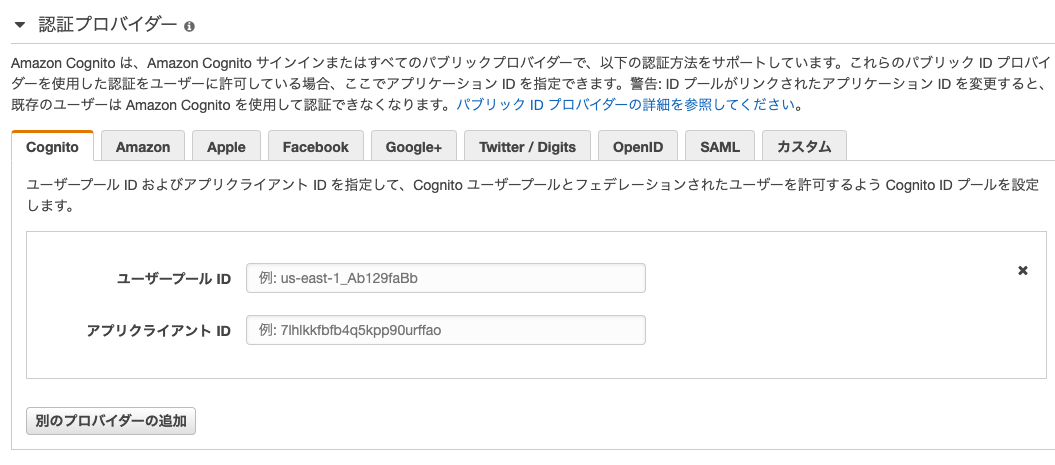
認証プロバイダは、さきほど作成したCognito User Poolを使うので、そちらを参照して各IDを埋めて次に進む。
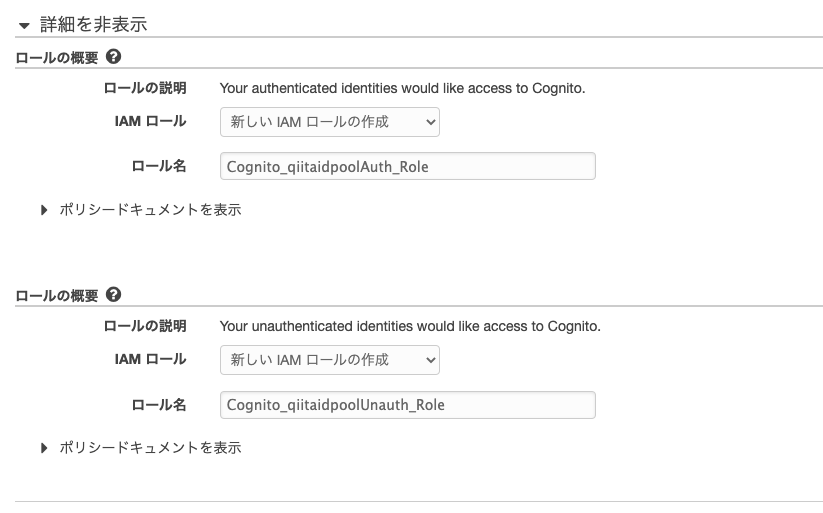
認証済み・未認証ユーザーにどのような権限を与えるかを指定する。
デフォルトでは新規作成になっており、認証していれば"cognito-identity:*"権限が付与されているようなので、id tokenなど取得できるようだ。未認証だとtoken取得できない。
余談だが、IAMロールでなにが実行できてなにが実行できないかの調査は、IAM Policy Simulatorを使うと便利。
ウェブサイトの作成
シンプルなウェブサイトを作成する。Cognitoログイン後のTokenの扱いなどのややこしいことはあまり気にしなくても良いように、Amplify CLIを使って実装する。
プロジェクトの作成
開発ディレクトリで、vue create cognito-testコマンドを実行し、cognito-testというvueプロジェクトを作成する。
今回はVue3で、TypeScriptで作成した。
Amplify CLIのインストールと初期化
npm install -g @aws-amplify/cliでAmplify CLIをインストール。
cd cognito-testにてプロジェクトディレクトリに移動した後にamplify init実行し、デフォルトで初期化。
? Enter a name for the project cognitotest
The following configuration will be applied:

Project information
| Name: cognitotest
| Environment: dev
| Default editor: Visual Studio Code
| App type: javascript
| Javascript framework: vue
| Source Directory Path: src
| Distribution Directory Path: dist
| Build Command: npm run-script build
| Start Command: npm run-script serve

? Initialize the project with the above configuration? (Y/n) Y
AWSリソースの変更に使う認証はデフォルトProfileを使う。
? Select the authentication method you want to use: AWS profile

For more information on AWS Profiles, see:
https://docs.aws.amazon.com/cli/latest/userguide/cli-configure-profiles.html

? Please choose the profile you want to use default
既存のCognito設定の追加
AmplifyとCognitoの連携をする。Cognitoユーザープールは作成済みなので、インポートを行う。
$ amplify import auth
作成したUser PoolとID Poolを使うので、以下を選択。
✔ What type of auth resource do you want to import? · Cognito User Pool and Identity Pool
その後、取り込んだ変更をAmplifyに反映する。
$ amplify push
サインイン
まずは開発用にモジュールのインストール。
$ yarn add aws-amplify
型宣言しないとエラーが出るので、以下のファイルをsrc直下に作成。
declare const awsmobile: {};
export default awsmobile;
tsconfig.jsonに追加しておく。
    "types": [
      "src"
    ],
App.vueを開いて、実装していく。
まずはサインアップできるようにボタン追加する。
<template>
  <button @click="signIn">Sign In</button>
  <button @click="signOut">Sign Out</button>
  <button @click="dumpIdToken">Dump ID Token</button>
</template>
なにはともあれAmplify.configure()を実行する。
Sign In手段としてAuth.federatedSignIn()でCognito備え付けのUIを表示する。
Sign OutはAuth.signOut()
認可後にToken得られるかどうか確認するためにID Tokenを確認する。
import { Vue } from 'vue-class-component';
import Amplify, { Auth } from 'aws-amplify';
import awsconfig from './aws-exports';

export default class App extends Vue {

  mounted() {
    Amplify.configure(awsconfig);
  }

  async signIn() {
    Auth.federatedSignIn();
  }

  async signOut() {
    await Auth.signOut();
  }

  async dumpIdToken() {
    const session = await Auth.currentSession()
    console.log(session)
    const accessToken = session.getIdToken().getJwtToken();
    console.log(accessToken);
  }

}
ちなみに、Auth.currentSession()の結果を出力すると、ID Token, Access Token, Refresh Tokenという3つのTokenが含まれている。
それぞれの役割については、Cognitoのサインイン時に取得できる、IDトークン・アクセストークン・更新トークンを理解するの解説がわかりやすかった。
トークンの保存
API call前に毎回Tokenをとってくるのは遅くなるので、ローカルでキャッシュしておく。
  async signOut() {
    Cache.removeItem('idToken');
    await Auth.signOut();
  }

  async dumpIdToken() {
    const idToken = await this.getIdToken();
    console.log(idToken);
  }

  async getIdToken() {
    let idToken = Cache.getItem('idToken');
    if (idToken === null) {
      const session = await Auth.currentSession()
      console.log(session)
      idToken = session.getIdToken().getJwtToken();
      Cache.setItem('idToken', idToken);
    }
    return idToken;
  }
ちなみに、Tokenの期限が切れた際にTokenのリフレッシュを行うには、Auth.currentSession()を呼べば良い。そして、新たにキャッシュしておけば良い。
APIの呼び出し
既存のAPIを使いたいので、amplifyで既存のものをimportする。
ここで判明したのだが、APIに関してはamplify import apiというコマンドはなく、Amplify.configure()に対して自力で情報渡さないといけないらしい。
となると、Authに関しても自力で情報渡すことになり、
import awsconfig from './aws-exports';
は役目を終える。。。少しいけてないな。
こちらの手順を参考に自身でAPIの情報を記載する。
Authはこちらと、ローカルのaws-exports.jsファイルの内容を照らし合わせて記載する。
その後、コーディングに入る。
  async testApiCall() {
    const idToken = await this.getIdToken();
    const myInit = {
      headers: {
        Authorization: idToken
      }
    };
    return API.get("cognito-test-api", "/testcall", myInit) // ここはAmplify.configure()に渡したAPI情報に合わせて変える
    .then(response => {
      console.log(response);
    }).catch(error => {
      console.log(error);
    })
  }
S3でウェブサイトの公開
S3にhtmlファイルなどを置いてパブリックからアクセスできるようにする。
まず、静的ウェブサイトホスティングの設定を行う。ホームページとして、index.htmlを指定しておく。

また、そもそもS3にアクセスできないと意味がないので、ブロックパブリックアクセスのチェックボックスをすべて解除する。
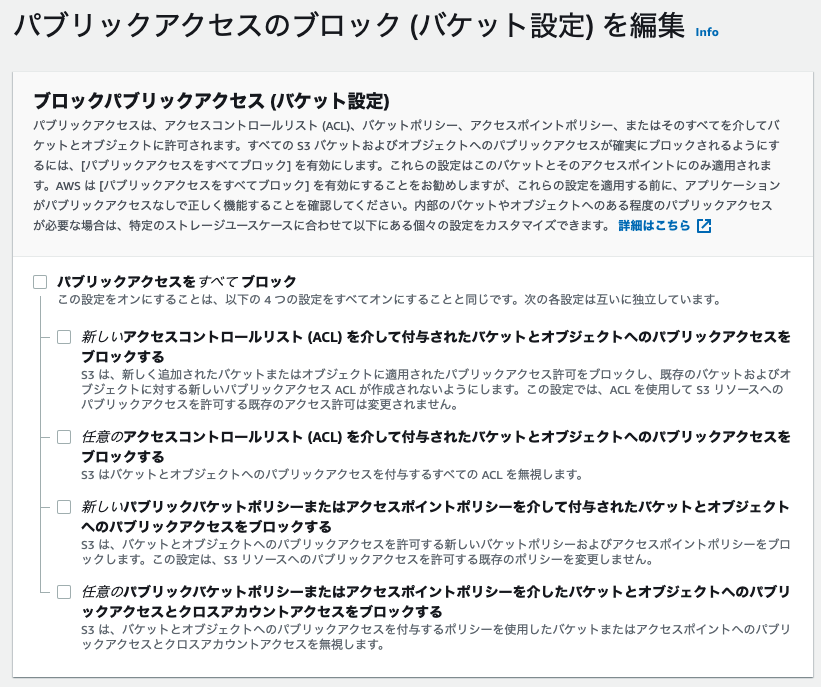
{
    "Version": "2012-10-17",
    "Statement": [
        {
            "Sid": "PublicReadGetObject",
            "Effect": "Allow",
            "Principal": "*",
            "Action": [
                "s3:GetObject"
            ],
            "Resource": [
                "arn:aws:s3:::YOUR-BUCKET-NAME/*"
            ]
        }
    ]
}
その後、S3バケットにindex.htmlをアップロードする。
API Gatewayの設定
Cognito連携
API Gatewayにアクセスし、オーソライザーから新しいオーソライザーの作成を選択する。
名前は適当につけ、Cognitoユーザープールには作成したユーザープール名を指定する。
トークンのソースはAuthorizationを指定し、保存する。
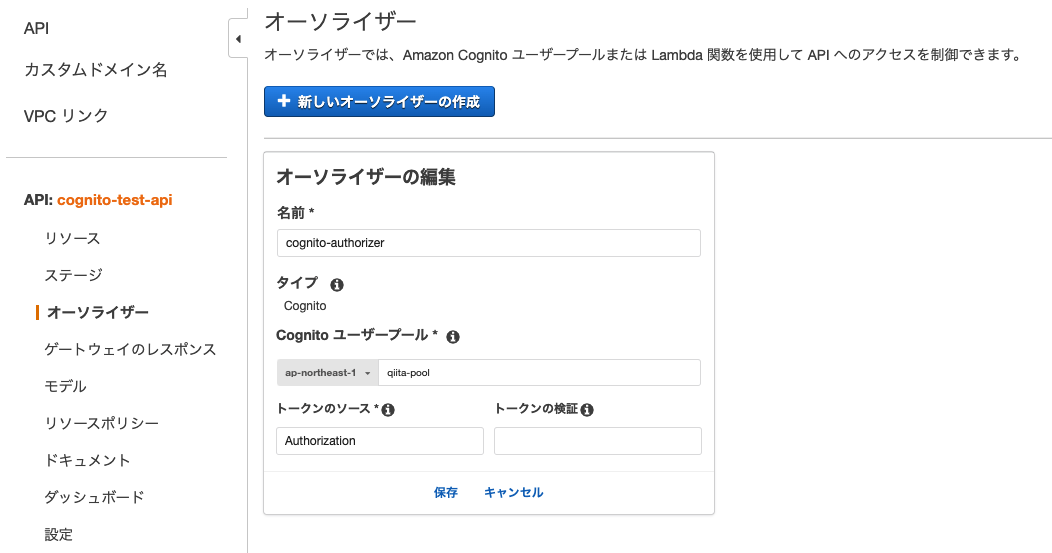
その後、リソースに移動し、Cognito認証を付けたいAPIのTypeを選択し、メソッドリクエストを選ぶ。
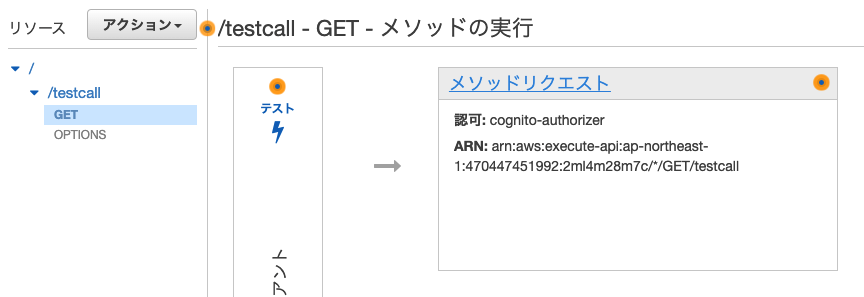
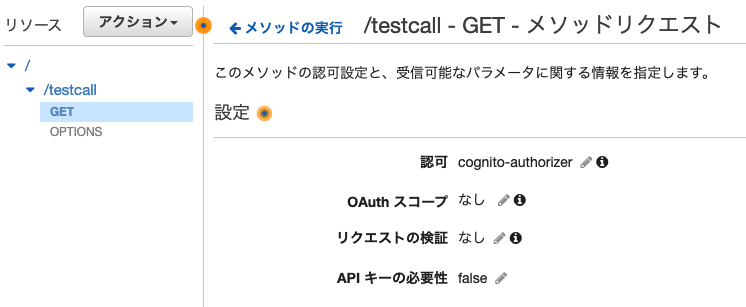
メソッドリクエストの設定として、認可の箇所を選択肢、上記で作成したオーソライザーを選択することで、APIの実行にCognito認証が必要となる。
CORS設定
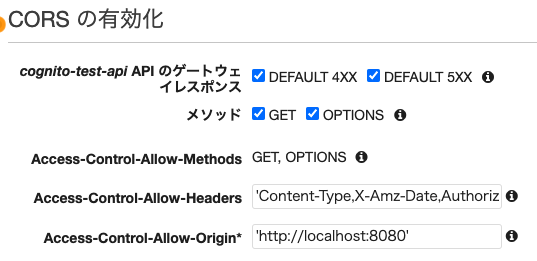
リソースのアクションから、CORSの有効化を選択する。
APIのゲートウェイレスポンスはDEFAULT 4XXとDEFAULT 5XXを選択し、Access-Control-Allow-Origin*にリクエストを許可したいoriginのウェブサイトを指定する。
今回の場合だと、S3の静的サイトホスティングを使っているので、S3が用意したURLとなる。
Lambdaの作成
実装コード
以下のようなコードを実装しておく。
exports.handler = async (event) => {
    // TODO implement
    console.log(event)
    const response = {
        statusCode: 200,
        headers: {
          "Access-Control-Allow-Origin": "*",
          "Access-Control-Allow-Headers": "*"
        },
        body: "hello " + JSON.stringify(event),
    };
    return response;
};
CORS設定
Lambda側のresponse headerにCORS設定を入れる必要がある。
API Gateway側でCors設定入っているので、Lambda側は*で許可で良いだろう。
exports.handler = async (event) => {
    // TODO implement
    console.log(event)
    const response = {
        statusCode: 200,
        headers: {
          "Access-Control-Allow-Origin": "*",
          "Access-Control-Allow-Headers": "*"
        },
        body: "hello " + JSON.stringify(event),
    };
    return response;
};
動作確認
ログインせずにAPI実行
Lambdaの呼び出しが行われず。レスポンスがエラーとなる。
CloudWatch Log上でもUnauthorized requestとなっている。
ログインしてAPI実行
正常にレスポンスが返ってくる。
今回の内容を踏まえて作成したサイト
このページの内容を踏まえて、お年玉付き年賀状の当選確認サイトというものを作成しました。
年賀状の写真を登録すると、自動で番号認識をして当たりかどうか判定してくれます。他の似たようなサイトだと、手動で番号入力する必要があるのですが、このサイトだと写真から番号認識しますし、複数枚の年賀状でも1つの写真で認識するので、確認がかなり楽になってるのが売りです。
ログインすると登録済み年賀状番号が参照できるのと、当選発表日にメールで連絡する機能がついてますが、未ログインでも当たりチェックはできるので、試してみてください。
