今回の処理はバックエンドのテンプレートExcelファイルを使用し
Vueの Pinia の処理内で書き込んでからダウンロードする処理の一部になります。
さらに書き込む際に、ドロップボックスで選択する範囲に名前を付けます。
処理の流れ
バックエンド→フロントエンド→ダウンロード
バックエンド側からテンプレートファイルを取得
バックエンド\methods\download_excel.php
download_excel.php
<?php
header('Content-Type: application/vnd.openxmlformats-officedocument.spreadsheetml.sheet');

// ファイルを提供するスクリプト

class download_excel{

        public function getData($method){

            if ($method !== 'GET') {
                echo json_encode(['status' => 'error', 'message' => '許可されていないメソッドです。']);
                http_response_code(405);
                exit;
            }

            // ファイルのパス
            $filePath = __DIR__ . '/../Excelファイル名.xlsx';

            // ファイルが存在するか確認
            if (!file_exists($filePath)) {
                http_response_code(404);
                // レスポンスの返却
                echo json_encode([
                    "status" => "not_file",
                    "message" => "失敗",
                    "data" => null,
                ], JSON_UNESCAPED_UNICODE);
                exit;
            }

            // ファイルの送信
            header('Content-Description: File Transfer');
            header('Content-Type: application/vnd.openxmlformats-officedocument.spreadsheetml.sheet'); // ExcelファイルのMIMEタイプ
            header('Content-Disposition: attachment; filename="' . basename($filePath) . '"');
            header('Content-Length: ' . filesize($filePath));
            header('Cache-Control: must-revalidate');
            header('Pragma: public');
            header('Expires: 0');

            // ファイルを読み込んで出力
            readfile($filePath);
            exit;
        }

}
?>
Vueの処理
npmのインストールコマンド
npm install exceljs
Piniaでの実装例🍍
フロントエンド\src\stores\useShareData.js
useShareData.js
import { defineStore } from 'pinia';
import apiService from '@/services/api.js';
import ExcelJS from 'exceljs'; // これをファイルの先頭で必ずインポート

export const useShareStore = defineStore('useShareData', {
  state: () => ({
    userList: [],
    staffList: [],
  }),

  actions: {

    async editExcel(day_val) {
      try {
        const templateData = await apiService.getExcel_template();//テンプレートExcelファイルの取得

        if (!templateData) {
          throw new Error("テンプレートデータの取得に失敗しました。");
        }

        const workbook = new ExcelJS.Workbook();
        await workbook.xlsx.load(templateData);

                // `Sheet2` を取得
        const sheet2 = workbook.getWorksheet('Sheet2');

          // データを挿入
          this.staffList.forEach((staff, index) => {
            const cell = sheet2.getCell(`A${1 + index}`);
            cell.value = staff.name;
            console.log(`Sheet2 A${1 + index} の値:`, cell.value); // デバッグ用
          });


           workbook.definedNames.add(`Sheet2!$A$1:$A$${this.staffList.length}`, '職員名');

            // workbook.definedNames.add('職員名', `Sheet2!$A$1:$A$20`);

          this.userList.forEach((user, index) => {
            const cell = sheet2.getCell(`B${1 + index}`);
            cell.value = user.name;
            console.log(`Sheet2 B${1 + index} の値:`, cell.value); // デバッグ用
          });

           workbook.definedNames.add(`Sheet2!$B$1:$B$${this.userList.length}`, '利用者名');


        // シート
        const worksheet = workbook.getWorksheet(1);
        if (!worksheet) {
          throw new Error("ワークシートが見つかりません。");
        }


        worksheet.getCell(`C3`).value = '値1';
        worksheet.getCell(`E3`).value = '値2';
        worksheet.getCell(`G3`).value = '値3';
        worksheet.getCell(`J3`).value = '値4';

        return workbook; // 編集済みのワークブックを返す
      } catch (error) {
        console.error("テンプレートの編集中にエラーが発生しました:", error);
        throw error;
      }
    },
    //----------------------------------------------------------------//
  },

  persist: {
    enabled: true,
    strategies: [
      {
        key: 'ShareData',
        storage: localStorage,
      },
    ],
  },
});
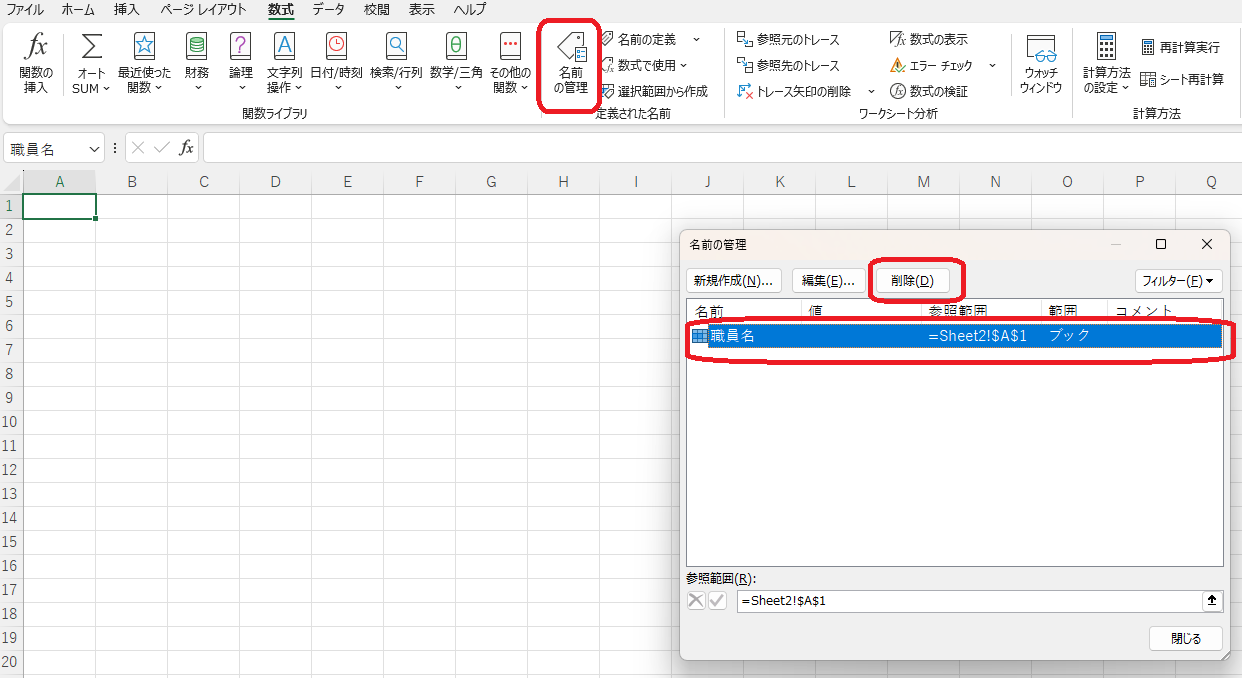
Excelファイルに動的に範囲に名前を命名する
以下は[データの入力規則]でリスト選択するためのセル範囲に後から名前を付けるコードです
workbook.definedNames.add(`Sheet2!$A$1:$A$${this.staffList.length}`, '職員名');
[データの入力規則]
[元の値]には以下の値を事前にテンプレートのExcelファイルに指定しておきます
=職員名
参考になったURL
https://github.com/exceljs/exceljs/pull/1481
Excel側の事前準備
- どこでもいいので範囲に名前を「職員名」とつける

- プルダウンのセレクトボックスを使用する範囲を選択し、データの入力規則を作成

- 入力値の種類「リスト」、元の値「=社員名」でOKを押す

- データの入力規則を作成し終わったら一旦「職員名」を削除する(Vueで作成するk)