Docker 環境と React (TypeScript) で最小フロントエンドを実装する:Spring Boot + MySQL
こんにちは、@studio_meowtoon です。今回は、WSL の Ubuntu 24.04 で TypeScript React Webアプリケーションを作成し、最小限のフロントエンドを実装する方法を紹介します。

目的
Windows 11 の Linux でクラウド開発します。
こちらから記事の一覧がご覧いただけます。
実現すること
ローカル環境の Ubuntu の Docker 環境で、Dockerfile からビルドした TypeScript React Web アプリのカスタムコンテナーと、REST API サービスコンテナー、MySQL データベースコンテナーを起動します。
HTML ファイル形式のアプリをコンテナーとして起動
実行環境
| 要素 | 概要 |
|---|---|
| web-browser | Web ブラウザ |
| Ubuntu | OS |
| Docker | コンテナー実行環境 |
Web アプリ コンテナー
| 要素 | 概要 |
|---|---|
| app-todo-reactts | Web アプリ カスタムコンテナー |
| nginx | Web サーバー |
| index.html | HTML アプリケーション |
REST API サービス コンテナー
| 要素 | 概要 |
|---|---|
| api-todo-spring-boot | REST API サービス カスタムコンテナー |
| JVM | Java 実行環境 |
| app.jar | Java アプリケーション |
| tomcat | Web サーバー |
データベース コンテナー
| 要素 | 概要 |
|---|---|
| mysql-todo | データベースコンテナー |
| mysql | DB サーバー |
| db_todo | データベース |
技術トピック
React とは?
こちらを展開してご覧いただけます。
React (リアクト)
React は、Meta (旧称 Facebook 社) によって開発された JavaScript ライブラリで、ユーザーインターフェイスを構築するために使用されます。
| キーワード | 内容 |
|---|---|
| コンポーネントベース | React は UI を小さな再利用可能な部品であるコンポーネントに分割します。これによりコードの保守性や再利用性が向上します。 |
| JSX | JSX は JavaScript の拡張構文で、UI コンポーネントを記述する際に HTML のような記法を使用できます。これにより UI の記述が直感的になります。 |
| 仮想DOM | React は仮想 DOM (Virtual DOM) を使用して、実際の DOM への変更を最小限に抑えて効率的な UI 更新を行います。これにより高速なアプリケーションが実現されます。 |
| リアクティブな UI | 仮想 DOM と単一方向データフローにより、リアルタイムな UI 更新がスムーズに行えます。 |
| パフォーマンス | 仮想 DOM と効率的な更新手法により、高速な UI パフォーマンスが実現されます。 |
| モジュール性 | コンポーネントごとに独立したスタイルやロジックを持ち、モジュール性の高いコードを書くことができます。 |
| 単一方向データフロー | データは親コンポーネントから子コンポーネントへ一方向で流れます。このアーキテクチャはデータの管理や予測可能な振る舞いを容易にします。 |
| コミュニティとエコシステム | React は広大なコミュニティと豊富なエコシステムを持ち、多くのライブラリやツールが利用可能です。 |
開発環境
- Windows 11 Home 23H2 を使用しています。
WSL の Ubuntu を操作しますので macOS の方も参考にして頂けます。
WSL (Microsoft Store アプリ版) ※ こちらの関連記事からインストール方法をご確認いただけます
> wsl --version
WSL バージョン: 2.2.4.0
カーネル バージョン: 5.15.153.1-2
WSLg バージョン: 1.0.61
Ubuntu ※ こちらの関連記事からインストール方法をご確認いただけます
$ lsb_release -a
No LSB modules are available.
Distributor ID: Ubuntu
Description:    Ubuntu 24.04 LTS
Release:        24.04
Codename:       noble
npm ※ こちらの関連記事からインストール方法をご確認いただけます
$ node -v
v20.15.1
$ npm -v
10.7.0
Docker ※ こちらの関連記事からインストール方法をご確認いただけます
$ docker --version
Docker version 27.0.3, build 7d4bcd8
この記事では基本的に Ubuntu のターミナルで操作を行います。Vim を使用してコピペする方法をはじめて学ぶ人のために、以下の記事で手順を紹介しています。ぜひ挑戦してみてください。
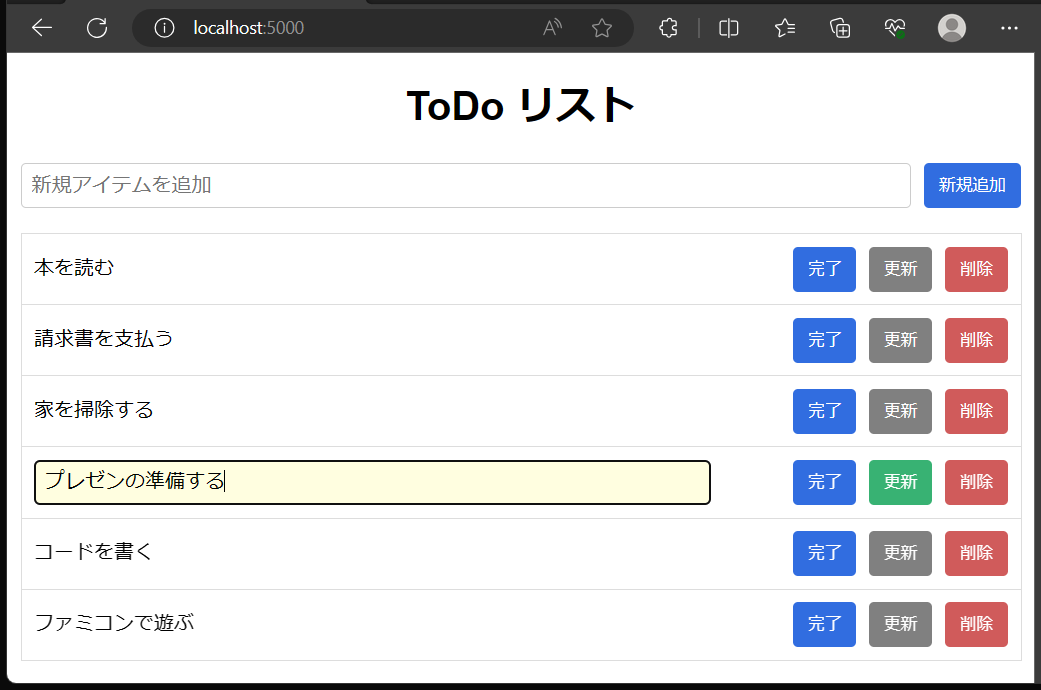
作成するアプリの外観
REST API サービス コンテナーと、データベース コンテナーの起動
こちらの記事で、ToDo アプリ用の REST API サービスと、RDBMS データベースを作成し、Docker コンテナーとして起動する手順をご確認いただけます。
REST API サービス、データベース コンテナーが起動していることを確認します。
$ docker ps
CONTAINER ID   IMAGE                  COMMAND                   CREATED         STATUS             PORTS                                                  NAMES
0defb5fd7af2   api-todo-spring-boot   "java -jar app.jar"       8 seconds ago   Up 7 seconds       0.0.0.0:5000->8080/tcp, :::5000->8080/tcp              api-local
5eb600ed3d54   mysql-base             "docker-entrypoint.s…"   16 hours ago    Up About an hour   0.0.0.0:3306->3306/tcp, :::3306->3306/tcp, 33060/tcp   mysql-todo
コンテナー間通信するために net-todo という Docker ネットワークをあらかじめ作成しています。ご注意ください。
REST クライアント を実装する手順
プロジェクトの作成
プロジェクトフォルダーを作成します。
※ ~/tmp/restclt-reactts をプロジェクトフォルダーとします。
$ mkdir -p ~/tmp/restclt-reactts
$ cd ~/tmp/restclt-reactts
TSX ファイルの作成
index.tsx ファイルを作成します。
$ mkdir -p src
$ vim src/index.tsx
ファイルの内容
コードの全体を表示する
import './styles.scss';

import React, { useState, useEffect, useRef } from 'react';
import ReactDOM from 'react-dom';

// ToDo アイテムのインターフェイス
interface Todo {
    id: string;
    content: string;
    created_date: string | null;
    completed_date: string | null;
    editing: boolean;
    editContent: string;
}

// メインコンポーネント
function App() {
    const _apiUrl: string | undefined  = process.env.API_URL; // API の URL
    const [_todos, setTodos]: [Todo[], React.Dispatch<React.SetStateAction<Todo[]>>] = useState<Todo[]>([]); // ToDo の一覧を管理するステート変数
    const _inputAdd: React.MutableRefObject<HTMLInputElement | null> = useRef<HTMLInputElement | null>(null); // 新規追加の input 要素の参照

    // コンポーネントがマウントされたときに実行される副作用フック
    useEffect(() => {
        fetchAndRender(); // データの取得と表示
    }, []);

    // データの取得と表示
    const fetchAndRender = async (): Promise<void> => {
        try {
            const response: Response = await fetch(`${_apiUrl}/todos`);
            if (!response.ok) { alert(`Fetch failed with status: ${response.status}`); return; }
            const data: Array<Todo> = await response.json();
            const filtered: Array<Todo> = data.filter((elem: Todo) => elem.completed_date === null);
            const updated: Array<Todo> = filtered.map((elem: Todo) => ({ // ToDo データに編集関連の情報を追加して新しい配列を作成
                ...elem, // 全ての要素を引継ぎ
                editing: false, // 編集フラグは OFF
                editContent: elem.content, // 元のテキストをコピー
            }));
            setTodos(updated); // 新しい配列をセットして ToDo データを更新
        } catch (error) { alert(`Error fetching todos: ${error}`); }
    };

    // 新規追加ボタンのクリックイベントハンドラ
    const handleButtonAddClick = async (): Promise<void> => {
        try {
            if (_inputAdd.current === null) { return; }
            const content: string = _inputAdd.current.value.trim();
            if (content === "") { return; }
            if (confirm("アイテムを新規追加しますか?")) {
                const response: Response = await fetch(`${_apiUrl}/todos`, {
                    method: "POST",
                    headers: { "Content-Type": "application/json" },
                    body: JSON.stringify({ content: content })
                });
                if (!response.ok) { alert(`Fetch failed with status: ${response.status}`); }
                fetchAndRender();
                _inputAdd.current.value = "";
            }
        } catch (error) { alert(`Error adding todos: ${error}`); }
    };

    // 完了ボタンのクリックイベントハンドラ
    const handleButtonCompleteClick = (todo: Todo) => async (): Promise<void> => {
        try {
            if (confirm("このアイテムを完了にしますか?")) {
                const response: Response = await fetch(`${_apiUrl}/todos/${todo.id}`, {
                    method: "PUT",
                    headers: { "Content-Type": "application/json" },
                    body: JSON.stringify({
                        content: todo.content,
                        completed_date: new Date().toISOString()
                    })
                });
                if (!response.ok) { alert(`Update failed with status: ${response.status}`); }
                fetchAndRender();
            }
        } catch (error) { alert(`Error updating todos: ${error}`); }
    };

    // テキスト要素のクリックイベントハンドラ
    const handleContentClick = (todo: Todo) => (): void => {
        setTodos((state: Todo[]) => state.map((elem: Todo) =>
            ({ ...elem, editing: false }) // すべて編集フラグは OFF
        ));
        setTodos((state: Todo[]) => state.map((elem: Todo) =>
            elem.id === todo.id
                ? { ...elem, editing: true } // id が一致したら編集フラグは ON
                : elem // 一致しなければそのまま
        ));
    };

    // テーブル行テキストのチェンジイベントハンドラ
    const handleRowContentChange = (todo: Todo, value: string) => {
        setTodos((state: Todo[]) => state.map((elem: Todo) =>
            elem.id === todo.id
                ? { ...elem, editContent: value } // id が一致したら編集テキストに適用
                : elem // 一致しなければそのまま
        ));
    };

    // 更新ボタンのクリックイベントハンドラ
    const handleButtonUpdateClick = (todo: Todo) => async (): Promise<void>  => {
        try {
            const updatedContent: string = todo.editContent.trim();
            if (updatedContent === "") { return; }
            if (confirm("このアイテムを更新しますか?")) {
                const response: Response = await fetch(`${_apiUrl}/todos/${todo.id}`, {
                    method: "PUT",
                    headers: { "Content-Type": "application/json" },
                    body: JSON.stringify({ content: updatedContent })
                });
                if (!response.ok) { alert(`Fetch failed with status: ${response.status}`); }
                fetchAndRender();
            }
        } catch (error) { alert(`Error updating todos: ${error}`); }
    };

    // 削除ボタンのクリックイベントハンドラ
    const handleButtonDeleteClick = (todo: Todo) => async (): Promise<void> => {
        try {
            if (confirm("このアイテムを削除しますか?")) {
                const response: Response = await fetch(`${_apiUrl}/todos/${todo.id}`, {
                    method: "DELETE",
                });
                if (!response.ok) { alert(`Delete failed with status: ${response.status}`); }
                fetchAndRender();
            }
        } catch (error) { alert(`Error deleting todos: ${error}`); }
    };

    // JSX レンダリング部分
    return (
        <div className="div-container">
            <h1>ToDo リスト</h1>
            <div className="div-add">
                <input
                    type="text" placeholder="新規アイテムを追加"
                    ref={_inputAdd}
                    onClick={handleContentClick({ id: '_dummy', content: '', created_date: null, completed_date: null, editing: false, editContent: '' })}
                />
                <button id="button-add" onClick={handleButtonAddClick}>
                    新規追加
                </button>
            </div>
            <div className="div-table" id="div-todo-list">
                {_todos.map((todo) => (
                    <div key={todo.id} className="div-row">
                        <div className="div-content">
                            {/* 編集中の場合は input を表示、そうでなければ div を表示 */}
                            {todo.editing ? (
                                <input
                                    type="text"
                                    className="input-edit"
                                    value={todo.editContent}
                                    onChange={(e) => handleRowContentChange(todo, e.target.value)}
                                />
                            ) : (
                                <div onClick={handleContentClick(todo)}>
                                    {todo.content}
                                </div>
                            )}
                        </div>
                        <div className="div-buttons">
                            <button
                                className="button-complete"
                                onClick={handleButtonCompleteClick(todo)}
                            >
                                完了
                            </button>
                            <button
                                className="button-update"
                                onClick={handleButtonUpdateClick(todo)}
                                disabled={!todo.editing}
                            >
                                更新
                            </button>
                            <button
                                className="button-delete"
                                onClick={handleButtonDeleteClick(todo)}
                            >
                                削除
                            </button>
                        </div>
                    </div>
                ))}
            </div>
        </div>
    );
}

// アプリケーションをレンダリング
ReactDOM.render(<App />, document.getElementById("app"));
以下、ポイントを説明します。
// データの取得と表示
const fetchAndRender = async (): Promise<void> => {
    try {
        const response: Response = await fetch(`${_apiUrl}/todos`);
        if (!response.ok) { alert(`Fetch failed with status: ${response.status}`); return; }
        const data: Array<Todo> = await response.json();
        const filtered: Array<Todo> = data.filter((elem: Todo) => elem.completed_date === null);
        const updated: Array<Todo> = filtered.map((elem: Todo) => ({ // ToDo データに編集関連の情報を追加して新しい配列を作成
            ...elem, // 全ての要素を引継ぎ
            editing: false, // 編集フラグは OFF
            editContent: elem.content, // 元のテキストをコピー
        }));
        setTodos(updated); // 新しい配列をセットして ToDo データを更新
    } catch (error) { alert(`Error fetching todos: ${error}`); }
};

// 新規追加ボタンのクリックイベントハンドラ
const handleButtonAddClick = async (): Promise<void> => {
    try {
        if (_inputAdd.current === null) { return; }
        const content: string = _inputAdd.current.value.trim();
        if (content === "") { return; }
        if (confirm("アイテムを新規追加しますか?")) {
            const response: Response = await fetch(`${_apiUrl}/todos`, {
                method: "POST",
                headers: { "Content-Type": "application/json" },
                body: JSON.stringify({ content: content })
            });
            if (!response.ok) { alert(`Fetch failed with status: ${response.status}`); }
            fetchAndRender();
            _inputAdd.current.value = "";
        }
    } catch (error) { alert(`Error adding todos: ${error}`); }
};

// 完了ボタンのクリックイベントハンドラ
const handleButtonCompleteClick = (todo: Todo) => async (): Promise<void> => {
    try {
        if (confirm("このアイテムを完了にしますか?")) {
            const response: Response = await fetch(`${_apiUrl}/todos/${todo.id}`, {
                method: "PUT",
                headers: { "Content-Type": "application/json" },
                body: JSON.stringify({
                    content: todo.content,
                    completed_date: new Date().toISOString()
                })
            });
            if (!response.ok) { alert(`Update failed with status: ${response.status}`); }
            fetchAndRender();
        }
    } catch (error) { alert(`Error updating todos: ${error}`); }
};

// テキスト要素のクリックイベントハンドラ
const handleContentClick = (todo: Todo) => (): void => {
    setTodos((state: Todo[]) => state.map((elem: Todo) =>
        ({ ...elem, editing: false }) // すべて編集フラグは OFF
    ));
    setTodos((state: Todo[]) => state.map((elem: Todo) =>
        elem.id === todo.id
            ? { ...elem, editing: true } // id が一致したら編集フラグは ON
            : elem // 一致しなければそのまま
    ));
};

// テーブル行テキストのチェンジイベントハンドラ
const handleRowContentChange = (todo: Todo, value: string) => {
    setTodos((state: Todo[]) => state.map((elem: Todo) =>
        elem.id === todo.id
            ? { ...elem, editContent: value } // id が一致したら編集テキストに適用
            : elem // 一致しなければそのまま
    ));
};

// 更新ボタンのクリックイベントハンドラ
const handleButtonUpdateClick = (todo: Todo) => async (): Promise<void>  => {
    try {
        const updatedContent: string = todo.editContent.trim();
        if (updatedContent === "") { return; }
        if (confirm("このアイテムを更新しますか?")) {
            const response: Response = await fetch(`${_apiUrl}/todos/${todo.id}`, {
                method: "PUT",
                headers: { "Content-Type": "application/json" },
                body: JSON.stringify({ content: updatedContent })
            });
            if (!response.ok) { alert(`Fetch failed with status: ${response.status}`); }
            fetchAndRender();
        }
    } catch (error) { alert(`Error updating todos: ${error}`); }
};

// 削除ボタンのクリックイベントハンドラ
const handleButtonDeleteClick = (todo: Todo) => async (): Promise<void> => {
    try {
        if (confirm("このアイテムを削除しますか?")) {
            const response: Response = await fetch(`${_apiUrl}/todos/${todo.id}`, {
                method: "DELETE",
            });
            if (!response.ok) { alert(`Delete failed with status: ${response.status}`); }
            fetchAndRender();
        }
    } catch (error) { alert(`Error deleting todos: ${error}`); }
};
説明を開きます。
| 要素 | 説明 |
|---|---|
| アイテム追加イベント | _input_add 要素がクリックされたときに、新しいアイテムを追加するためのイベントハンドラーを登録しています。_buttonAdd 要素がクリックされたときに、handleButtonAddClick() 関数が呼び出されます。 |
| データ表示 | fetchAndRender() 関数は、サーバーからデータを取得して未完了の ToDo アイテムを表示するための非同期関数です。サーバーからのデータをフィルタリングし、それぞれのアイテムに対して初期化します。 |
| アイテム追加ボタンのクリック | _buttonAdd 要素がクリックされたときに実行される関数です。入力内容を取得し、サーバーに新しいアイテムを追加するための非同期処理を行います。 |
| 完了ボタンのクリック | 各アイテムの完了ボタンがクリックされたときに実行される関数です。サーバーにアイテムの完了情報を送信してアイテムのステータスを更新します。 |
| アイテムテキスト編集 | ToDo アイテムのテキストをクリックすると、その内容が編集可能な input 要素に置き換えられます。 |
| アイテム更新と削除 | 更新ボタンをクリックすると、アイテムの内容がサーバーに送信されて更新されます。削除ボタンをクリックすると、アイテムがサーバーから削除されます。 |
HTML ファイルの作成
index.html ファイルを作成します。
$ vim src/index.html
ファイルの内容
<!DOCTYPE html>
<html>
    <head>
        <meta charset="UTF-8">
        <meta name="viewport" content="width=device-width, initial-scale=1.0">
        <title>ToDo アプリ</title>
    </head>
    <body>
        <div id="app"></div>
    </body>
</html>
SCSS ファイルの作成
styles.scss ファイルを作成します。
$ vim src/styles.scss
ファイルの内容
コードの全体を表示する
$primary-font: Arial, sans-serif;

/* カラーパレット */
$blue: royalblue;
$green: mediumseagreen;
$yellow: lightyellow;
$red: indianred;
$gray: gray;

body {
    font-family: $primary-font;
    margin: 0;
    padding: 0;
}

h1 {
    text-align: center;
    margin: 20px 0;
}

/* コンテナ */
.div-container {
    max-width: 800px;
    margin: 0 auto;
}

/* テーブル */
.div-table {
    display: table;
    width: 100%;
    max-width: 800px;
    margin: 0 auto;
    border-collapse: collapse;
    border: 1px solid #ddd;
}

/* テーブルの行 */
.div-row {
    display: table-row;
}

/* 行のテキストセル */
.div-content {
    display: table-cell;
    padding: 10px;
    border-top: 1px solid #ddd;
    flex: 1;
    text-align: left;
    width: 68%;
}

/* ボタングループセル */
.div-buttons {
    display: table-cell;
    padding: 10px;
    border-top: 1px solid #ddd;
    text-align: right;
}

/* 完了ボタン */
.button-complete {
    margin-left: 10px;
    padding: 8px 12px;
    background-color: $blue;
    color: #fff;
    border: none;
    border-radius: 4px;
    cursor: pointer;
    @media (max-width: 768px) {
        margin-left: 2px;
        padding: 5px 2px;
    }
}

/* 更新ボタン */
.button-update {
    margin-left: 10px;
    padding: 8px 12px;
    background-color: $green;
    color: #fff;
    border: none;
    border-radius: 4px;
    cursor: pointer;
    &:disabled {
        background-color: $gray;
        cursor: not-allowed;
    }
    @media (max-width: 768px) {
        margin-left: 2px;
        padding: 5px 2px;
    }
}

/* 更新テキスト */
.input-edit {
    padding: 8px;
    background-color: $yellow;
    font-size: 16px;
    border: 1px solid #ccc;
    border-radius: 4px;
    width: 100%;
}

/* 削除ボタン */
.button-delete {
    margin-left: 10px;
    padding: 8px 12px;
    background-color: $red;
    color: #fff;
    border: none;
    border-radius: 4px;
    cursor: pointer;
    @media (max-width: 768px) {
        margin-left: 2px;
        padding: 5px 2px;
    }
}

/* 新規追加エリア */
.div-add {
    margin-bottom: 20px;
    display: flex;
    align-items: center;
    width: 100%;
}

/* 新規追加テキスト */
.div-add input {
    flex: 1;
    padding: 8px;
    font-size: 16px;
    border: 1px solid #ccc;
    border-radius: 4px;
    &:focus {
        background-color: $yellow;
    }
}

/* 新規追加ボタン */
.div-add button {
    margin-left: 10px;
    padding: 8px 12px;
    background-color: $blue;
    color: #fff;
    border: none;
    border-radius: 4px;
    cursor: pointer;
}
以下、ポイントを説明します。
/* テーブル */
.div-table {
    display: table;
    /* 省略 */
}

/* テーブルの行 */
.div-row {
    display: table-row;
}

/* 行のテキストセル */
.div-content {
    display: table-cell;
    /* 省略 */
}

/* ボタングループセル */
.div-buttons {
    display: table-cell;
   /* 省略 */
}
| 要素 | 内容 |
|---|---|
| display: table | 要素をテーブルとして表示するために使用されます。 |
| display: table-row | テーブル内の行を表すために使用されます。 |
| display: table-cell | テーブル内のセル (セル内のデータやコンテンツ) を表すために使用されます。 |
ビルドと実行
webpack の設定ファイルを作成します。
$ vim webpack.config.ts
ファイルの内容
const path = require('path');
const HtmlWebpackPlugin = require('html-webpack-plugin');
const webpack = require('webpack');

module.exports = {
  mode: 'production',
  entry: './src/index.tsx',
  output: {
    path: path.resolve(__dirname, 'build'),
    filename: 'bundle.js',
  },
  module: {
    rules: [
      {
        test: /\.tsx?$/,
        exclude: /node_modules/,
        use: 'ts-loader'
      },
      {
        test: /\.scss$/,
        use: ['style-loader', 'css-loader', 'sass-loader']
      }
    ]
  },
  resolve: {
    extensions: ['.ts', '.tsx', '.js']
  },
  plugins: [
    new HtmlWebpackPlugin({
      template: './src/index.html'
    }),
    new webpack.DefinePlugin({
      'process.env.API_URL': JSON.stringify(process.env.API_URL)
    })
  ]
};
説明を開きます。
| 要素 | 内容 |
|---|---|
| mode | ビルドモードを指定します。 |
| entry | アプリケーションのエントリーポイントとなる TypeScript ファイル (ここでは index.tsx) を指定します。このファイルを起点にして依存関係を解決してバンドルします。 |
| output | バンドルされたファイル (ここでは bundle.js) の出力先を指定します。filename で出力ファイル名、path で出力先ディレクトリの絶対パスを指定します。 |
| module.rules | ファイルのローダー (変換ツール) を定義します。test でファイルの正規表現を指定し、ローダーを適用するファイルを絞り込みます。use で使用するローダーを指定します。ここでは、TypeScript ファイルには ts-loader を適用し、SCSS ファイルには style-loader と css-loader、sass-loader を順番に適用します。 |
| resolve.extensions: extensions | webpack がモジュールを解決する際に、指定した拡張子のファイル (ここでは .ts, .js) を自動的に解決対象として扱うことを定義しています。 |
| plugins | プラグインを設定します。ここでは HtmlWebpackPlugin と DefinePlugin が設定されています。HtmlWebpackPlugin は HTML ファイルを生成するプラグインで、template オプションで指定した HTML ファイルを元に、バンドルされた JavaScript ファイルを自動的に挿入します。DefinePlugin は環境変数をバンドル内で利用可能にします。ここでは process.env.API_URL を定義しています。 |
プロジェクトの初期化を行います。
$ npm init -y
package.json を修正します。
$ vim package.json
ファイルの内容
{
  "name": "restclt-reactts",
  "version": "1.0.0",
  "description": "",
  "main": "webpack.config.ts",
  "scripts": {
    "build": "webpack --mode production"
  },
  "keywords": [],
  "author": "",
  "license": "ISC"
}
説明を開きます。
| 要素 | 内容 |
|---|---|
| name | プロジェクトの名前。一意の識別子として使用されます。 |
| version | プロジェクトのバージョン。通常はメジャーバージョン.マイナーバージョン.パッチバージョンの形式です。 |
| description | プロジェクトの簡単な説明。ここでは空です。 |
| main | プロジェクトのエントリーポイントとなるファイル。ここでは webpack.config.ts と指定されています。 |
| scripts | タスクやコマンドを定義するスクリプトセクションです。ここでは build スクリプトが定義されています。npm run build コマンドを実行すると、Webpack がプロジェクトをビルドします。 |
| keywords | プロジェクトに関連するキーワード。ここでは空です。 |
| author | プロジェクトの作者。ここでは空です。 |
| license | プロジェクトのライセンスを示す。ここでは ISC ライセンスと指定されています。 |
ライブラリをインストールします。
$ npm install \
    react react-dom @types/react @types/react-dom \
    webpack webpack-cli html-webpack-plugin \
    css-loader style-loader node-sass sass-loader\
    typescript ts-node ts-loader \
    --save-dev
説明を開きます。
| 要素 | 内容 |
|---|---|
| react react-dom | React と React DOM の2つのライブラリを指定しています。 |
| @types/react, @types/react-dom | TypeScript で React, React DOM を使用する際に、React, React DOM の型定義を提供するパッケージです。 |
| webpack | webpack のコアパッケージです。 |
| webpack-cli | webpack のコマンドラインインターフェイスです。 |
| html-webpack-plugin | バンドルされたスクリプトを提供するための HTML ファイルを生成します。 |
| css-loader | CSS のインポートを処理します。 |
| style-loader | CSS スタイルを HTML に注入します。 |
| node-sass | Node.js 環境で SASS ファイルをコンパイルするためのモジュールです。 |
| sass-loader | SCSS のインポートを処理します。 |
| typescript | TypeScript コンパイラを提供します。 |
| ts-node | TypeScript を実行するための Node.js ランタイムです。 |
| ts-loader | TypeScript ファイルを webpack バンドル内でコンパイルするのに使用されます。 |
TypeScript のトランスパイル設定ファイルを作成します。
$ vim tsconfig.json
ファイルの内容
{
  "compilerOptions": {
    "target": "ES2020",
    "useDefineForClassFields": true,
    "module": "ESNext",
    "lib": ["ES2020", "DOM", "DOM.Iterable"],
    "strict": true,
    "noImplicitAny": true,
    "noUnusedLocals": true,
    "noUnusedParameters": true,
    "noFallthroughCasesInSwitch": true,
    "allowSyntheticDefaultImports": true,
    "jsx": "react"
  },
  "include": [
    "src/**/*.ts",
    "src/**/*.tsx"
  ],
  "exclude": [
    "node_modules"
  ]
}
説明を開きます。
| 要素 | 内容 |
|---|---|
| target: ES2020 | TypeScript コンパイラが生成する JavaScript コードの対象バージョンを指定します。ここではECMAScript 2020 をターゲットにしています。 |
| useDefineForClassFields: true | クラスフィールドのプロパティに defineProperty を使用して定義するように指定します。これにより、クラスフィールドの初期化が遅延され、プロトタイプには直接追加されなくなります。 |
| module: ESNext | コードモジュールの形式を指定します。ここでは ECMAScript のモジュールシステム (ES6モジュール) を採用しています。 |
| lib: ["ES2020", "DOM", "DOM.Iterable"] | コード内で利用可能な組み込みライブラリを指定します。この設定は、指定されたバージョンの ECMAScript および DOM ライブラリにアクセスできることを意味します。 |
| strict: true | TypeScript コンパイラの厳密な型チェックを有効にする設定です。これにより、型の不整合やエラーが検出され、コードの品質が向上します。 |
| noImplicitAny: true | 暗黙的な any 型の使用を許可しないかを指定します。 |
| noUnusedLocals: true | 未使用のローカル変数がある場合にエラーを発生させる設定です。 |
| noUnusedParameters: true | 未使用のパラメーターがある場合にエラーを発生させる設定です。 |
| noFallthroughCasesInSwitch: true | switch 文内の case ステートメントにおいて、フォールスルー (case の終了後に次の case に進む) をエラーとして検出する設定です。 |
| allowSyntheticDefaultImports: true | import 文でのデフォルトインポートの合成を許可するかを指定します。 |
| jsx | JSX をどのように扱うかを指定します。ここでは react に設定されており、React の JSX 構文を使用することを示しています。 |
| include: src//*.ts, src//*.tsx | TypeScript ファイルのソースコードが存在するディレクトリとファイルを指定します。この設定に基づいて、コンパイル対象の TypeScript ファイルが選択されます。 |
| exclude: node_modules | コンパイルから除外するディレクトリを指定します。通常、プロジェクト内の Node.js モジュールがここに含まれます。 |
環境変数を作成します。
$ export API_URL=http://localhost:5000
API サービス コンテナーの URL を設定してます。この環境変数が一時的なものであることに注意してください。
ビルドします。
$ npm run build
アプリを起動します。
※ アプリを停止するときは ctrl + C を押します。
$ python3 \
    -m http.server 8000 \
    --directory ./build
説明を開きます。
| 要素 | 内容 |
|---|---|
| python3 | Python のインタープリターを起動するコマンドです。 |
| -m http.server | Python の組み込みモジュールである http.server モジュールを指定して起動します。このモジュールを使用することで、簡単な HTTP サーバーをローカルに立ち上げることができます。 |
| 8000 | サーバーが使用するポート番号です。ここではポート番号 8000 を指定していますが、必要に応じて変更できます。 |
| --directory ./build | オプションとして --directory を使用し、提供したディレクトリ (./build ディレクトリ) をルートとするよう指定します。これにより、指定したディレクトリ内のファイルが提供されます。 |
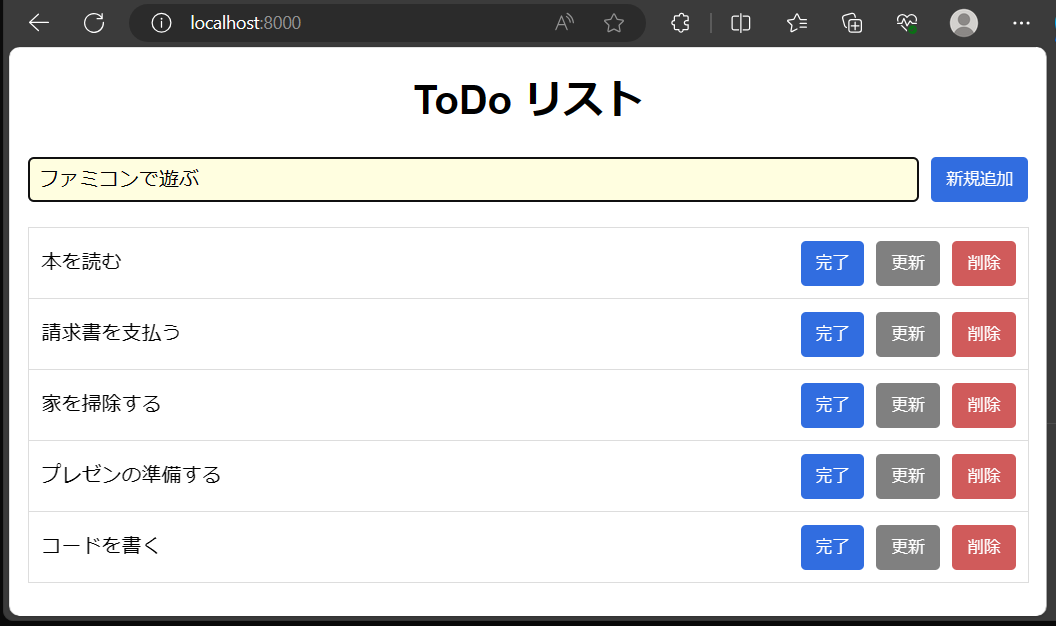
Web ブラウザで確認します。
$ sudo apt install wslu
$ wslview http://localhost:8000
ここまでの手順で、Ubuntu でアプリを Web サーバー上で起動することができました。
コンテナーイメージの作成
Nginx の設定ファイルを作成します。
$ vim nginx.conf
ファイルの内容
user nginx;
worker_processes 3; # ワーカープロセス数を 3 に設定:調整してください。
events {
    worker_connections 256; # 同時接続数の最大値を設定:調整してください。
}
http {
    include /etc/nginx/mime.types;
    default_type application/octet-stream;
    server {
        listen 80;
        server_name localhost;
        location / {
            root /usr/share/nginx/html;  # 静的ファイルのルートディレクトリ
            index index.html;  # デフォルトのインデックスファイル
        }
    }
}
Dockerfile を作成します。
$ vim Dockerfile
ファイルの内容
# build the app.
FROM node:lts-bookworm-slim as build-env

# set the working dir.
WORKDIR /app

# copy json files to the working dir.
COPY package.json package-lock.json tsconfig.json /app/
COPY webpack.config.ts /app/

# copy the source files to the working dir.
COPY src /app/src

# set the environment.
ARG API_URL
ENV API_URL=$API_URL

# run the build command to build the app.
RUN npm install && \
    npm run build

# set up the production container.
FROM nginx:bookworm

# copy nginx.conf.
COPY nginx.conf /etc/nginx/nginx.conf

# copy the build output from the build-env.
COPY --from=build-env /app/build /usr/share/nginx/html

# expose port.
EXPOSE 80

# command to run nginx.
CMD ["nginx","-g","daemon off;"]
説明を開きます。
| 要素 | 説明 |
|---|---|
| FROM node:lts-bookworm-slim as build-env | ベースイメージを node:lts-bookworm-slim に設定します。このイメージは Node.js の環境を提供します。 |
| WORKDIR /app | ワーキングディレクトリを /app に設定します。 |
| COPY package.json package-lock.json tsconfig.json /app/ | アプリケーションの依存関係をインストールするために package.json と package-lock.json、また TypeScript のコンパイル設定ファイル tsconfig.json をワーキングディレクトリにコピーします。 |
| COPY webpack.config.ts /app/ | webpack の設定ファイル webpack.config.ts をワーキングディレクトリにコピーします。 |
| COPY src /app/src | アプリケーションのソースコードが含まれる src ディレクトリ内のファイルを /app/src にコピーします。 |
| ARG API_URL | ビルド時に渡される API_URL という名前の引数を定義します。この引数はビルド時に変数を渡すために使用されます。 |
| ENV API_URL=$API_URL | ビルドステージ内で定義された API_URL の値をコンテナー内の環境変数 API_URL に設定します。 |
| RUN npm install && npm run build | 依存関係をインストールしてアプリケーションをビルドします。この段階で先に定義した API_URL がアプリケーション内に埋め込まれます。 |
| FROM nginx:bookworm | 2つ目のビルドステージを始めます。Nginx コンテナーのベースイメージ nginx:bookworm に設定します。 |
| COPY nginx.conf /etc/nginx/nginx.conf | Nginx の設定ファイル nginx.conf を /etc/nginx/ にをコピーします。 |
| COPY --from=build-env /app/build /usr/share/nginx/html | build-env ステージからビルドされた結果を Nginx コンテナー内の /usr/share/nginx/html にコピーします。これにより、Nginx が静的ファイルを提供できるようになります。 |
| EXPOSE 80 | コンテナー内のポート 80 をエクスポートします。 |
| CMD ["nginx","-g","daemon off;"] | コンテナーが起動した際に実行されるコマンドを指定します。ここでは Nginx をバックグラウンドで実行するコマンドを設定しています。 |
Docker デーモンを起動します。
$ sudo service docker start
Docker 環境をお持ちでない場合は、以下の関連記事から Docker Engine のインストール手順をご確認いただけます。
コンテナーイメージをビルドします。
$ docker build \
    --no-cache \
    --build-arg API_URL=http://localhost:5000 \
    --tag app-todo-reactts:latest .
コンテナーをビルドする際に、API サービスの URL が確定されている必要があります。
コンテナーイメージを確認します。
$ docker images | grep app-todo-reactts
app-todo-reactts    latest    d44fc1a0d1e9    12 seconds ago    188MB
ここまでの手順で、ローカル環境の Docker にアプリのカスタムコンテナーイメージをビルドすることができました。
コンテナーを起動
ローカルでコンテナーを起動します。
※ コンテナーを停止するときは ctrl + C を押します。
コンテナー間通信するために net-todo という Docker ネットワークをあらかじめ作成しています。ご注意ください。
$ docker run --rm \
    --publish 8000:80 \
    --name app-local \
    --net net-todo \
    app-todo-reactts
ここまでの手順で、ローカル環境の Docker でアプリのカスタムコンテナーを起動することができました。
コンテナーの動作確認
Web ブラウザで確認します。
$ wslview http://localhost:8000
コンテナーの状態を確認してみます。
$ docker ps
CONTAINER ID   IMAGE                  COMMAND                   CREATED          STATUS             PORTS                                                  NAMES
f9b42175fe6c   app-todo-reactts       "/docker-entrypoint.…"   52 seconds ago   Up 52 seconds      0.0.0.0:8000->80/tcp, :::8000->80/tcp                  app-local
0defb5fd7af2   api-todo-spring-boot   "java -jar app.jar"       11 minutes ago   Up 11 minutes      0.0.0.0:5000->8080/tcp, :::5000->8080/tcp              api-local
5eb600ed3d54   mysql-base             "docker-entrypoint.s…"   16 hours ago     Up About an hour   0.0.0.0:3306->3306/tcp, :::3306->3306/tcp, 33060/tcp   mysql-todo
ここまでの手順で、カスタムコンテナーとして起動した Todo アプリを操作することができました。
コンテナーに接続
別ターミナルからコンテナーに接続します。
$ docker exec -it app-local /bin/bash
コンテナー接続後にディレクトリを確認します。
※ コンテナーから出るときは ctrl + D を押します。
# pwd
/
# cd /usr/share/nginx/html
# ls -lah
total 172K
drwxr-xr-x 1 root root 4.0K Aug 12 03:43 .
drwxr-xr-x 1 root root 4.0K Jul 23 07:14 ..
-rw-r--r-- 1 root root  497 May 28 13:22 50x.html
-rw-r--r-- 1 root root 145K Aug 12 03:43 bundle.js
-rw-r--r-- 1 root root  721 Aug 12 03:43 bundle.js.LICENSE.txt
-rw-r--r-- 1 root root  239 Aug 12 03:43 index.html
top コマンドで状況を確認します。
# apt update
# apt install procps
# top
top - 03:47:10 up  2:01,  0 user,  load average: 0.10, 0.16, 0.11
Tasks:   6 total,   1 running,   5 sleeping,   0 stopped,   0 zombie
%Cpu(s):  0.1 us,  0.1 sy,  0.0 ni, 99.8 id,  0.0 wa,  0.0 hi,  0.1 si,  0.0 st
MiB Mem :  15949.2 total,  13223.0 free,   1896.1 used,   1142.5 buff/cache
MiB Swap:   4096.0 total,   4096.0 free,      0.0 used.  14053.1 avail Mem

    PID USER      PR  NI    VIRT    RES    SHR S  %CPU  %MEM     TIME+ COMMAND
      1 root      20   0   11404   7300   6172 S   0.0   0.0   0:00.02 nginx
     29 nginx     20   0   11564   2596   1320 S   0.0   0.0   0:00.00 nginx
     30 nginx     20   0   11564   2608   1332 S   0.0   0.0   0:00.00 nginx
     31 nginx     20   0   11564   2608   1328 S   0.0   0.0   0:00.00 nginx
     32 root      20   0    4188   3404   2900 S   0.0   0.0   0:00.01 bash
    223 root      20   0    8636   4676   2796 R   0.0   0.0   0:00.00 top
コンテナーの情報を表示してみます。
# cat /etc/*-release
PRETTY_NAME="Debian GNU/Linux 12 (bookworm)"
NAME="Debian GNU/Linux"
VERSION_ID="12"
VERSION="12 (bookworm)"
VERSION_CODENAME=bookworm
ID=debian
HOME_URL="https://www.debian.org/"
SUPPORT_URL="https://www.debian.org/support"
BUG_REPORT_URL="https://bugs.debian.org/"
このコンテナーは Debian GNU/Linux をベースに作成されています。つまり、Debian GNU/Linux と同じように扱うことができます。
まとめ
WSL Ubuntu の Docker 環境で、TypeScript React の最小フロントエンドを実装することができました。
この記事の実装例は1つのアプローチに過ぎず、必ずしも正しい方法とは限りません。他にも多様な方法がありますので、さまざまな情報を照らし合わせて検討してみてください。
どうでしたか? WSL Ubuntu で、TypeScript React アプリケーションを手軽に起動できます。ぜひお試しください。今後も React の開発環境などを紹介しますので、ぜひお楽しみにしてください。
推奨コンテンツ