React-leafletとは
Open Source Mapを表示するJavaScriptライブラリであるleafletを、React.js上で使えるように拡張するライブラリです。
React Leaflet公式
https://react-leaflet.js.org/
本記事は公式のチュートリアルを順番にやっていくだけですので詳しくは公式サイトを参照してください
https://react-leaflet.js.org/docs/start-introduction
1. プロジェクトの作成
mkdir react-leaflet
cd react-leaflet
npx create-react-app my-app
2. インストール
今回は開発版をインストールしました
npm install leaflet react-leaflet@next --save
npm install leaflet react-leaflet --save
3. 地図を表示
こちらのコードを参考にやっていきます
https://qiita.com/sugasaki/items/d225cf548e9a787dbd9c
地図を表示する為のクラスを作成
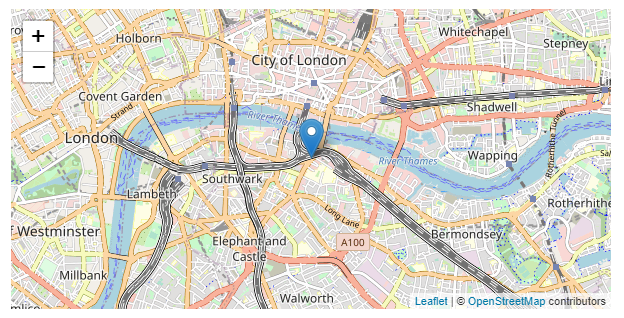
MapContainerで地図オブジェクトをつくり、TileLayerで地図タイルを取得できるようにすると地図が表示されます。
MapContainerがL.map()、TileLayerがL.tileLayer()、MarkerがL.marker()に対応していますので、leaflet触ったことがある方はイメージしやすいと思います。
import React, { Component } from 'react'
import { MapContainer, TileLayer, Marker, Popup } from 'react-leaflet'
export default class SimpleExample extends Component {
render() {
const position = [51.505, -0.09];
return (
<MapContainer center={position} zoom={13} scrollWheelZoom={false}>
<TileLayer
attribution='© <a href="http://osm.org/copyright">OpenStreetMap</a> contributors'
url="https://{s}.tile.openstreetmap.org/{z}/{x}/{y}.png"
/>
<Marker position={position}>
<Popup>
A pretty CSS3 popup. <br /> Easily customizable.
</Popup>
</Marker>
</MapContainer>
)
}
}
App.jsでSimpleExampleクラスを呼ぶように変更
import Leaflet from 'leaflet'
import React, { Component } from 'react';
import './App.css';
import 'leaflet/dist/leaflet.css';
import SimpleExample from './components/simple'

Leaflet.Icon.Default.imagePath =
  '//cdnjs.cloudflare.com/ajax/libs/leaflet/1.3.1/images/'

class App extends Component {
  render() {
    return (
      <SimpleExample />
    );
  }
}

export default App;
leafletコンテナの表示幅を指定
指定し忘れると高さゼロ(=表示されない)になってしまうので必ず設定します
.leaflet-container {
  width: 600px;
  height: 300px;
  margin: 10px;
サーバーを起動して確認
サーバーを起動します
npm start
以上でhttp://localhost:3000/ に地図が表示される筈です
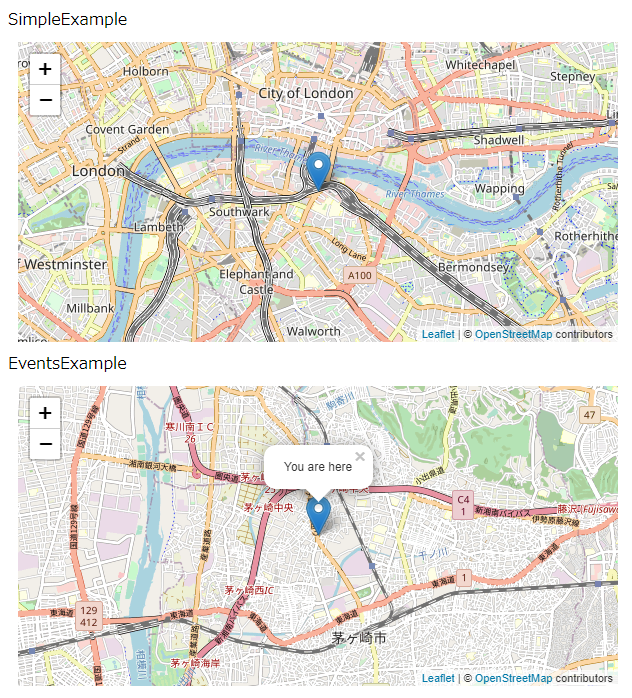
4. イベント管理
useMapEvents()によりleafletのイベントハンドラを使うことができます。以下ではclick()イベントが発生したら端末の現在位置を取得してMarkerを置くという動作を追加しています。
import React, { Component, useState } from 'react'
import { MapContainer, TileLayer, useMapEvents, Marker, Popup } from 'react-leaflet'
function LocationMarker() {
const [position, setPosition] = useState(null)
const map = useMapEvents({
click() {
map.locate()
},
locationfound(e) {
setPosition(e.latlng)
map.flyTo(e.latlng, map.getZoom())
},
})
return position === null ? null : (
<Marker position={position}>
<Popup>You are here</Popup>
</Marker>
)
}
export default class EventsExample extends Component {
render() {
const position = [51.505, -0.09];
return (
<MapContainer center={position} zoom={13} scrollWheelZoom={false}>
<TileLayer
attribution='© <a href="http://osm.org/copyright">OpenStreetMap</a> contributors'
url="https://{s}.tile.openstreetmap.org/{z}/{x}/{y}.png"
/>
<LocationMarker />
</MapContainer>
)
}
}
import Leaflet from 'leaflet'
import React, { Component } from 'react';
import './App.css';
import 'leaflet/dist/leaflet.css';
import SimpleExample from './components/simple'
import EventsExample from './components/events'

Leaflet.Icon.Default.imagePath =
  '//cdnjs.cloudflare.com/ajax/libs/leaflet/1.3.1/images/'

class App extends Component {
  render() {
    return (
      <div>
        SimpleExample
        <SimpleExample />

        EventsExample
        <EventsExample />
      </div>
    );
  }
}

export default App;
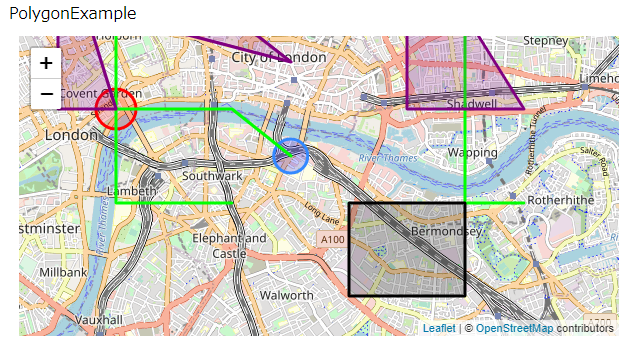
5. ポリゴンを表示
ポリゴンも簡単に追加できます
import React, { Component } from 'react'
import { MapContainer, TileLayer, Popup, Circle, CircleMarker, Polyline, Polygon, Rectangle } from 'react-leaflet'
export default class PolygonExample extends Component {
render() {
const center = [51.505, -0.09];
const polyline = [
[51.505, -0.09],
[51.51, -0.1],
[51.51, -0.12],
];
const multiPolyline = [
[
[51.5, -0.1],
[51.5, -0.12],
[51.52, -0.12],
],
[
[51.5, -0.05],
[51.5, -0.06],
[51.52, -0.06],
],
];
const polygon = [
[51.515, -0.09],
[51.52, -0.1],
[51.52, -0.12],
];
const multiPolygon = [
[
[51.51, -0.12],
[51.51, -0.13],
[51.53, -0.13],
],
[
[51.51, -0.05],
[51.51, -0.07],
[51.53, -0.07],
],
];
const rectangle = [
[51.49, -0.08],
[51.5, -0.06],
];
const fillBlueOptions = { fillColor: 'blue' };
const blackOptions = { color: 'black' };
const limeOptions = { color: 'lime' };
const purpleOptions = { color: 'purple' };
const redOptions = { color: 'red' };
return (
<MapContainer center={center} zoom={13} scrollWheelZoom={false}>
<TileLayer
attribution='© <a href="http://osm.org/copyright">OpenStreetMap</a> contributors'
url="https://{s}.tile.openstreetmap.org/{z}/{x}/{y}.png"
/>
<Circle center={center} pathOptions={fillBlueOptions} radius={200} />
<CircleMarker center={[51.51, -0.12]} pathOptions={redOptions} radius={20}>
<Popup>Popup in CircleMarker</Popup>
</CircleMarker>
<Polyline pathOptions={limeOptions} positions={polyline} />
<Polyline pathOptions={limeOptions} positions={multiPolyline} />
<Polygon pathOptions={purpleOptions} positions={polygon} />
<Polygon pathOptions={purpleOptions} positions={multiPolygon} />
<Rectangle bounds={rectangle} pathOptions={blackOptions} />
</MapContainer>
)
}
}
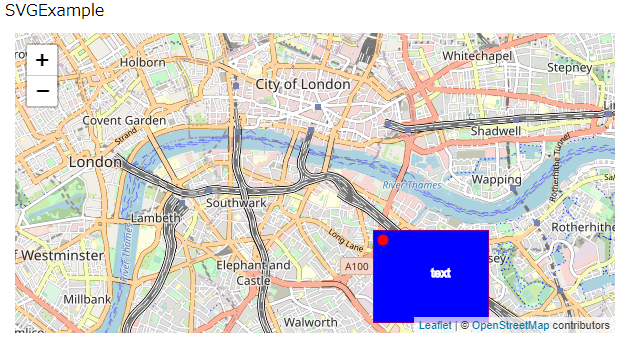
6. SVG overlay
SVGを上に重ねることもできます
import React, { Component } from 'react'
import { MapContainer, TileLayer, SVGOverlay } from 'react-leaflet'
export default class SVGExample extends Component {
render() {
const position = [51.505, -0.09];
const bounds = [
[51.49, -0.08],
[51.5, -0.06],
];
return (
<MapContainer center={position} zoom={13} scrollWheelZoom={false}>
<TileLayer
attribution='© <a href="http://osm.org/copyright">OpenStreetMap</a> contributors'
url="https://{s}.tile.openstreetmap.org/{z}/{x}/{y}.png"
/>
<SVGOverlay attributes={{ stroke: 'red' }} bounds={bounds}>
<rect x="0" y="0" width="100%" height="100%" fill="blue" />
<circle r="5" cx="10" cy="10" fill="red" />
<text x="50%" y="50%" stroke="white">
text
</text>
</SVGOverlay>
</MapContainer>
)
}
}
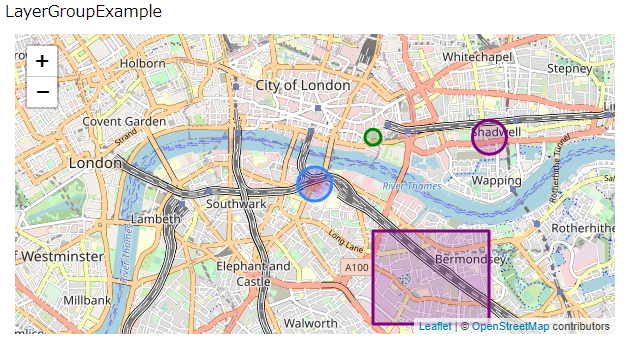
7. LayerGroupとFeatureGroup
leafletにあるLayerGroupとかFeatureGroupも使えます
import React, { Component } from 'react'
import { MapContainer, TileLayer, Popup, LayerGroup, Circle, FeatureGroup, Rectangle } from 'react-leaflet'
export default class LayerGroupExample extends Component {
render() {
const center = [51.505, -0.09];
const rectangle = [
[51.49, -0.08],
[51.5, -0.06],
];
const fillBlueOptions = { fillColor: 'blue' };
const fillRedOptions = { fillColor: 'red' };
const greenOptions = { color: 'green', fillColor: 'green' };
const purpleOptions = { color: 'purple' };
return (
<MapContainer center={center} zoom={13} scrollWheelZoom={false}>
<TileLayer
attribution='© <a href="http://osm.org/copyright">OpenStreetMap</a> contributors'
url="https://{s}.tile.openstreetmap.org/{z}/{x}/{y}.png"
/>
<LayerGroup>
<Circle center={center} pathOptions={fillBlueOptions} radius={200} />
<Circle
center={center}
pathOptions={fillRedOptions}
radius={100}
stroke={false}
/>
<LayerGroup>
<Circle
center={[51.51, -0.08]}
pathOptions={greenOptions}
radius={100}
/>
</LayerGroup>
</LayerGroup>
<FeatureGroup pathOptions={purpleOptions}>
<Popup>Popup in FeatureGroup</Popup>
<Circle center={[51.51, -0.06]} radius={200} />
<Rectangle bounds={rectangle} />
</FeatureGroup>
</MapContainer>
)
}
}
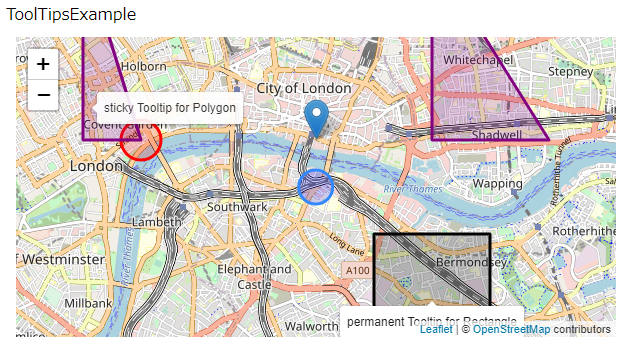
8. マウスオーバーで注釈を出す
MarkerやCircleにTooltipを追加しておくと注釈を出すことが出来ます
import React, { Component } from 'react'
import { MapContainer, TileLayer, Marker, Popup, Circle, CircleMarker, Polygon, Rectangle, Tooltip } from 'react-leaflet'
import { useState, useMemo } from 'react'
const center = [51.505, -0.09]
const multiPolygon = [
[
[51.51, -0.12],
[51.51, -0.13],
[51.53, -0.13],
],
[
[51.51, -0.05],
[51.51, -0.07],
[51.53, -0.07],
],
];
const rectangle = [
[51.49, -0.08],
[51.5, -0.06],
];
function TooltipCircle() {
const [clickedCount, setClickedCount] = useState(0)
const eventHandlers = useMemo(
() => ({
click() {
setClickedCount((count) => count + 1)
},
}),
[],
)
const clickedText =
clickedCount === 0
? 'Click this Circle to change the Tooltip text'
: `Circle click: ${clickedCount}`
return (
<Circle
center={center}
eventHandlers={eventHandlers}
pathOptions={{ fillColor: 'blue' }}
radius={200}>
<Tooltip>{clickedText}</Tooltip>
</Circle>
)
}
export default class ToolTipsExample extends Component {
render() {
return (
<MapContainer center={center} zoom={13} scrollWheelZoom={false}>
<TileLayer
attribution='© <a href="http://osm.org/copyright">OpenStreetMap</a> contributors'
url="https://{s}.tile.openstreetmap.org/{z}/{x}/{y}.png"
/>
<TooltipCircle />
<CircleMarker
center={[51.51, -0.12]}
pathOptions={{ color: 'red' }}
radius={20}>
<Tooltip>Tooltip for CircleMarker</Tooltip>
</CircleMarker>
<Marker position={[51.51, -0.09]}>
<Popup>Popup for Marker</Popup>
<Tooltip>Tooltip for Marker</Tooltip>
</Marker>
<Polygon pathOptions={{ color: 'purple' }} positions={multiPolygon}>
<Tooltip sticky>sticky Tooltip for Polygon</Tooltip>
</Polygon>
<Rectangle bounds={rectangle} pathOptions={{ color: 'black' }}>
<Tooltip direction="bottom" offset={[0, 20]} opacity={1} permanent>
permanent Tooltip for Rectangle
</Tooltip>
</Rectangle>
</MapContainer>
)
}
}
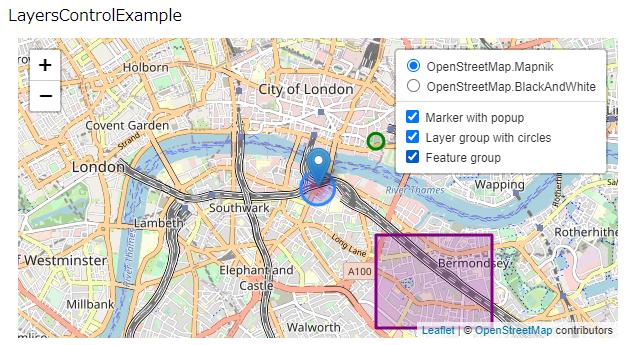
9. LayersControl
レイヤーを選んで表示するようにすることもできます
import React, { Component } from 'react'
import { MapContainer, TileLayer, Marker, Popup, LayersControl, LayerGroup, Circle, FeatureGroup, Rectangle } from 'react-leaflet'
export default class LayersControlExample extends Component {
render() {
const center = [51.505, -0.09];
const rectangle = [
[51.49, -0.08],
[51.5, -0.06],
];
return (
<MapContainer center={center} zoom={13} scrollWheelZoom={false}>
<LayersControl position="topright">
<LayersControl.BaseLayer checked name="OpenStreetMap.Mapnik">
<TileLayer
attribution='© <a href="http://osm.org/copyright">OpenStreetMap</a> contributors'
url="https://{s}.tile.openstreetmap.org/{z}/{x}/{y}.png"
/>
</LayersControl.BaseLayer>
<LayersControl.BaseLayer name="OpenStreetMap.BlackAndWhite">
<TileLayer
attribution='© <a href="http://osm.org/copyright">OpenStreetMap</a> contributors'
url="https://tiles.wmflabs.org/bw-mapnik/{z}/{x}/{y}.png"
/>
</LayersControl.BaseLayer>
<LayersControl.Overlay name="Marker with popup">
<Marker position={center}>
<Popup>
A pretty CSS3 popup. <br /> Easily customizable.
</Popup>
</Marker>
</LayersControl.Overlay>
<LayersControl.Overlay checked name="Layer group with circles">
<LayerGroup>
<Circle
center={center}
pathOptions={{ fillColor: 'blue' }}
radius={200}
/>
<Circle
center={center}
pathOptions={{ fillColor: 'red' }}
radius={100}
stroke={false}
/>
<LayerGroup>
<Circle
center={[51.51, -0.08]}
pathOptions={{ color: 'green', fillColor: 'green' }}
radius={100}
/>
</LayerGroup>
</LayerGroup>
</LayersControl.Overlay>
<LayersControl.Overlay name="Feature group">
<FeatureGroup pathOptions={{ color: 'purple' }}>
<Popup>Popup in FeatureGroup</Popup>
<Circle center={[51.51, -0.06]} radius={200} />
<Rectangle bounds={rectangle} />
</FeatureGroup>
</LayersControl.Overlay>
</LayersControl>
</MapContainer>
)
}
}
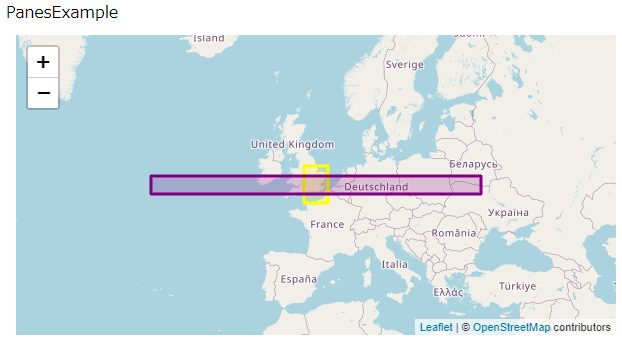
10. stateの値でRectangleの色を変える
この辺からleaflet単独ではなくReactからleafletを操作する手順になります。ここではEffectフックでRectangleの色を変えています。
import React, { Component, useState, useRef, useEffect } from 'react'
import { MapContainer, TileLayer, Pane, Rectangle } from 'react-leaflet'
const outer = [
[50.505, -29.09],
[52.505, 29.09],
]
const inner = [
[49.505, -2.09],
[53.505, 2.09],
]
function BlinkingPane() {
const [render, setRender] = useState(true)
const timerRef = useRef()
useEffect(() => {
timerRef.current = setInterval(() => {
setRender((r) => !r)
}, 1000)
return () => {
clearInterval(timerRef.current)
}
}, [])
return render ? (
<Pane name="cyan-rectangle" style={{ zIndex: 500 }}>
<Rectangle bounds={outer} pathOptions={{ color: 'cyan' }} />
</Pane>
) : null
}
export default class PanesExample extends Component {
render() {
return (
<MapContainer bounds={outer} scrollWheelZoom={false}>
<TileLayer
attribution='© <a href="http://osm.org/copyright">OpenStreetMap</a> contributors'
url="https://{s}.tile.openstreetmap.org/{z}/{x}/{y}.png"
/>
<BlinkingPane />
<Pane name="yellow-rectangle" style={{ zIndex: 499 }}>
<Rectangle bounds={inner} pathOptions={{ color: 'yellow' }} />
<Pane name="purple-rectangle">
<Rectangle bounds={outer} pathOptions={{ color: 'purple' }} />
</Pane>
</Pane>
</MapContainer>
)
}
}
横に長いRectangleが紫⇔青と交互に色を変えながら表示されます
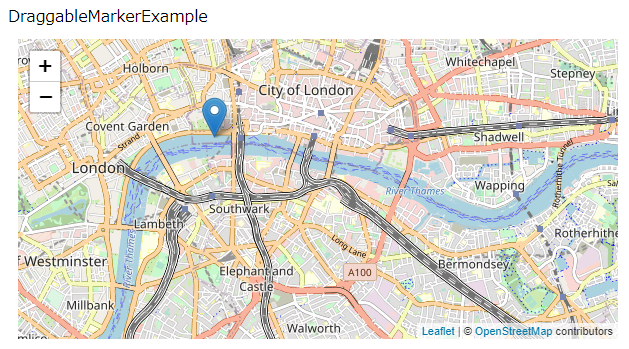
11. Drag可能なMarker
MarkerをDraggableにするかどうかをReact stateにしておいて、途中でDrag可能にしたりDragできなくしたりする例です
import React, { Component, useState, useRef, useMemo, useCallback } from 'react'
import { MapContainer, TileLayer, Marker, Popup } from 'react-leaflet'
const center = {
lat: 51.505,
lng: -0.09,
}
function DraggableMarker() {
const [draggable, setDraggable] = useState(false)
const [position, setPosition] = useState(center)
const markerRef = useRef(null)
const eventHandlers = useMemo(
() => ({
dragend() {
const marker = markerRef.current
if (marker != null) {
setPosition(marker.getLatLng())
}
},
}),
[],
)
const toggleDraggable = useCallback(() => {
setDraggable((d) => !d)
}, [])
return (
<Marker
draggable={draggable}
eventHandlers={eventHandlers}
position={position}
ref={markerRef}>
<Popup minWidth={90}>
<span onClick={toggleDraggable}>
{draggable
? 'Marker is draggable'
: 'Click here to make marker draggable'}
</span>
</Popup>
</Marker>
)
}
export default class DraggableMarkerExample extends Component {
render() {
return (
<MapContainer center={center} zoom={13} scrollWheelZoom={false}>
<TileLayer
attribution='© <a href="http://osm.org/copyright">OpenStreetMap</a> contributors'
url="https://{s}.tile.openstreetmap.org/{z}/{x}/{y}.png"
/>
<DraggableMarker />
</MapContainer>
)
}
}
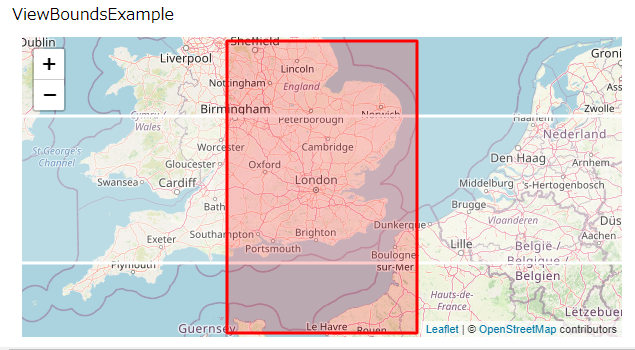
12. View Bounds
innerBoundsまたはouterBoundsの内側をクリックすると、クリックした側をinnerHandler、クリックしていない側をouterHandlerに登録して、その範囲が大きく表示されるように
import React, { Component, useState, useMemo } from 'react'
import { MapContainer, TileLayer, Rectangle, useMap } from 'react-leaflet'
const innerBounds = [
[49.505, -2.09],
[53.505, 2.09],
]
const outerBounds = [
[50.505, -29.09],
[52.505, 29.09],
]
const redColor = { color: 'red' }
const whiteColor = { color: 'white' }
function SetBoundsRectangles() {
const [bounds, setBounds] = useState(outerBounds)
const map = useMap()
const innerHandlers = useMemo(
() => ({
click() {
setBounds(innerBounds)
map.fitBounds(innerBounds)
},
}),
[map],
)
const outerHandlers = useMemo(
() => ({
click() {
setBounds(outerBounds)
map.fitBounds(outerBounds)
},
}),
[map],
)
return (
<>
<Rectangle
bounds={outerBounds}
eventHandlers={outerHandlers}
pathOptions={bounds === outerBounds ? redColor : whiteColor}
/>
<Rectangle
bounds={innerBounds}
eventHandlers={innerHandlers}
pathOptions={bounds === innerBounds ? redColor : whiteColor}
/>
</>
)
}
export default class ViewBoundsExample extends Component {
render() {
return (
<MapContainer bounds={outerBounds} scrollWheelZoom={false}>
<TileLayer
attribution='© <a href="http://osm.org/copyright">OpenStreetMap</a> contributors'
url="https://{s}.tile.openstreetmap.org/{z}/{x}/{y}.png"
/>
<SetBoundsRectangles />
</MapContainer>
)
}
}
13. Animated Panning
checkboxの値でsetViewのanimateを有効にしたり無効にしたりできます
import React, { Component, useRef } from 'react'
import { MapContainer, TileLayer, useMapEvent } from 'react-leaflet'
function SetViewOnClick({ animateRef }) {
const map = useMapEvent('click', (e) => {
map.setView(e.latlng, map.getZoom(), {
animate: animateRef.current || false,
})
})
return null
}
function AnimateExample() {
const animateRef = useRef(false)
return (
<>
<p>
<label>
<input
type="checkbox"
onChange={() => {
animateRef.current = !animateRef.current
}}
/>
Animate panning
</label>
</p>
<MapContainer center={[51.505, -0.09]} zoom={13} scrollWheelZoom={false}>
<TileLayer
attribution='© <a href="http://osm.org/copyright">OpenStreetMap</a> contributors'
url="https://{s}.tile.openstreetmap.org/{z}/{x}/{y}.png"
/>
<SetViewOnClick animateRef={animateRef} />
</MapContainer>
</>
)
}
export default class AnimatedPanningExample extends Component {
render() {
return (
<AnimateExample />
)
}
}
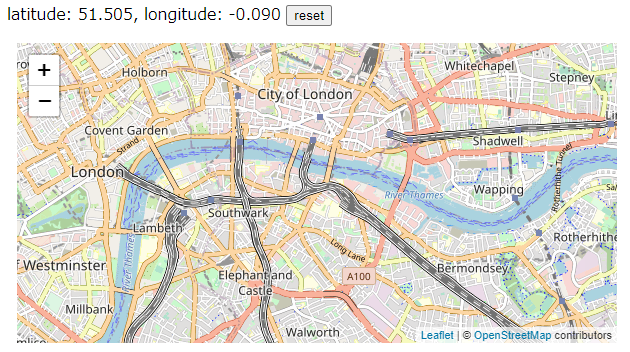
14. External State
逆にleafletの情報をコンポーネント外で使うことも出来ます
import React, {useState, useCallback, useEffect, useMemo} from 'react'
import { MapContainer, TileLayer } from 'react-leaflet'
const center = [51.505, -0.09]
const zoom = 13
function DisplayPosition({ map }) {
const [position, setPosition] = useState(map.getCenter())
const onClick = useCallback(() => {
map.setView(center, zoom)
}, [map])
const onMove = useCallback(() => {
setPosition(map.getCenter())
}, [map])
useEffect(() => {
map.on('move', onMove)
return () => {
map.off('move', onMove)
}
}, [map, onMove])
return (
<p>
latitude: {position.lat.toFixed(4)}, longitude: {position.lng.toFixed(4)}{' '}
<button onClick={onClick}>reset</button>
</p>
)
}
function ExternalStateExample() {
const [map, setMap] = useState(null)
const displayMap = useMemo(
() => (
<MapContainer
center={center}
zoom={zoom}
scrollWheelZoom={false}
whenCreated={setMap}>
<TileLayer
attribution='© <a href="http://osm.org/copyright">OpenStreetMap</a> contributors'
url="https://{s}.tile.openstreetmap.org/{z}/{x}/{y}.png"
/>
</MapContainer>
),
[],
)
return (
<div>
{map ? <DisplayPosition map={map} /> : null}
{displayMap}
</div>
)
}
export default ExternalStateExample;
まとめ
Reactを使う環境でleafletを使うなら単独で使うよりこちらを使った方が良さげです