やりたいこと
React Router v7で良さげにCSSを書きたい
選択肢
よく選択肢に上るのは以下のようです
・CSS Modules
・styled-components
・Zero-Runtime
・Tailwind
・Bootstrap
どれが良いとか悪いとかはあまり知らないのですが、今回は簡単そうに見えるCSS Modulesを使う事にしてみます
CSS Modulesとは
CSS Modulesの公式サイトは以下になります
https://github.com/css-modules/css-modules?tab=readme-ov-file
公式は仕様のみ定めていて、これに基づく実装がいくつかあります
・css-loader (Webpack用)
・Parcel
・Vite
css-loaderはCSS Modulesを非推奨としていくようですが、ParcelとViteではそういう動きはなさそうなので、Viteが使われている今どきのReact環境では引き続き使えるようです
今回はReact Router v7をViteで構築していきます
使い方
1. 基本編
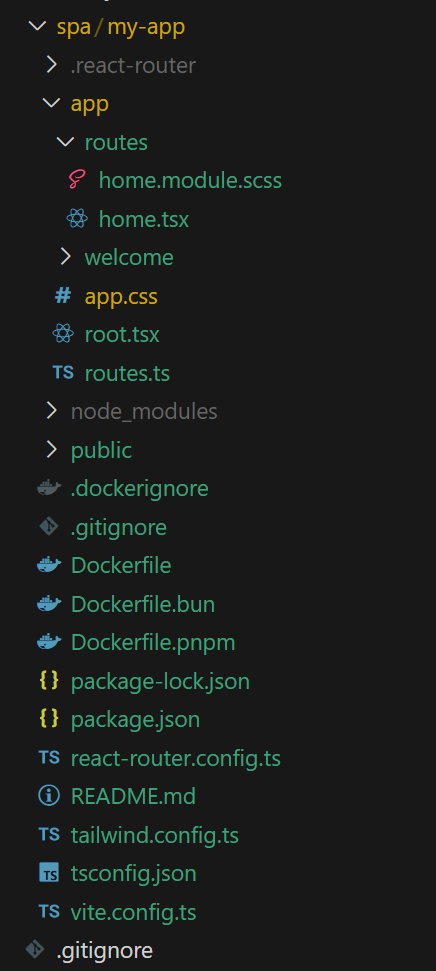
React Router v7でnpx create-react-router@latest my-appによりアプリを作ると以下のようなフォルダ構成になると思います
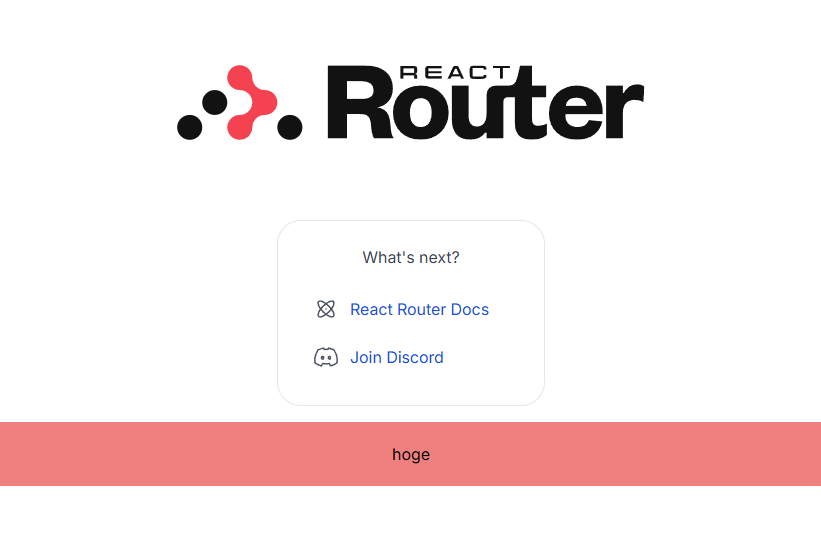
home.tsxにCSSを適用しようと思います
.homeContainer {
  background-color: lightblue;
  padding: 20px;
  text-align: center;
}
cssファイルをimportしてTSX内でclassNameに渡してやるように書くとViteがビルド時に適用してくれます。静的分析利くのでClassNameをTypoする可能性がなくなるのが良いですね
import type { Route } from "./+types/home";
import { Welcome } from "../welcome/welcome";
import styles from './home.module.css';

export default function Home() {
  return <>
    <Welcome />
    <div className={styles.homeContainer}>
      <h1>hoge</h1>
    </div>
  </>
}
hogeの部分がスタイルを適用している部分です

2. stateで表示を変える
stateを使って切り替えることもできます
.homeContainer {
  background-color: lightblue;
  padding: 20px;
  text-align: center;
}

.homeContainer2 {
  background-color: lightcoral;
  padding: 20px;
  text-align: center;
}
import type { Route } from "./+types/home";
import { Welcome } from "../welcome/welcome";
import styles from './home.module.scss';
import { useState } from "react";

export default function Home() {
  const [fuga, setFuga] = useState(true)

  return <>
    <Welcome />
    <div className={fuga ? styles.homeContainer : styles.homeContainer2} onClick={()=>setFuga(!fuga)}>
      <h1>hoge</h1>
    </div>
  </>
}
クリックすると色が変わるようにしてみました
3. composes
公式だと以下に説明があります
https://github.com/css-modules/css-modules/blob/master/docs/composition.md
composes要素にclassNameを書くと、指定したclassNameを継承してCSSを適用できます
例えば以下でfugaを適用すると、color: yellow; background: red;となります
.hoge {
  color: green;
  background: red;
}

.fuga {
  composes: hoge;
  color: yellow;
}
pseudo classes
以下のように書くと、:hoverまで含めて引き継いでくれます
.className {
  color: green;
}
.className:hover {
  color: red;
}
.otherClassName {
  composes: className;
  background: black;
}
つまり以下のように書いたのと同じになります
.otherClassName {
  color: green;
  background: black;
}
.otherClassName:hover {
  color: red;
}
Composing from other files
別ファイルからcomposeすることもできます
.otherClassName {
  composes: className from './style.css';
}
Composing from global class names
グローバルスコープのCSSからcomposeすることもできます
.otherClassName {
  composes: globalClassName from global;
}
4. 複数のCSSモジュールをimportする
複数のCSSモジュールをimportしてきて使う事もできます
https://github.com/css-modules/css-modules/blob/master/docs/import-multiple-css-modules.md
CSS Modulesでimportしたstylesはオブジェクトであるので、Object.assign()で他のstyleオブジェクトとマージすることができます。以下の場合はDemo.cssファイルとcss-fancy-buttonライブラリをstylesにマージしていて、単独の場合と同じように使うことができます
import React from 'react';
let styles = {};
import demo from './Demo.css';
import fancyButton from 'css-fancy-button';
Object.assign(styles, fancyButton, demo);

export default function Demo() {
  return (
    <div className={styles.demo}>
      <button className={styles.fancyButton}>Press Me</button>
    </div>
  );
}
まとめ
良さげに書けるし簡単です
おススメ