はじめに
TCAアーキテクチャとSwiftUIを用いた開発にて、汎用的なポップアップ画面の実装を行いました。作りとして、そこそこ汎用的に使えるようにできたので、記事として展開しようと思います。
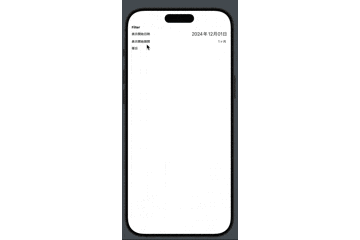
完成品
以下の様に、アニメーションを伴ってポップアップ画面が表示、非表示にできるものを実装していきます。
実装コード
実装方針
ポップアップ画面のバックグラウンドを表示するViewを実装し、そのViewにコンテンツを注入できるような設計にします。
上記完成品でいうところの、グレー色のバックグラウンドの部分は汎用的な部品として、白いコンテンツ部分は開発者が好きに実装できる部分にします。
ここでは便宜上汎用的な部品を 親画面 、コンテンツ部分を 子画面 と呼称します。
親画面の実装
import ComposableArchitecture
import SwiftUI

// Viewの実装

struct PopUpView<PopUpContentView: PopUpableContentView, PopUpContentFeature: PopUpableContentFeature>: View where PopUpContentView.Feature == PopUpContentFeature {

    @Bindable private var store: StoreOf<PopUpFeature<PopUpContentFeature>>

    init(store: StoreOf<PopUpFeature<PopUpContentFeature>>) {

        self.store = store
    }

    var body: some View {
        ZStack {
            if store.isShowing {
                ZStack {
                    createBackground()
                    createContentArea()
                        .padding(16)
                }
                .transition(.opacity.animation(.easeInOut))
            }
        }
        .presentationBackground(.clear)
        .onAppear {
            store.send(.onAppear)
        }
    }
}

private extension PopUpView {

    func createBackground() -> some View {
        Color(asset: CustomColor.dialogBackgroundColor)
            .frame(maxWidth: .infinity, maxHeight: .infinity)
            .ignoresSafeArea()
            .onTapGesture {
                store.send(.tappedBackground)
            }
    }

    func createContentArea() -> some View {
        PopUpContentView(store: store.scope(state: \.childState, action: \.childAction))
            .padding(16)
            .frame(maxWidth: .infinity)
            .background(Color(asset: CustomColor.appPrimaryBackgroundColor))
            .borderModifier()
    }
}

// 以降がReducerの実装

@Reducer
struct PopUpFeature<ChildContentFeature: PopUpableContentFeature> where ChildContentFeature.State: Equatable & Sendable, ChildContentFeature.Action: PopUpableContentAction {

    struct DebounceId: Hashable {}

    // MARK: - state definition

    @ObservableState
    struct State: Equatable, Sendable {

        var isShowing = false
        var childState: ChildContentFeature.State
    }

    // MARK: - action definition

    enum Action: Equatable, Sendable {

        // MARK: event action

        case onAppear
        case tappedBackground

        // MARK: child content action

        case childAction(ChildContentFeature.Action)
    }

    // MARK: - dependency

    @Dependency(\.dismiss) private var dismiss

    // MARK: - reducer definition

    var body: some ReducerOf<Self> {

        Scope(state: \.childState, action: \.childAction) {
            ChildContentFeature()
        }
        Reduce { state, action in

            logger.info("action: \(action)")

            switch action {

            case .onAppear:
                state.isShowing = true
                return .none

            case .tappedBackground:
                return .run { send in

                    await send(.childAction(.willDismissAction),
                               animation: .easeInOut)
                }

            case .childAction(.willDismissAction):
                state.isShowing = false
                return dismissPopUp()

            case .childAction:
                return .none
            }
        }
    }
}

private extension PopUpFeature {

    func dismissPopUp() -> Effect<Action> {

        return .run { _ in

            await dismiss()
        }
        .debounce(id: DebounceId(),
                  for: .seconds(1.0),
                  scheduler: DispatchQueue.main)
    }
}
子画面を表すプロトコル実装
import ComposableArchitecture
import SwiftUI

protocol PopUpableContentFeature: Reducer where State: Equatable & Sendable, Action: PopUpableContentAction {

    init()
}

protocol PopUpableContentAction: Equatable, Sendable {

    static var willDismissAction: Self { get }
}

protocol PopUpableContentView<Feature>: View {

    associatedtype Feature: PopUpableContentFeature

    init(store: some StoreOf<Feature>)
}
子画面の実装
import Combine
import ComposableArchitecture
import Foundation
import SwiftUI

// Viewの実装

struct SelectTrainingTypeContentView: PopUpableContentView {

    typealias Feature = SelectTrainingTypeContentFeature

    // MARK: - store property

    @Bindable private var store: StoreOf<SelectTrainingTypeContentFeature>

    // MARK: - initialize method

    init(store: some StoreOf<SelectTrainingTypeContentFeature>) {

        self.store = store
    }

    // MARK: - view definition

    var body: some View {
        ZStack {
            Button {
                store.send(.tappedCloseButton)
            } label: {
                Image(systemName: "xmark.circle")
                    .resizable()
                    .frame(width: 20, height: 20)
                    .padding(8)
            }
            .frameButtonStyle(frameWidth: .zero)
            .frame(maxWidth: .infinity,
                   maxHeight: .infinity,
                   alignment: .topTrailing)
            .zIndex(.infinity)
            VStack(alignment: .leading, spacing: .zero) {
                Text("種目の選択")
                    .font(.system(size: 20, weight: .bold))
                Spacer()
                    .frame(maxHeight: 20)
                ScrollView {
                    VStack(alignment: .leading,
                           spacing: .zero) {
                    }
                    .frame(maxWidth: .infinity, alignment: .leading)
                }
                .scrollBounceBehavior(.basedOnSize)
            }
        }
        .frame(maxHeight: 300)
        .onAppear {
            store.send(.onAppear)
        }
    }
}

// 以降がReducerの実装

@Reducer
struct SelectTrainingTypeContentFeature: PopUpableContentFeature {

    // MARK: - state definition

    @ObservableState
    struct State: Equatable {}

    // MARK: - action definition

    enum Action: PopUpableContentAction {

        // MARK: event action

        /// 画面表示時
        case onAppear
        /// 画面非表示前
        case willDismiss
        /// 閉じるボタン押下時
        case tappedCloseButton

        static let willDismissAction: Self = .willDismiss
    }

    // MARK: - reducer body

    var body: some ReducerOf<Self> {

        Reduce { state, action in

            switch action {

            case .onAppear:
                return .none

            case .willDismiss:
                return .none

            case .tappedCloseButton:
                return .run { send in
                    await send(.willDismiss, animation: .easeInOut)
                }
            }
        }
    }
}
実装の説明
親画面のView部分の実装
struct PopUpView<PopUpContentView: PopUpableContentView, PopUpContentFeature: PopUpableContentFeature>: View where PopUpContentView.Feature == PopUpContentFeature {

    @Bindable private var store: StoreOf<PopUpFeature<PopUpContentFeature>>

    init(store: StoreOf<PopUpFeature<PopUpContentFeature>>) {

        self.store = store
    }

    var body: some View {
        ZStack {
            if store.isShowing {
                ZStack {
                    createBackground()
                    createContentArea()
                        .padding(16)
                }
                .transition(.opacity.animation(.easeInOut))
            }
        }
        .presentationBackground(.clear) // 背景を透過させるためのmodifier
        .onAppear {
            store.send(.onAppear)
        }
    }
}

private extension PopUpView {

    func createBackground() -> some View {
        Color(asset: CustomColor.dialogBackgroundColor) // プロジェクトで定義したColorなので任意にColorを設定してください
            .frame(maxWidth: .infinity, maxHeight: .infinity)
            .ignoresSafeArea()
            .onTapGesture {
                store.send(.tappedBackground)
            }
    }

    func createContentArea() -> some View {
        PopUpContentView(store: store.scope(state: \.childState, action: \.childAction))
            .padding(16)
            .frame(maxWidth: .infinity)
            .background(Color(asset: CustomColor.appPrimaryBackgroundColor))
            .borderModifier()
    }
}
まず、ポイントとしてはジェネリクスを用いて、子画面のViewとReducerの型を受け入れられる様にしています。
これにより、さまざまな子画面を受け入れられる様になります。
createContentAreaでは子画面を生成していますが、これができるのはジェネリクスのViewの型であるPopUpContentViewをPopUpableContentViewに準拠させているためです。
protocol PopUpableContentView<Feature>: View {

    associatedtype Feature: PopUpableContentFeature

    init(store: some StoreOf<Feature>)
}
ここでstoreを引数に持ったイニシャライザを定義しているため、createContentAreaでそのイニシャライザを呼び、子画面のReducerの型でStoreを生成して子画面であるPopUpContentViewのインスタンスを生成できます。
ポップアップ画面はfullCoverScreenでモーダル遷移で表示することを想定していますが、これを任意のアニメーションで表示するための実装は以下記事を参考に行いました。
具体的には以下実装のtransitionのmodifier部分でアニメーションを指定しています。
isShowingでZStack部分、つまりポップアップ画面全体を出し分けしており、transitionで表示、非表示時のアニメーションを指定しているのです。
Stack {
    if store.isShowing {
        ZStack {
            createBackground()
            createContentArea()
                .padding(16)
        }
        .transition(.opacity.animation(.easeInOut))
    }
}
transitionについては、過去に記事を書いたのでよければご参照ください!
https://qiita.com/stotic-dev/items/294c89bd1622fb35fcce
isShowingはonAppear時とDismiss前に切り替える様にしています。
@Reducer
struct PopUpFeature<ChildContentFeature: PopUpableContentFeature> where ChildContentFeature.State: Equatable & Sendable, ChildContentFeature.Action: PopUpableContentAction {

    struct DebounceId: Hashable {}

    // MARK: - state definition

    @ObservableState
    struct State: Equatable, Sendable {

        var isShowing = false
        var childState: ChildContentFeature.State
    }

    // MARK: - action definition

    enum Action: Equatable, Sendable {

        // MARK: event action

        case onAppear
        case tappedBackground

        // MARK: child content action

        case childAction(ChildContentFeature.Action)
    }

    // MARK: - dependency

    @Dependency(\.dismiss) private var dismiss

    // MARK: - reducer definition

    var body: some ReducerOf<Self> {

        Scope(state: \.childState, action: \.childAction) {
            ChildContentFeature()
        }
        Reduce { state, action in

            logger.info("action: \(action)")

            switch action {

            case .onAppear:
                state.isShowing = true
                return .none

            case .tappedBackground:
                return .run { send in

                    await send(.childAction(.willDismissAction),
                               animation: .easeInOut)
                }

            case .childAction(.willDismissAction):
                state.isShowing = false
                return dismissPopUp()

            case .childAction:
                return .none
            }
        }
    }
}

private extension PopUpFeature {

    func dismissPopUp() -> Effect<Action> {

        return .run { _ in

            await dismiss()
        }
        .debounce(id: DebounceId(),
                  for: .seconds(1.0),
                  scheduler: DispatchQueue.main)
    }
}
今回はポップアップ画面の背景をタップされた場合、画面を閉じるということを行うためにtappedBackgroundを呼ばれたときに、子画面のReducerのActionを介してdismissPopUpを呼んでdismissで画面を非表示にしています。
わざわざ、子画面のReducerを介しているのは、画面非表示しようとしていることを子画面にも伝えるためです。
子画面ではonDisappearで画面非表示のイベントを拾えば良いという考えもありますが、私が調べた限りはこれは良くなさそうでした。
というのも、TCAではDismiss後にActionをsendするとTCAのワーニングが表示されてしまいます。onDisappearはどうしてもDismiss後にsendされてしまうため、ワーニングが回避できなかったのです。
この辺りの事情は、きちんとドキュメントやフォーラムで見たわけではなく、コードに警告が出るといういう結果から私の考えを述べたに過ぎませんので、本当のところは正しいのか怪しいです。
もしご指摘やより良い解決法などあればご教授いただけますと幸いです。
親Reducerがジェネリクスの子Reducerにどうやって画面を非表示にしようとしているのかを通知しているのかというと、子ReducerがPopUpableContentFeatureに準拠し、子Reducer.ActionがPopUpableContentActionに準拠しているためです。
protocol PopUpableContentFeature: Reducer where State: Equatable & Sendable, Action: PopUpableContentAction {

    init()
}

protocol PopUpableContentAction: Equatable, Sendable {

    static var willDismissAction: Self { get }
}

// 子画面のReducer.Action

enum Action: PopUpableContentAction {

        // MARK: event action

        /// 画面表示時
        case onAppear
        /// 画面非表示前
        case willDismiss
        /// 閉じるボタン押下時
        case tappedCloseButton

        static let willDismissAction: Self = .willDismiss
}
子画面のReducer.Actionはプロトコルに準拠するためにwillDismissActionを定義し、そこで画面を閉じる前に通知されるActionを指定します。
そうすることで、親画面のReducerでも子画面のReducer.Actionを一部知ることができるのです。
あとは、dismissPopUpについて、単純にdismissを呼んでいるだけでなく、debounceにて1秒遅延させて行っているのは、画面非表示のアニメーションが終わる前にdismissで画面が非表示になってしまうことを防ぐためです。
つまりアニメーションが終わるのを待つために、遅延処理を入れています。
バニラSwiftUIであれば、withAnimation(completion:)でアニメーションを終えた後にdismissを行うということもできるのでしょうが、TCAだとこれに変わるAPIがなさそうだったので、仕方なく遅延処理を入れています、、
(何か良いやり方あれば是非教えていただきたいです!)
子画面の実装
子画面のモジュール(View+Reducer)は以下プロトコルに準拠するだけですので、詳細の説明は省略します。
protocol PopUpableContentFeature: Reducer where State: Equatable & Sendable, Action: PopUpableContentAction {

    init()
}

protocol PopUpableContentAction: Equatable, Sendable {

    static var willDismissAction: Self { get }
}

protocol PopUpableContentView<Feature>: View {

    associatedtype Feature: PopUpableContentFeature

    init(store: some StoreOf<Feature>)
}
ポップアップ画面呼び出しの実装
最後に以下の様にポップアップ画面を呼び出し部分を実装すれば完成です。
.fullScreenCover(item: $store.scope(state: \.popup, action: \.popup)) {
    PopUpView<SelectTrainingTypeContentView, SelectTrainingTypeContentFeature>(store: $0)
}
.transaction { $0.disablesAnimations = true }
補足として、transactionのmodifierで行っているのは、モーダル遷移のアニメーションを発火させないようにするためです。
これを行わないと、下からにゅっと出てくるモーダル遷移のアニメーションが付与されるため、ポップアップ画面ぽくなりません。
こちらも以下記事を参考にしたものです。
https://stackoverflow.com/questions/78365391/custom-fullscreencover-animation
おわり
以上が、TCA+SwiftUIでの汎用的なポップアップ画面の実装になります。
割と限られた状況での実装例なので、ニッチな話ですがドンピシャでこの内容を取り上げている記事もなかったと思うので、参考になる方がいれば幸いです。