はじめに
Vue Internals①では全体の流れを見ていきました。
ただwatcher周りはほとんど触れていないのでVueにおいてどのような働きをするのかよく理解できませんでした。
Vue Internals②ではこのwatcherの働きとcomputed,watchについてをやっていきたいと思います。
Watcherについて
Vue Internals① 1-4mountComponentにてnew watcherのgetで実際のDOMをrenderingする過程を見ました。
watcherの役割はこのrenderingにあります。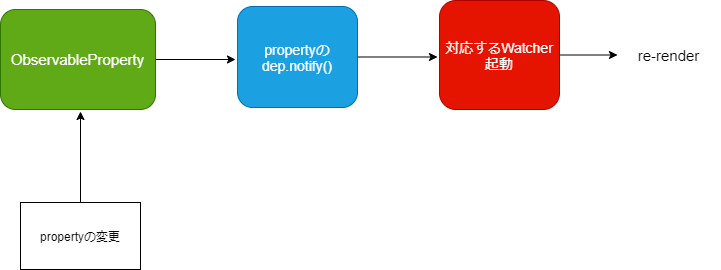
ただ、re-renderingの際、何がこのwatcherのトリガーとなるのでしょうか?
答えはdefinePropertyにあります。
Vue Internals① 1-1compile前まででmessageをObservable化したことを思い出してみましょう。
もしvm._data.message="test"みたいにするとmessageのsetが起動して、
setの処理中にdep.Notify()という項目があり、そこからwatcherにつながります。
今回調べたいことはwactherとdep関連なんですが、そのつながりがどこで作られるかです。
先にmessageに新しい値がsetされた時の動きの略図を見て、どこでwactherとdepのつながりが作られるかを実際のコード探索で見ていくことにします。

ここで全体のwactherとは1-4mountComponentで出てきたwactherのことでexpressionが"function () {
vm.update(vm._render(), hydrating);
}"となっているやつのことです。re-renderingを担っているので全体のwactherと呼んでいます。
今欲しい情報としてはmessageのDepのsubsにどこでwactherが登録されるか?、またwactherにどこでmessageのdepが登録されるかです。なのでこの後は
①computedのwactherが作られるところ
②messageのDepが作られるところ
③messageのDepにwactherが登録されるところ、またwactherにmessageのDepが登録されるところ
を見ていこうと思います。
今回のコード
<html>
<script src="https://unpkg.com/vue"></script>
<body>

<div id="vue_example">
  {{comp_message}}
</div>
</body>

<script>
var vue_example = new Vue({
  el: '#vue_example',

  data: {
    message: 'Hello Vue.js!',
  },
  computed:{
     comp_message(){
         return `comp ${this.message}`
     }
  }
})
</script>


</html>
Vue Internals①に細かい処理は譲り、ここではcomputed,watcher絡みのところを見ていきます。
init~compileまで
まずmergeOptionでoptionを作るときにstratsから対応する関数を取り出してその戻り値がoptionに入ります。
この時strats.computedは

結局option[computed]={comp_message:...}となります。
次はinitStateに行くと、initData、initComputedがあります。
initDataでは①でもみましたがdataをObservableにしています。
ここでdataとnew Observerの関係を図で見てみます。
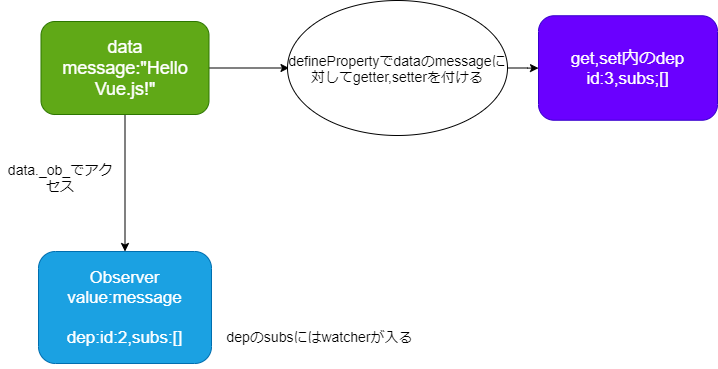
ここで分からなかったことはnew Observerの存在意義で、messageに新しい値を入れるときにはdefinePropertyで設定されたsetが使われて、そのままid:3のdepが使われて対応するwatcherに行くはずなので、new Observerを介していないんですよね・・・こうなるとid:2のdepの存在意義がわからない・・・
ともかく②messageのDepが作られるところはinitDataということですね。
initComputedに行きます。
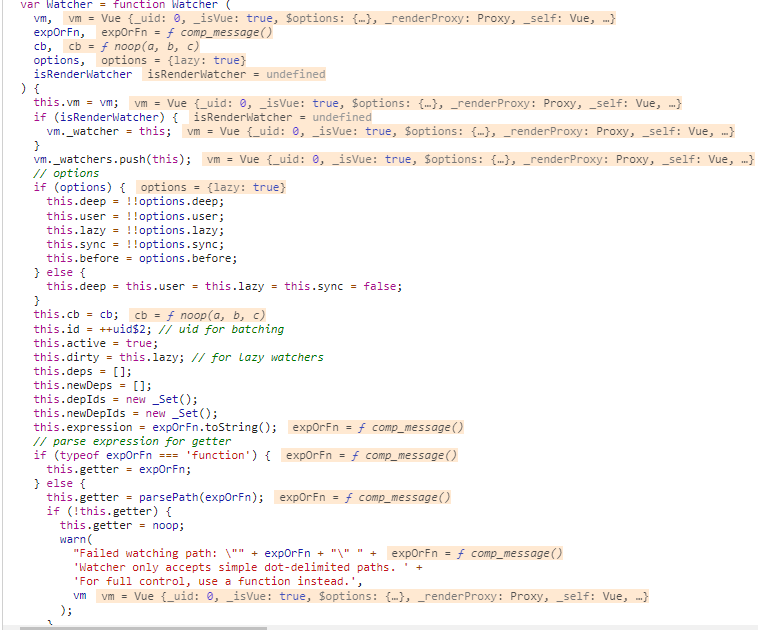
ここでcomputed用のwactherを作ります。
ここでcomputed用のwactherはoptionでlazyがtrueになっていることに注意します。これが実際にmessageの値を変えるときに役になってきます。
vm.wacthersにcomputedのwactherを追加して、
lazy=trueなのでthis.get()はここでは発火しません。
initComputedに戻って、
wacthers["comp_message"]=new Wactherだったのでcomputedのwactherが追加され、さらに
watchers = vm._computedWatchersだったのでvm._computedWacthersにも追加されます。
defineComputedでは後にcomp_messageをgetするときのgetterを定義します。通常setterは定義されません。
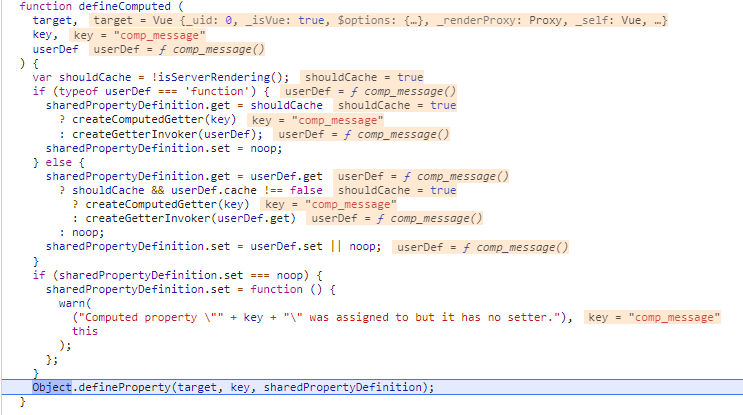
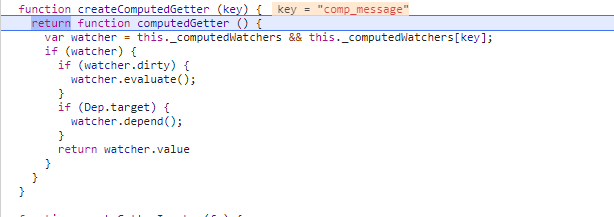
comp_messageをgetしようとするとcomputedGetterが起動して、vm._computedeWacthers[comp_message]からwactherを取り出す流れで使います。詳しくは後ほど。
ここまででinitComputedは終わりです。①computedのwactherが作られるところはinitComputedでした。
ここから一気にmountComponentまで飛びます。AST関連は前回と大して違いがないので省略
mountComponent
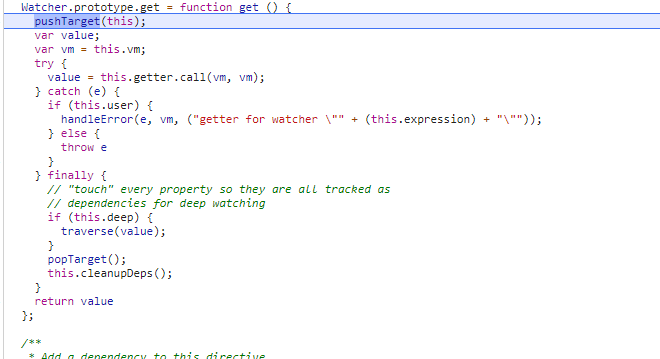
全体のwactherを作成するところで、this.lazy=falseなのでthis.getが起動します。
ここでdepsにwactherが追加されるのですがpushTargetとpopTargetという関数が重要になってきます。
動きを図で見てみましょう。
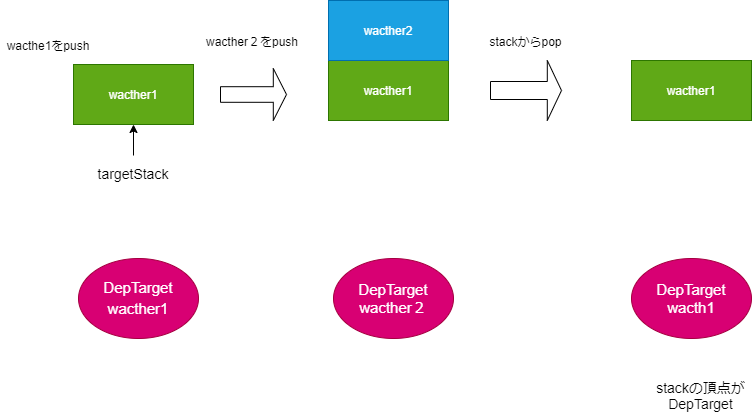
pushTargetはwactherをtargetStackにpushして、DepTargetをそのwactherとします。
popTargetはtargetStackからpopしてDepTargetをStackの頂点のwactherとします。
DepTargetはglobalなので、どのdepからDepTargetを見ても同じwactherなので注意しましょう。
今のDepTargetが全体のwactherであることを念頭に置いて、
(function anonymous(
) {
with(this){return _c('div',{attrs:{"id":"vue_example"}},[_v("\n  "+_s(comp_message)+"\n")])}
})
の実行まで飛びます。
ここでcomp_messageの値を得るときにcomputedGetterが起動するのでした。
computedのwacther.evaluate()に行きます。
Watcher.prototype.evaluate = function evaluate () {
    this.value = this.get();
    this.dirty = false;
  };
ここで2度目のpushTargetで今度はcomputedのwactherをpushします。動きは上記の図を思い出してください。
DepTargetはcomputedのwactherに。
computedのwactherのgetterはcomp_messageでした。
 comp_message(){
         return `comp ${this.message}`
     }
messageを取得するときに①astを中心にでもやった通り、messageのgetterが呼ばれることに注意してください。
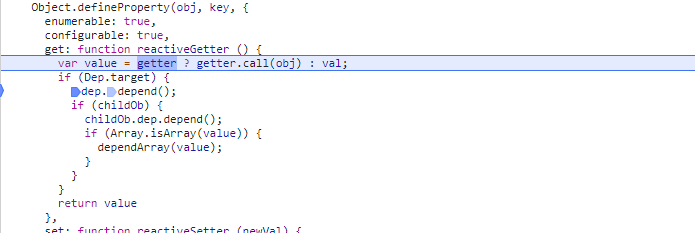
さて、ここでDep.targetは今computedのwactherでした。
なのでmessageのdep.depend()が呼ばれます。
Dep.prototype.depend = function depend () {
    if (Dep.target) {
      Dep.target.addDep(this);
    }
  };
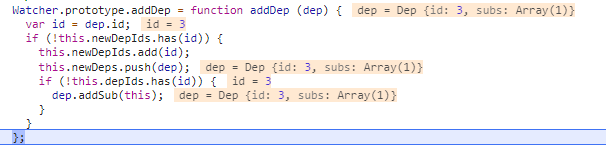
addDepによってmessageのdepのsubsにcomputedのwactherが追加されました。
③messageのDepにwactherが登録されるところはmessageのgetterからでした。
comuptedのwactherのgetに戻り、次はpopTargetです。
ここでDepTargetが全体のwactherに戻ります。
cleanupDepsに行きます。
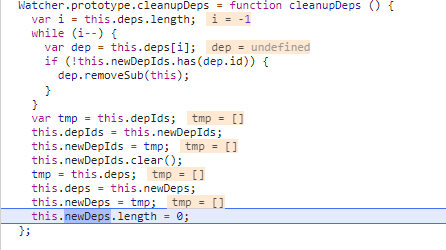
ここでnewDepsからDepsに移ります。
newDepsはdep.depned→Dep.target.addDep内でwactherにnewDepsが追加されていました。
③のwactherにdepsを登録するのはcleanupDepsでした。
最初はnewDepsに入れてそれからDepsに移す流れです。
computedGetterに戻って、watcher.depend()へ
Watcher.prototype.depend = function depend () {
    var i = this.deps.length;
    while (i--) {
      this.deps[i].depend();
    }
  };
今回はcomputedのwactherのdepsはさっき追加した。messageのdepのみなので、そのdep.depend()だけですね。
今のDep.targetが全体のwacherで会ったことを思い出すとmessageのdepのsubsに全体のwactherが追加されてこれでmessageのdepはcomputedと全体のwacther二つがあることになります。
まとめると、①全体のwacther.get()→②computedのwatcher.get()でcomputedGetterが呼ばれる、computedGetterではまず②でpushしたcomputedのwactherをmessageのdepに入れて、そのあとに①でpushしたwactherもmessageのdepに入れました。
wactherにdepsが追加されるのはdep.depnedでnewDepsとしていったん入った後、watcher.get()のcleanupDepsでnewDepsからDepsするときです。
図でもまとめてみましょう。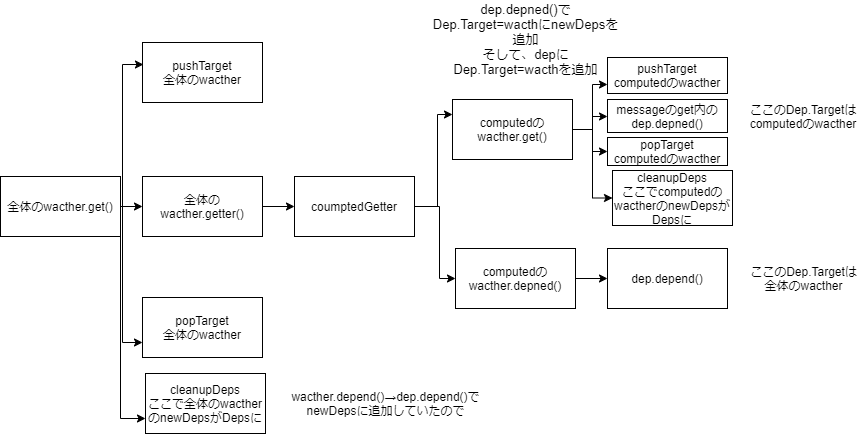
後の工程は①ASTを中心にでやったことと同じです。
ここまでで、wactherの生成、deps↔wacherの追加されるタイミングがわかったと思います。
ようやく準備も整ったので次回実際にmessageに新しい値を入れた後の動きを見ましょう。