Loopback4のGAがリリースされたので、TODOチュートリアルを参考に簡単なAPIを作ってみる。
モデルを作る
データベース上に保存するテーブルの設計図となるmodel(モデル)は、lb4 modelコマンドで作成することができる。
lb4 modelコマンドを実行後、プロパティ名とその性質を指定すると、モデルを作ることができる。ここでは、Itemというモデルを作成してみた。なお、生成されるファイルの拡張子.model.tsは重要らしく、自動的にモデルを定義したファイルを読み込むためのフィルタ条件に使われていた。
import {Entity, model, property} from '@loopback/repository';

@model()
export class Item extends Entity {
  @property({
    type: 'number',
    id: true,
    required: true,
  })
  id: number;

  @property({
    type: 'string',
    required: true,
  })
  name?: string;

  constructor(data?: Partial) {
    super(data);
  }
}
データソースを作る
実際にデータを格納する場所をdatasource(データソース)という。データソースにはMySQLやSQLite、メモリなどいろいろな手段を選択することができる。データソースはlb4 datasourceコマンドで作成することができる。
> lb4 datasource
? Datasource name: db
? Select the connector for sqldb: MySQL (supported by StrongLoop)
? Connection String url to override other settings (eg: mysql://user:pass@host/db):
? host: localhost
? port: 3306
? user: loopback_user
? password: [hidden]
? database: loopback_db
   create src\datasources\db.datasource.json
   create src\datasources\db.datasource.ts
この操作により、datasourceフォルダに設定値が書かれた.datasource.jsonと、それを読み込む.datasource.tsが生成されるのだが、.datasource.jsonの扱いは注意が必要。認証情報が平文になっているので、Gitに保管しないように気を付けなくてはならない。
ローカルサーバ用のパスワードだからよかったものの、普通にやらかしたので注意。
.datasource.jsonの中身を暗号化して保存できる手段があれば、そちらに保存してファイルを消した方が良い。
生成されるファイルは以下のようになる。lb4 datasourceで設定したデータソース名がファイル名や設定値に反映されていることが分かる。データソース名は後でデータソースを指定するのに使うので、サンプルコードを利用するときは間違っていないか気を付ける必要がある。
{
  "name": "sqldb",
  "connector": "mysql",
  "url": "",
  "host": "localhost",
  "port": 3306,
  "user": "loopback_user",
  "password": "ここにパスワードが入る",
  "database": "loopback_db"
}
import {inject} from '@loopback/core';
import {juggler} from '@loopback/repository';
import * as config from './sqldb.datasource.json';

export class SqldbDataSource extends juggler.DataSource {
  static dataSourceName = 'sqldb';

  constructor(
    @inject('datasources.config.sqldb', {optional: true})
    dsConfig: object = config,
  ) {
    super(dsConfig);
  }
}
リポジトリを作る
モデルをデータソースに保存したり、取り出したりするためのrepository(リポジトリ)を作成する。リポジトリはlb4 repositoryで基本的なCRUD機能を有したDefaultCrudRepositoryを作ることができる。
ここでは、これまでに作成したItemモデルをSqldbデータソースに置くリポジトリを作成する。
>lb4 repository
? Please select the datasource SqldbDatasource
? Select the model(s) you want to generate a repository Item
? Please enter the name of the ID property for Item: id
   create src\repositories\item.repository.ts
   update src\repositories\index.ts

Repository Item was created in src\repositories/
生成されるファイルは以下のようになる。
import {DefaultCrudRepository, juggler} from '@loopback/repository';
import {Item} from '../models';
import {SqldbDataSource} from '../datasources';
import {inject} from '@loopback/core';

export class ItemRepository extends DefaultCrudRepository<Item, typeof Item.prototype.id> {
  constructor(
    @inject('datasources.sqldb') dataSource: SqldbDataSource,
  ) {
    super(Item, dataSource);
  }
}
コントローラを作る
外部に公開するAPIを定義するcontrollerは、lb4 controllerコマンドで作ることができる。CRUDリポジトリにアクセスするためのRestAPIであれば、このコマンドで自動で作ることができる。
>lb4 controller
? Controller class name: item
? What kind of controller would you like to generate? REST Controller with CRUD functions
? What is the name of the model to use with this CRUD repository? Item
? What is the name of your CRUD repository? ItemRepository
? What is the type of your ID? number
? What is the base HTTP path name of the CRUD operations? /items
   create src\controllers\item.controller.ts
   update src\controllers\index.ts

Controller item was created in src\controllers/
生成されるcontrollerは以下のようになる。
import {
  Count,
  CountSchema,
  Filter,
  repository,
  Where,
} from '@loopback/repository';
import {
  post,
  param,
  get,
  getFilterSchemaFor,
  getWhereSchemaFor,
  patch,
  del,
  requestBody,
} from '@loopback/rest';
import {Item} from '../models';
import {ItemRepository} from '../repositories';

export class ItemController {
  constructor(
    @repository(ItemRepository)
    public itemRepository : ItemRepository,
  ) {}

  @post('/items', {
    responses: {
      '200': {
        description: 'Item model instance',
        content: {'application/json': {'x-ts-type': Item}},
      },
    },
  })
  async create(@requestBody() item: Item): Promise<Item> {
    return await this.itemRepository.create(item);
  }

  @get('/items/count', {
    responses: {
      '200': {
        description: 'Item model count',
        content: {'application/json': {schema: CountSchema}},
      },
    },
  })
  async count(
    @param.query.object('where', getWhereSchemaFor(Item)) where?: Where,
  ): Promise<Count> {
    return await this.itemRepository.count(where);
  }

  @get('/items', {
    responses: {
      '200': {
        description: 'Array of Item model instances',
        content: {
          'application/json': {
            schema: {type: 'array', items: {'x-ts-type': Item}},
          },
        },
      },
    },
  })
  async find(
    @param.query.object('filter', getFilterSchemaFor(Item)) filter?: Filter,
  ): Promise<Item[]> {
    return await this.itemRepository.find(filter);
  }

  @patch('/items', {
    responses: {
      '200': {
        description: 'Item PATCH success count',
        content: {'application/json': {schema: CountSchema}},
      },
    },
  })
  async updateAll(
    @requestBody() item: Item,
    @param.query.object('where', getWhereSchemaFor(Item)) where?: Where,
  ): Promise<Count> {
    return await this.itemRepository.updateAll(item, where);
  }

  @get('/items/{id}', {
    responses: {
      '200': {
        description: 'Item model instance',
        content: {'application/json': {'x-ts-type': Item}},
      },
    },
  })
  async findById(@param.path.number('id') id: number): Promise<Item> {
    return await this.itemRepository.findById(id);
  }

  @patch('/items/{id}', {
    responses: {
      '204': {
        description: 'Item PATCH success',
      },
    },
  })
  async updateById(
    @param.path.number('id') id: number,
    @requestBody() item: Item,
  ): Promise<void> {
    await this.itemRepository.updateById(id, item);
  }

  @del('/items/{id}', {
    responses: {
      '204': {
        description: 'Item DELETE success',
      },
    },
  })
  async deleteById(@param.path.number('id') id: number): Promise<void> {
    await this.itemRepository.deleteById(id);
  }
}
動かしてみる
npm startでサーバを起動すると、デフォルトでlocalhost:3000から公開したAPIを呼び出せるようになる。API Explorer( http://explorer.loopback.io/?url=http://localhost:3000/openapi.json )を開けば、ブラウザからAPIを試すことができる。
ただ、データベースのテーブルを準備していなければAPI呼び出し時にエラーが出る。MySQLの場合以下の様なエラーが出る。
Unhandled error in POST /items: 500 Error: ER_NO_SUCH_TABLE: Table 'loopback_db.item' doesn't exist
LoopBack4は'18/11時点で開発中なのでマニュアルやサンプルが見当たらないが、GitHubのIssueで今後用意されることが書かれていた。色々難しそうなので、とりあえず今は、コントローラにmigrateとupdate機能を追加してしのぐことにした。
  @post('/item-migrate', {
    responses: {
      '200': {
        description: 'migrate'
      },
    },
  } )
  async migrate(): Promise<any> {
      return new Promise( ( resolve, reject ) => {
          this.itemRepository.dataSource.automigrate( 'Item', () => {
              resolve();
          } )
      } )
  }

  @post('/item-update', {
    responses: {
      '200': {
        description: 'update'
      },
    },
  } )
  async update(): Promise<any> {
      return new Promise( ( resolve, reject ) => {
          this.itemRepository.dataSource.autoupdate( 'Item', () => {
              resolve();
          } )
      } );
  }
暫定的に2つのテーブル作成item-migrate・テーブル更新item-updateのAPIを追加した。

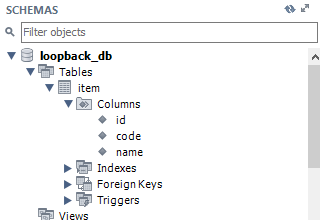
item-migrateを実行すると、itemテーブルが追加される。

もしモデルを更新したら、item-updateを実行すると反映できる。
import {Entity, model, property} from '@loopback/repository';

@model()
export class Item extends Entity {
    @property( {
        type: 'number',
        id: true,
        required: true,
    } )
    id: number;

    @property( {
        type: 'string',
    } )
    code?: number;

    @property( {
        type: 'string',
        required: true,
    } )
    name: string;

    @property( {
        type: 'date',
        required: true,
    } )
    createdAt: Date;

    @property( {
        type: 'date',
        required: true,
    } )
    updatedAt: Date;

    constructor(data?: Partial<Item>) {
        super(data);
    }
}
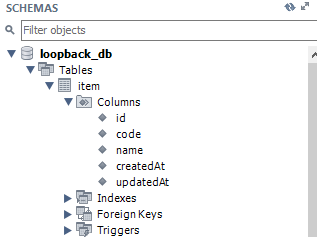
作成日createdAtと更新日updatedAtを追加したら以下のようになる。
これで一通りデータベースを作れた。今度は、クライアントから利用したり、少し複雑なモデルを作ったりしてみる。
追記
IDのオートインクリメントを使いたい場合は、generated: trueを付け、requiredは付けないかfalseにする必要があった。更に'Auto Increment'が設定されたプロパティをデータベースに渡してしまうと以下のエラーが出てしまうことも分かった。うっかり嵌まらないようにする必要がある。
インスタンスは無効です。 詳細:
idcan't be set auto increment
    @property( {
        type: 'number',
        id: true,
        generated: true
    } )
    id: number;
{
  "id": "1",            <---- Auto Incrementと干渉してNG。消す必要あり。
  "code": "00001",
  "name": "string",
  "createdAt": "2018-11-03T17:35:38.142Z",
  "updatedAt": "2018-11-03T17:35:38.142Z"
}