「nestjsとSqliteで簡単なAPIを作る」の続きで、備品管理的なWebアプリを作っていく。
まずはバックエンド側を整備していく。
GitHub: https://github.com/stm32p103/nestjs-sample/releases/tag/0.0.1
APIの情報を公開する(Swagger)
「nestjsとSqliteで簡単なAPIを作る」ではItemクラスを作り、REST APIを公開するまで試してみた。あとはクライアントからアクセスできるようにすれば良いわけだが、利用者にどんなAPIが利用できるかを見せてあげるとより親切になる。
NestJSでは、OpenAPI(Swagger)でAPIの仕様を公開し、利用者に試してもらえるようにする機能が提供されている。マニュアル(NestJS/Swagger)を参考にすると以下のようになる。(マニュアルのBootstrapの項に従い、NestJS起動前にSwaggerの)
Item Entity
お題として、備品を表すItemエンティティは以下のように作った。ID、作成日と更新日、名前と説明が入った質素なエンティティにしている。(エンティティの作り方はTypeORMでエンティティを定義する際のガイドラインを参考にした)
@Entity()
export class Item {
    @PrimaryGeneratedColumn()
    readonly id?: number;

    @CreateDateColumn()
    readonly createdAt?: Date;

    @UpdateDateColumn()
    readonly updatedAt?: Date;

    @Column( { length: 128 } )
    name: string;

    @Column()
    description: string;

    constructor( init?: Partial<Item> ) {
        Object.assign(this, init);
    }
}
Item Controller
コントローラ(Itemエンティティの操作を公開する)は、以下のように簡単なCRUDを提供するようにした。
ここで、エンドポイント(@Postや@Patch)の引数にリクエストボディ(@Body)としてItemDtoを受け取るようにしている。このDTO(DataTransferObject)の定義において、NestJSが提供するデコレータを使ってOpenAPI向けの情報を付加してあげることで、OpenAPIの画面から何を与えたらよいかが見えるようになる。また、@ApiUseTagsデコレータを付加してあげることで、対象のコントローラが提供するエンドポイントがタグ名でまとめられて見やすくなる。
@ApiUseTags('Items')
@Controller('items')
export class ItemController {
    constructor(private readonly items: ItemService ) {}
    @Get()
    async findAll():  Promise<Item[]> {
        return await this.items.findAll();
    }

    @Get(':id')
    async getById( @Param('id') id: number ):  Promise<Item> {
        try {
            return await this.items.findOneById( id );
        } catch( e ) {
            throw new HttpException( 'Entity Not Found', HttpStatus.NOT_FOUND );
        }
    }

    @Post()
    async create( @Body() dto: ItemDto ): Promise<Item> {
        let id = await this.items.create( new Item( dto ) );
        return this.items.findOneById( id );
    }

    @Patch(':id')
    async update( @Param('id') id: number, @Body() dto: ItemDto ): Promise<Item> {
        await this.items.update( id, new Item( dto ) );
        try {
            return await this.items.findOneById( id );
        } catch( e ) {
            throw new HttpException( 'Entity Not Found', HttpStatus.NOT_FOUND );
        }
    }

    @Delete(':id')
    async delete( @Param('id') id: number ): Promise<void> {
        return await this.items.delete( [ id ] );
    }
}
備考
TypeORMのupdateメソッドは、対象が存在しない場合でも成功を返す。だからAPIとしても成功(ステータス200)が返る。対象がいなかったというだけで更新は成功したという考えなのかもしれない。この辺はREST APIの応答をどうするか(冪等性?)の話になるので、調べないと良く分からない。
HTTP応答を返すまでに例外が起きたら、NestJSが気を利かせて500 Internal Server Errorを返してくれるので、上の例では明示的に処置している例外は、ID指定のGETに対して404 Not Foundを返すくらいしかしていない。
上記の例では、POSTやPATCHに対して、「綺麗なAPIを設計するには気をつけたい5つのポイント」で書かれていた、最新のデータを返すという考えに倣っている。
(参考)ItemService
Swaggerとは直接関係ないので参考だが、ItemのCRUD操作を提供するItemServiceは以下のようにした。TypeORMのリポジトリのドキュメントを参考に作成した。あまりエラーとか考えていないので微妙かもしれない。
@Injectable()
export class ItemService  {
    constructor(
        @InjectRepository( Item ) private readonly repo: Repository<Item>
    ) {}

    async create( item: Partial<Item> ): Promise<number> {
        let result = await this.repo.insert( item );
        return result.identifiers[0].id;
    }

    async update( id: number, item: Partial<Item> ): Promise<void> {
        await this.repo.update( id, item );
    }

    async findOneById( id: number ): Promise<Item> {
        return await this.repo.findOneOrFail( id );
    }

    async findAll(): Promise<Item[]> {
        return await this.repo.find();
    }

    async delete( ids: number[] ): Promise<void> {
        await this.repo.delete( ids );
    }
}
ItemDto
Itemの作成や更新の時には、nameとdescriptionだけ渡せばよい。ID・作成日・更新日といったプロパティはシステムで設定するためだ。なので、必要な情報だけをItemDtoにまとめている。
以下のようにデコレータを付けてあげることで、OpenAPIにどんなパラメータを必要とするかを表示できるようになる。
export class ItemDto {
    @ApiModelProperty( {
        required: false
    } )
    name?: string;

    @ApiModelProperty( {
        required: false
    } )
    description?: string;
}
動かした結果
サーバを起動して、SwaggerのURL(デフォルトだとlocalhost:3000/api)を開くと、以下のような画面が表示されると思う。
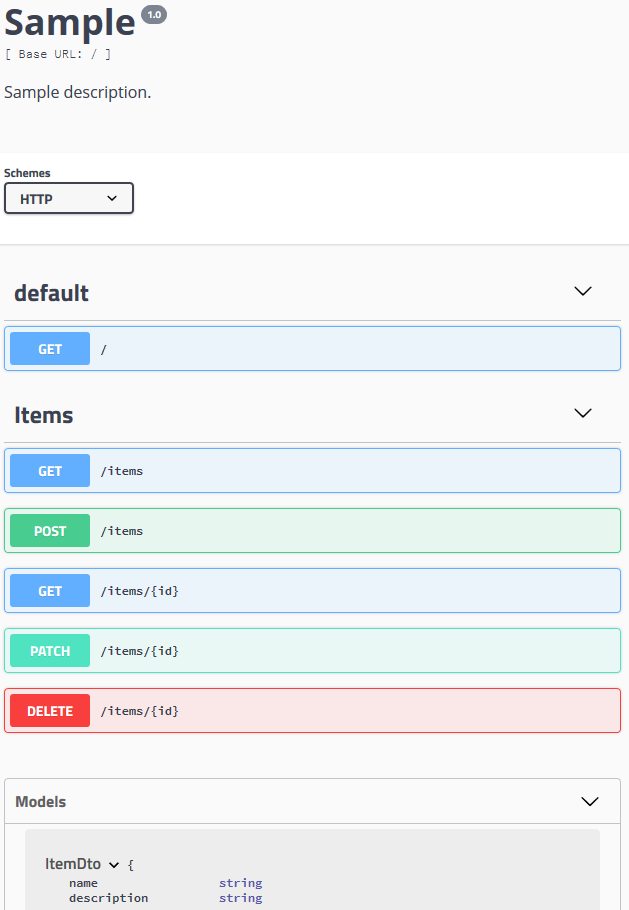
どんなAPIが提供されているかのリストが表示されて、選ぶと以下のように試すための設定が表示される。

例えばこの画面からは、nameとdescriptionを設定すると、新しいItemが生成される。
まとめ
NestJSではコントローラとそのパラメータにデコレータを付けることで、OpenAPIでAPIを公開できるようになる。単純な文字列や数値だけでなく、列挙型や配列も扱えたり、ステータスコードの説明も付けることができるらしい。内輪で使用する分には構わないかもしれないが、誰かに使ってもらうなら、公式ドキュメントをしっかり見て作っていきたい。