Swift時代に悩ましいUIViewControllerをどう扱うか - Qiita
先日の Swift Tweets で UIViewController の初期化とか画面遷移は Swift っぽく書けないからコードで書くのおすすめだよ、ってあったのでコードだけで画面を生成し画面遷移してみる。
AutoLayout の記述には SnapKit を利用するので Cocoapods などで追加しておく。
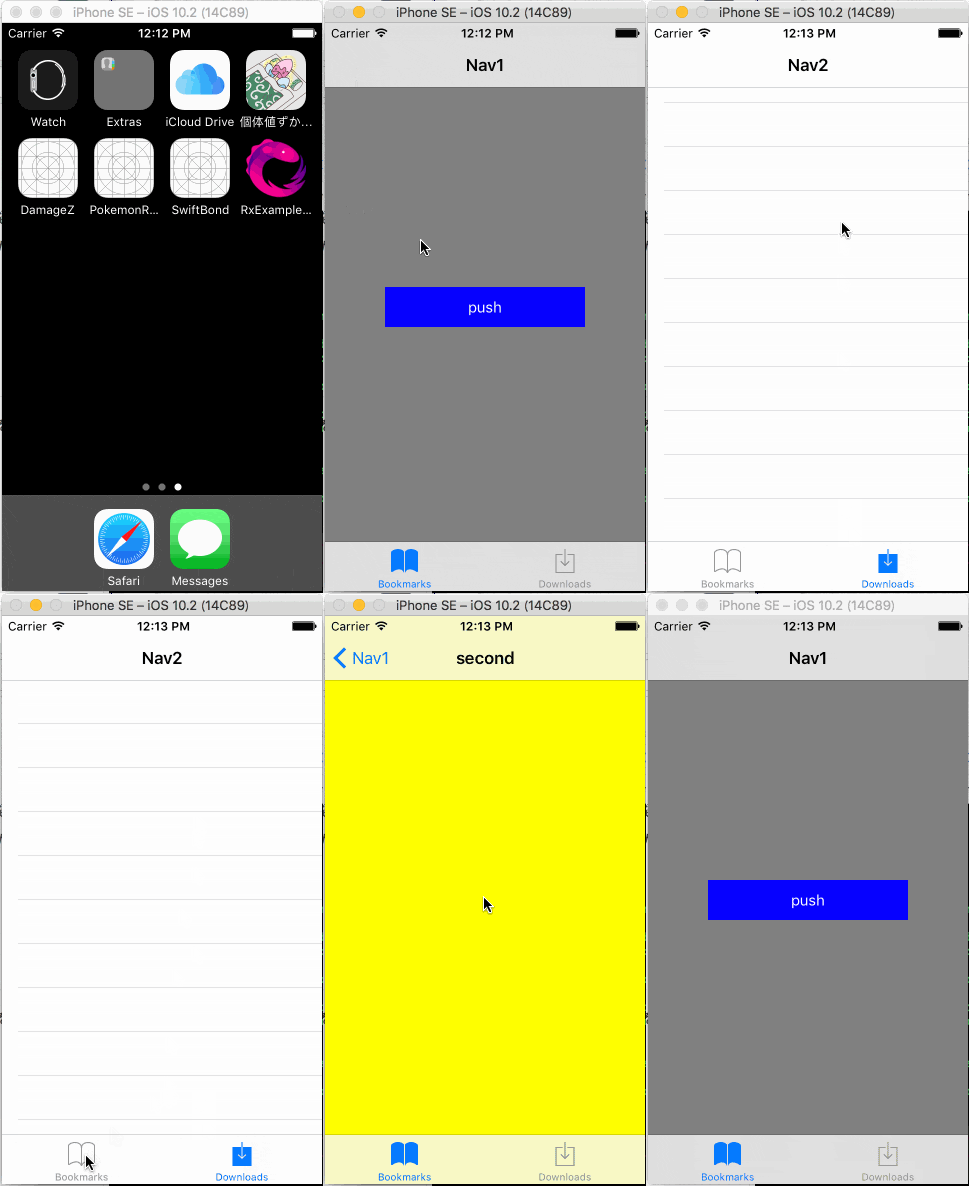
完成画面
先に作る画面がわかっていた方がわかりやすいので完成画面を先に載せておく、Tab + Navigation の一般的な画面です。
1. 初回起動の Storyboard を削除
Main.storyboard はいらないので削除してしまいましょう。
また、 General > Deployment Info > Main Interface も空欄になるようにしましょう。
2. 各画面を作成
今回のアプリで出てくる3つの画面を作成する。
Nav1ViewController
push ってかいてあるボタンが載っている画面。
背景 gray の container を生成し、その中心に button を設置している。
ボタンをタップすると SecondViewController に遷移する。
画面遷移は class の init 時に引数を渡して navigationController で遷移している、これで prepareForSegue など使わないで済む。
final class Nav1ViewController: UIViewController {
    private lazy var container: UIView = {
        let container = UIView()
        container.backgroundColor = UIColor.gray

        let button = UIButton(type: .system)
        container.addSubview(button)
        button.setTitle("push", for: .normal)
        button.tintColor = UIColor.white
        button.backgroundColor = UIColor.blue
        button.addTarget(self, action: #selector(onTappedPush(_:)), for: .touchUpInside)
        button.snp.makeConstraints { make in
            make.width.equalTo(200)
            make.height.equalTo(40)
            make.center.equalTo(container)
        }
        return container
    }()

    override func viewDidLoad() {
        super.viewDidLoad()

        navigationItem.title = "Nav1"
        self.view.addSubview(container)
        container.snp.makeConstraints { make in
            make.edges.equalToSuperview()
        }
    }

    override func didReceiveMemoryWarning() {
        super.didReceiveMemoryWarning()
        // Dispose of any resources that can be recreated.
    }

    func onTappedPush(_ sender: UIButton) {
        print(sender)
        let vc = SecondViewController(titleName: "second")
        navigationController?.pushViewController(vc, animated: true)
    }
}
SecondViewController
Nav1 の遷移先。
init で titleName を必須にしている。
final class SecondViewController: UIViewController {
    let titleName: String

    init(titleName: String) {
        self.titleName = titleName
        super.init(nibName: nil, bundle: nil)
    }

    required init?(coder aDecoder: NSCoder) { fatalError("init(coder:) has not been implemented") }

    private lazy var container: UIView = {
        let container = UIView()
        container.backgroundColor = UIColor.yellow
        return container
    }()

    override func viewDidLoad() {
        super.viewDidLoad()
        navigationItem.title = titleName
        self.view.addSubview(container)
        container.snp.makeConstraints { make in
            make.edges.equalToSuperview()
        }
    }

    override func didReceiveMemoryWarning() {
        super.didReceiveMemoryWarning()
        // Dispose of any resources that can be recreated.
    }
}
Nav2ViewController
タブの2つ目に設定している画面。
view を tableView にして、 Delegate などを実装している。
final class Nav2ViewController: UIViewController {
    private lazy var tableView: UITableView = {
        let tableView = UITableView()
        tableView.delegate = self
        tableView.dataSource = self
        return tableView
    }()

    override func viewDidLoad() {
        super.viewDidLoad()

        navigationItem.title = "Nav2"
        view = tableView
    }

    override func didReceiveMemoryWarning() {
        super.didReceiveMemoryWarning()
        // Dispose of any resources that can be recreated.
    }
}

extension Nav2ViewController: UITableViewDelegate {

}

extension Nav2ViewController: UITableViewDataSource {
    func tableView(_ tableView: UITableView, cellForRowAt indexPath: IndexPath) -> UITableViewCell {
        return UITableViewCell()
    }

    public func tableView(_ tableView: UITableView, numberOfRowsInSection section: Int) -> Int {
        return 10
    }
}
3. TabBar の作成
👆 で作成した VC を利用する TabBar を作成する。
Navigation の rootViewController に VC を設定することで TabBar + Navigation が実現できる。
final class MainTabBarViewController: UITabBarController {
    override func viewDidLoad() {
        super.viewDidLoad()

        let vc = Nav1ViewController()
        vc.tabBarItem = UITabBarItem(tabBarSystemItem: .bookmarks, tag: 1)
        let nv = UINavigationController(rootViewController: vc)
        let vc2 = Nav2ViewController()
        vc2.tabBarItem = UITabBarItem(tabBarSystemItem: .downloads, tag: 2)
        let nv2 = UINavigationController(rootViewController: vc2)
        setViewControllers([nv, nv2], animated: false)
    }

    override func didReceiveMemoryWarning() {
        super.didReceiveMemoryWarning()
        // Dispose of any resources that can be recreated.
    }
}
4. AppDelegate で初回起動画面を設定する
    func application(_ application: UIApplication, didFinishLaunchingWithOptions launchOptions: [UIApplicationLaunchOptionsKey: Any]?) -> Bool {
        window = UIWindow(frame: UIScreen.main.bounds)
        window?.rootViewController = MainTabBarViewController()
        window?.makeKeyAndVisible()

        return true
    }
5. アプリを起動してみる
こうなる!
感想
Storyboard もういらないですね…。
ただ、VC に View の初期化コードを書くのでそれだけで VC の見通し悪くなってしまうので、 CustomView に分割などしていかないとまずそう。
Storyboard を捨てるということはデザイナが自分自身でデザインを直すということがかなり難しくなってしまうが、まあ Storyboard 触れるデザイナもほぼいないので問題ではなさそう。
画面遷移はもう segue 使うのやめて init しよう、そっちの方が良い。
