この記事はリンク情報システムの「TechConnect!2022年2月」のリレー記事です。
engineer.hanzomon のグループメンバによってリレーされます。
(リンク情報システムのFacebookはこちらから)
TechConnect!2022年2月のインデックスはこちら
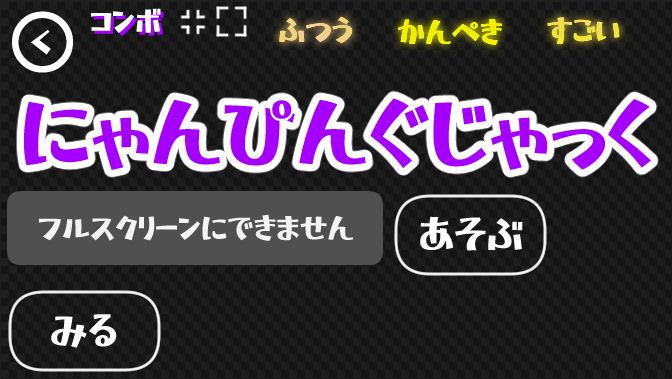
Phaserでにゃんぴんぐじゃっくを作りました。
 にゃんぴんぐじゃっくとは
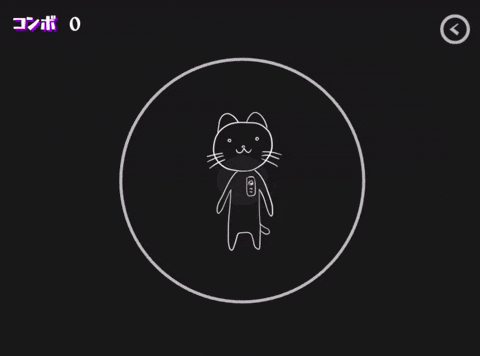
あそべ!!![]()
スマホでも遊べるよ。
Phaserとは
A fast, fun and free open source HTML5 game framework
なるほどね。
ゲームのメモ
シーン構成
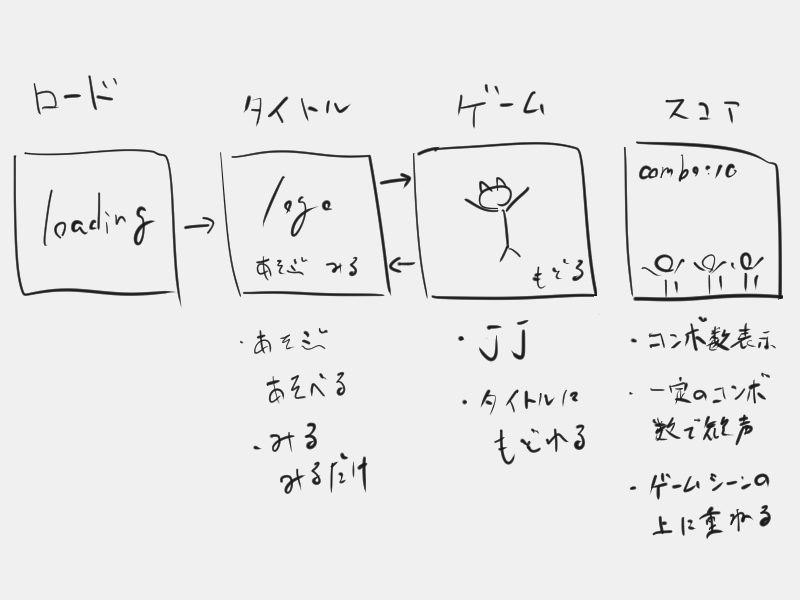
ロードシーン
- ロード画面
- 画像とか音とかのロードが終わったらタイトルシーンへ遷移
タイトルシーン
- タイトル画面
- "あそぶ" or "みる"をクリックでゲームシーンへ遷移
ゲームシーン
- ゲーム画面
- "スペース"押すとジャンピングジャック
- "もどる"をクリックでタイトルシーンへ遷移
スコアシーン
- コンボ数表示
- 一定のコンボ数で歓声
- ゲーム画面の上に重ねて使う(単体で使うことはない)
歓声の素材
歓声の声、イラストはそれぞれ効果音ラボさん、いらすとやさんからお借りしました。
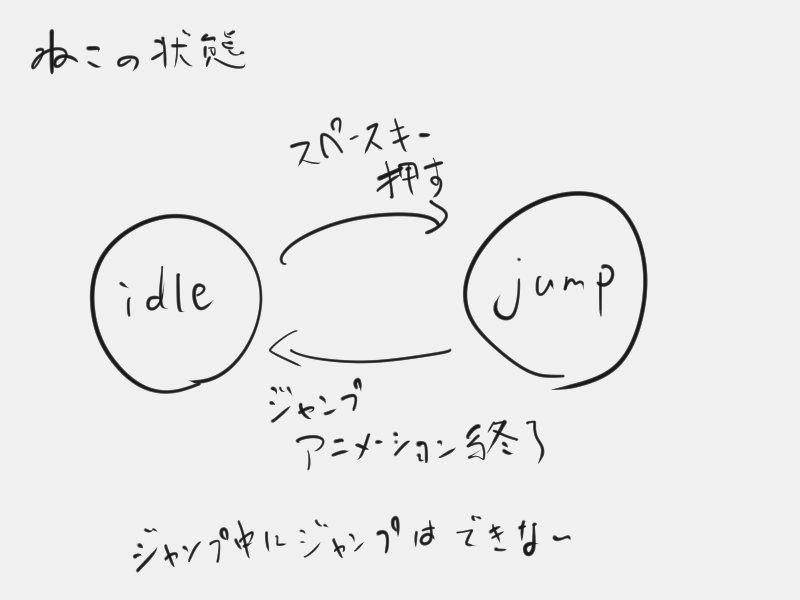
ゲームシーンの主な登場人物
ねこ
真ん中のねこ。状態に応じた処理を行う。
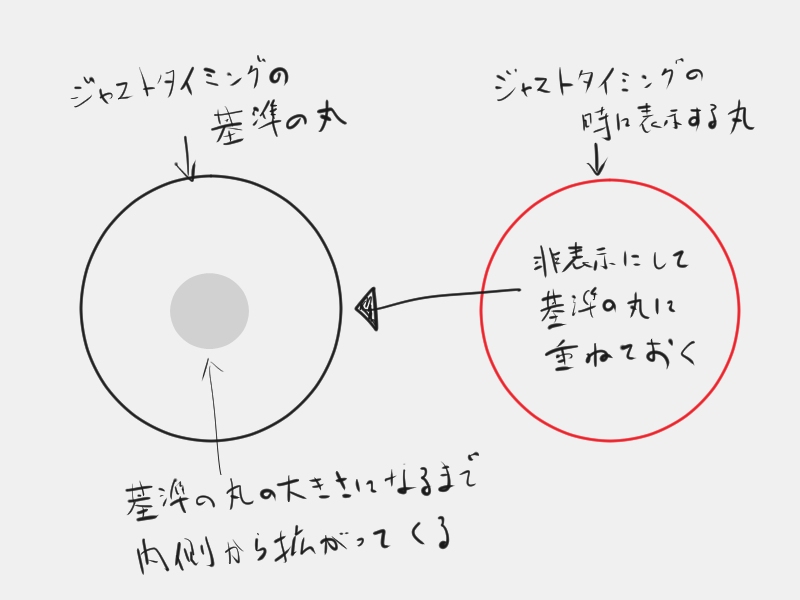
まる
なんちゃってリズムゲーの部分。
内側から拡がってくる丸が基準の丸に重なったところでジャンプするとジャストタイミング。
Phaserのメモ
ハマったところとか覚えておきたいところとか。
シーンの並列実行
スコアシーンをゲームシーン上に表示する際に使った。こうするだけ。
this.scene.launch('score');
スマホ対応
いちおうスマホでも遊べるように2点ほど対応した。
ゲーム画面を画面幅に合わせる
Phaser.Types.Core.GameConfigのscaleプロパティで設定するだけ。
ScaleConfigの他のプロパティはここ見て。
| プロパティ | 設定値 | 説明 |
|---|---|---|
| mode | Phaser.Scale.FIT | 画面幅に合わせる |
| autoCenter | Phaser.Scale.CENTER_BOTH | 真ん中にする (画面幅とは関係ないけど真ん中に表示されたほうがそれっぽいんで) |
const scale: Phaser.Types.Core.ScaleConfig = {
    mode: Phaser.Scale.FIT,
    autoCenter: Phaser.Scale.CENTER_BOTH,
    width: 800,
    height: 600
};

const config: Phaser.Types.Core.GameConfig = {
    type: Phaser.AUTO,
    scale: scale,
    // ...
};
フルスクリーン対応
Phaser.Scale.ScaleManagerのstartFullscreen([fullscreenOptions])メソッドを使うだけだがひとつ注意。
This method must be called from a pointerup user-input gesture (not pointerdown).
fullscreenOptionsはここのOptions参照。
this.add.text(10, 10, 'フルスクリーンにする')
    .setInteractive()
    .on('pointerup', () => {
        this.scale.startFullscreen();
});
フルスクリーンのときは横画面表示にする
scene.scale.lockOrientationではうまくいかなかった。
内部の実装を見ると非推奨のScreen.lockOrientation()を使っていたのでそれが原因か?
ScreenOrientation.lock()を使って解決。
Fullscreen APIに対応していないブラウザ
If the browser does not support this, a FULLSCREEN_UNSUPPORTED event will be emitted.
そういうことや。
このゲームではメッセージを表示するだけなので対応してない場合はドンマイ。
フルスクリーン関連のイベントは他にもあるんでここ見て。
this.scale.on('fullscreenunsupported', () => {
    // サポートされていない場合におこなう処理
});
シーン間での値の渡し方
タイトルシーンで"あそぶ"と"みる"のどちらをクリックしたかで挙動を変えるために使った。
渡す側
Phaser.Scenes.ScenePluginのstartでobjectを渡す。
シーンの起動・停止に関連するメソッド(launchとかpauseとか)では大体渡せるっぽい。
const data: PassingData = {isPlay: true};
this.scene.start('game', data);
受け側
initもしくはcreateでdataを受け取れる。
    create(data: PassingData): void
    {
        // あそぶ場合に必要な処理
        if (data.isPlay)
        {
            this.scene.launch('score');

            const bgm = this.sound.add("bgm", { volume: 0.3, loop: false });
            this.maru = new Maru(
                this,
                bgm,
                200
            );
            this.maru.play();
        }

        // ~略~
    }
キーが押された瞬間を知りたい
スペースキーを押しっぱなしにしているとidleになった後すぐにjumpに遷移してしまっていた。
タイミングよく押すのが唯一のゲーム性なのに長押しで遊べたら元も子もないわな。
JustDown
JustDownという便利なものがあったんでそれを使って解決。
    private idleOnUpdate(): void
    {
        if (Phaser.Input.Keyboard.JustDown(this.cursor.space))
        {
            this.stateMachine.setState('jump');
        }
    }
内側から拡がる丸
どうやって作ろうかと思ってたけどtweenがあったので簡単だった。
        // ジャストタイミングの丸
        // 半径this.radiusの丸を描く
        const just = this.scene.add.circle(width / 2, height / 2, this.radius);
        just.setStrokeStyle(5, 0xffffff, 0.7);

        // 内側から拡がる丸
        // 半径1の丸を描く
        this.expand = this.scene.add.circle(width / 2, height / 2, 1, 0x333333, 0.4);

        // 内側から拡がる丸を1000ミリ秒かけて水平方向、垂直方向にthis.radius倍する
        // 1 x this.radius = this.radius !!!
        this.scene.tweens.add({
            targets: this.expand,
            // scaleX, scaleYを消して「scale: this.radius」としてもいい
            scaleX: this.radius,
            scaleY: this.radius,
            duration: 1000,
            loop: -1,
        });
アトラス画像を使う
こんなやつ。
アトラス画像とjson作る
ここを使わせてもらった。使い方は行けば分かる。
アトラス画像読み込み
見たまんま。
this.load.atlas('images', 'assets/atlas.png', 'assets/atlas.json');
特定の画像を使う
back.pngを使う場合の例。
{
	"frames": {
		"back.png": {
			"frame": {
				"x": 2,
				"y": 2,
				"w": 78,
				"h": 75
			},
			"rotated": false,
			"trimmed": false,
			"spriteSourceSize": {
				"x": 0,
				"y": 0,
				"w": 78,
				"h": 75
			},
			"sourceSize": {
				"w": 78,
				"h": 75
			}
		},
これも見たまんま。
this.add.sprite(width - 50, 50, 'images', 'back.png')
アニメーション
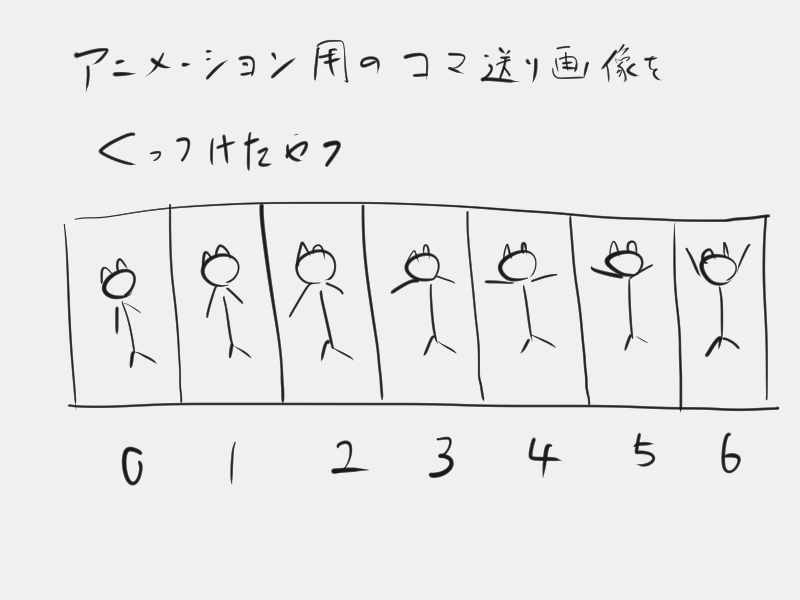
スプライトシート(上図のようなの)を元にアニメーションを作成できる。
スプライトシート読み込み
jj.pngは200x270の画像をいっぱいくっつけたやつ。
this.load.spritesheet('jj', 'assets/jj.png', { frameWidth: 200, frameHeight: 270 });
アニメーション作成
スプライトシートの0~12番目を使用して13fpsの"neko-jump"という名前のアニメーションを作ってる。
    private createAnimations(): void
    {
        this.sprite.anims.create({
            key: 'neko-jump',
            frames: this.sprite.anims.generateFrameNumbers('jj', { start: 0, end: 12 }),
            frameRate: 13,
            repeat: 0
        });
    }
アニメーション実行
this.sprite.anims.play('neko-jump');
シーンプラグインに登録したイベントリスナー
Phaser.Scenes.ScenePluginのstartの説明。
Shutdown this Scene and run the given one.
start呼んだシーンをシャットダウンして指定されたシーンを起動するというだけ。
シーンのシャットダウンではシーンプラグインに登録(scene.events.on)したイベントリスナーは削除されないので注意が必要。
サンプルコード
シーン2が起動したらランダムな位置に文字を1つだけ表示したい。
import Phaser from 'phaser';

class SceneOne extends Phaser.Scene
{
    constructor()
    {
        super('scene1');
    }

    create(): void
    {
        this.add.text(10, 10, 'シーン1');
        this.add.text(10, 370, 'シーン2へ').setInteractive()
        .on('pointerdown', () => {
            this.scene.start('scene2');
        });
    }
}

class SceneTwo extends Phaser.Scene
{
    constructor()
    {
        super('scene2');
    }

    init(): void
    {
        // イベント登録
        this.events.on('myEvent', this.myEvent, this);
    }

    create(): void
    {
        this.add.text(10, 10, 'シーン2');
        this.add.text(10, 370, 'シーン1へ').setInteractive()
        .on('pointerdown', () => {
            this.scene.start('scene1');
        });

        // イベント発火
        this.events.emit('myEvent');
    }

    private myEvent(): void
    {
        const {width, height} = this.game.canvas;

        const x = Math.random() * (width - 40);
        const y = Math.random() * (height - 40);

        // canvas内のランダムな位置に表示
        this.add.text(x, y, 'ランダム');
    }
}

const config: Phaser.Types.Core.GameConfig = {
    type: Phaser.AUTO,
    width: 400,
    height: 400,
    parent: 'app',
    scene: [SceneOne, SceneTwo]
};

new Phaser.Game(config);
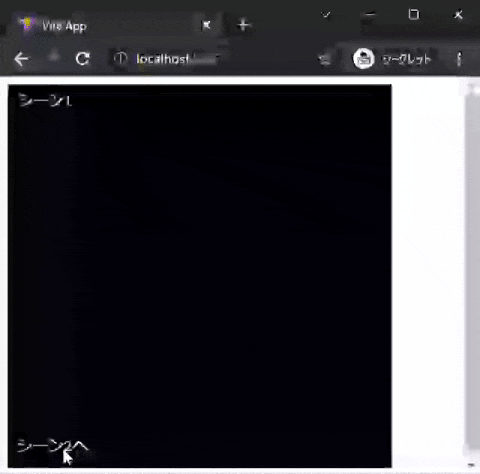
 うまくいかない
シーン2が起動するたびにイベントリスナーが登録されるため表示される文字が増えていく。
令和とは思えない画質だけどどうでもいい画像なんでどうでもいいです。

修正
シーン2のシャットダウンイベントにイベントリスナー削除を行うイベントリスナー(one-time)を登録する。
    init(): void
    {
        // イベント登録
        this.events.on('myEvent', this.myEvent, this);

        // これを追加
        this.events.once('shutdown', () => {
            this.events.off('myEvent', this.myEvent, this);
        });
    }
 うまくいく
うまくいく
意図通り1つだけ表示されるようになった。
相変わらず画質の方が気になってしまう。
環境構築からデプロイまでの流れ
環境構築
Phaser + Typescript + Vite
Viteプロジェクト生成
npm init vite@latest
Project name: ... nj
Select a framework: » vanilla
Select a variant: » vanilla-ts
パッケージインストール
cd nj
npm install
npm install -D phaser
npm install surge
Viteの設定ファイル作成
プロジェクトディレクトリ直下に作成。(設定値はここ見て)
今回は以下のように設定し./public/assetsに画像と音を入れた。
publicDir内のファイルはビルド時にbuild.outDirにコピーされる。
npm run buildすると./public/assetsが./dist/assetsにコピーされるということ。
import { defineConfig } from 'vite'

// publicDir、build.outDirは両方ともデフォルト値
export default defineConfig({
    publicDir: 'public',

    build: {
        outDir: 'dist',
    },
})
tsconfig.json編集
好きなように設定する。(設定値はここ見て)
{
  "compilerOptions": {
    "target": "ESNext",
    "useDefineForClassFields": true,
    "module": "ESNext",
    "lib": ["ESNext", "DOM", "scripthost"],
    "moduleResolution": "Node",
    "strict": true,
    "sourceMap": true,
    "resolveJsonModule": true,
    "esModuleInterop": true,
    "noEmit": true,
    "noUnusedLocals": true,
    "noImplicitReturns": true
  },
  "include": ["./src"]
}
ゲーム作成
ここら辺で勉強して作った。
ビルド
npm run build
デプロイ
surgeにデプロイ。
npx surge dist
参考
上のゲーム作成に書いてあるところと以下。ありがとうございます。
さいごに
にゃんぴんぐじゃっくという言葉が思い浮かんで何かしようとした結果がこれ。
初めてPhaserをさわったけど面白かったのでまたクソゲーを作りたい。
きょうからきみもジャンピングジャック!!