OpenSeesPyを用いた1質点系の時刻歴応答解析その2
前回はOpenSeesPyを用いて一質点系のモデルの定義まで行いました.今回は解析の実行プログラムの説明と結果の描画をします.
このページに掲載されている内容によって生じた損失や損害に対して一切責任を負いません.
もしコードの誤りなどありましたらご連絡ください.
1. 地震動波形の読み込み
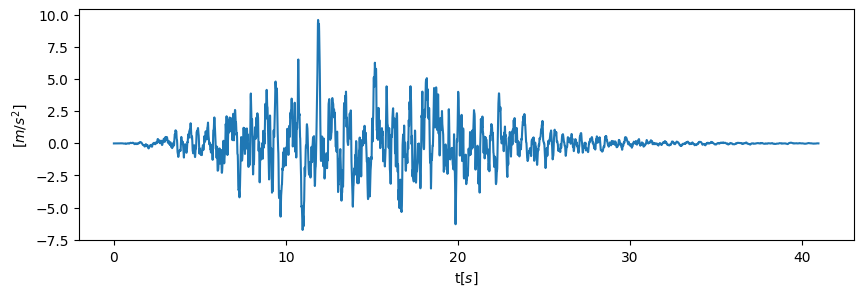
地震動の波形は入手できます.今回は乱数を用いて作成した模擬地震動のデータを使用します.(ここからダウンロードできます)時間刻みは$dt=0.01 \mathrm{s}$となっている,継続時間$40.96\mathrm{s}$の波形が1波入っています.この波形を読み取るスクリプトは次のとおりです.
import numpy as np
import matplotlib.pyplot as plt

# 波形ファイルの読み取り
wave = np.load('eq_wave.npy')

# グラフの描画
plt.figure(figsize=(10, 3))
plt.plot([0.01*int(i) for i in range(len(wave))], wave)
plt.xlabel('t[$s$]')
plt.ylabel('[$m/s^2$]')
これを実行すると,地震動の波形が描画されます.次の図のとおりです.
2. 解析の設定
解析実行プログラムの説明をします.まず応答解析の定義をします.
timeSeriesのタグとパターンのタグをそれぞれ用意します.
そのあと,timeSeriesを設定します.
ops.timeSeries('Path', tag, '-dt', dt, '-values', *values)
として,tagにtimeSeriesのタグ,dtに時刻歴の時間刻み,*valuesに時刻歴の値を入れた一次元の配列を入れます.なお,*valuesの中身はnp.float32だとエラーが出て,np.float64だとうまくいく(原因は不明)ので地震動の読み込みのところでnp.float64に設定しています.
続いて,パターンを定義します.
ops.pattern('UniformExcitation', pattern_tag_dynamic, direction, '-accel', load_tag_dynamic)
であり,UniformExcitationでは固定されている座標を指定する方向に指定する時刻歴の値に併せて揺らして解析を行うパターンです.
directionには揺らす方向(x方向なら1など)を指定します.
# 応答解析の定義
load_tag_dynamic = 1
pattern_tag_dynamic = 1

# 外力の形で与える
dt = 0.01
# print(values)
ops.timeSeries('Path', load_tag_dynamic, '-dt', dt, '-values', *wave)
ops.pattern('UniformExcitation', pattern_tag_dynamic, opc.X, '-accel', load_tag_dynamic)
続いて下のようなコードを実行します.
別に意味がわからなくても実行できるので気にしなくても大丈夫です.
(僕もあまり詳しくなく,https://kozoarcheng.blogspot.com/2024/ を参考にさせて頂きました.ありがとうございます.)
一つ一つのメソッドでどのような設定が行われているか示すと,次のとおりです.
-
ops.wipeAnalysis()| 応答解析の設定を初期化します. -
ops.algorithm('Newton')| 解析アルゴリズムの設定です.Newton-Raphson法を使用します. -
ops.system('SparseGeneral')| 連立方程式を解くための線形ソルバーの設定 -
ops.numberer('RCM')| 有限要素解析のための接点番号を再配置するための設定.RCMとすることで,Reverse Cuthill-McKeeアルゴリズムを用いて接点番号を再配置する.行列が疎行列になり計算効率が向上するらしいです. -
ops.constraints('Transformation')拘束条件に関連した設定をしているらしいです.よくわからん... -
ops.integrator('Newmark', gamma, beta)ニューマーク法で積分計算を行う設定です.今回は$\gamma = 0.5$, $\beta = 0.25$と設定し,平均加速度法を使用します. -
ops.analysis('Transient')解析の種類を設定します.'Transient'は一定の時間刻みの時刻歴解析です.
ops.wipeAnalysis()
ops.algorithm('Newton')
ops.system('SparseGeneral')
ops.numberer('RCM')
ops.constraints('Transformation')
ops.integrator('Newmark', 0.5, 0.25)
ops.analysis('Transient')
続いて,応答解析の収束判定に関する設定を行います.
最大反復回数が10回で,許容誤差が1.0e-10の収束判定を行います.単位はわからないので誰かご存じの方がいましたら教えてください.
tol = 1.0e-10
iterations = 10
ops.test('EnergyIncr', tol, iterations, 0, 2)
3. 応答解析の実行
結果を格納していく配列を入れた連想配列を作ります.
outputs = {
    "time": [],
    "rel_disp": [],
    "rel_accel": [],
    "rel_vel": [],
    "force": [],
    "damping": []
}
続いて時間ステップおきに解析を実行していきます.
ops.analyze(numIncr, dt)では,時間刻みdtでnumIncrステップだけ解析を進めます.
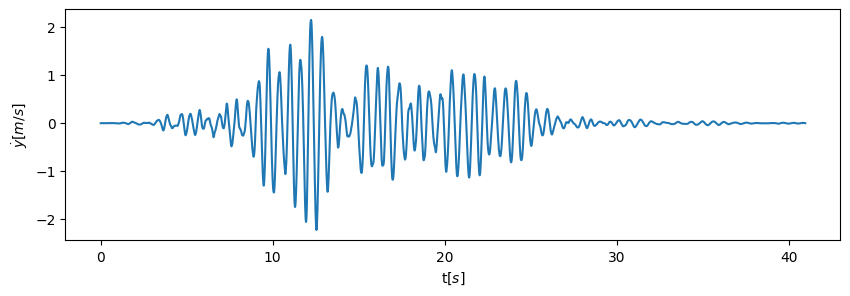
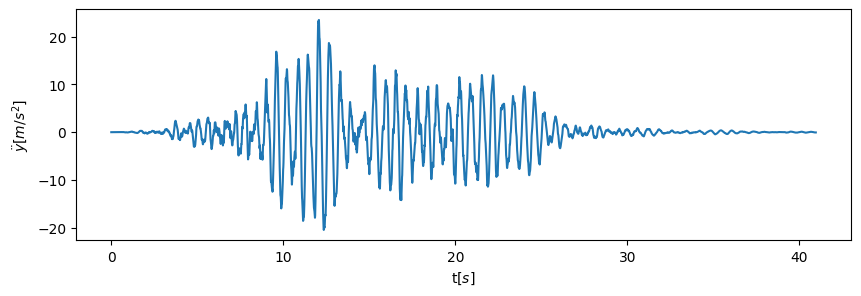
rel_disp, rel_vel, rel_accel, force, dampingはそれぞれ,相対変位,相対速度,相対加速度,反力に対応しています.
analysis_time = (len(wave)) * 0.01
analysis_dt = 0.01

while ops.getTime() <= analysis_time:
    curr_time = ops.getTime()
    ops.analyze(1, analysis_dt)
    outputs['time'].append(curr_time)
    outputs["rel_disp"].append(ops.nodeDisp(top, 1))
    outputs["rel_vel"].append(ops.nodeVel(top, 1))
    outputs["rel_accel"].append(ops.nodeAccel(top, 1))
    ops.reactions('-dynamic')
    outputs["force"].append(-ops.eleForce(bottom, 1))  # Negative since diff node
    # ops.reactions('-rayleigh')
    # outputs['damping'].append(ops.nodeReaction(top, 1))


ops.wipe()
for item in outputs:
    outputs[item] = np.array(outputs[item])
以上のプログラムを前回のプログラムに続けて実行することで応答解析が実行できます.
4. 結果の描画
最後に応答解析の結果を描画しておきます.
plt.figure(figsize=(10, 3))
plt.plot(outputs['time'], outputs['rel_disp'])
plt.xlabel('t[$s$]')
plt.ylabel('y[$m$]')
plt.show()

plt.figure(figsize=(10, 3))
plt.plot(outputs['time'], outputs['rel_vel'])
plt.xlabel('t[$s$]')
plt.ylabel('$\dot{y}$[$m/s$]')
plt.show()

plt.figure(figsize=(10, 3))
plt.plot(outputs['time'], outputs['rel_accel'])
plt.xlabel('t[$s$]')
plt.ylabel('$\ddot{y}$[$m/s^2$]')
plt.show()
5. まとめ
前回のコードも併せて応答解析のコードを下に示します.
# import ilbrary
import openseespy.opensees as ops
import numpy as np
import matplotlib.pyplot as plt

# 波形ファイルの読み取り
wave = np.load('eq_wave.npy')
wave = np.array(wave, dtype=np.float64)

# グラフの描画
plt.figure(figsize=(10, 3))
plt.plot([0.01*int(i) for i in range(len(wave))], wave)
plt.xlabel('t[$s$]')
plt.ylabel('[$m/s^2$]')


class opensees_constants:
    def __init__(self):
        self.free = 0
        self.fixed = 1

        self.X = 1
        self.Y = 2
        self.ROTZ = 3

opc = opensees_constants()

ops.wipe()# モデルの初期化
ops.model('basic', '-ndm', 2, '-ndf', 3)

bottom = 1
top = 2
ops.node(bottom, 0.0, 0.0)
ops.node(top, 0.0, 0.0)

# FIX
# node_Tag, x, y, Rz
ops.fix(top, opc.free, opc.fixed, opc.fixed)
ops.fix(bottom, opc.fixed, opc.fixed, opc.fixed)

# y, Rz方向の変位はtopとbottomで同じなので拘束する
ops.equalDOF(bottom, top, *[opc.Y, opc.ROTZ])

G = 9.8 #重力加速度m/s^2
mass = 200.0 # 質量kg
ops.mass(top, mass, 0.0, 0.0)


# Define material
elastic_mat_tag = 1
mat_type = 'Elastic'
E = float(20000) # N/m
mat_props = [E]
ops.uniaxialMaterial(mat_type, elastic_mat_tag, *mat_props)

# zero length elementを指定する
beam_tag = 1
ops.element('zeroLength', beam_tag, bottom, top, '-mat', elastic_mat_tag, '-dir', 1, '-doRayleigh', 1)

# 減衰の設定
h = 0.05
eigen_1 = ops.eigen('-fullGenLapack', 1)
angular_freq = eigen_1[0] ** 0.5 #固有値の0.5乗, omega
alpha_m = 0.0
beta_k = 2 * h / angular_freq
beta_k_comm = 0.0
beta_k_init = 0.0
print(np.pi*2/angular_freq)

ops.rayleigh(alpha_m, beta_k, beta_k_init, beta_k_comm)

# 応答解析の定義
load_tag_dynamic = 1
pattern_tag_dynamic = 1


# 外力の形で与える
values = wave  # waveがリストまたはNumPy配列であることを確認
dt = 0.01

# Ensure values is a list or numpy array
if not isinstance(values, (list, np.ndarray)):
    raise ValueError("values must be a list or numpy array")

# print(values)
ops.timeSeries('Path', load_tag_dynamic, '-dt', dt, '-values', *values)
ops.pattern('UniformExcitation', pattern_tag_dynamic, opc.X, '-accel', load_tag_dynamic)

# 応答解析の実行
ops.wipeAnalysis()
ops.algorithm('Newton')
ops.system('SparseGeneral')
ops.numberer('RCM')
ops.constraints('Transformation')
ops.integrator('Newmark', 0.5, 0.25)
ops.analysis('Transient')

# tol = 1.0e-5
tol = 1.0e-10
iterations = 10
ops.test('EnergyIncr', tol, iterations, 0, 2)
analysis_time = (len(wave)) * 0.01
analysis_dt = 0.01
outputs = {
    "time": [],
    "rel_disp": [],
    "rel_accel": [],
    "rel_vel": [],
    "force": [],
    "damping": []
}


while ops.getTime() <= analysis_time:
    curr_time = ops.getTime()
    ops.analyze(1, analysis_dt)
    outputs['time'].append(curr_time)
    outputs["rel_disp"].append(ops.nodeDisp(top, 1))
    outputs["rel_vel"].append(ops.nodeVel(top, 1))
    outputs["rel_accel"].append(ops.nodeAccel(top, 1))
    ops.reactions('-dynamic')
    outputs["force"].append(-ops.eleForce(bottom, 1))  # Negative since diff node
    ops.reactions('-rayleigh')
    outputs['damping'].append(ops.nodeReaction(top, 1))


ops.wipe()
for item in outputs:
    outputs[item] = np.array(outputs[item])

# 結果の描画
plt.figure(figsize=(10, 3))
plt.plot(outputs['time'], outputs['rel_disp'])
plt.xlabel('t[$s$]')
plt.ylabel('y[$m$]')
plt.show()

plt.figure(figsize=(10, 3))
plt.plot(outputs['time'], outputs['rel_vel'])
plt.xlabel('t[$s$]')
plt.ylabel('$\dot{y}$[$m/s$]')
plt.show()

plt.figure(figsize=(10, 3))
plt.plot(outputs['time'], outputs['rel_accel'])
plt.xlabel('t[$s$]')
plt.ylabel('$\ddot{y}$[$m/s^2$]')
plt.show()


