前から気になっていたAWS SAMを使ってみました。
AWSでサーバーレスといえば、私はずっとServerlessFrameworkを使っていたので、ServerlessFrameworkと比較しながらやってみました。
AWS SAMとは?
AWSのサービス(Lambda、API Gateway、DynamoDBなど)を使って、サーバーレスアプリケーションを構築できるフレームワークです。
公式ドキュメントの要約のようになってしまいますが、
AWS SAMはAWS SAMテンプレート仕様とAWS SAM CLIで構成されています。
AWS SAMテンプレート仕様はアプリケーションを定義するものです。ServerlessFrameworkのymlファイルに相当するものでしょうか・・・?なんとなくそんなイメージです。
AWS SAM CLIはコマンドラインインターフェースです。ServerlessFrameworkで
$ sls deploy
とかやったりしますね。それのSAM CLI版と思っておけば良さそうです。
AWS SAM CLIをインストールする
ドキュメントの順番に沿ってやってみます。
インストールにはpipを使います。
$ pip install aws-sam-cli
Collecting aws-sam-cli
  Could not fetch URL https://pypi.python.org/simple/aws-sam-cli/: There was a problem confirming the ssl certificate: [SSL: TLSV1_ALERT_PROTOCOL_VERSION] tlsv1 alert protocol version (_ssl.c:661) - skipping
  Could not find a version that satisfies the requirement aws-sam-cli (from versions: )
No matching distribution found for aws-sam-cli
私はMacユーザーなのですが、MacにはデフォルトでPython2.7が入っています。
そのまんま2系でインストールしようとしたら失敗しました。
なんとかして3系に切り替えましょう(pythonのバージョン管理にはpyenvを使っています。pathがめちゃくちゃになっていて直すのに苦労しましたが・・・)
$ python --version
Python 3.6.3
3系に切り替えました。
改めて・・・
$ pip install --user aws-sam-cli
少し時間がかかるかもしれませんが、3分くらいで終わると思います。
終わったらインストールできたことを確認してみます。
$ sam --version
SAM CLI, version 0.17.0
インストールできたみたいです。
サンプルアプリを作ってみる
Quick Startに沿ってサンプルアプリを作ってみます。
まずは初期化します。
$ sam init --runtime nodejs8.10
**--runtime [言語]**で言語を指定することができます。
Quick Startではpythonを使っていましたが、私はNodeが好きなのでNodeにしました。
調べてみると結構選べるようですね。参考
※ちなみに、Nodeを選択する場合、Node6はLambdaでサーポート対象外となりますので、避けた方が無難かと思います。
$ sam init --runtime nodejs8.10
[+] Initializing project structure...

Project generated: ./sam-app

Steps you can take next within the project folder
===================================================
[*] Invoke Function: sam local invoke HelloWorldFunction --event event.json
[*] Start API Gateway locally: sam local start-api

Read sam-app/README.md for further instructions

[*] Project initialization is now complete
sam-appというフォルダが作成され、その中にプロジェクトが作成されました。

確かに何かができている。
Read sam-app/README.md for further instructions
とのことですので、READMEを確認してみます。
 一部ですが、こんな感じです。
構成など色々書いてありますね。
(そしてDockerのインストールが必要なことに気付く・・・)
一部ですが、こんな感じです。
構成など色々書いてありますね。
(そしてDockerのインストールが必要なことに気付く・・・)
とりあえず色々作成されたファイルの中身を見ていこうと思います。
まずはyamlを見てみます。
AWSTemplateFormatVersion: '2010-09-09'
Transform: AWS::Serverless-2016-10-31
Description: >
  sam-app

  Sample SAM Template for sam-app

# More info about Globals: https://github.com/awslabs/serverless-application-model/blob/master/docs/globals.rst
Globals:
  Function:
    Timeout: 3

Resources:
  HelloWorldFunction:
    Type: AWS::Serverless::Function # More info about Function Resource: https://github.com/awslabs/serverless-application-model/blob/master/versions/2016-10-31.md#awsserverlessfunction
    Properties:
      CodeUri: hello-world/
      Handler: app.lambdaHandler
      Runtime: nodejs8.10
      Events:
        HelloWorld:
          Type: Api # More info about API Event Source: https://github.com/awslabs/serverless-application-model/blob/master/versions/2016-10-31.md#api
          Properties:
            Path: /hello
            Method: get

Outputs:
  # ServerlessRestApi is an implicit API created out of Events key under Serverless::Function
  # Find out more about other implicit resources you can reference within SAM
  # https://github.com/awslabs/serverless-application-model/blob/master/docs/internals/generated_resources.rst#api
  HelloWorldApi:
    Description: "API Gateway endpoint URL for Prod stage for Hello World function"
    Value: !Sub "https://${ServerlessRestApi}.execute-api.${AWS::Region}.amazonaws.com/Prod/hello/"
  HelloWorldFunction:
    Description: "Hello World Lambda Function ARN"
    Value: !GetAtt HelloWorldFunction.Arn
  HelloWorldFunctionIamRole:
    Description: "Implicit IAM Role created for Hello World function"
    Value: !GetAtt HelloWorldFunctionRole.Arn
yamlはの役割はサーバーレスアプリケーション全体を定義することです。
(ServerlessFrameworkでいうところのserverless.yml)
大きく分けるとGlobals、Resources、Outputsで構成されています。
Globals:SAMで作成する関数やAPIの中で、共通の設定を定義します。例えば、関数のRuntime、APIのCORSの設定など。ここで書いたことがResoucesで継承されるので、矛盾のないように書きます。
Resources:リソースを定義します。例えば、Lambdaの関数、テーブルなど。SAMを構成するリソースをここで定義します。
Outputs:AWS SAMによって作成されるものの定義。説明やエンドポイントなんかもここに書くようです。
Resourcesを詳しくみてみます。
Resources:
 HelloWorldFunction: # 関数の名前。
    Type: AWS::Serverless::Function # 定義するものの種類。ここではLambdaの関数を指定。
    Properties: # 詳細をここに書いていく。
      CodeUri: hello-world/ #コードのパス(コードがどこにあるか)。これか、InlineCodeのどちらか片方必須。
      Handler: app.lambdaHandler # ハンドラの種類。必須。
      Runtime: nodejs8.10 #言語。必須。
      Events: #イベント
        HelloWorld: #イベント名
          Type: Api # イベントの種類。Lamba+API GatewayのAPIを作りたいので、今回はAPi
          Properties: # イベントの詳細
            Path: /hello #パス
            Method: get #メソッド
いくつかよく分からない部分があったので調べました。
かいつまんで補足します。
-
Code Uri
Lambda関数のコード(app.js)の場所を書きます。 -
Type
AWS::Serverless::Functionを指定しました。というかデフォルトのまま使いました。
詳しくはここに記述がありますが、他にもApi、Applicationなどから選択できます。
今回指定したAWS::Serverless::Functionは、Lambda関数と関数実行に必要なIAMロールの作成、関数のトリガーになるリソースのマッピングを行うものです。 -
Events/Type
今回はAPIを作りたいので、Apiを指定しています。
APIではなくてApiなところがちょっといやらしいですね。
他にもS3、DynamoDBなどから選択できます。詳しくはこちら。
app.jsも確認しておきます。
// const axios = require('axios')
// const url = 'http://checkip.amazonaws.com/';
let response;

/**
 *
 * Event doc: https://docs.aws.amazon.com/apigateway/latest/developerguide/set-up-lambda-proxy-integrations.html#api-gateway-simple-proxy-for-lambda-input-format
 * @param {Object} event - API Gateway Lambda Proxy Input Format
 *
 * Context doc: https://docs.aws.amazon.com/lambda/latest/dg/nodejs-prog-model-context.html
 * @param {Object} context
 *
 * Return doc: https://docs.aws.amazon.com/apigateway/latest/developerguide/set-up-lambda-proxy-integrations.html
 * @returns {Object} object - API Gateway Lambda Proxy Output Format
 *
 */
exports.lambdaHandler = async (event, context) => {
    try {
        // const ret = await axios(url);
        response = {
            'statusCode': 200,
            'body': JSON.stringify({
                message: 'hello world! yeah!!',
                // location: ret.data.trim()
            })
        }
    } catch (err) {
        console.log(err);
        return err;
    }

    return response
};
exports.ハンドラ名のところに処理の実態(?)となるソースコードを書きます。
messageの部分を少し変えてテンション高めにしてみました。
ビルドしてみる
sam-app直下に移動します。
$ cd sam-app
sam buildでビルドします。
$ sam build
2019-08-01 16:59:06 Building resource 'HelloWorldFunction'
2019-08-01 16:59:06 Running NodejsNpmBuilder:NpmPack
2019-08-01 16:59:08 Running NodejsNpmBuilder:CopyNpmrc
2019-08-01 16:59:08 Running NodejsNpmBuilder:CopySource
2019-08-01 16:59:08 Running NodejsNpmBuilder:NpmInstall
2019-08-01 16:59:12 Running NodejsNpmBuilder:CleanUpNpmrc

Build Succeeded

Built Artifacts  : .aws-sam/build
Built Template   : .aws-sam/build/template.yaml

Commands you can use next
=========================
[*] Invoke Function: sam local invoke
[*] Package: sam package --s3-bucket <yourbucket>
ビルドは成功したようです。
次のアクションを教えてくれていますが、とりあえずQuickStartに沿って、パッケージングしてみます。
この時、S3のバケットが必要になるので、あらかじめ作成しておきます。
$ sam package --output-template packaged.yaml --s3-bucket バケット名
Unable to upload artifact HelloWorldFunction referenced by CodeUri parameter of HelloWorldFunction resource.
An error occurred (AccessDenied) when calling the PutObject operation: Access Denied
失敗・・・
aws cliのデフォルトのプロファイルが別アカウントのものになっていたので、当該アカウントでユーザー作ってaws configureにプロファイル名付きで登録し、次はプロファイル名を指定して再挑戦します。
$ sam package --output-template packaged.yaml --s3-bucket バケット名 --profile プロファイル名
Uploading to 3122241ba16383fd9ddd3167e75d2d25  127243 / 127243.0  (100.00%)
Successfully packaged artifacts and wrote output template to file packaged.yaml.
Execute the following command to deploy the packaged template
aws cloudformation deploy --template-file /Users/ootaizumi/Desktop/aws_sam/sam-app/packaged.yaml --stack-name <YOUR STACK NAME>
成功したみたいです。
次はデプロイです。
$ sam deploy --template-file packaged.yaml --region ap-northeast-1 --capabilities CAPABILITY_IAM --stack-name aws-sam-getting-started
Waiting for changeset to be created..
Waiting for stack create/update to complete

Failed to create/update the stack. Run the following command
to fetch the list of events leading up to the failure
aws cloudformation describe-stack-events --stack-name aws-sam-getting-started
また失敗・・・
aws cloudformationをやってみると色々ログが出てきます。
確認してみると、S3に何かを作るところで失敗していたようです。
profileを指定し忘れていたので、それが原因かも・・・?
もう一度profileを指定して
$ sam deploy --template-file packaged.yaml --region ap-northeast-1 --capabilities CAPABILITY_IAM --stack-name aws-sam-getting-started --profile プロファイル名
Waiting for changeset to be created..
Waiting for stack create/update to complete
Successfully created/updated stack - aws-sam-getting-started
成功です。
これでStackができました。
StackはAWS CloudFormationの単位で、一つのStack=SeverlessFrameworkの1つのアプリみたいな感じです。
デプロイする一つの単位、みたいな・・・
Stack単位でAWSの各リソース(S3,Dynamoなど)の管理(更新、削除など)を行います。
Stackがどんなものなのか確認してみます。
$ aws cloudformation describe-stacks --stack-name aws-sam-getting-started --region ap-northeast-1 --query "Stacks[].Outputs" --profile プロファイル名

[
    [
        {
            "OutputKey": "HelloWorldFunctionIamRole",
            "OutputValue": "arn:aws:iam::34**********:role/aws-sam-getting-started-HelloWorldFunctionRole-AGMUJDANDJBG",
            "Description": "Implicit IAM Role created for Hello World function"
        },
        {
            "OutputKey": "HelloWorldApi",
            "OutputValue": "https://vmxxxxxxxx.execute-api.ap-northeast-1.amazonaws.com/Prod/hello/",
            "Description": "API Gateway endpoint URL for Prod stage for Hello World function"
        },
        {
            "OutputKey": "HelloWorldFunction",
            "OutputValue": "arn:aws:lambda:ap-northeast-1:34**********:function:aws-sam-getting-started-HelloWorldFunction-F2FDJ1FIHKB5",
            "Description": "Hello World Lambda Function ARN"
        }
    ]
]
yamlのOutputsに書いていたものが出力されています。なるほど。
Getのエンドポイントができたのでcurlで叩いてみます。
curl入ってるよね・・・?
$ curl version
curl: (6) Could not resolve host: version
ある。
curl https://vmxxxxxxxx.execute-api.ap-northeast-1.amazonaws.com/Prod/hello/

{"message":"hello world! yeah!!"}
できてる。なるほど。
これでとりあえずGETのエンドポイントができました。
ローカルでテストしてみる
ローカルで試してみます。むしろこっちがやりたかった。
ローカルでの実行にはDockerが必要になります。
Dockerインストールしていなかったので、そこからはじめました。
インストールにはこちらの記事を参考にさせて頂きましたm(__)m
準備ができたら、Dockerが起動している状態でコマンドを打ちます。
$ sam local start-api
2019-08-02 14:22:41 Mounting HelloWorldFunction at http://127.0.0.1:3000/hello [GET]
2019-08-02 14:22:41 You can now browse to the above endpoints to invoke your functions. You do not need to restart/reload SAM CLI while working on your functions, changes will be reflected instantly/automatically. You only need to restart SAM CLI if you update your AWS SAM template
2019-08-02 14:22:41  * Running on http://127.0.0.1:3000/ (Press CTRL+C to quit)
Docker上にLambdaの実行環境が作られているようです。
デプロイした時には実際のエンドポイントが作成されましたが、ローカルでのテストではLambda関数を実行するための場所がDockerに作成されるので、当然エンドポイントは違うものになります。
とりあえずcurlで試してみます。
$ curl http://127.0.0.1:3000/hello
{"message":"hello world! yeah!!"}
できました。
試しにブラウザでやってみても
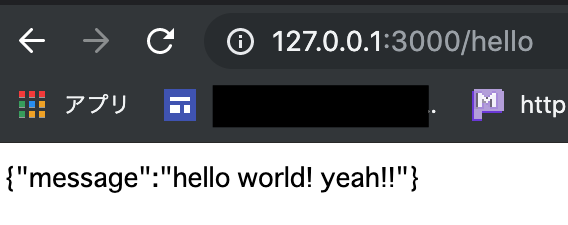
動いてますね。
この時、cliからは
Fetching lambci/lambda:nodejs8.10 Docker container image......
2019-08-02 14:31:11 Mounting /Users/ootaizumi/Desktop/aws_sam/sam-app/.aws-sam/build/HelloWorldFunction as /var/task:ro,delegated inside runtime container
START RequestId: 7b337349-c45c-1518-31f0-f1e78b3ba212 Version: $LATEST
END RequestId: 7b337349-c45c-1518-31f0-f1e78b3ba212
REPORT RequestId: 7b337349-c45c-1518-31f0-f1e78b3ba212  Duration: 7.43 ms       Billed Duration: 100 ms Memory Size: 128 MB     Max Memory Used: 31 MB
2019-08-02 14:31:13 No Content-Type given. Defaulting to 'application/json'.
2019-08-02 14:31:13 127.0.0.1 - - [02/Aug/2019 14:31:13] "GET /hello HTTP/1.1" 200 -
のような応答が返ってきます。
所感
yamlの書き方がCloudFormationのそれと同じなので、あまり馴染みのなかった私にとっては「???」となることが多かったです。
もう少し色々いじってみて、SAMに移行するのもありかなあと思いました。