はじめに
この記事はUnityゆるふわサマーアドベントカレンダー 2018の1日目です!
(まだ半分くらい埋まってないので、興味があったらぜひご参加くださいw)
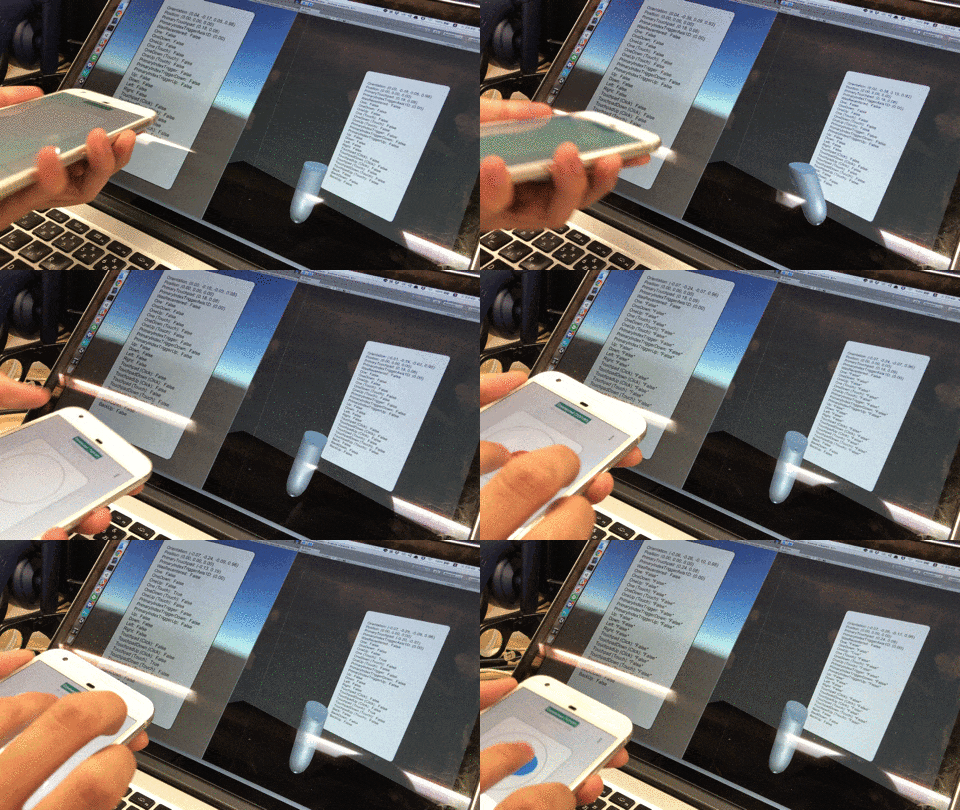
今回はOculusGoでコントローラーを使う開発をする際に手軽に使えるエミュレータを作ったので、その方法を紹介します。
(Oculus Touchでもエミュレートできるみたいですが、今回はAndroid端末を使った方法です)
ソースコードはこちら
https://github.com/nkjzm/OVREmulator
出来ることは以下の通りです。
- コントローラーの表示
- コントローラーの角度
- タッチパッドの座標
- タッチパッドのタッチ判定
- タッチパッドのクリック判定
- バックボタンのクリック判定
- センター位置の初期化
※トリガーの判定は対応するボタンがないため利用できません。
使い方
用意するもの
- PC(Mac,Windows)
- インストール済みのUnity
- セットアップ済みのadb
- Android端末
- Oculus UtilityがインポートされたUnityプロジェクト
動作確認をした環境は以下の通りですが特にバージョンに依存せず動くと思います。
- MacBook Pro (macOS 10.13.6)
- Unity2018.1.4f1
- adb 1.0.39
- Pixel XL (Android 7.1.2)
導入手順
-
controller_emulator.apkをダウンロードする(https://developers.google.com/vr/daydream/controller-emulator) - Android端末にapkをインストールする(
adb install ./controller_emulator.apk) -
GoogleVRForUnity_1.150.0.unitypackageをダウンロード/インポートする(https://github.com/googlevr/gvr-unity-sdk/releases) -
OVREmulator.unitypackageをダウンロード&インポートする(https://github.com/nkjzm/OVREmulator/releases) - メニューより
Edit/Project Settings/PlayerのAndroidタブのOtherSettinsでAllow 'unsafe' Codeにチェックを入れる -
Assets/OVREmulator/PrefabsよりGvrControllerMainプレハブをシーンに置く - Android端末を繋げたまま再生
アプローチ
リフレクションで動的にメソッドを入れ替えています。
OVRInputをそのまま使えるので、少ない変更でエミュレータできるようになりました。
タッチパット上の座標を取得するメソッドを例に説明します。
Oculusではタッチパット上の座標を以下のように取得できますが、これをGoogleVRで上書きしていきます。
var pos = OVRInput.Get(OVRInput.Axis2D.PrimaryTouchpad)
まず定義を確認しておきます。上は引数は一つですが、第二引数にデフォルト引数が使われている点に注意です。
public static Vector2 Get(Axis2D virtualMask, Controller controllerMask = Controller.Active)
{
    return GetResolvedAxis2D(virtualMask, RawAxis2D.None, controllerMask);
}
入れ替えるためのメソッドを用意します。関数名は任意ですが、引数を揃えておきます。
public class OVRInputEmulator
{
    // このメソッドと入れ替える
    public static Vector2 Get(OVRInput.Axis2D virtualMask, OVRInput.Controller controllerMask = OVRInput.Controller.Active)
    {
        return GvrControllerInput.GetDevice(GvrControllerHand.Dominant).TouchPos;
    }
}
準備ができたので、リフレクションでメソッドを入れ替えます。
関数のポインタを入れ替えることで、呼び出し先を変更しています。
# if UNITY_EDITOR
using System;
using System.Reflection;
using UnityEditor;

[InitializeOnLoad]
public class OVRInputReplacer
{
    static OVRInputReplacer()
    {
        // タッチパッド上の座標
        ReplaceMethod(typeof(OVRInput), typeof(OVRInputEmulator), "Get", new System.Type[] { typeof(OVRInput.Axis2D), typeof(OVRInput.Controller) });
    }

    static void ReplaceMethod(System.Type originType, System.Type replaceType, string methodName, System.Type[] types)
    {
        var origin = originType.GetMethod(methodName, types);
        var replace = replaceType.GetMethod(methodName, types);
        ReplaceFunctionPointer(origin, replace);
    }
    static void ReplaceFunctionPointer(MethodInfo originalMethod, MethodInfo replaceMethod)
    {
        unsafe
        {
            var originalPointer = originalMethod.MethodHandle.Value.ToPointer();
            var replacePointer = replaceMethod.MethodHandle.Value.ToPointer();
            *((int*)new IntPtr(((int*)originalPointer + 1)).ToPointer()) = *((int*)new IntPtr(((int*)replacePointer + 1)).ToPointer());
        }
    }
}
# endif
[InitializeOnLoad]アトリビュートはエディタの起動直後やコンパイル後に自動的に呼ばれる関数です。明示的に呼び出す必要がないため便利です。
あとはGoogleVRに含まれるGvrControllerMainを少し拡張したものをシーンに配置するだけで、エミュレータが使用できます。拡張といってもコントローラーの左右の設定をするだけなので、全然難しくないです。

最後に
OculusのSDKの全てに対応しているわけではありませんが、基本的なデバッグ作業であれば毎回ビルドする必要はなくなるのではないでしょうか。
オープンソースで公開しているので、ぜひ気軽に利用してください。プルリクもお待ちしております。
https://github.com/nkjzm/OVREmulator
不明点等あれば @nkjzm までお願いします。
