Onion omega2+でクロスコンパイル環境を立ち上げました。
Onionからクロスコンパイル環境のdockerイメージが提供されていたので、試してみたのですが、なぜかmakeで失敗してしまう・・・
そこで、ubuntu 16.04のイメージにクロスコンパイル環境を立ち上げてみました。
サンプルコードの動作確認までできたので、以下に纏めます。
0. 前提条件
- docker for windows(Docker version 18.06.1-ce, build e68fc7a)
- ubuntu 16.04:latest (docker image)
- onion omega2+
1.docker
dockerでubuntu 16.04のイメージからコンテナを作成し起動します。
PS C\:> docker run -it --name onion-omega2 ubuntu:16.04 /bin/bash
2.ツールのインストール
必要なツールをインストールします。
$ apt update
$ apt install -y build-essential vim git wget curl subversion  \
              libncurses5-dev zlib1g-dev gawk flex quilt \
              git-core unzip libssl-dev python-dev python-pip \
              libxml-parser-perl
※Github:OnionIoT/sourceのDockerfileでは、default-jdk, npm もインストールしてたけど、必要か否かが不明だったので、とりあえず省略しました。
3.クロスコンパイル環境構築
Githubより、クロスコンパイル環境ソースコードをダウンロードします。
$ cd /root
$ git clone https://github.com/OnionIoT/source.git
ダウンロードが終わったら、以下のコマンドを実行します。
$ export FORCE_UNSAFE_CONFIGURE=1
$ cd source
$ ./scripts/feeds update -a
次に make条件のアップデートを行います。
以下のコマンドを実行すると、画面が立ち上がります。
$ make menuconfig
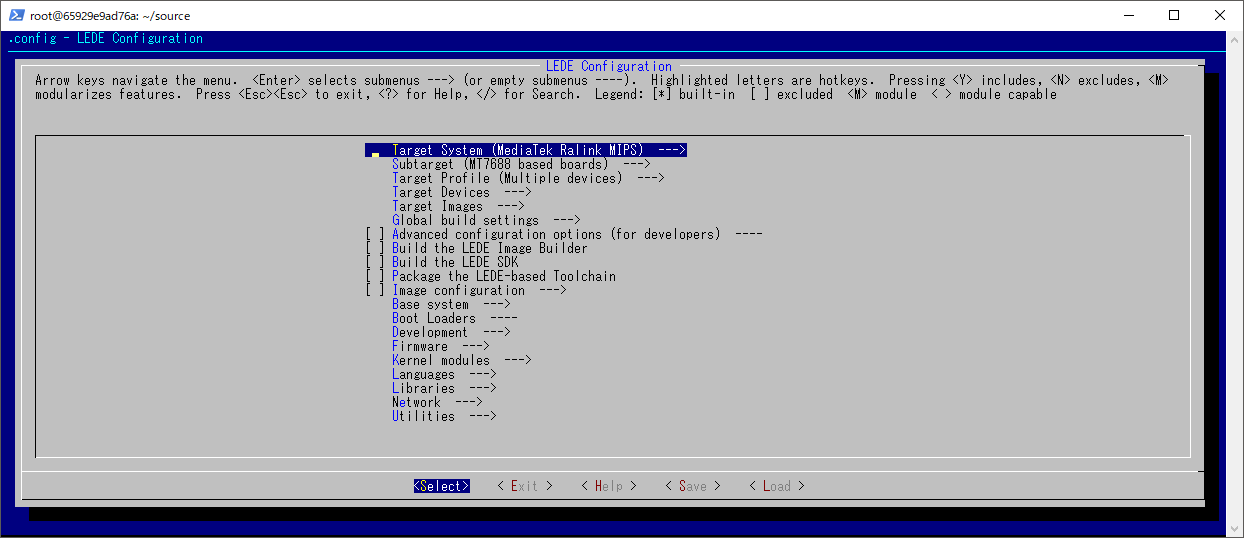
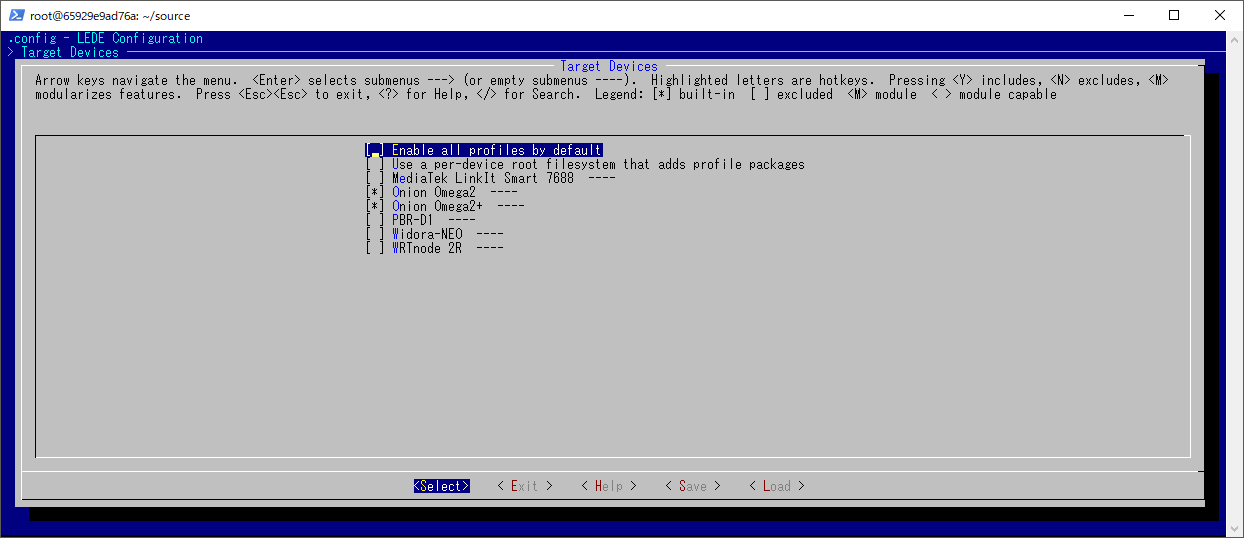
| 項目 | 設定値 |
|---|---|
| Target System | MediaTek Ralink MIPS |
| For Subtarget | MT7688 based boards |
| Target Profile | Multiple Devices |
| Target Devices | Onion Omega2 and Onion Omega2+ |
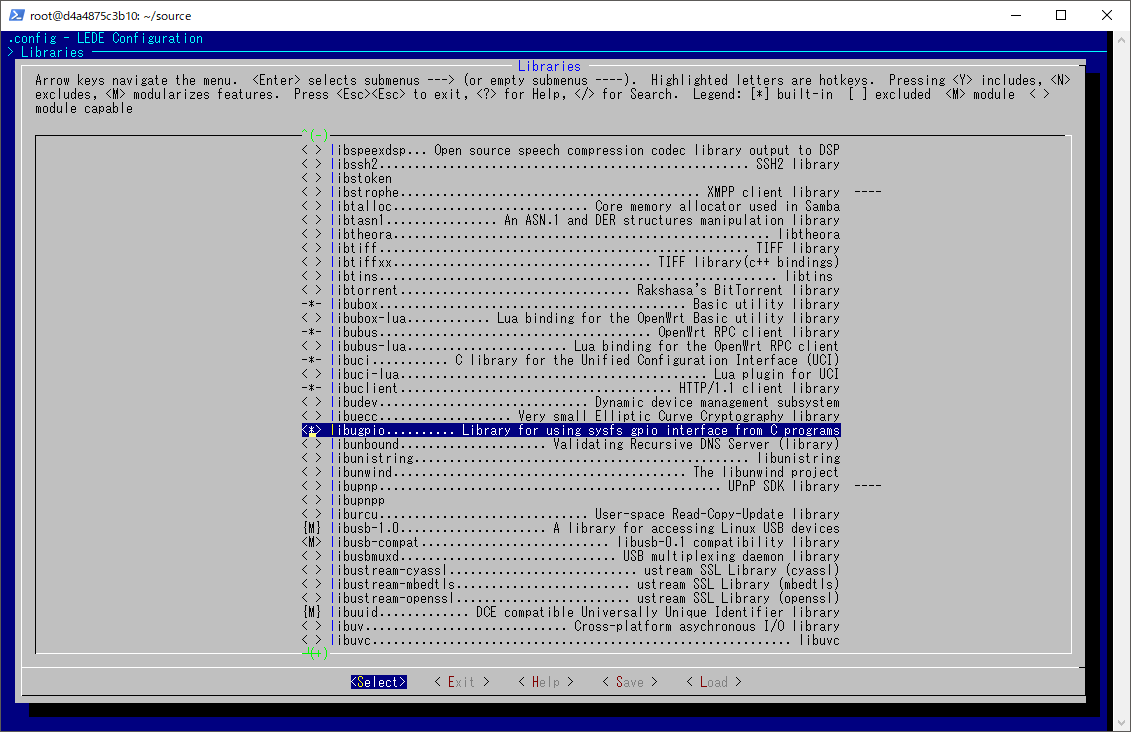
サンプルコードを実行するために「Libraries」で「libugpio」を「*(built-in)」 にしておきます。
その後、で.configを更新して、終了します。
次にmakeコマンドでビルドを実行します。
結構時間がかかります・・・
$ make
4.サンプルコード
クロスコンパイル環境でGPIOを使ったサンプルコードをビルドして、Omega2+上で動作することを確認します。
以下のコマンドでサンプルコードをダウンロードします。
$ cd /root
$ git clone https://github.com/OnionIoT/c-cross-compile-example.git
サンプルコードをビルドします。
$ cd c-cross-compile-example/
$ sh xCompile.sh -buildroot /root/source/  -lib ugpio
ビルドしたgpioReadをhttps://transfer.shに転送します。
※https://transfer.shは、Omega2+とのデータやり取りで使うだけです。
$ curl --upload-file ./gpioRead https://transfer.sh/gpioRead
https://transfer.sh/15c9cJ/gpioRead
$
Omega2+のコンソールで以下のコマンドを実行すると、先ほどのgpioReadがダウンロードできます。
※https://transfer.sh/15c9cJ/gpioReadは上記転送時に出力されたアドレスです。
$ wget https://transfer.sh/15c9cJ/gpioRead
--2018-09-24 08:12:47--  https://transfer.sh/15c9cJ/gpioRead
Resolving transfer.sh... 185.216.24.82
Connecting to transfer.sh|185.216.24.82|:443... connected.
HTTP request sent, awaiting response... 200 OK
Length: 9804 (9.6K) []
Saving to: 'gpioRead.1'

gpioRead.1          100%[===================>]   9.57K  --.-KB/s    in 0.1s

2018-09-24 08:12:49 (65.0 KB/s) - 'gpioRead' saved [9804/9804]
$
実行権限を付けて、gpioReadを実行します。
GPIO端子に3.3Vをかけると'1'、GNDだと'0'が表示されます。
$ chmod x+u gpioRead
$ ./gpioRead 1
> exporting gpio
> setting to input
> begin reading GPIO1
  > Read GPIO1: value '1'
  > Read GPIO1: value '1'
  > Read GPIO1: value '1'
  > Read GPIO1: value '1'
  > Read GPIO1: value '0'
  > Read GPIO1: value '0'
  > Read GPIO1: value '0'
  > Read GPIO1: value '0'
  > Read GPIO1: value '0'
  > Read GPIO1: value '1'
  > Read GPIO1: value '1'
  > Read GPIO1: value '1'
  > Read GPIO1: value '1'
  > Read GPIO1: value '1'
  > Read GPIO1: value '1'
  > Read GPIO1: value '1'
  > Read GPIO1: value '1'
  > Read GPIO1: value '1'
  > Read GPIO1: value '0'
  > Read GPIO1: value '0'
> unexporting gpio
以上で終了です。
この環境で、python-broadlinkのためのpycryptodomex-3.4.11をクロスコンパイルする予定ですが、まだ、いろいろと躓いている状況です・・・