はじめに
業務の中で拡張機能を触ることが多いのですが、一から作ったことが無かったことと、V2とV3の違いがしっかり分かっていなかったため、復習がてら記事にまとめようと思います。
その1の続きです。
https://qiita.com/spc_knakano/private/8f518af2770cca13520a
今回のゴール
オプションで設定を追加する
その1で作成した通知のON/OFFを拡張機能のオプションから選択できるようにします。
目次
- オプションの設定とは?
- option.html
- option.js
- background.js
- manifest.json
- 参考文献
作成環境
OS: Windows 11 Pro 23H2
chrome: 133.0.6943.142
VSCode: 1.97.2
1. オプションの設定とは?
Chrome拡張機能の設定をユーザーが変更できるオプションページを使って行うことです。
このページを使うことで、ユーザーが拡張機能の動作を変更することができるようになります。
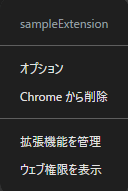
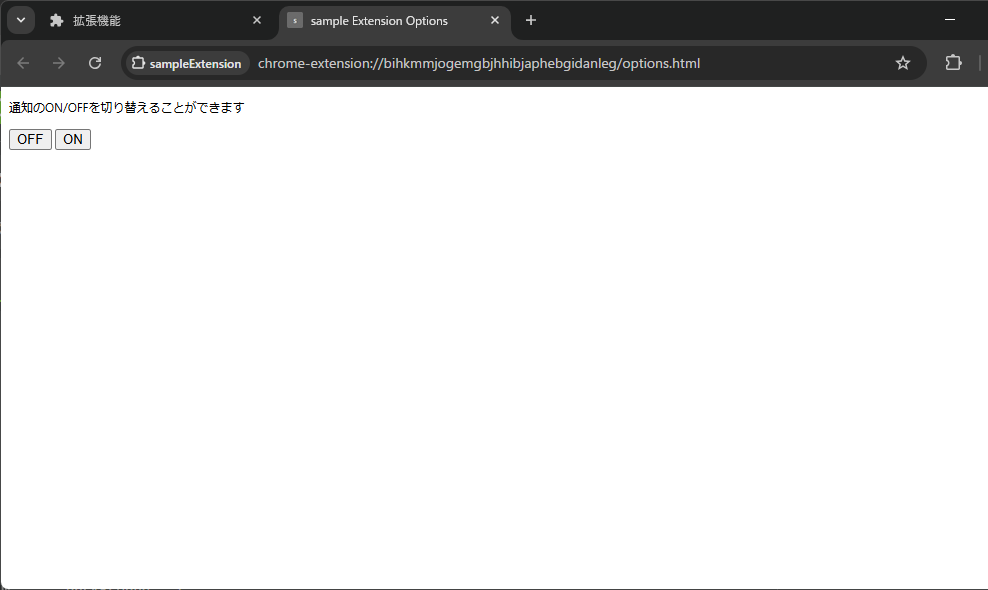
拡張機能ボタンを押して「・・・」を選択すると、次のような画面が開きます。そこでオプションを選択すると、オプションページが表示されます。
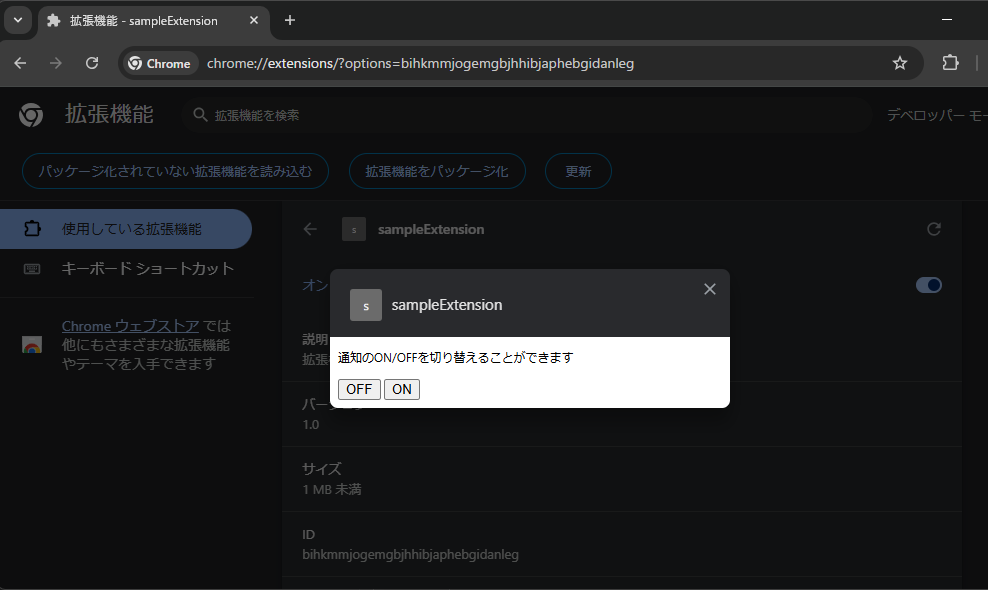
chrome://extensions/ 開いて、作成した拡張機能の詳細を選択すると詳細ページが開きます。ページの下の方に「拡張機能のオプション」という項目があるので選択すると、こちらからもオプションページを表示することができます。

2. option.html
<!DOCTYPE html>
<html>
  <head>
    <meta charset="utf-8" />
    <title>sample Extension Options</title>
  </head>
  <body>
    <p class="text">通知のON/OFFを切り替えることができます</p>

    <div class="button">
        <input type="button" id="btn_off" value="OFF">
        <input type="button" id="btn_on" value="ON">
      </div>

    <script src="options.js"></script>
  </body>
</html>
まずオプションページを作成します。
charsetをutf-8にすることで以下のテキストを日本語で表示することができます。
3. option.js
var offBtns = document.querySelectorAll("[id^='btn_off']");
offBtns.forEach((item) => {item.addEventListener("click", async ()=>{
    await chrome.storage.local.set({ "option": false });
})});

var onBtns = document.querySelectorAll("[id^='btn_on']");
onBtns.forEach((item) => {item.addEventListener("click", async ()=>{
    await chrome.storage.local.set({ "option": true });
})});
オプションのスクリプトです。
ON/OFFそれぞれのボタンがクリックされたとき、Storageにtrue/falseをセットしています。
4. background.js
var path = "https://sciencepark.co.jp";
var opt = {
    type: "basic",
    title: "notification",
    iconUrl: "icon.png",
    message: "サイエンスパークのHPです",
};
var bool = true;

function changeNotification(){
    chrome.storage.local.get((items) => {
        var option = !!items["option"];
        if (option) {
            bool = true;
        } else {
            bool = false;
        }
    });
}

chrome.tabs.onActivated.addListener(function (activeInfo) {
    chrome.tabs.get(activeInfo.tabId, tab => {
        var url = tab.url;
        changeNotification();
        if(bool){
            if(url.indexOf(path) === 0){
                chrome.notifications.create(opt);
            }
        }
    });
});

chrome.tabs.onUpdated.addListener(function (tabId, changeInfo, tab) {
    var url = tab.url;
    changeNotification();
    if(bool){
        if(url.indexOf(path) === 0){
            chrome.notifications.create(opt);
        }
    }
});
タブがアクティブになったときと更新されたときにストレージの情報を取得し、trueだったら通知を表示、falseだったら何もしないという処理を追加しています。
5. manifest.json
{
    "name": "sampleExtension",
    "version": "1.1",
    "manifest_version": 3,
    "description": "拡張機能のテスト",
    "background": {
        "service_worker" : "background.js"
    },
    "permissions": [
        "tabs",
        "notifications",
        "storage"
    ],
    "options_page": "options.html"
}
今回ストレージを使用して設定を保存・取得するため、permissionsに"storage"を追加します。
"options_page"にすると作成したOptions.htmlが新しいタブとして追加され、以下のようにページ全体に表示されます。
"options_ui": {
    "page": "options.html",
    "open_in_tab": false
}
"options_ui"にすると埋め込みオプションページとなり、画面の真ん中に表示されます。
6. 参考文献
https://developer.chrome.com/docs/extensions/develop/ui/options-page?hl=ja
https://developer.chrome.com/docs/extensions/mv2/reference/storage?hl=ja